OptiPlex 755の取扱説明書・マニュアル [全170ページ 4.80MB]


7


47 / 170 ページ
47 / 170 ページ


現在のページURL
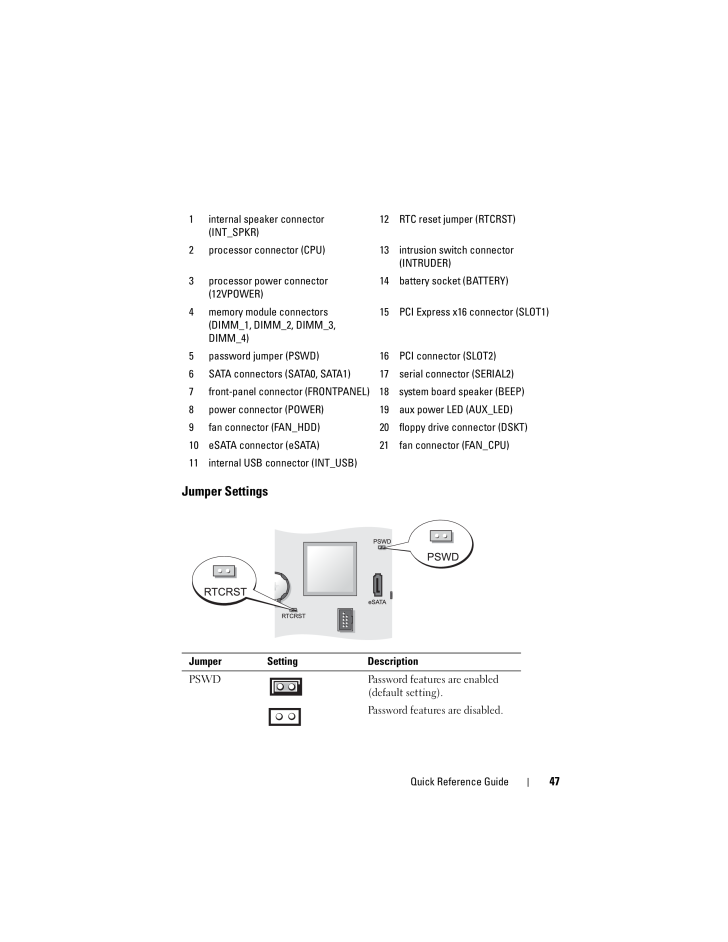
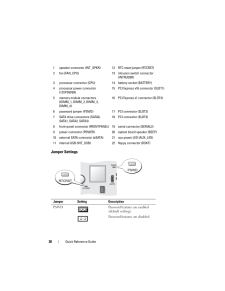
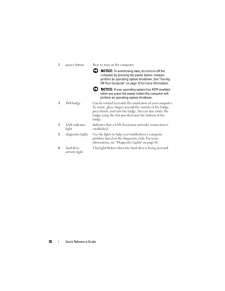
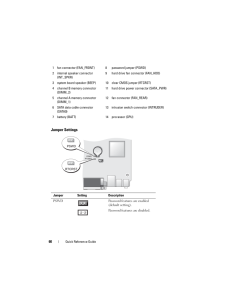
Quick Reference Guide 47Jumper Settings1 internal speaker connector (INT_SPKR)12 RTC reset jumper (RTCRST)2 processor connector (CPU) 13 intrusion switch connector (INTRUDER)3 processor power connector (12VPOWER)14 battery socket (BATTERY)4 memory module connectors (DIMM_1, DIMM_2, DIMM_3, DIMM_4)15 PCI Express x16 connector (SLOT1)5 password jumper (PSWD) 16 PCI connector (SLOT2)6 SATA connectors (SATA0, SATA1) 17 serial connector (SERIAL2)7 front-panel connector (FRONTPANEL) 18 system board speaker (BEEP)8 power connector (POWER) 1 9 aux power LED (AUX_LED)9 fan connector (FAN_HDD) 20 fl oppy drive connector (DSKT)10 eSATA connector (eSATA) 21 fan connector (FAN_CPU)11 internal USB connector (INT_USB)Jumper Setting DescriptionPSWD Password features are enabled (default setting).Password features are disabled.
参考になったと評価  41人が参考になったと評価しています。
このマニュアルの目次
-
1 .www.dell.com | support.de...www.dell.com | support.dell.comDellTM OptiPlexTM 755Quick Reference GuideModels DCTR, DCNE, DCSM, and DCCY
-
2 .Notes, Notices, and Cauti...Notes, Notices, and Cautions NOTE: A NOTE indicates important information that helps you make better use of your computer. NOTICE: A NOTICE indicates either potential damage to ha rdware or loss of data and tells you how to avoid the problem. CAUTION: ...
-
3 .Contents 3ContentsFinding...Contents 3ContentsFinding Information . . . . . . . . . . . . . . . . . . . . 5Setting Up Your Computer. . . . . . . . . . . . . . . . 10Set Up Your Keyboard and Mouse. . . . . . . . . 11Set Up Your Monitor . . . . . . . . . . . . . . . . 12Pow...
-
4 .4 ContentsInside Your Com...4 ContentsInside Your Computer . . . . . . . . . . . . . . . . 44System Board Components. . . . . . . . . . . . . 46Jumper Settings . . . . . . . . . . . . . . . . . . 47Ultra Small Form Factor Computer . . . . . . . . . . . 48System Views. . ....
-
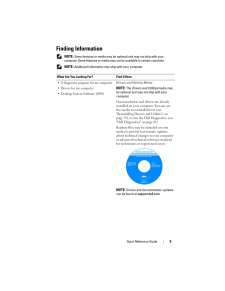
5 .Quick Reference Guide 5Fi...Quick Reference Guide 5Finding Information NOTE: Some features or media may be optional and ma y not ship with your computer. Some features or media may n ot be available in certain countries. NOTE: Additional information may ship with your computer.Wh...
-
6 .6 Quick Reference Guide H...6 Quick Reference Guide How to set up my computer How to run the Dell Diagnostics Error codes and diagnostic lights Tools and utilities How to set up a printer How to troubleshoot and solve problems How to remove and install partsOwner's ManualNOTE: Thi...
-
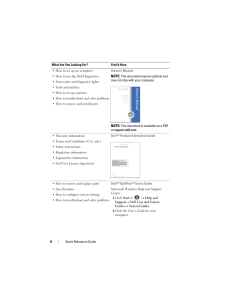
7 .Quick Reference Guide 7 S...Quick Reference Guide 7 Service Tag and Express Service Code Microsoft Windows License LabelService Tag and Microsoft(R) Windows(R) LicenseThese labels are located on your computer. Use the Service Tag to identify your computer when you use support.dell.c...
-
8 .8 Quick Reference Guide S...8 Quick Reference Guide Solutions - Troubleshooting hints and tips, articles from technicians, and online courses, frequently asked questions Community - Online discussion with other Dell customers Upgrades - Upgrade information for components, such as mem...
-
9 .Quick Reference Guide 9 H...Quick Reference Guide 9 How to use Windows XP How to work with programs and files How to personalize my desktopWindows Help and Support Center1To access Windows Help and Support: In Windows XP, click Start and click Help and Support. In Windows VistaTM, ...
-
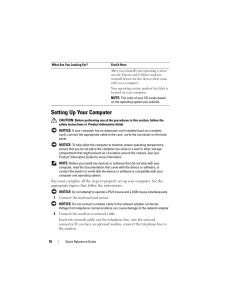
10 .10 Quick Reference GuideS...10 Quick Reference GuideSetting Up Your Computer CAUTION: Before performing any of the proced ures in this section, follow the safety instructions in Product Information Guide . NOTICE: If your computer has an expansion card installed (such as a modem ...
-
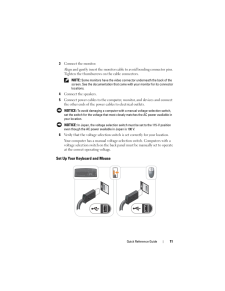
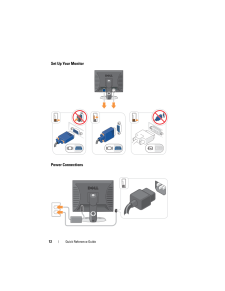
11 .Quick Reference Guide 113...Quick Reference Guide 113 Connect the monitor.Align and gently insert the monitor cable to avoid bending connector pins. Tighten the thumbscrews on the cable connectors. NOTE: Some monitors have the video connector underneath the back of the screen. See ...
-
13 .Quick Reference Guide 13B...Quick Reference Guide 13Before You BeginThis chapter provides procedures for removing and installing the components in your computer. Unless otherwise noted, each procedure assumes that the following conditions exist: You have performed the steps in "Tur...
-
14 .14 Quick Reference Guide ...14 Quick Reference Guide NOTICE: Ensure that the computer and all attach ed devices are turned off. If your computer and attached devices did not automatically turn off when you shut down your operating system, press and hold the power button for abou t...
-
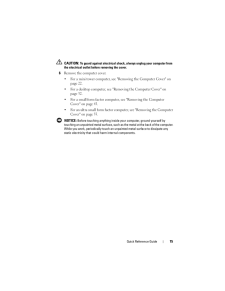
15 .Quick Reference Guide 15 ...Quick Reference Guide 15 CAUTION: To guard against electr ical shock, always unplug your computer from the electrical outlet befor e removing the cover.6 Remove the computer cover. For a mini tower computer, see "Removing the Computer Cover" on page 22. ...
-
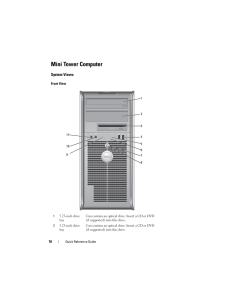
16 .16 Quick Reference GuideM...16 Quick Reference GuideMini Tower ComputerSystem ViewsFront View15.25-inch drive bayCan contain an optical drive. Insert a CD or DVD (if supported) into this drive.25.25-inch drive bayCan contain an optical drive. Insert a CD or DVD (if supported) into th...
-
17 .Quick Reference Guide 173...Quick Reference Guide 1733.5-inch drive bayCan contain an optional floppy drive or optional media card reader.4USB 2.0 connectors (2)Use the front USB connectors fo r devices that you connect occasionally, such as joysticks or cameras, or for bootable US...
-
18 .18 Quick Reference Guide8...18 Quick Reference Guide8power light The power light illuminate s and blinks or remains solid to indicate different operating modes: No light - The computer is turned off. Steady green - The computer is in a normal operating state. Blinking green - The co...
-
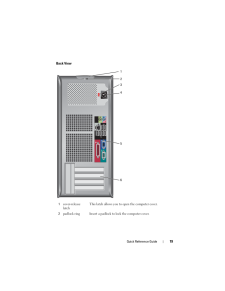
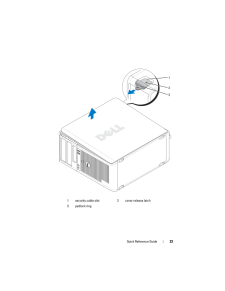
19 .Quick Reference Guide 19B...Quick Reference Guide 19Back View1cover-release latchThis latch allows you to open the computer cover.2padlock ring Insert a padlock to lock the computer cover.435621
-
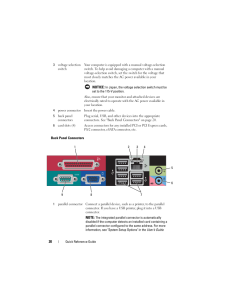
20 .20 Quick Reference GuideB...20 Quick Reference GuideBack Panel Connectors3voltage selection switchYour computer is equipped with a manual voltage-selection switch. To help avoid damaging a computer with a manual voltage-selection switch, set the switch for the voltage that most close...
-
21 .Quick Reference Guide 212...Quick Reference Guide 212link integrity light Green - A good connection exists between a 10-Mbps network and the computer. Orange - A good connection exists between a 100-Mbps network and the computer. Yellow - A good connection exists between a 1-Gbps (o...
-
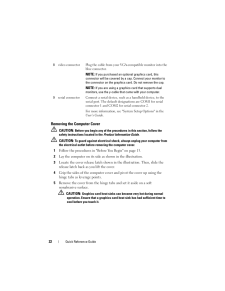
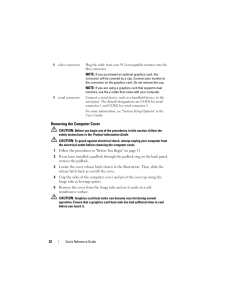
22 .22 Quick Reference GuideR...22 Quick Reference GuideRemoving the Computer Cover CAUTION: Before you begin any of the pro cedures in this section, follow the safety instructions located in the Product Information Guide . CAUTION: To guard against electrical shock, always unplug you...
-
23 .Quick Reference Guide 231...Quick Reference Guide 231 security cable slot 2 cover release latch3 padlock ring213
-
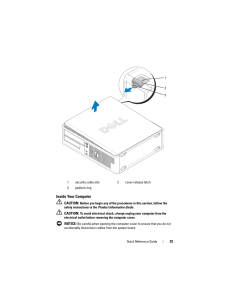
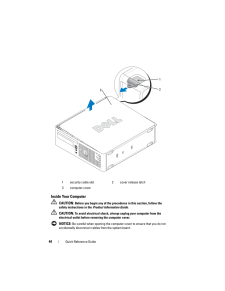
24 .24 Quick Reference GuideI...24 Quick Reference GuideInside Your Computer CAUTION: Before you begin any of the pro cedures in this section, follow the safety instructions located in the Product Information Guide . CAUTION: To avoid electrical shock, always unplug your computer from...
-
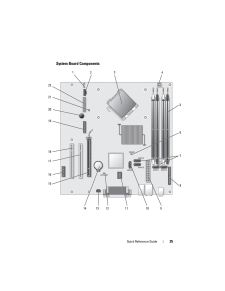
25 .Quick Reference Guide 25S...Quick Reference Guide 25System Board Components235716817189104131122211911514 12206
-
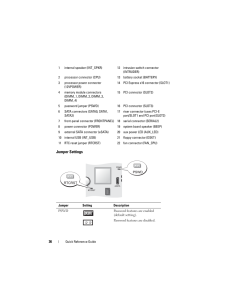
26 .26 Quick Reference GuideJ...26 Quick Reference GuideJumper Settings1 speaker connector (INT_SPKR) 1 2 RTC reset jumper (RTCRST)2 fan (FAN_CPU) 13 intrusion switch connector (INTRUDER)3 processor connector (CPU) 14 battery socket (BATTERY)4 processor power connector (12VPOWER)15 PCI E...
-
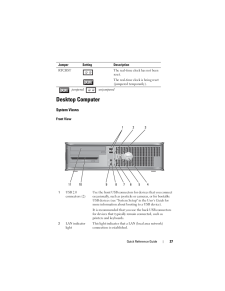
27 .Quick Reference Guide 27D...Quick Reference Guide 27Desktop ComputerSystem ViewsFront ViewRTCRST The real-time clock has not been reset. The real-time clock is being reset (jumpered temporarily).jumpered unjumpered1USB 2.0 connectors (2)Use the front USB connectors for devices that ...
-
28 .28 Quick Reference Guide3...28 Quick Reference Guide3power button Press this button to turn on the computer. NOTICE: To avoid losing data, do not turn off the computer by pressing the power button. Instead, perform an operating system shutdown. See "Turning Off Your Computer" in t...
-
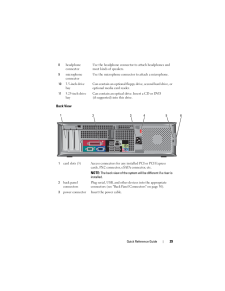
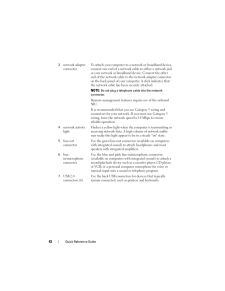
29 .Quick Reference Guide 29B...Quick Reference Guide 29Back View8headphone connectorUse the headphone connector to attach headphones and most kinds of speakers.9microphone connectorUse the microphone connector to attach a microphone.103.5-inch drive bayCan contain an optional floppy ...
-
30 .30 Quick Reference GuideB...30 Quick Reference GuideBack Panel Connectors4voltage selection switchYour computer is equipped with a manual voltage selection switch. To help avoid damaging a computer with a manual voltage selection switch, set the switch for the voltage that most clo...
-
31 .Quick Reference Guide 312...Quick Reference Guide 312link integrity light Green - A good connection exists between a 10-Mbps network and the computer. Orange - A good connection exists between a 100-Mbps network and the computer. Yellow - A good connection exists between a 1-Gbps (o...
-
32 .32 Quick Reference GuideR...32 Quick Reference GuideRemoving the Computer Cover CAUTION: Before you begin any of the pro cedures in this section, follow the safety instructions in the Product Information Guide . CAUTION: To guard against electrical shock, always unplug your compu...
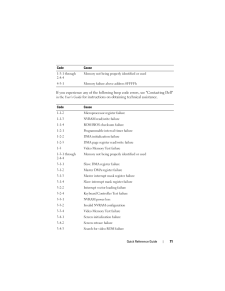
-
33 .Quick Reference Guide 33I...Quick Reference Guide 33Inside Your Computer CAUTION: Before you begin any of the proc edures in this section, follow the safety instructions in the Product Information Guide . CAUTION: To avoid electrical shock, always unplug your computer from the el...
-
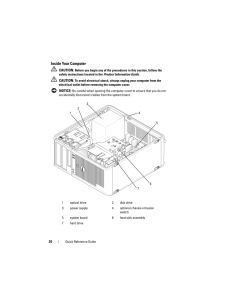
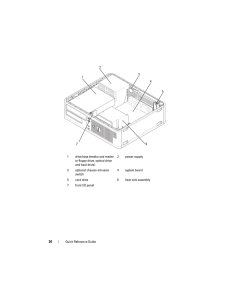
34 .34 Quick Reference Guide1...34 Quick Reference Guide1 drive bays (media card reader or floppy drive, optical drive and hard drive) 2 power supply3 optional chassis-intrusion switch4 system board5 card slots 6 heat sink assembly7 front I/O panel1245367
-
35 .Quick Reference Guide 35S...Quick Reference Guide 35System Board Components12415168 111231820172214659 10 1319721
-
36 .36 Quick Reference GuideJ...36 Quick Reference GuideJumper Settings1 internal speaker (INT_SPKR) 12 intrusion switch connector (INTRUDER)2 processor connector (CPU) 13 b attery socket (BATTERY)3 processor power connector (12VPOWER)14 PCI Express x16 connector (SLOT1)4 memory module c...
-
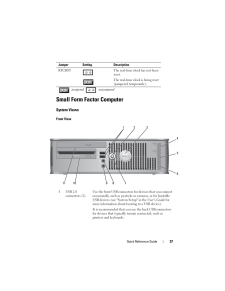
37 .Quick Reference Guide 37S...Quick Reference Guide 37Small Form Factor ComputerSystem ViewsFront ViewRTCRST The real-time clock has not been reset. The real-time clock is being reset (jumpered temporarily).jumpered unjumpered1USB 2.0 connectors (2)Use the front USB connectors for dev...
-
38 .38 Quick Reference Guide2...38 Quick Reference Guide2power button Press to turn on the computer. NOTICE: To avoid losing data, do not turn off the computer by pressing the power button. Instead, perform an operating system shutdown. See "Turning Off Your Computer" on page 13 for m...
-
39 .Quick Reference Guide 397...Quick Reference Guide 397power light The power light illuminat es and blinks or remains solid to indicate different operating states: No light - The computer is turned off. Steady green - The computer is in a normal operating state. Blinking green - The co...
-
40 .40 Quick Reference GuideB...40 Quick Reference GuideBack View1card slots (2) Access connectors for any installed PCI cards, PCI Express cards, PS/2, eSATA, and so on.2back panel connectorsPlug serial, USB, and other devices into the appropriate connectors (see "Back Panel Connectors...
-
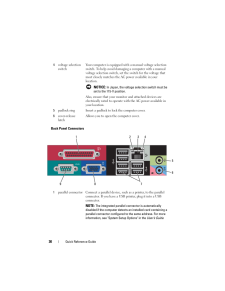
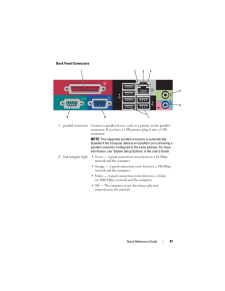
41 .Quick Reference Guide 41B...Quick Reference Guide 41Back Panel Connectors1parallel connector Connect a parallel device, such as a printer, to the parallel connector. If you have a USB printer, plug it into a USB connector.NOTE: The integrated parallel co nnector is automatically ...
-
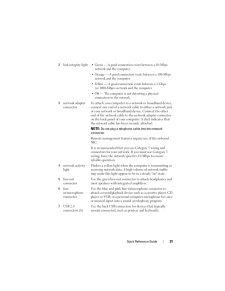
42 .42 Quick Reference Guide3...42 Quick Reference Guide3network adapter connectorTo attach your computer to a network or broadband device, connect one end of a network cable to either a network jack or your network or broadband device. Connect the other end of the network cable to the ...
-
43 .Quick Reference Guide 43R...Quick Reference Guide 43Removing the Computer Cover CAUTION: Before you begin any of the proc edures in this section, follow the safety instructions in the Product Information Guide . CAUTION: To guard against electr ical shock, always unplug your comp...
-
44 .44 Quick Reference GuideI...44 Quick Reference GuideInside Your Computer CAUTION: Before you begin any of the pro cedures in this section, follow the safety instructions in the Product Information Guide . CAUTION: To avoid electrical shock, always unplug your computer from the el...
-
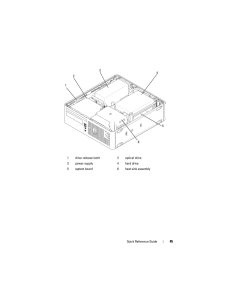
45 .Quick Reference Guide 451...Quick Reference Guide 451 drive-release latch 2 optical drive3 power supply 4 hard drive5 system board 6 heat sink assembly345612
-
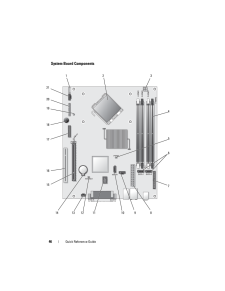
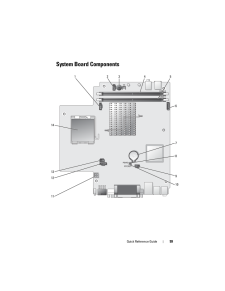
46 .46 Quick Reference GuideS...46 Quick Reference GuideSystem Board Components12451661983712 1020172115149 111813
-
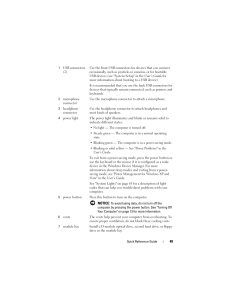
47 .Quick Reference Guide 47J...Quick Reference Guide 47Jumper Settings1 internal speaker connector (INT_SPKR)12 RTC reset jumper (RTCRST)2 processor connector (CPU) 13 intrusion switch connector (INTRUDER)3 processor power connector (12VPOWER)14 battery socket (BATTERY)4 memory module c...
-
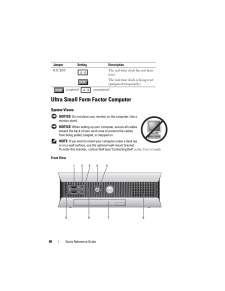
48 .48 Quick Reference GuideU...48 Quick Reference GuideUltra Small Form Factor ComputerSystem Views NOTICE: Do not place your moni tor on the computer. Use a monitor stand. NOTICE: When setting up your com puter, secure all cables toward the back of your work area to prevent the cable...
-
49 .Quick Reference Guide 491...Quick Reference Guide 491USB connectors (2)Use the front USB connectors for devices that you connect occasionally, such as joysticks or cameras, or for bootable USB devices (see "System Setup" in the User's Guide for more information about booting to a USB...
-
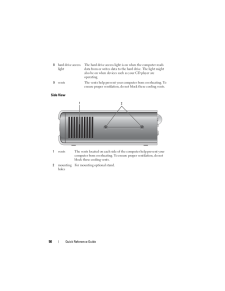
50 .50 Quick Reference GuideS...50 Quick Reference GuideSide View8hard drive access lightThe hard drive access light is on when the computer reads data from or writes data to the hard drive. The light might also be on when devices such as your CD player are operating.9vents The vents h...
-
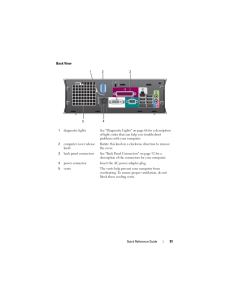
51 .Quick Reference Guide 51B...Quick Reference Guide 51Back View1diagnostic lights See "Diagnostic Li ghts" on page 66 for a description of light codes that can help you troubleshoot problems with your computer.2computer cover release knobRotate this knob in a cl ockwise direction to re...
-
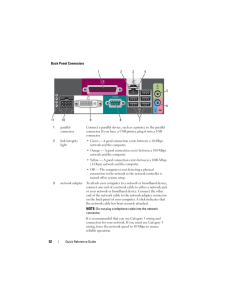
52 .52 Quick Reference GuideB...52 Quick Reference GuideBack Panel Connectors1parallel connectorConnect a parallel device, such as a printer, to the parallel connector. If you have a USB printer, plug it into a USB connector.2link integrity light Green - A good connection exists between ...
-
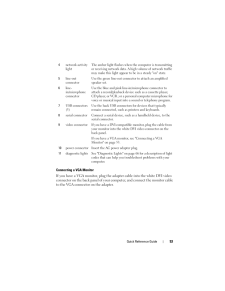
53 .Quick Reference Guide 53C...Quick Reference Guide 53Connecting a VGA MonitorIf you have a VGA monitor, plug the ad apter cable into the white DVI video connector on the back panel of your com puter, and connect the monitor cable to the VGA connector on the adapter.4network activity l...
-
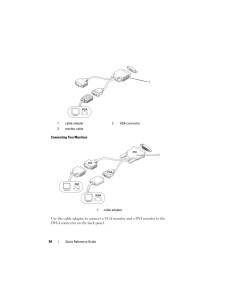
54 .54 Quick Reference GuideC...54 Quick Reference GuideConnecting Two MonitorsUse the cable adapter to connect a VG A monitor and a DVI monitor to the DVI-I connector on the back panel.1 cable adapter 2 VGA connector3 monitor cable1 cable adapter11
-
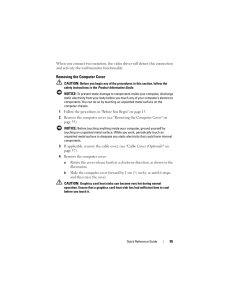
55 .Quick Reference Guide 55W...Quick Reference Guide 55When you connect two monitors, the video driver will detect this connection and activate the multim onitor functionality.Removing the Computer Cover CAUTION: Before you begin any of the proc edures in this section, follow the safe...
-
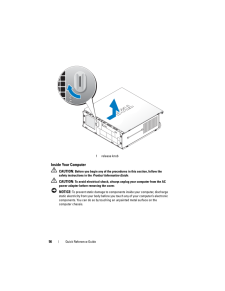
56 .56 Quick Reference GuideI...56 Quick Reference GuideInside Your Computer CAUTION: Before you begin any of the pro cedures in this section, follow the safety instructions in the Product Information Guide . CAUTION: To avoid electrical shock, always u nplug your computer from the AC...
-
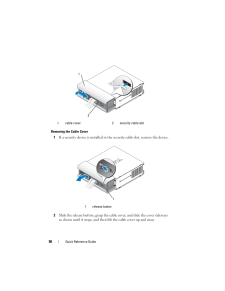
57 .Quick Reference Guide 57C...Quick Reference Guide 57Cable Cover (Optional)Attaching the Cable Cover1 Ensure that all external device cables are threaded through the hole in the cable cover.2 Connect all device cables to the conne ctors on the back of the computer.3 Hold the bottom of...
-
58 .58 Quick Reference GuideR...58 Quick Reference GuideRemoving the Cable Cover1 If a security device is installed in th e security cable slot, remove the device.2 Slide the release button, grasp the cable cover, and slide the cover sideways as shown until it stops, and then lift the ca...
-
60 .60 Quick Reference GuideJ...60 Quick Reference GuideJumper Settings1 fan connector (FAN_FRONT) 8 password jumper (PSWD)2 internal speaker connector (INT_SPKR)9 hard drive fan connector (FAN_HDD)3 system board speaker (BEEP) 10 clear CMOS jumper (RTCRST)4 channel B memory connector (D...
-
61 .Quick Reference Guide 61S...Quick Reference Guide 61Solving ProblemsDell provides a number of tools to help you if your computer does not perform as expected. For the latest trou bleshooting information available for your computer, see the Dell Support website at support.dell.com. ...
-
62 .62 Quick Reference GuideS...62 Quick Reference GuideStart the Dell Diagnostics from eit her your hard drive or from the Drivers and Utilities media (an optional CD). See "Start ing the Dell Diagnostics From Your Hard Drive" on page 62 or "Starting the Dell Diagnostics From the Drive...
-
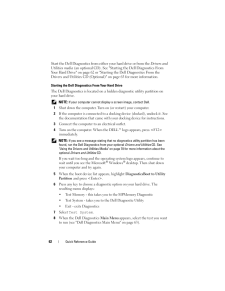
63 .Quick Reference Guide 63S...Quick Reference Guide 63Starting the Dell Diagnostics From th e Drivers and Utilities CD (Optional)1 Insert the Drivers and Utilities CD (optional).2 Shut down and restart the computer.When the DELL logo appears, press
immediately.If you wait too l... -
64 .64 Quick Reference Guide2...64 Quick Reference Guide2 If a problem is encountered during a te st, a message appears with an error code and a description of the proble m. Write down the error code and problem description and follow the instructions on the screen.If you cannot resolve...
-
65 .Quick Reference Guide 654...Quick Reference Guide 654 When the tests are completed, if yo u are running the Dell Diagnostics from the Drivers and Utilities CD , remove the CD.5 When the tests are complete, close Clos e the test screen to return to the Main Menu screen. To exit the ...
-
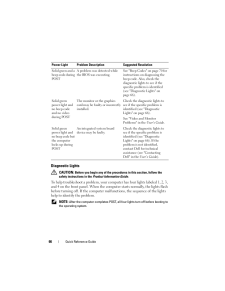
66 .66 Quick Reference GuideD...66 Quick Reference GuideDiagnostic Lights CAUTION: Before you begin any of the proc edures in this section, follow the safety instructions in the Product Information Guide .To help troubleshoot a problem, your co mputer has four lights labeled 1, 2, 3, a...
-
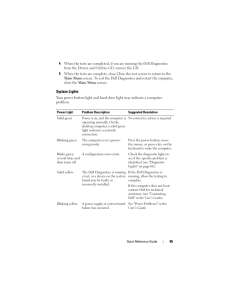
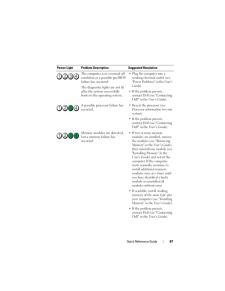
67 .Quick Reference Guide 67P...Quick Reference Guide 67Power Light Problem Desc ription Suggested ResolutionThe computer is in a normal off condition or a possible pre-BIOS failure has occurred.The diagnostic lights are not lit after the system successfully boots to the operating syste...
-
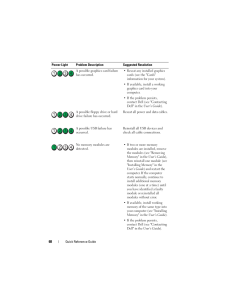
68 .68 Quick Reference GuideA...68 Quick Reference GuideA possible graphics card failure has occurred. Reseat any installed graphics cards (see the "Cards" information for your system). If available, install a working graphics card into your computer. If the problem persists, contact De...
-
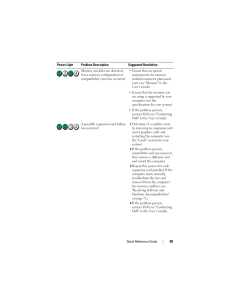
69 .Quick Reference Guide 69M...Quick Reference Guide 69Memory modules are detected, but a memory configuration or compatibility error has occurred. Ensure that no special requirements for memory module/connector placement exist (see "Memory" in the User's Guide ). Ensure that the memory...
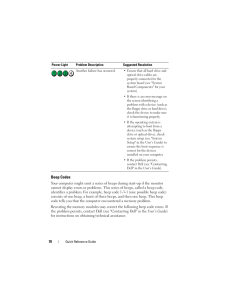
-
70 .70 Quick Reference GuideB...70 Quick Reference GuideBeep CodesYour computer might emit a series of beeps during start-up if the monitor cannot display errors or problems. This s eries of beeps, called a beep code, identifies a problem. For example, beep code 1-3-1 (one possible bee...
-
71 .Quick Reference Guide 71I...Quick Reference Guide 71If you experience any of the following b eep code errors, see "Contacting Dell" in the User's Guide for instructions on obtaining technical assistance. Code Cause1-3-1 through 2-4-4Memory not being properly identified or used4-3-1...
-
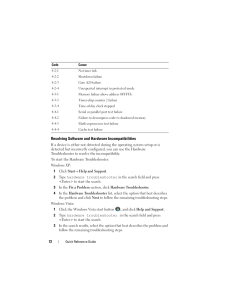
72 .72 Quick Reference GuideR...72 Quick Reference GuideResolving Software and Hardware IncompatibilitiesIf a device is either not detected d uring the operating system setup or is detected but incorrectly config ured, you can use the Hardware Troubleshooter to resolve the incompatibilit...
-
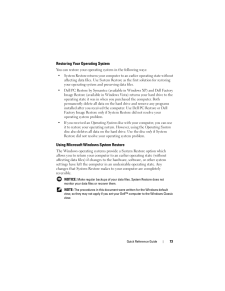
73 .Quick Reference Guide 73R...Quick Reference Guide 73Restoring Your Operating SystemYou can restore your operating system in the following ways: System Restore returns your computer to an earlier operating state without affecting data files. Use System Restor e as the first solution ...
-
74 .74 Quick Reference GuideS...74 Quick Reference GuideStarting System RestoreWindows XP: NOTICE: Before you restore the computer to an earlier operating state, save and close any open files and exit any open prog rams. Do not alter, open, or delete any files or programs until the sys...
-
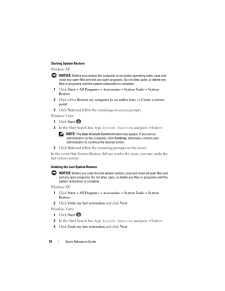
75 .Quick Reference Guide 75E...Quick Reference Guide 75Enabling System Restore NOTE: Windows Vista does not disable Sys tem Restore; regardless of low disk space. Therefore, the steps be low apply only to Windows XP.If you reinstall Windows XP with less than 200 MB of free hard-disk sp...
-
76 .76 Quick Reference Guide2...76 Quick Reference Guide2 Immediately upon seeing the blue bar, press
.If you do not press in time, let the computer finish starting, and then restart the computer again. NOTICE: If you do not want to proceed with PC Restore, clic... -
77 .Quick Reference Guide 773...Quick Reference Guide 773 Double-click the filename DSRIRRemv2.exe . NOTE: If you do not log on as a local ad ministrator, a message appears stating that you that you must lo g on as administrator. Click Quit, and then log on as a local administrator. N...
-
78 .78 Quick Reference Guide6...78 Quick Reference Guide6 Click Next.The Confirm Data Deletion screen appears. NOTICE: If you do not want to proceed with Factory Image Restore, click Cancel.7 Click the checkbox to confirm that you want to continue reformatting the hard drive and res...
-
79 .Quick Reference Guide 79M...Quick Reference Guide 79Microsoft Windows VistaTM1 Click the Windows Vista start button , and right-click Computer .2 Click Properties → Device Manager . NOTE: The User Account Control window may appear. If you are an administrator on the computer, cl...
-
80 .80 Quick Reference Guide3...80 Quick Reference Guide3 Right-click the device for which the new driver was installed and click Properties .4 Click the Drivers tab → Roll Back Driver .If Device Driver Rollback does not resolve the problem, then use System Restore (see "Restoring Y...
-
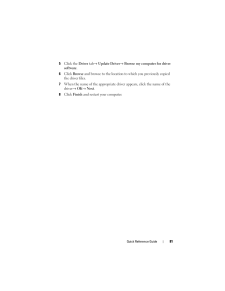
81 .Quick Reference Guide 815...Quick Reference Guide 815 Click the Driver tab → Update Driver → Browse my computer for driver software.6 Click Browse and browse to the location to which you previously copied the driver files.7 When the name of the appropriate driv er appears, click...
-
83 .Index 83IndexBbeep codes,...Index 83IndexBbeep codes, 70CCDsoperating system, 9computerbeep codes, 70restore to previous state, 73coveropening, 22, 32, 43DDell support site, 8diagnostic lights, 65-66diagnosticsbeep codes, 70lights, 65-66documentationEnd User License Agreement, 6ergon...
-
84 .84 IndexIinstalling parts...84 IndexIinstalling partsbefore you begin, 13, 61recommended tools, 13turning off your computer, 13LlabelsMicrosoft Windows, 7Service Tag, 7lightsdiagnostic, 65-66front of computer, 65-66power, 28, 39power button, 65system, 65Mmotherboard. See system board...
-
85 .Index 85Ttroubleshootingd...Index 85Ttroubleshootingdiagnostic lights, 65-66Help and Support Center, 9restore to previous state, 73UUser's Guide, 6Wwarranty information, 6Windows VistaFactory Image Restore, 75System Restore, 73Windows XPDevice Driver Rollback, 79Help and Support Cent...
-
87 .87 ページ目のマニュアルwww.dell.com | support.dell.comDellTM OptiPlexTM 755クイックリファレンスガイドモデル DCTR 、DCNE 、DCSM 、および DCCY
-
88 .メモ、注意、警告 メモ : コンピュータを使いやす...メモ、注意、警告 メモ : コンピュータを使いやすくするための重要な情報を説明しています。 注意 : ハードウェアの損傷やデータの損失の可能性を示し、その危険を回避するための方法を説明しています。 警告 : 物的損害、けが、または死亡の原因となる可能性があることを示しています。____________________この文書の情報は、事前の通知なく変更されることがあります。(C) 2007 すべての著作権は Dell Inc. にあります。Dell Inc. の書面による許可のない複写は、いかなる形態...
-
89 .目次 89目次情報の検索方法 . . . . ....目次 89目次情報の検索方法 . . . . . . . . . . . . . . . . . . . . . . 91コンピュータのセットアップ . . . . . . . . . . . . . . . 95キーボードおよびマウスのセットアップ . . . . . 97モニターのセットアップ . . . . . . . . . . . . . . 97電源の接続 . . . . . . . . . . . . . . . . . . . . . 98作業を開始する前に . . . ...
-
90 .90 目次システム基板コンポーネント . . ....90 目次システム基板コンポーネント . . . . . . . . . . . . . . 143ジャンパ設定 . . . . . . . . . . . . . . . . . . . 144問題の解決 . . . . . . . . . . . . . . . . . . . . . . . . 145Dell Diagnostics(診断)プログラム . . . . . . 145システムライト . . . . . . . . . . . . . . . . . . 1...
-
91 .クイックリファレンスガイド 91情報の検索方法 メ...クイックリファレンスガイド 91情報の検索方法 メモ : 一部の機能やメディアはオプションなの で、出荷時にコンピュータに搭載されていない場合があります。特定の国で は使用できない機能やメディアもあります。 メモ : 追加の情報がコンピュータに同梱されている場合があります。何をお探しですか? こちらをご覧ください* コンピュータの診断プログラム コンピュータのドライバ DSS(デスクトップシステムソフトウェア)Drivers and Utilities メディアメモ: 『Drivers and Util...
-
92 .92 クイックリファレンスガイド コンピュータのセ...92 クイックリファレンスガイド コンピュータのセットアップ方法 Dell Diagnostics (診断)プログラムの実行方法 エラーコードおよび診断ライト ツールとユーティリティ プリンタのセットアップ方法 トラブルシューティングおよび問題解決の方法 部品の取り外しおよび取り付け方法オーナーズマニュアルメモ: このマニュアルはオプションの場合があるため、必ずしもお使いのコンピュータに付属しているとは限りません。メモ : このマニュアルは、 PDF 形式のものをウェブサイト(support.jp.d...
-
93 .クイックリファレンスガイド 93 サービスタグとエ...クイックリファレンスガイド 93 サービスタグとエクスプレスサービスコード Microsoft Windows ライセンスラベルサービスタグおよび Microsoft(R) Windows(R) ライセンスこれらのラベルはお使いのコンピュータに貼られています。 サービスタグは、 support.jp.dell.com をご参照の際に、またはサポートへのお問い合わせの際に、コンピュータの識別に使用します。 エクスプレスサービスコードを利用すると、サポートに直接電話で問い合わせることができます。メモ : ...
-
94 .94 クイックリファレンスガイド デスクトップシス...94 クイックリファレンスガイド デスクトップシステムソフトウェア(DSS )- お使いのコンピュータでオペレーティングシステムを再インストールする場合は、DSS ユーティリティも再インストールする必要があります。DSS は、お使いのオペレーティングシステムのための重要な更新を提供し、プロセッサ、オプティカルドライブ、USB デバイスなどをサポートします。DSS はお使いの Dell コンピュータが正しく動作するために必要なものです。ソフトウェアはお使いのコンピュータおよびオペレーティングシステ...
-
95 .クイックリファレンスガイド 95コンピュータのセッ...クイックリファレンスガイド 95コンピュータのセットアップ 警告 : この項の手順を開始する前に『製品情報ガイド』の安全手順に従ってください。 注意 : コンピュータにモデムカードなどの拡張 カードが取り付けられている場合は、適切なケーブルをカードに接続します。コ ンピュータ背面パネルのコネクタには接続しないでください。 注意 : コンピュータが適切な動作温度を保持で きるように、コンピュータを壁や他のストレージ用仕切りのすぐ近くに置かないで ください。シャーシ周辺の空気循環が妨げられる恐れがあります。詳細...
-
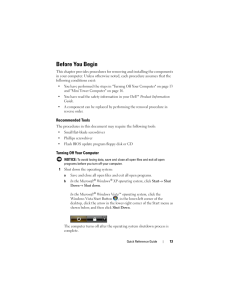
96 .96 クイックリファレンスガイドコンピュータを正し...96 クイックリファレンスガイドコンピュータを正しくセットアップするには、すべての手順を行う必要があります。それぞれの該当する図を参照しながら、手順に従います。 注意 : PS/2 マウスと USB マウスを同時に動作しようとしないでください。1 キーボードとマウスを接続します。 注意 : モデムケーブルをネットワークアダ プタのコネクタに接続しないでください。電話通信からの電圧は、ネットワー クアダプタを損傷する恐れがあります。2 モデムまたはネットワークケーブルを接続します。ネットワークケーブルを...
-
98 .98 クイックリファレンスガイド電源の接続作業を開...98 クイックリファレンスガイド電源の接続作業を開始する前に本章では、コンピュータのコンポーネントの取り付けおよび取り外しの手順について説明します。特に指示がない限り、それぞれの手順では以下の条件を満たしていることを前提とします。99 ページの「コンピュータの電源を切る」と 101 ページの「ミニタワーコンピュータ」の手順をすでに完了していること。 DellTM 『製品情報ガイド』の安全に関する情報をすでに読んでいること。 取り外しの手順と逆の手順を行うことで部品の取り付けが可能であること。奨励するツールこ...
-
99 .クイックリファレンスガイド 99コンピュータの電源...クイックリファレンスガイド 99コンピュータの電源を切る 注意 : データの損失を避けるため、コンピュー タの電源を切る前に、開いているファイルをすべて保存して閉じ、実行中 のプログラムをすべて終了します。1 オペレーティングシステムをシャットダウンします。a 開いているファイルをすべて保存して閉じ、実行中のプログラムをすべて終了します。b Microsoft(R) Windows(R) XP オペレーティングシステムで 、スタート → シャットダウン → シャットダウン とクリックします。Micr...
-
100 .100 クイックリファレンスガイド 注意 : コン...100 クイックリファレンスガイド 注意 : コンピュータの損傷を防ぐため、コンピュータ 内部の作業を始める前に、次の手順を実行します。1 コンピュータの電源を切ります。2 コンピュータがドッキングデバイスに接続(ドッキング)されている場合は、ドッキングを解除します。手順については、ドッキングデバイス付属のマニュアルを参照してください。 注意 : ネットワークケーブルを外すには、まずネットワークケーブルをコンピュータから外し、次に壁のネットワークジャックから 外します。3 コンピュータからすべての電話線また...