
CTの取扱説明書・マニュアル [全80ページ 3.07MB]


3


2 / 80 ページ


現在のページURL
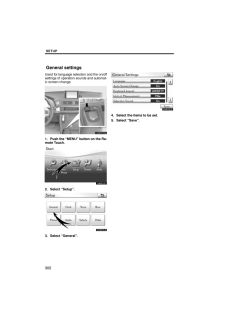
SETUP302Used for language selection and the on/offsettings of operation sounds and automat-ic screen change.1. Push the "MENU" button on the Re-mote Touch.U4001LS2. Select "Setup".U10001LS3. Select "General".4. Select the items to be set.5. Select "Save".General settings
参考になったと評価  3人が参考になったと評価しています。


このマニュアルの目次
-
1 .SECTION 10SETUP301SETU...SECTION 10SETUP301SETUPGeneral settings 302 . . . . . . . . . . . . . . . . . . . . . . . . . . . . . . . . . . . . . . (Used for language selection and the on/off settings of operation sounds and automatic screen change.)Clock settings 308 . . . . . . ...
-
2 .SETUP302Used for language...SETUP302Used for language selection and the on/offsettings of operation sounds and automat-ic screen change.1. Push the "MENU" button on the Re-mote Touch.U4001LS2. Select "Setup".U10001LS3. Select "General".4. Select the items to be set.5. Select "Save".G...
-
3 .SETUP303SCREENS FOR GENER...SETUP303SCREENS FOR GENERAL SETTINGS On this screen, the following functions canbe performed.No.Function1You can change the language.(See " Selecting a language" onpage 304.)2"On" or "Off" can be selected forautomatic screen changes fromthe audio/air condi...
-
4 .SETUP304Selecting a langu...SETUP304Selecting a languageYou can change the language.1. Push the "MENU" button on the Re-mote Touch, then select "Setup".2. Select "General" on the "Setup"screen.3. Select "Language".4. Select the desired button.The previous screen will be displayed.5. ...
-
5 .SETUP305LAYOUT TYPE"ABC" ...SETUP305LAYOUT TYPE"ABC" type"QWERTY" type Unit of measurementDistance unit can be changed.1. Push the "MENU" button on the Re-mote Touch, then select "Setup".2. Select "General" on the "Setup"screen.3. Select "Unit of Measurement".4. Select "Kilometer" or...
-
6 .SETUP306Setting a feedbac...SETUP306Setting a feedback forceWhen the pointer moves close to a button,it will be automatically pulled onto that but-ton. The strength of this pull can be ad-justed.1. Push the "MENU" button on the Re-mote Touch, then select "Setup".2. Select "General" ...
-
7 .SETUP307Changing the poin...SETUP307Changing the pointer sizePointer size can be changed.1. Push the "MENU" button on the Re-mote Touch, then select "Setup".2. Select "General" on the "Setup"screen.3. Select "Pointer Size".4. Select the desired button.5. Select "Save". Delete persona...
-
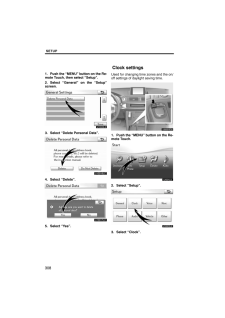
8 .SETUP3081. Push the "MENU...SETUP3081. Push the "MENU" button on the Re-mote Touch, then select "Setup".2. Select "General" on the "Setup"screen.3. Select "Delete Personal Data".4. Select "Delete".5. Select "Yes".Used for changing time zones and the on/off settings of daylight saving...
-
9 .SETUP3094. Select the ite...SETUP3094. Select the items to be set.5. Select "Save".SCREEN FOR CLOCK SETTINGSOn this screen, the following functions canbe performed.No.Function1Time zone can be changed. (See" Time zone" on page 310.)2"On" or "Off" can be selected fordaylight savings ...
-
10 .SETUP310Time zoneA time z...SETUP310Time zoneA time zone can be selected and GMT canbe set.1. Push the "MENU" button on the Re-mote Touch, then select "Setup".2. Select "Clock" on the "Setup"screen.3. Select "Time Zone".4. Select the desired time zone.If you select "Other", adjust th...
-
11 .SETUP311Voice guidance ca...SETUP311Voice guidance can be set.1. Push the "MENU" button on the Re-mote Touch.U4001LS2. Select "Setup".U10003LS3. Select "Voice".4. Select the items to be set.5. Select "Save".Voice settings
-
12 .SETUP312SCREEN FOR VOICE ...SETUP312SCREEN FOR VOICE SETTINGSU10030LSOn this screen, the following functions canbe performed.No.Function1The voice guidance volume canbe adjusted or switched off. (See" Voice volume" on page 313.)2Voice guidance during route guid-ance can be set to "O...
-
13 .SETUP313Voice volumeThe v...SETUP313Voice volumeThe voice guidance volume can be ad-justed or switched off.1. Push the "MENU" button on the Re-mote Touch, then select "Setup".2. Select "Voice" on the "Setup"screen.3. Select the desired level by selectingthe number.If voice guidance i...
-
14 .SETUP314Voice guidance sp...SETUP314Voice guidance speakerThe projection position of voice guidancecan be adjusted.1. Push the "MENU" button on the Re-mote Touch, then select "Setup".2. Select "Voice" on the "Setup"screen.U10032LS3. Select "Voice Guidance Speaker".4. Select "Center" ...
-
15 .SETUP315Average cruising ...SETUP315Average cruising speed, displayed screencontents, and POI icon categories can beset.1. Push the "MENU" button on the Re-mote Touch.U4001LS2. Select "Setup".U4002LS3. Select "Navi.".4. Select "Detailed Navi. Settings".5. Select the items to be set.6...
-
16 .SETUP316SCREENS FOR NAVIG...SETUP316SCREENS FOR NAVIGATION SET-TINGSOn this screen, the following functions canbe performed.No.Function1Average cruising speed can beset. (See " Driving speeds" onpage 317.)2The automatic input function canbe set to "On" or "Off".3During route guidanc...
-
17 .SETUP317Driving speedsThe...SETUP317Driving speedsThe speed that is used for the calculationof the estimated travel time and the esti-mated arrival time can be set.1. Push the "MENU" button on the Re-mote Touch, then select "Setup".2. Select "Navi." on the "Setup"screen.3. Select "De...
-
18 .SETUP318Auto avoid traffi...SETUP318Auto avoid trafficThe guidance route automaticallychanges to another route to avoid heavycongestion.To turn the "Auto Avoid Traffic" on:1. Push the "MENU" button on the Re-mote Touch, then select "Setup".2. Select "Navi." on the "Setup"screen.3. Se...
-
19 .SETUP319Show free flowing...SETUP319Show free flowing trafficFreely flowing traffic is shown with the ar-row.To turn the "Show Free Flowing Traffic" on:1. Push the "MENU" button on the Re-mote Touch, then select "Setup".2. Select "Navi." on the "Setup"screen.3. Select "Detailed Navi...
-
20 .SETUP3206. Select the des...SETUP3206. Select the desired group.If the desired POI category is not on thescreen, select "List All Categories" to listall POI categories.7. Select the desired category.8. Select "OK". Screen layout function ("Off" Function)Each screen buttons and curre...
-
21 .SETUP321Current position/...SETUP321Current position/tire change cal-ibrationThe current vehicle position mark can beadjusted manually. Miscalculation of thedistance caused by tire replacement canalso be adjusted.1. Push the "MENU" button on the Re-mote Touch, then select "Setup".2....
-
22 .SETUP3224. Select either ...SETUP3224. Select either the or to ad-just the direction of the current vehicleposition mark.5. Select "OK".The map will be displayed.TIRE CHANGE CALIBRATIONThe tire change calibration function will beused when replacing the tires. This func-tion will...
-
23 .SETUP323Pop−up informatio...SETUP323Pop−up informationWhen the "Pop−up information" is turnedon, the pop−up information will be dis-played.1. Push the "MENU" button on the Re-mote Touch, then select "Setup".2. Select "Navi." on the "Setup"screen.3. Select "Detailed Navi. Settings" on...
-
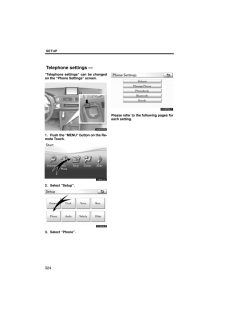
24 .SETUP324"Telephone settin...SETUP324"Telephone settings" can be changedon the "Phone Settings" screen.1. Push the "MENU" button on the Re-mote Touch.U4001LS2. Select "Setup".U10004LS3. Select "Phone".Please refer to the following pages foreach setting.Telephone settings -
-
25 .SETUP325You can adjust th...SETUP325You can adjust the voice and ring vol-ume.1. Select "Volume".2. Change each setting according tothe following procedures.3. When you complete all settings, se-lect "Save".Automatic volume settings for highspeedThe system will automatically increase...
-
26 .SETUP326Initializing the ...SETUP326Initializing the settingsYou can initialize the settings.1. Select "Default".2. Select "Yes"."Manage phone" is accessed from the"Connect Phone" screen.1. Push the "MENU" button on the Re-mote Touch. (See "- Remote Touch"on page 5.)2. Select "Setup...
-
27 .SETUP327Registering a Blu...SETUP327Registering a Bluetooth phone1. Select "(add new)" to register yourcellular phone to the system.2. When this screen is displayed, inputthe passcode displayed on the screeninto the phone.For the operation of the phone, see themanual that comes with...
-
28 .SETUP328When another Blue...SETUP328When another Bluetooth device isconnectedWhen another Bluetooth device is cur-rently connected, this screen is displayed.If you want to disconnect it, select "Yes".INFORMATIONWhen you register your phone,Bluetooth audio will disconnect. Itwill r...
-
29 .SETUP3296. Select "(empty...SETUP3296. Select "(empty)" to register yourcellular phone to the system.The following operations are the sameas the operation after you select "(addnew)". Selecting a Bluetooth phoneIn case you register more than oneBluetooth phone, you need to choosewhi...
-
30 .SETUP3302. The "Connect B...SETUP3302. The "Connect Bluetooth*" screen isdisplayed.3. When the result message is dis-played, you can use the Bluetooth phone.*: Bluetooth is a registered trademark ofBluetooth SIG, Inc.When you connect the phone whileBluetooth audio is playingThis scre...
-
31 .SETUP331Setting the hands...SETUP331Setting the handsfree powerYou can select the state of "HandsfreePower".Changes between "On" and "Off" everytime you select "Handsfree Power".For the "Handsfree Power", see"Changing the handsfree power" onpage 356. Editing the Bluetooth phoneYou c...
-
32 .SETUP3323. Select the pho...SETUP3323. Select the phone to edit.4. This screen is displayed.If you want to change the device name,select "Edit".5. Use the software keyboard to inputthe device name.6. Confirm the device name and select"OK".
-
33 .SETUP333Deleting a Blueto...SETUP333Deleting a Bluetooth phone1. Select "Options".2. Select "Remove Phones".3. Select the desired phone or select"Select All", then select "Delete".You can select multiple phones and deletethem at the same time.4. Select "Yes".INFORMATIONWhen you dele...
-
34 .SETUP334By voice recognit...SETUP334By voice recognitionYou can operate "Connect Phone" by giv-ing a command."Connect Phone" includes "Select Phone","Add New Phone" and "Handsfree PowerOff" (On).The operating procedure is similar to othervoice recognition. (For the operation ofvoice...
-
35 .SETUP335"Setting the phon...SETUP335"Setting the phonebook" is accessedfrom the "Contacts" screen.1. Push the "MENU" button on the Re-mote Touch. (See "- Remote Touch"on page 5.)2. Select "Setup".3. Select "Phone".4. Select "Phonebook".5. Select "Manage Contacts".Please refer to the...
-
36 .SETUP336Transferring a ph...SETUP336Transferring a phone numberYou can transfer the phone numbers inyour Bluetooth phone to the system.The phonebook manages a maximumof 4 phonebooks in all. The data for1000 contacts (up to 3 numbers percontact) can be registered in total ofphonebook...
-
37 .SETUP3374. In case that y...SETUP3374. In case that you have selected "AddContacts", this screen is displayed.If you want to transfer another phone-book, select "Yes".When another Bluetooth device isconnectedWhen another Bluetooth device is cur-rently connected, this screen is disp...
-
38 .SETUP338Registering the p...SETUP338Registering the phonebook dataYou can register the phonebook data.Up to 3 numbers per person can be reg-istered.1. Select "New Contact".2. Use the software keyboard to inputthe name and select "OK".3. Input the phone number and select"OK".If you wa...
-
39 .SETUP3395. When two or le...SETUP3395. When two or less numbers in totalare registered to this contact, thisscreen is displayed.When you want to add a number to thiscontact, select "Yes". Editing the phonebook dataYou can register the phone number in"Phone#1", "Phone#2" and "Phone#3"...
-
40 .SETUP3403. Select "Edit" ...SETUP3403. Select "Edit" for the desired nameor number.4. Edit the name or the number. (See " Registering the phonebook data" onpage 338.)5. When you complete the edit, select"Save".You can also display the "Edit Contact"screen in the following ways.From "...
-
41 .SETUP341From "Call Histor...SETUP341From "Call History" screen1. Push the "MENU" button on the Re-mote Touch, then select "Info./Phone".2. Select "Phone".3. Select "Call History".4. Select the desired number from thelist.5. Select "Add Contact" or "UpdateContact".6. In case that you ...
-
42 .SETUP3423. Select "Yes".Y...SETUP3423. Select "Yes".You can also delete it in the followingway.1. Push the "MENU" button on the Re-mote Touch, then select "Info./Phone".2. Select "Phone".3. Select "Contacts".4. Select the desired data from the list.5. Select "Options".6. Select "Dele...
-
43 .SETUP3437. Select "Yes".I...SETUP3437. Select "Yes".INFORMATIONWhen you delete a Bluetooth phone, the phonebook data will bedeleted at the same time."Speed dials setting" is accessed fromthe "Speed Dials" screen.1. Push the "MENU" button on the Re-mote Touch. (See "- Remote Touch"on...
-
44 .SETUP344You can also disp...SETUP344You can also display the "Speed Dials"screen in the following way.1. Push the "MENU" button on the Re-mote Touch, then select "Info./Phone".2. Select "Phone".3. Select "Speed Dials".4. Select "Options". Registering the speed dialYou can register th...
-
45 .SETUP3453. Select the des...SETUP3453. Select the desired phone number.4. Select the button you want to regis-ter in.5. If you select a button you registeredbefore, this screen is displayed.Select "Yes" if you want to replace it.6. When this screen is displayed, theoperation is compl...
-
46 .SETUP346You can also regi...SETUP346You can also register the speed dial inthe following ways.From "Speed Dial" screen1. Push the "MENU" button on the Re-mote Touch, then select "Info./Phone".2. Select "Phone".3. Select "Speed Dials".4. Select "(add new)".5. Select "Yes" to set new s...
-
47 .SETUP347From "Contact Dat...SETUP347From "Contact Data" screen1. Push the "MENU" button on the Re-mote Touch, then select "Info./Phone".2. Select "Phone".3. Select "Contacts".4. Select the desired data from the list.5. Select "Options".6. Select "Set Speed Dial".7. This screen is dis...
-
48 .SETUP348Editing the speed...SETUP348Editing the speed dialYou can edit the speed dial.1. Select "Edit Speed Dials".2. Select the button you want to edit.3. Select "Edit".4. Use the software keyboard to inputthe name.5. Select "Save".
-
49 .SETUP349Deleting the spee...SETUP349Deleting the speed dialYou can delete the speed dial.1. Select "Delete Speed Dials".2. Select the desired data or select"Select All", then select "Delete".You can select multiple data and deletethem at the same time.3. Select "Yes".
-
50 .SETUP350You can delete th...SETUP350You can delete the call history.1. Select "Delete Call History".2. Select the desired history to delete.3. Select the desired data or select"Select All", then select "Delete".You can select multiple data and deletethem at the same time.4. Select "Y...
-
51 .SETUP351You can also dele...SETUP351You can also delete the call history inthe following way.1. Push the "MENU" button on the Re-mote Touch, then select "Info./Phone".2. Select "Phone".3. Select "Call History".4. Select "Delete".5. This screen is displayed.The following operations ar...
-
52 .SETUP352You can also disp...SETUP352You can also display "Voice Tags"screen in the following way.1. Push the "MENU" button on the Re-mote Touch, then select "Info./Phone".2. Select "Phone".3. Select "Contacts".4. Select "Options".5. Select "Manage Voice Tags". Registering the voice t...
-
53 .SETUP3533. Select " REC",...SETUP3533. Select " REC", and record a voicetag.4. Select " Play" to play the voicetag.When you complete the voice tag registra-tion, select "OK".INFORMATIONWhen you use the voice tag, do notchange the language setting fromthe language setting used when re...
-
54 .SETUP3547. This screen is...SETUP3547. This screen is displayed.The following operations are the sameas the operation when you operate itfrom "Setup" screen. Editing the voice tag1. Select "Edit Voice Tags".2. Select the data you want to edit.3. This screen is displayed.The following...
-
55 .SETUP355Deleting the voic...SETUP355Deleting the voice tag1. Select "Delete Voice Tags".2. Select the desired data or select"Select All", then select "Delete".You can select multiple data and deletethem at the same time.3. Select "Yes".You can confirm and change theBluetooth settings...
-
56 .SETUP356The information d...SETUP356The information displays the followingitems."Device Name"This name will be displayed on. . . . . the phone when registering anew device. You can changeit."Passcode"The passcode when you used. . . . . to register your Bluetooth phone in the system. ...
-
57 .SETUP3571. Select "Handsf...SETUP3571. Select "Handsfree Power".2. Select "On" or "Off".3. Select "Save".In case that "Handsfree Power" ischanged from "Off" into "On",Bluetooth connection will begin.When you connect the phone whileBluetooth audio is playingThis screen is displayed, a...
-
58 .SETUP358Editing the devic...SETUP358Editing the device name1. Select "Edit" of "Device Name".2. Use the software keyboard to inputthe device name.INFORMATIONThe device names are commonbetween Bluetooth audio andBluetooth phone.If you change the device name of thephone, the device na...
-
59 .SETUP359Initializing the ...SETUP359Initializing the Bluetooth settingsYou can initialize the settings.1. Select "Default".2. Select "Yes".If "Handsfree Power" is changed from "Off"into "On", Bluetooth connection will be-gin.If you connect a phone whileBluetooth audio is playingThi...
-
60 .SETUP360You can do the de...SETUP360You can do the detail settings.1. Push the "MENU" button on the Re-mote Touch. (See "- Remote Touch"on page 5.)2. Select "Setup".3. Select "Phone".4. Select "Details".5. Do each setting according to the fol-lowing procedures.6. When you complete e...
-
61 .SETUP3612. Select "Full S...SETUP3612. Select "Full Screen" or "DropDown"."Full Screen" modeWhen a call is received, the. . . . . Hands−free screen is dis-played and you can operate iton the screen."Drop Down" modeThe message is displayed on. . . . . the upper side of the screen.You ...
-
62 .SETUP3621. Select "Displa...SETUP3621. Select "Display Phone Status".2. Select "On" or "Off". Initializing the settingsYou can initialize the settings.1. Select "Default".2. Select "Yes".
-
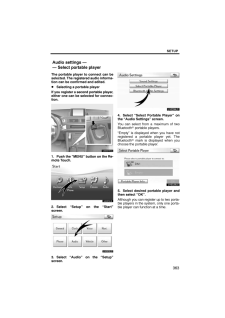
63 .SETUP363The portable play...SETUP363The portable player to connect can beselected. The registered audio informa-tion can be confirmed and edited. Selecting a portable playerIf you register a second portable player,either one can be selected for connec-tion.1. Push the "MENU" button o...
-
64 .SETUP364Displaying Blueto...SETUP364Displaying Bluetooth informationYou can see or change the informationof the portable player on the system."Device Name"The name of Bluetooth portable . . . player which is displayed on thescreen. You can change it into a de-sired name."Device Add...
-
65 .SETUP365Selecting Connect...SETUP365Selecting Connection methodThe connection method can be se-lected.From Vehicle: Connect the audio sys-tem to the portable player.From Portable Player: Connect the por-table player to the audio system.Select desired connection method"From Vehicle" ...
-
66 .SETUP3663. When this scre...SETUP3663. When this screen is displayed, enterthe passcode displayed on the screeninto the portable player.For the operation of the portable player,see the manual that comes with it.If you want to cancel the entry, select"Cancel".4. When the connection is...
-
67 .SETUP367(a) Removing a Bl...SETUP367(a) Removing a Bluetooth audio1. Select "Remove" of "Bluetooth∗Audio" on the "BT Audio Settings"screen.2. Select the portable player you wantto delete and select "OK".3. Select "Yes" to unregister the se-lected portable player.∗: Bluetooth is a re...
-
68 .SETUP368(b) Connecting Bl...SETUP368(b) Connecting Bluetooth audioAUTOMATICALLYSelect "On" for "Auto Bluetooth∗Connect" to activate the automaticconnection for the Bluetooth . Always setit to this mode and leave the Bluetooth portable player in a condition whereconnection can be est...
-
69 .SETUP369(c) Changing the ...SETUP369(c) Changing the passcodeThe passcode for registering your por-table player on the system. You canchange this to 4 to 8 digit number ofyour choice. The default is "0000".1. Select "Edit" of "Passcode" on the"BT Audio Settings" screen.2. Enter the n...
-
70 .SETUP370(e) Initializing ...SETUP370(e) Initializing the Bluetooth audiosettingsYou can initialize the settings.1. Select "Default" on the "BT AudioSettings" screen.2. Select "Yes".When the navigation system is turned on,the "Information" screen displays when it istime to replace a...
-
71 .SETUP3714. Select "Mainte...SETUP3714. Select "Maintenance". Setting maintenance information (See page 371.) Setting dealer (See page 373.)(a) Maintenance information setting1. Push the "MENU" button on the Re-mote Touch, then select "Setup".2. Select "Vehicle" on the "Setup"screen.3...
-
72 .SETUP372INFORMATION ITEMS...SETUP372INFORMATION ITEMS"Engine oil": Replace engine oil"Oil filter": Replace engine oil filter"Rotation": Rotate tires"Tires": Replace tires"Battery": Replace 12−volt battery"Brake pad": Replace brake linings"Wipers": Replace wiper blades"Coolant": Repla...
-
73 .SETUP373(b) Dealer settin...SETUP373(b) Dealer settingIt is possible to register a dealer in the sys-tem. With dealer information registered,route guidance to the dealer is available.1. Push the "MENU" button on the Re-mote Touch, then select "Setup".2. Select "Vehicle" on the "Setup...
-
74 .SETUP374To edit "Dealer" ...SETUP374To edit "Dealer" or "Contact"1. Select "Edit" of "Dealer" or "Con-tact".2. Enter the name using the alphanu-meric keys.Up to 32 characters can be entered.3. Select "OK".The previous screen will be displayed. To edit "Location"1. Select "Edit" of "L...
-
75 .SETUP375To edit "Phone #"...SETUP375To edit "Phone #" (telephone number)1. Select "Edit" of "Phone #".2. Enter the number using numberkeys.3. Select "OK".The previous screen will be displayed.Vehicle settings can be changed.1. Push the "MENU" button on the Re-mote Touch. (See "- Rem...
-
76 .SETUP376CAUTIONWhen perfo...SETUP376CAUTIONWhen performing the customizationprocedure, ensure that there is suffi-cient ventilation in the vehicle andsurrounding area. If there is insuffi-cient ventilation, exhaust gases maycollect and enter the vehicle. Ex-haust gases include harm...
-
77 .SETUP377Setting an alert ...SETUP377Setting an alert volumeThe alert volume can be adjusted.1. Push the "MENU" button on the Re-mote Touch, then select "Setup".2. Select "Vehicle" on the "Setup"screen.3. Select "LEXUS Park Assist" on the"Vehicle Settings" screen.4. Select the desired...
-
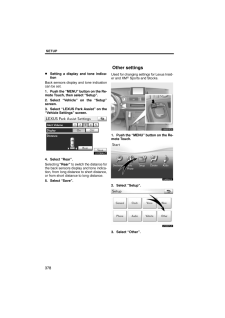
78 .SETUP378Setting a display...SETUP378Setting a display and tone indica-tionBack sensors display and tone indicationcan be set.1. Push the "MENU" button on the Re-mote Touch, then select "Setup".2. Select "Vehicle" on the "Setup"screen.3. Select "LEXUS Park Assist" on the"Vehicle Setti...
-
79 .SETUP379On this screen, t...SETUP379On this screen, the following functions canbe performed.No.Function1Sets Lexus Insider(See page 180.)2Sets XM sports(See page 168.)3Sets XM stocks(See page 171.)
