
HSの取扱説明書・マニュアル [全62ページ 3.44MB]


3


7 / 62 ページ
7 / 62 ページ


現在のページURL
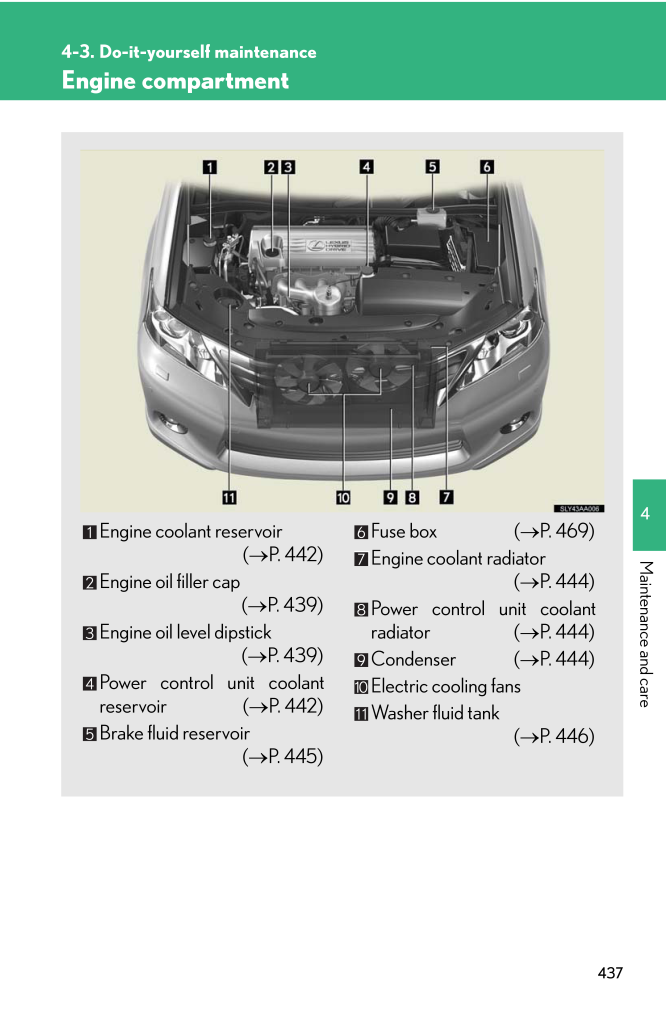
4374-3. Do-it-yourself maintenance4Maintenance and careEngine compartmentEngine coolant reservoir (→P. 442)Engine oil filler cap (→P. 439)Engine oil level dipstick (→P. 439)Power control unit coolant reservoir (→P. 442)Brake fluid reservoir (→P. 445)Fuse box (→P. 469)Engine coolant radiator (→P. 444)Power control unit coolant radiator (→P. 444)Condenser (→P. 444)Electric cooling fans Washer fluid tank (→P. 446)
参考になったと評価  4人が参考になったと評価しています。


このマニュアルの目次
-
1 .4314Maintenance and care4...4314Maintenance and care4-3. Do-it-yourself maintenanceDo-it-yourself service precautionsIf you perform maintenance by yourself, be sure to follow the correct pro -cedure as given in these sections.Items Parts and tools12-volt battery condition (→P. 447)*G...
-
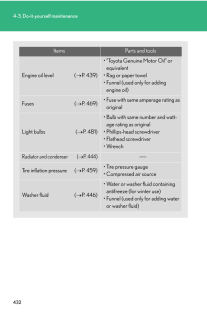
2 .4324-3. Do-it-yourself ma...4324-3. Do-it-yourself maintenanceItems Parts and toolsEngine oil level (→P. 439)*"Toyota Genuine Motor Oil" or equivalent*Rag or paper towel*Funnel (used only for adding engine oil)Fuses (→P. 469)*Fuse with same amperage rating as originalLight bulbs (→P....
-
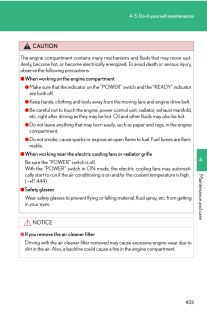
3 .4334-3. Do-it-yourself ma...4334-3. Do-it-yourself maintenance4Maintenance and careCAUTIONThe engine compartment contains many mechanisms and fluids that may move sud-denly, become hot, or become electrically energized. To avoid death or serious injury, observe the following precaut...
-
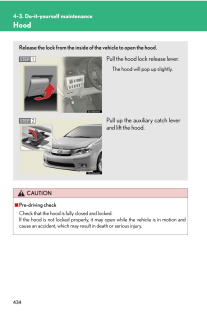
4 .4344-3. Do-it-yourself ma...4344-3. Do-it-yourself maintenanceHoodCAUTION■Pre-driving checkCheck that the hood is fully closed and locked. If the hood is not locked properly, it may open while the vehicle is in motion and cause an accident, which may result in death or serious inju...
-
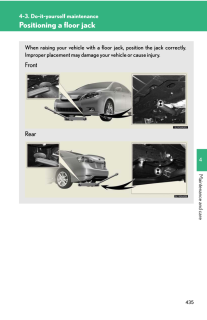
5 .4354-3. Do-it-yourself ma...4354-3. Do-it-yourself maintenance4Maintenance and carePositioning a floor jackWhen raising your vehicle with a floor jack, position the jack correctly. Improper placement may damage your vehicle or cause injury.Front Rear
-
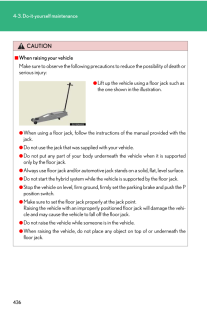
6 .4364-3. Do-it-yourself ma...4364-3. Do-it-yourself maintenanceCAUTION■When raising your vehicleMake sure to observe the following precauti ons to reduce the possibility of death or serious injury:●When using a floor jack, follow the instructions of the manual provided with the jack.●...
-
7 .4374-3. Do-it-yourself ma...4374-3. Do-it-yourself maintenance4Maintenance and careEngine compartmentEngine coolant reservoir (→P. 442)Engine oil filler cap (→P. 439)Engine oil level dipstick (→P. 439)Power control unit coolant reservoir (→P. 442)Brake fluid reservoir (→P. 445)Fus...
-
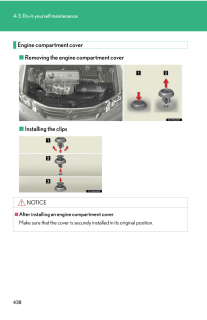
8 .4384-3. Do-it-yourself ma...4384-3. Do-it-yourself maintenanceEngine compartment cover■Removing the engine compartment cover■Installing the clipsNOTICE■After installing an engine compartment coverMake sure that the cover is securely installed in its original position.
-
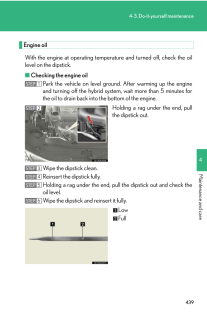
9 .4394-3. Do-it-yourself ma...4394-3. Do-it-yourself maintenance4Maintenance and careEngine oilWith the engine at operating temperat ure and turned off, check the oil level on the dipstick.■Checking the engine oilPark the vehicle on level ground. After warming up the engine and turning...
-
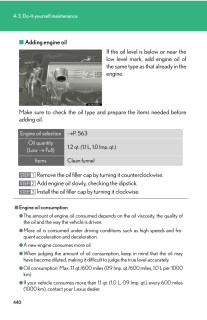
10 .4404-3. Do-it-yourself ma...4404-3. Do-it-yourself maintenance■Adding engine oilIf the oil level is below or near the low level mark, add engine oil of the same type as that already in the engine.Make sure to check the oil type and prepare the items needed before adding oil.Remove th...
-
11 .4414-3. Do-it-yourself ma...4414-3. Do-it-yourself maintenance4Maintenance and careCAUTION■Used engine oil●Used engine oil contains potentially harmful contaminants which may cause skin disorders such as inflammation and skin ca ncer, so care should be taken to avoid prolonged and re...
-
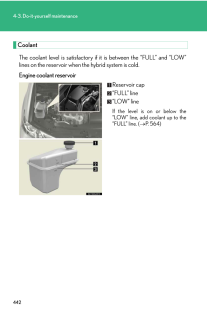
12 .4424-3. Do-it-yourself ma...4424-3. Do-it-yourself maintenanceCoolantThe coolant level is satisfactory if it is between the "FULL" and "LOW" lines on the reservoir when the hybrid system is cold.Engine coolant reservoirReservoir cap"FULL" line"LOW" lineIf the level is on or below th...
-
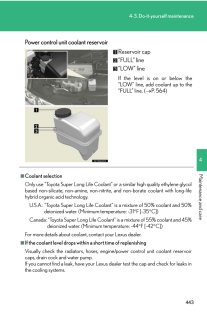
13 .4434-3. Do-it-yourself ma...4434-3. Do-it-yourself maintenance4Maintenance and carePower control unit coolant reservoirReservoir cap"FULL" line"LOW" lineIf the level is on or below the "LOW" line, add coolant up to the "FULL" line. (→P. 564 )■Coolant selectionOnly use "Toyota Super L...
-
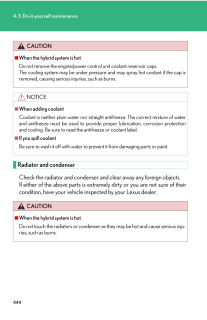
14 .4444-3. Do-it-yourself ma...4444-3. Do-it-yourself maintenanceRadiator and condenserCheck the radiator and condenser an d clear away any foreign objects. If either of the above parts is extremely dirty or you are not sure of their condition, have your vehicle inspected by your Lex...
-
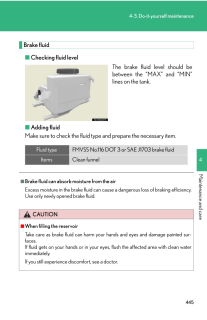
15 .4454-3. Do-it-yourself ma...4454-3. Do-it-yourself maintenance4Maintenance and careBrake fluid■Checking fluid levelThe brake fluid level should be between the "MAX" and "MIN" lines on the tank.■Adding fluidMake sure to check the fluid type and prepare the necessary item.■Brake fluid ...
-
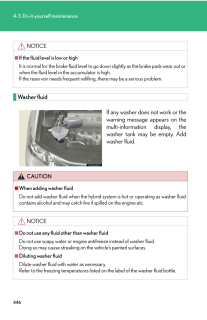
16 .4464-3. Do-it-yourself ma...4464-3. Do-it-yourself maintenanceWasher fluidIf any washer does not work or the warning message appears on the multi-information display, the washer tank may be empty. Add washer fluid.NOTICE■If the fluid level is low or highIt is normal for the brake flu...
-
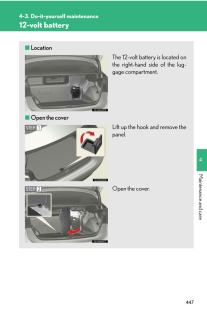
17 .4474-3. Do-it-yourself ma...4474-3. Do-it-yourself maintenance4Maintenance and care12-volt battery■LocationThe 12-volt battery is located on the right-hand side of the lug-gage compartment.■Open the coverLift up the hook and remove the panel.Open the cover.
-
18 .■Before rechargingWhen re...■Before rechargingWhen recharging, the 12-volt battery produces hydrogen gas which is flammable and explosive. Therefore, observe the following precautions before recharging:●If recharging with the 12-volt battery installed on the vehicle, be sure to disco...
-
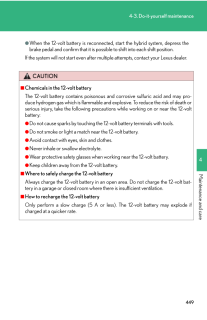
19 .4494-3. Do-it-yourself ma...4494-3. Do-it-yourself maintenance4Maintenance and care●When the 12-volt battery is reconnected, start the hybrid system, depress the brake pedal and confirm that it is possible to shift into each shift position.If the system will not start even after mul...
-
20 .4504-3. Do-it-yourself ma...4504-3. Do-it-yourself maintenanceCAUTION■Emergency measures regarding electrolyte●If electrolyte gets in your eyes Flush your eyes with clean water for at least 15 minutes and get immediate medi-cal attention. If possible, continue to apply water with...
-
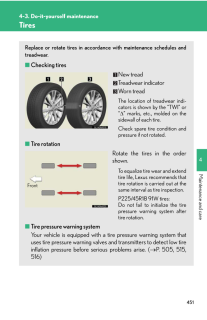
21 .4514-3. Do-it-yourself ma...4514-3. Do-it-yourself maintenance4Maintenance and careTiresReplace or rotate tires in accordan ce with maintenance schedules and treadwear.■Checking tiresNew treadTreadwear indicatorWorn treadThe location of treadwear indi -cators is shown by the "TWI" or...
-
22 .4524-3. Do-it-yourself ma...4524-3. Do-it-yourself maintenanceInstalling tire pressure warning valves and transmittersWhen replacing tires or wheels, tire pressure warning valves and trans -mitters must also be installed.When new tire pressure warning va lves and transmitters are ins...
-
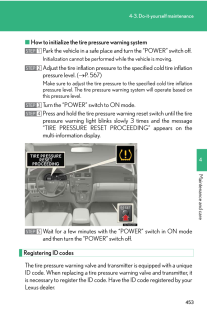
23 .4534-3. Do-it-yourself ma...4534-3. Do-it-yourself maintenance4Maintenance and care■How to initialize the tire pressure warning systemPark the vehicle in a safe place and turn the "POWER" switch off.Initialization cannot be performed while the vehicle is moving.Adjust the tire inflat...
-
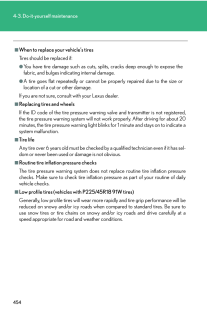
24 .■When to replace your veh...■When to replace your vehicle's tiresTires should be replaced if:●You have tire damage such as cuts, splits, cracks deep enough to expose the fabric, and bulges indicating internal damage.●A tire goes flat repeatedly or cannot be properly repaired due to ...
-
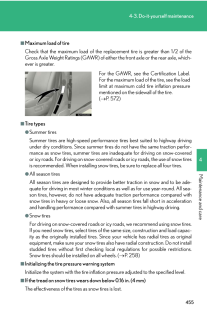
25 .4554-3. Do-it-yourself ma...4554-3. Do-it-yourself maintenance4Maintenance and care■Maximum load of tireCheck that the maximum load of the replac ement tire is greater than 1/2 of the Gross Axle Weight Ratings (GAWR) of either the front axle or the rear axle, which-ever is greater.■T...
-
26 .4564-3. Do-it-yourself ma...4564-3. Do-it-yourself maintenance■If you press the tire pressure warning reset switch accidentallyIf initialization is performed, adjust the ti re inflation pressure to the specified level and initialize the tire pressure warning system again.■When the in...
-
27 .4574-3. Do-it-yourself ma...4574-3. Do-it-yourself maintenance4Maintenance and careCAUTION■When inspecting or replacing tiresObserve the following precautions to prevent accidents. Failure to do so may cause damage to parts of the drive train as well as dangerous handling characteri...
-
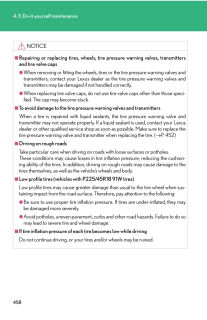
28 .4584-3. Do-it-yourself ma...4584-3. Do-it-yourself maintenanceNOTICE■Repairing or replacing tires, wheels, ti re pressure warning valves, transmitters and tire valve caps●When removing or fitting the wheels, tires or the tire pressure warning valves and transmitters, contact your Lex...
-
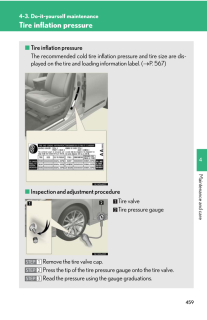
29 .4594-3. Do-it-yourself ma...4594-3. Do-it-yourself maintenance4Maintenance and careTire inflation pressure■Tire inflation pressureThe recommended cold tire inflation pressure and tire size are dis -played on the tire and loading information label. ( → P. 567 )■Inspection and adjustm...
-
30 .■Tire inflation pressure ...■Tire inflation pressure check intervalYou should check tire inflation pressure every two weeks, or at least once a month. Do not forget to check the spare.■Effects of incorrect tire inflation pressureDriving with incorrect tire inflation pressure may re...
-
31 .4614-3. Do-it-yourself ma...4614-3. Do-it-yourself maintenance4Maintenance and care●Never exceed the vehicle capacity weight. Passengers and luggage weight should be placed so that the vehicle is bal-anced.CAUTION■Proper inflation is critical to save tire performanceKeep your tire...
-
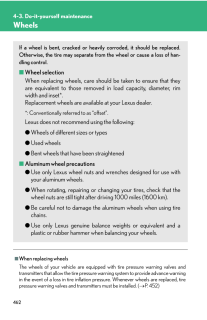
32 .4624-3. Do-it-yourself ma...4624-3. Do-it-yourself maintenanceWheels■When replacing wheelsThe wheels of your vehicle are equipped with tire pressure warning valves and transmitters that allow the tire pressure warning system to provide advance warning in the event of a loss in tire ...
-
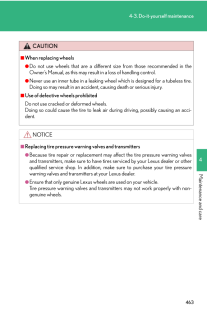
33 .4634-3. Do-it-yourself ma...4634-3. Do-it-yourself maintenance4Maintenance and careCAUTION■When replacing wheels●Do not use wheels that are a different size from those recommended in the Owner's Manual, as this may result in a loss of handling control.●Never use an inner tube in a le...
-
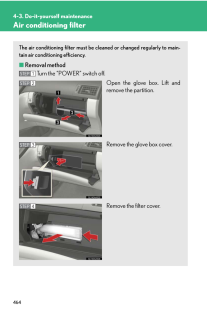
34 .4644-3. Do-it-yourself ma...4644-3. Do-it-yourself maintenanceAir conditioning filterThe air conditioning filter must be cleaned or changed regularly to main -tain air conditioning efficiency.■Removal methodTurn the "POWER" switch off.Open the glove box. Lift and remove the partitio...
-
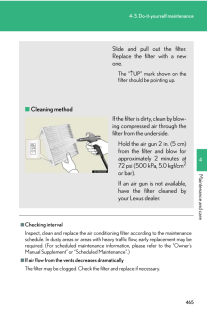
35 .■Checking intervalInspect...■Checking intervalInspect, clean and replace the air conditioning filter according to the maintenance schedule. In dusty areas or areas with he avy traffic flow, early replacement may be required. (For scheduled maintenance information, please refer to the...
-
36 .4664-3. Do-it-yourself ma...4664-3. Do-it-yourself maintenanceNOTICE■To prevent damage to the system●When using the air conditioning system, make sure that a filter is always installed.●When cleaning the filter, do not clean with water.
-
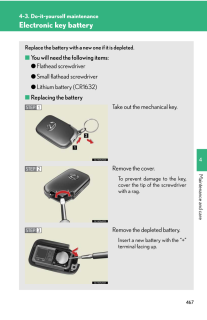
37 .4674-3. Do-it-yourself ma...4674-3. Do-it-yourself maintenance4Maintenance and careElectronic key batteryReplace the battery with a new one if it is depleted.■You will need the following items:●Flathead screwdriver●Small flathead screwdriver●Lithium battery (CR1632)■Replacing the bat...
-
38 .■Use a CR1632 lithium bat...■Use a CR1632 lithium battery●Batteries can be purchased at your Le xus dealer, local electrical appliance shops or camera stores.●Replace only with the same or equivalent type recommended by the manufac -turer.●Dispose of used batteries according to local...
-
39 .4694-3. Do-it-yourself ma...4694-3. Do-it-yourself maintenance4Maintenance and careChecking and replacing fusesIf any of the electrical components do not operate, a fuse may have blown. If this happens, check and re place the fuses as necessary.Turn the "POWER" switch off.Open the fu...
-
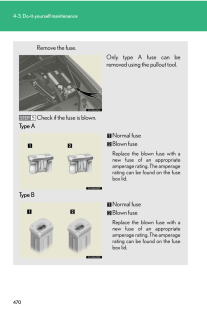
40 .4704-3. Do-it-yourself ma...4704-3. Do-it-yourself maintenanceRemove the fuse.Only type A fuse can be removed using the pullout tool.Check if the fuse is blown.Type ANormal fuseBlown fuseReplace the blown fuse with a new fuse of an appropriate amperage rating. The amperage rating can...
-
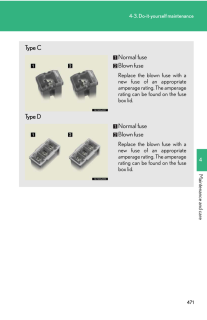
41 .4714-3. Do-it-yourself ma...4714-3. Do-it-yourself maintenance4Maintenance and careType CNormal fuseBlown fuseReplace the blown fuse with a new fuse of an appropriate amperage rating. The amperage rating can be found on the fuse box lid.Type DNormal fuseBlown fuseReplace the blown fu...
-
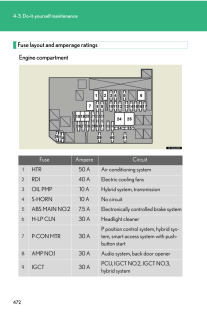
42 .4724-3. Do-it-yourself ma...4724-3. Do-it-yourself maintenanceFuse layout and amperage ratingsEngine compartmentFuse Ampere Circuit1HTR 50 A Air conditioning system2RDI 40 A Electric cooling fans3OIL PMP 10 A Hybrid system, transmission4S-HORN 10 A No circuit5ABS MAIN NO.2 7.5 A Elec...
-
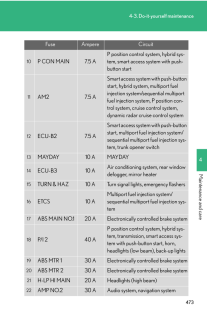
43 .4734-3. Do-it-yourself ma...4734-3. Do-it-yourself maintenance4Maintenance and care10P CON MAIN 7.5 AP position control system, hybrid sys-tem, smart access system with push-button start11AM2 7.5 ASmart access system with push-button start, hybrid system, multiport fuel injection sys...
-
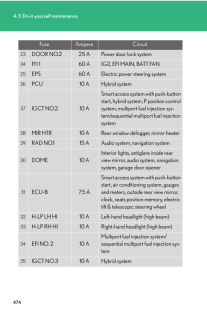
44 .4744-3. Do-it-yourself ma...4744-3. Do-it-yourself maintenance23DOOR NO.2 25 A Power door lock system24P/I 1 60 A IG2, EFI MAIN, BATT FAN25EPS 60 A Electric power steering system26PCU 10 A Hybrid system27IGCT NO.2 10 ASmart access system with push-button start, hybrid system, P posit...
-
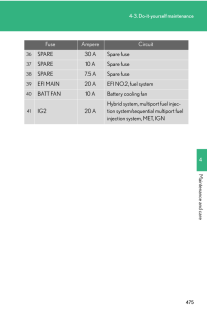
45 .4754-3. Do-it-yourself ma...4754-3. Do-it-yourself maintenance4Maintenance and care36SPARE 30 A Spare fuse37SPARE 10 A Spare fuse38SPARE 7.5 A Spare fuse39EFI MAIN 20 A EFI NO.2, fuel system40BATT FAN 10 A Battery cooling fan41IG2 20 AHybrid system, multiport fuel injec-tion system/s...
-
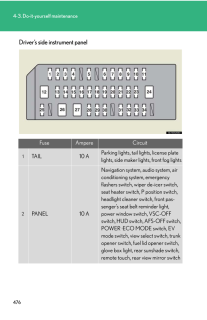
46 .4764-3. Do-it-yourself ma...4764-3. Do-it-yourself maintenanceDriver's side instrument panelFuse Ampere Circuit1TAIL 10 AParking lights, tail lights, license plate lights, side maker lights, front fog lights2PANEL 10 ANavigation system, audio system, air conditioning system, emergenc...
-
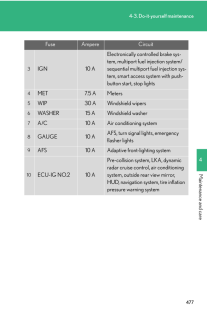
47 .4774-3. Do-it-yourself ma...4774-3. Do-it-yourself maintenance4Maintenance and care3IGN 10 AElectronically controlled brake sys-tem, multiport fuel injection system/sequential multiport fuel injection sys-tem, smart access system with push-button start, stop lights4MET 7.5 A Meters5W...
-
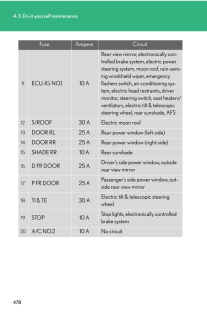
48 .4784-3. Do-it-yourself ma...4784-3. Do-it-yourself maintenance11ECU-IG NO.1 10 ARear view mirror, electronically con-trolled brake system, electric power steering system, moon roof, rain-sens-ing windshield wiper, emergency flashers switch, air conditioning sys-tem, electric head res...
-
49 .4794-3. Do-it-yourself ma...4794-3. Do-it-yourself maintenance4Maintenance and care21RR FOG 7.5 A No circuit22FUEL OPN 7.5 ATrunk opener switch, fuel filler door opener switch23OBD 7.5 A On-board diagnosis24PWR SEAT FL 30 A Driver's side power seat25FR FOG 15 A Front fog lights26PWR ...
-
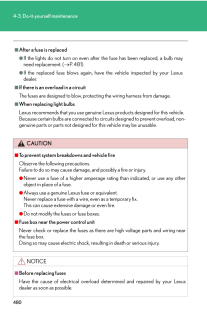
50 .■After a fuse is replaced...■After a fuse is replaced●If the lights do not turn on even afte r the fuse has been replaced, a bulb may need replacement. (→P. 481 )●If the replaced fuse blows again, have the vehicle inspected by your Lexus dealer.■If there is an overload in a circuitTh...
-
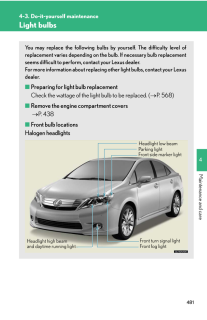
51 .4814-3. Do-it-yourself ma...4814-3. Do-it-yourself maintenance4Maintenance and careLight bulbsYou may replace the following bulbs by yourself. The difficulty level of replacement varies depending on the bulb. If necessary bulb replacement seems difficult to perform, contact your Lex...
-
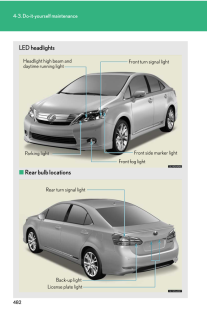
52 .4824-3. Do-it-yourself ma...4824-3. Do-it-yourself maintenanceLED headlights■Rear bulb locationsFront fog lightFront turn signal lightParking lightFront side marker lightHeadlight high beam and daytime running light Rear turn signal lightBack-up lightLicense plate light
-
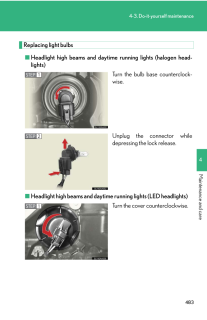
53 .4834-3. Do-it-yourself ma...4834-3. Do-it-yourself maintenance4Maintenance and careReplacing light bulbs■Headlight high beams and day time running lights (halogen head -lights)Turn the bulb base counterclock -wise.Unplug the connector while depressing the lock release.■Headlight high...
-
54 .4844-3. Do-it-yourself ma...4844-3. Do-it-yourself maintenanceTurn the bulb base counterclock -wise.Unplug the connector while depressing the lock release.■Headlight low beams (halogen headlights)Turn the bulb base counterclock -wise.Unplug the connector while depressing the lock rel...
-
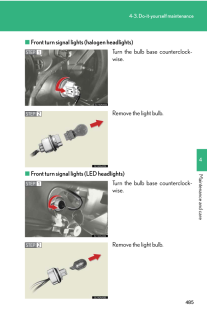
55 .4854-3. Do-it-yourself ma...4854-3. Do-it-yourself maintenance4Maintenance and care■Front turn signal lights (halogen headlights)Turn the bulb base counterclock -wise.Remove the light bulb.■Front turn signal lights (LED headlights)Turn the bulb base counterclock -wise.Remove the ligh...
-
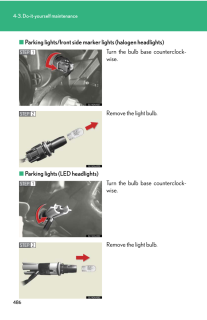
56 .4864-3. Do-it-yourself ma...4864-3. Do-it-yourself maintenance■Parking lights/front side marker lights (halogen headlights)Turn the bulb base counterclock -wise.Remove the light bulb.■Parking lights (LED headlights)Turn the bulb base counterclock -wise.Remove the light bulb.
-
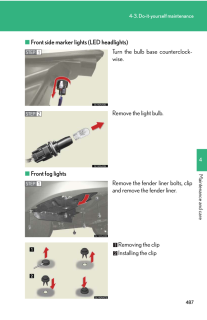
57 .4874-3. Do-it-yourself ma...4874-3. Do-it-yourself maintenance4Maintenance and care■Front side marker lights (LED headlights)Turn the bulb base counterclock -wise.Remove the light bulb.■Front fog lightsRemove the fender liner bolts, clip and remove the fender liner.Removing the clipI...
-
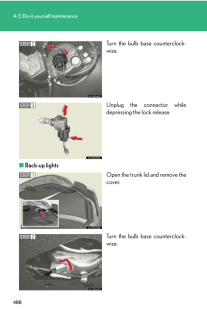
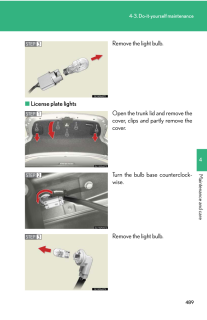
58 .4884-3. Do-it-yourself ma...4884-3. Do-it-yourself maintenanceTurn the bulb base counterclock -wise.Unplug the connector while depressing the lock release.■Back-up lightsOpen the trunk lid and remove the cover.Turn the bulb base counterclock -wise.
-
59 .4894-3. Do-it-yourself ma...4894-3. Do-it-yourself maintenance4Maintenance and careRemove the light bulb.■License plate lightsOpen the trunk lid and remove the cover, clips and partly remove the cover.Turn the bulb base counterclock -wise.Remove the light bulb.
-
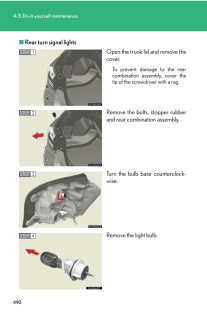
60 .4904-3. Do-it-yourself ma...4904-3. Do-it-yourself maintenance■Rear turn signal lightsOpen the trunk lid and remove the cover.To prevent damage to the rear combination assembly, cover the tip of the screwdriver with a rag.Remove the bolts, stopper rubber and rear combination assembly...
-
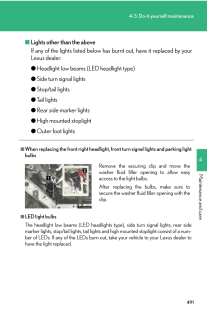
61 .4914-3. Do-it-yourself ma...4914-3. Do-it-yourself maintenance4Maintenance and care■Lights other than the aboveIf any of the lights listed below has burnt out, have it replaced by your Lexus dealer.●Headlight low beams (LED headlight type)●Side turn signal lights●Stop/tail lights●Tai...
-
62 .4924-3. Do-it-yourself ma...4924-3. Do-it-yourself maintenance■Condensation build-up on the inside of the lensContact your Lexus dealer for more inform ation in the following situations. Tempo-rary condensation build-up on the inside of the headlight lens does not indicate a malfunct...
