
W1946SM-BFの取扱説明書・マニュアル [全30ページ 1.92MB]


5


28 / 30 ページ


現在のページURL
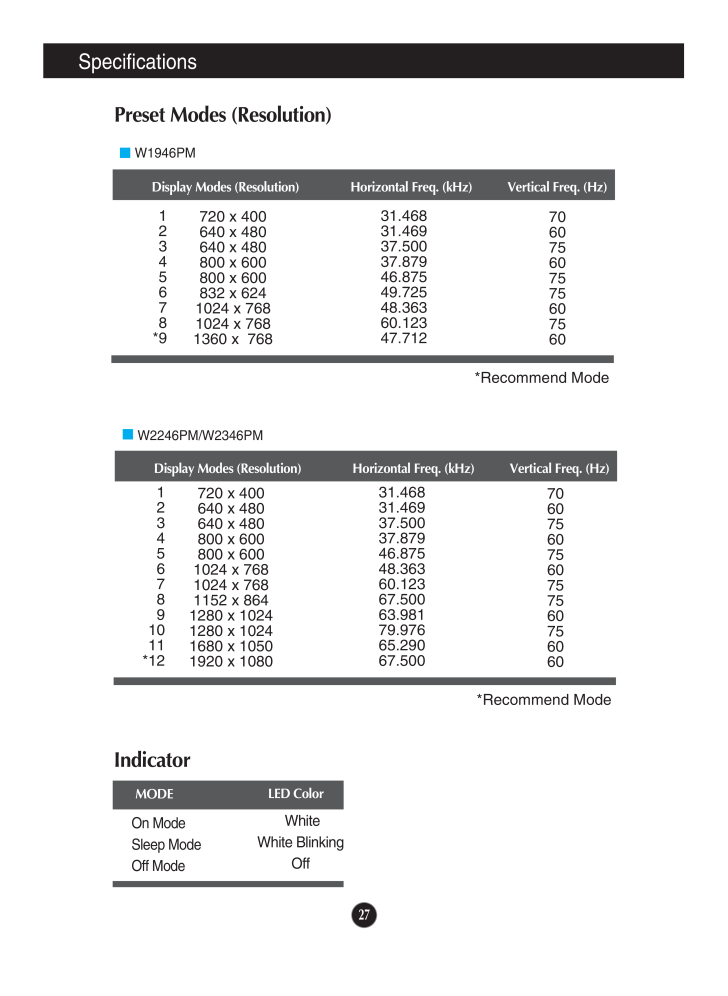
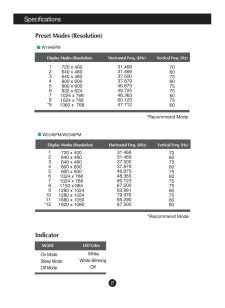
27IndicatorOn ModeSleep ModeOff ModeWhiteWhite BlinkingOffLED ColorMODEDisplay Modes (Resolution) Horizontal Freq. (kHz) Vertical Freq. (Hz)*Recommend ModeW2246PM/W2346PM1234567891011*12720 x 400640 x 480640 x 480800 x 600800 x 6001024 x 7681024 x 7681152 x 8641280 x 10241280 x 10241680 x 10501920 x 108031.46831.46937.50037.87946.87548.36360.12367.50063.98179.97665.29067.500706075607560757560756060SpecificationsPreset Modes (Resolution)Display Modes (Resolution) Horizontal Freq. (kHz) Vertical Freq. (Hz)*Recommend ModeW1946PM12345678*9720 x 400640 x 480640 x 480800 x 600800 x 600832 x 6241024 x 7681024 x 7681360 x 76831.46831.46937.50037.87946.87549.72548.36360.12347.712706075607575607560
参考になったと評価  5人が参考になったと評価しています。
このマニュアルの目次
-
1 .M ake sure to read the Im...M ake sure to read the Important Precautions before using theproduct. Keep the User's Guide(CD) in an accessible place for futurereference.See the label attached on the product and give the information toyour dealer when you ask for service.W1946PMW2346PMU...
-
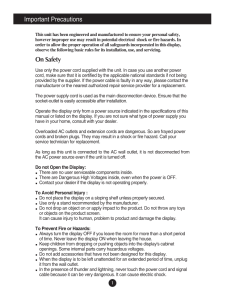
2 .1This unit has been engin...1This unit has been engineered and manufactured to ensure your personal safety,however improper use may result in potential electrical shock or fire hazards. Inorder to allow the proper operation of all safeguards incorporated in this display,observe the ...
-
3 .2Important PrecautionsOn ...2Important PrecautionsOn InstallationDo not allow anything to rest upon or roll over the power cord, and do not place thedisplay where the power cord is subject to damage.Do not use this display near water such as near a bathtub, washbowl, kitchen sink,lau...
-
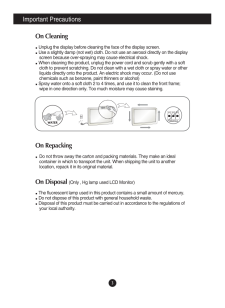
4 .Important Precautions3On ...Important Precautions3On CleaningUnplug the display before cleaning the face of the display screen.Use a slightly damp (not wet) cloth. Do not use an aerosol directly on the displayscreen because over-spraying may cause electrical shock.When cleaning the p...
-
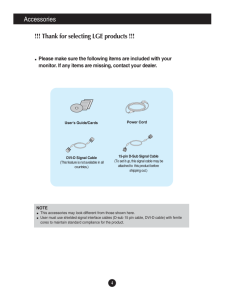
5 .4Accessories!!! Thank for...4Accessories!!! Thank for selecting LGE products !!! Please make sure the following items are included with yourmonitor. If any items are missing, contact your dealer.User's Guide/CardsPower Cord15-pin D-Sub Signal Cable(To set it up, this signal cable may...
-
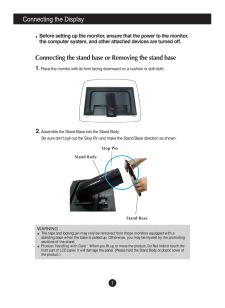
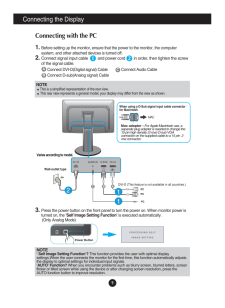
6 .Connecting the Display5Be...Connecting the Display5Before setting up the monitor, ensure that the power to the monitor,the computer system, and other attached devices are turned off. Connecting the stand base or Removing the stand base1. Place the monitor with its front facing downwa...
-
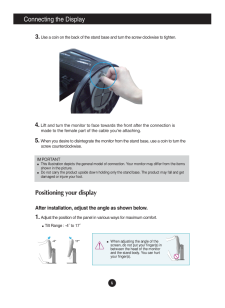
7 .6Connecting the DisplayIM...6Connecting the DisplayIMPORTANTThis illustration depicts the general model of connection. Your monitor may differ from the itemsshown in the picture.Do not carry the product upside down holding only the stand base. The product may fall and getdamaged or i...
-
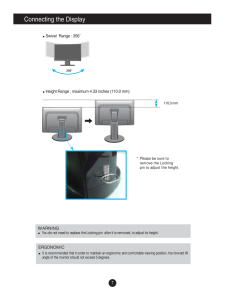
8 .7Connecting the DisplaySw...7Connecting the DisplaySwivel Range : 356Height Range : maximum 4.33 inches (110.0 mm)* Please be sure to remove the Locking pin to adjust the height. 110.0 mmERGONOMICIt is recommended that in order to maintain an ergonomic and comfortable viewin...
-
9 .8Connecting the Display-T...8Connecting the Display-The pivot function allows you to rotate the screen 90 degrees clockwise. 1.Lift the monitor to its highest height to utilize the Pivot function.2.Landscape & Portrait : You can rotate the panel 90o clockwise. Please be cautious and...
-
10 .9Connecting the DisplayNO...9Connecting the DisplayNOTE' Self Image Setting Function'? This function provides the user with optimal displaysettings.When the user connects the monitor for the first time, this function automatically adjuststhe display to optimal settings for individua...
-
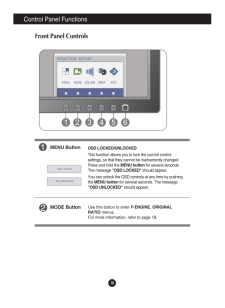
11 .10Control Panel Functions...10Control Panel FunctionsFront Panel ControlsMENU ButtonOSD LOCKED/UNLOCKEDThis function allows you to lock the current controlsettings, so that they cannot be inadvertently changed.Press and hold the MENU buttonfor several seconds.The message "OSD LOCKED"...
-
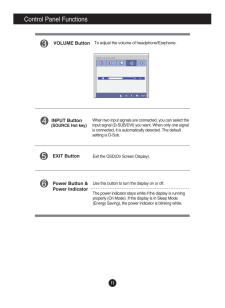
12 .11Control Panel Functions...11Control Panel FunctionsVOLUME ButtonINPUT ButtonUse this button to turn the display on or off.The power indicator stays white if the display is runningproperly (On Mode). If the display is in Sleep Mode(Energy Saving), the power indicator is blinking whi...
-
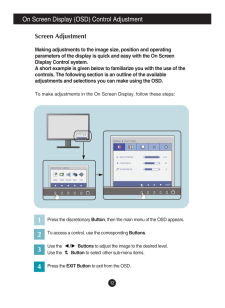
13 .12On Screen Display (OSD)...12On Screen Display (OSD) Control AdjustmentScreen AdjustmentMaking adjustments to the image size, position and operatingparameters of the display is quick and easy with the On ScreenDisplay Control system. A short example is given below to familiarize you...
-
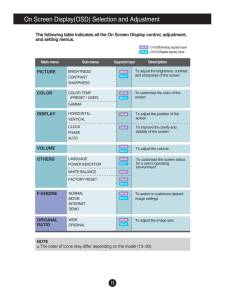
14 .VOLUME13On Screen Display...VOLUME13On Screen Display(OSD) Selection and Adjustment The following table indicates all the On Screen Display control, adjustment,and setting menus.NORMALMOVIEINTERNETDEMOF-ENGINETo select or customize desiredimage settings: D-SUB(Analog signal) input : ...
-
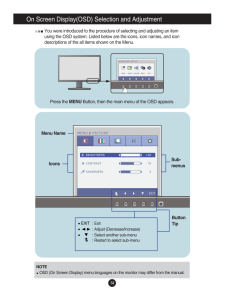
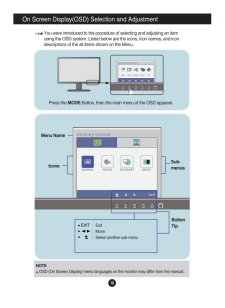
15 .14On Screen Display(OSD) ...14On Screen Display(OSD) Selection and Adjustment You were introduced to the procedure of selecting and adjusting an itemusing the OSD system. Listed below are the icons, icon names, and icondescriptions of the all items shown on the Menu.Sub-menusNOTEOSD ...
-
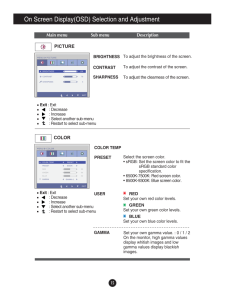
16 .15On Screen Display(OSD) ...15On Screen Display(OSD) Selection and Adjustment Main menu Sub menu DescriptionExit: Exit: Decrease: Increase: Select another sub-menu: Restart to select sub-menuBRIGHTNESSCONTRAST SHARPNESSTo adjust the brightness of the screen. To adjust the contrast of...
-
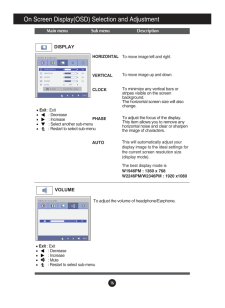
17 .16On Screen Display(OSD) ...16On Screen Display(OSD) Selection and Adjustment Main menu Sub menu DescriptionCLOCKPHASETo minimize any vertical bars orstripes visible on the screenbackground.The horizontal screen size will alsochange.To adjust the focus of the display. This item allow...
-
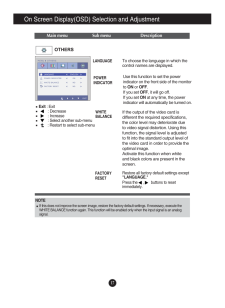
18 .17On Screen Display(OSD) ...17On Screen Display(OSD) Selection and Adjustment Press the , buttons to resetimmediately.Main menu Sub menu DescriptionTo choose the language in which thecontrol names are displayed.LANGUAGEWHITEBALANCEIf the output of the video card isdifferen...
-
19 .18On Screen Display(OSD) ...18On Screen Display(OSD) Selection and Adjustment You were introduced to the procedure of selecting and adjusting an itemusing the OSD system. Listed below are the icons, icon names, and icondescriptions of the all items shown on the Menu.Sub-menusNOTEOSD ...
-
20 .19On Screen Display(OSD) ...19On Screen Display(OSD) Selection and Adjustment Main menu Sub menu DescriptionNORMALSelect this when you want to use the productin the most general using environment. MOVIESelect this when you are watching a video ormovie.INTERNETSelect this when you are...
-
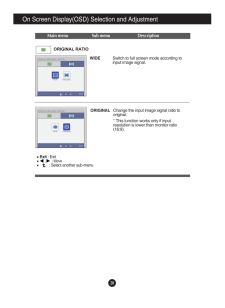
21 .20On Screen Display(OSD) ...20On Screen Display(OSD) Selection and Adjustment Main menu Sub menu DescriptionChange the input image signal ratio tooriginal. WIDEORIGINALSwitch to full screen mode according toinput image signal. * This function works only if inputresolution is lower t...
-
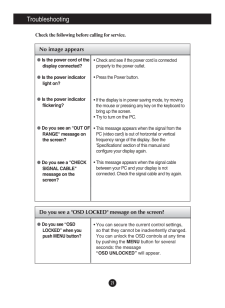
22 .21TroubleshootingNo image...21TroubleshootingNo image appearsCheck the following before calling for service.No image appearsDo you see a "OSD LOCKED" message on the screen?Is the power cord of thedisplay connected?Is the power indicatorlight on?Is the power indicatorflickering?Do you...
-
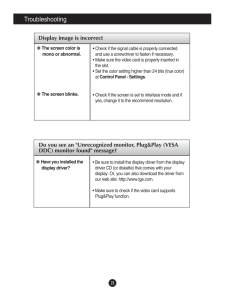
23 .22TroubleshootingDisplay ...22TroubleshootingDisplay image is incorrectDisplay Position isincorrect.On the screenbackground, verticalbars or stripes arevisible.Any horizontal noiseappearing in anyimage or charactersare not clearlyportrayed.* Press the AUTObutton to automatically adju...
-
24 .23Display image is incorr...23Display image is incorrectTroubleshootingThe screen color ismono or abnormal.The screen blinks.* Check if the signal cable is properly connectedand use a screwdriver to fasten if necessary.* Make sure the video card is properly inserted inthe slot.* Set ...
-
25 .24Specifications ...24Specifications W1946PM47.0 cm (18.5 inch) Flat Panel Active matrix-TFT LCD Anti-Glare coating Visible diagonal size : 47.0 cm0.300 x 0.300 mm (Pixel pitch)DisplayHorizontal Freq. 30 kHz to ...
-
26 .25Specifications ...25Specifications W2246PM54.6 cm (21.5 inch) Flat Panel Active matrix-TFT LCD Anti-Glare coating Visible diagonal size : 54.6 cm0.248 x 0.248 mm (Pixel pitch)DisplayHorizontal Freq. 30 kHz to ...
-
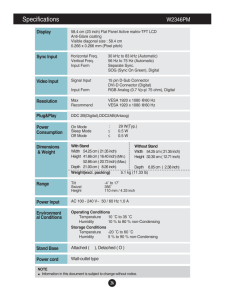
27 .26Specifications ...26Specifications W2346PM58.4 cm (23 inch) Flat Panel Active matrix-TFT LCD Anti-Glare coating Visible diagonal size : 58.4cm0.266 x 0.266 mm (Pixel pitch)DisplayHorizontal Freq. 30 kHz to 83 ...
-
28 .27IndicatorOn ModeSleep M...27IndicatorOn ModeSleep ModeOff ModeWhiteWhite BlinkingOffLED ColorMODEDisplay Modes (Resolution) Horizontal Freq. (kHz) Vertical Freq. (Hz)*Recommend ModeW2246PM/W2346PM1234567891011*12720 x 400640 x 480640 x 480800 x 600800 x 6001024 x 7681024 x 7681152 ...
-
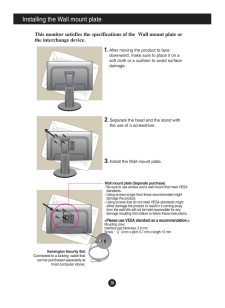
29 .28Installing the Wall mou...28Installing the Wall mount plate
Mounting crew:Interface pad thickness: 2.6 mmScrew : 4 mm x pitch 0.7 mm x length 10 mmThis monitor satisfies the specifications of the Wall mount plate orthe interchange devi...
