
W2362TQ-PFの取扱説明書・マニュアル [全22ページ 0.87MB]


6


9 / 22 ページ


現在のページURL
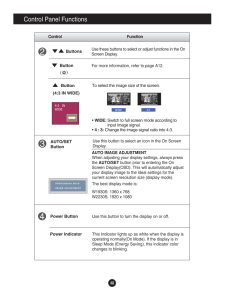
A8Control FunctionControl Panel FunctionsThis Indicator lights up as white when the display isoperating normally(On Mode). If the display is inSleep Mode (Energy Saving), this indicator colorchanges to blinking.Use this button to turn the display on or off.Power ButtonPower IndicatorUse this button to select an icon in the On ScreenDisplay.AUTO/SETButtonAUTO IMAGE ADJUSTMENTWhen adjusting your display settings, always pressthe AUTO/SETbutton prior to entering the OnScreen Display(OSD). This will automatically adjustyour display image to the ideal settings for thecurrent screen resolution size (display mode).The best display mode is:W1930S: 1360 x 768W2230S: 1920 x 1080ButtonsUse these buttons to select or adjust functions in the OnScreen Display.For more information, refer to page A12.ButtonButton( )(4:3 IN WIDE)To select the image size of the screen.* WIDE:Switch to full screen mode according toinput image signal.* 4 : 3:Change the image signal ratio into 4:3.WIDE4:3
参考になったと評価  6人が参考になったと評価しています。
このマニュアルの目次
-
1 .M ake sure to read the Im...M ake sure to read the Important Precautionsbefore using the product. Keep the User's Guide(CD) in an accessible place for future reference.See the label attached on the product and give the information to yourdealer when you ask for service.W1930SW2230SUs...
-
2 .A1This unit has been engi...A1This unit has been engineered and manufactured to ensure your personal safety,however improper use may result in potential electrical shock or fire hazards. Inorder to allow the proper operation of all safeguards incorporated in this display,observe the...
-
3 .A2Important PrecautionsOn...A2Important PrecautionsOn InstallationDo not allow anything to rest upon or roll over the power cord, and do not placethe display where the power cord is subject to damage.Do not use this display near water such as near a bathtub, washbowl, kitchensink, la...
-
4 .A3Important PrecautionsOn...A3Important PrecautionsOn CleaningUnplug the display before cleaning the face of the display screen.Use a slightly damp (not wet) cloth. Do not use an aerosol directly on the displayscreen because over-spraying may cause electrical shock.When cleaning the ...
-
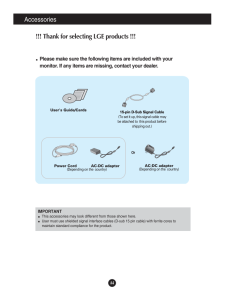
5 .A4Accessories!!! Thank fo...A4Accessories!!! Thank for selecting LGE products !!! Please make sure the following items are included with yourmonitor. If any items are missing, contact your dealer.User's Guide/CardsPower Cord AC-DC adapter(Depending on the country)AC-DC ad...
-
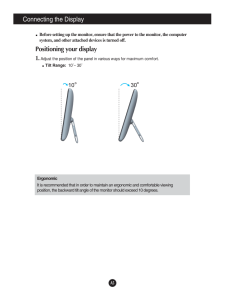
6 .A5Connecting the DisplayB...A5Connecting the DisplayBefore setting up the monitor, ensure that the power to the monitor, the computersystem, and other attached devices is turned off. Positioning your display1. Adjust the position of the panel in various ways for maximum comfort.Tilt ...
-
7 .A6Connecting the DisplayN...A6Connecting the DisplayNOTEThis is a simplified representation of the rear view.This rear view represents a general model; your display may differ fromthe view as shown.Using the Computer1. Make sure to turn off the computer and product. Connect the cabl...
-
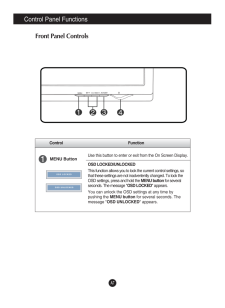
8 .A7Control FunctionControl...A7Control FunctionControl Panel FunctionsMENU ButtonUse this button to enter or exit from the On Screen Display.OSD LOCKED/UNLOCKEDThis function allows you to lock the current control settings, sothat these settings are not inadvertently changed. To lock t...
-
9 .A8Control FunctionControl...A8Control FunctionControl Panel FunctionsThis Indicator lights up as white when the display isoperating normally(On Mode). If the display is inSleep Mode (Energy Saving), this indicator colorchanges to blinking.Use this button to turn the display on or off...
-
10 .A9On Screen Display (OSD)...A9On Screen Display (OSD) Control AdjustmentScreen AdjustmentMaking adjustments to the image size, position and operating parameters ofthe display is quick and easy with the On Screen Display Control system. A short example is given below to familiarize yo...
-
11 .A10On Screen Display(OSD)...A10On Screen Display(OSD) Selection and Adjustment NOTEThe order of icons may differ depending on the model (A10~A14 ).The following table indicates all the On Screen Display control, adjustment, andsetting menus.Main menu Sub-menu ...
-
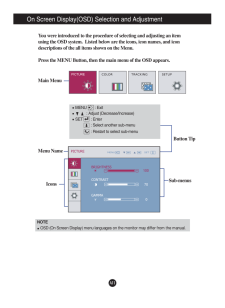
12 .A11Sub-menusOn Screen Dis...A11Sub-menusOn Screen Display(OSD) Selection and Adjustment NOTEOSD (On Screen Display) menu languages on the monitor may differ from the manual.You were introduced to the procedure of selecting and adjusting an itemusing the OSD system. Listed below are ...
-
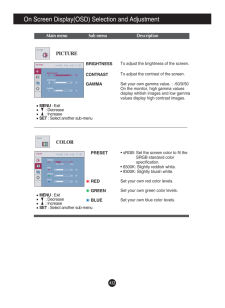
13 .A12On Screen Display(OSD)...A12On Screen Display(OSD) Selection and Adjustment Main menu Sub menu DescriptionBRIGHTNESSCONTRAST GAMMATo adjust the brightness of the screen. To adjust the contrast of the screen.Set your own gamma value. : -50/0/50On the monitor, high gamma valuesdispl...
-
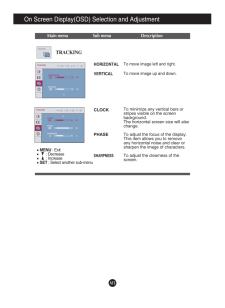
14 .A13On Screen Display(OSD)...A13On Screen Display(OSD) Selection and Adjustment Main menu Sub menu DescriptionCLOCKPHASESHARPNESSTo minimize any vertical bars orstripes visible on the screenbackground.The horizontal screen size will alsochange.To adjust the focus of the display. any h...
-
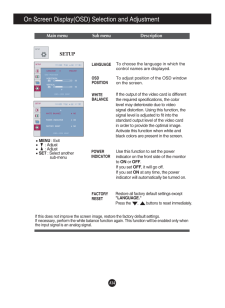
15 .A14Restore all factory de...A14Restore all factory default settings except"LANGUAGE." Press the , buttons to reset immediately.On Screen Display(OSD) Selection and Adjustment Main menu Sub menu DescriptionIf this does not improve the screen image, restore the factory def...
-
16 .A15TroubleshootingNo imag...A15TroubleshootingNo image appearsCheck the following before calling for service.No image appearsDo you see a "OSD LOCKED" message on the screen?Is the power cord of thedisplay connected?Is the power indicatorlight on?Is the power indicatorblinking?Do you ...
-
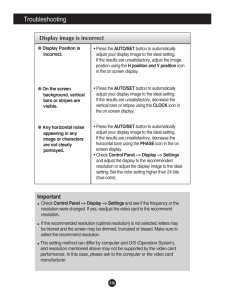
17 .A16TroubleshootingDisplay...A16TroubleshootingDisplay image is incorrectDisplay Position isincorrect.On the screenbackground, verticalbars or stripes arevisible.Any horizontal noiseappearing in anyimage or charactersare not clearlyportrayed.* Press the AUTO/SETbutton to automatically...
-
18 .A17Display image is incor...A17Display image is incorrectThe screen color ismono or abnormal.The screen blinks.• Check if the signal cable is properly connectedand use a screwdriver to fasten if necessary.•Make sure the video card is properly inserted in the slot.•Set the color set...
-
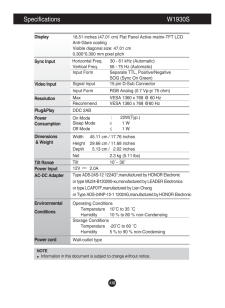
19 .A18Specifications W1930SN...A18Specifications W1930SNOTEInformation in this document is subject to change without notice.DisplaySync InputVideo InputResolutionPlug&PlayPowerConsumptionDimensions& WeightTilt RangePower InputAC-DC AdapterEnvironmentalConditionsPower cord 18.51 inches (...
-
20 .A19Specifications W2230SN...A19Specifications W2230SNOTEInformation in this document is subject to change without notice.DisplaySync InputVideo InputResolutionPlug&PlayPowerConsumptionDimensions& WeightTilt RangePower InputAC-DC AdapterEnvironmentalConditionsPower cord 21.53 inches (...
-
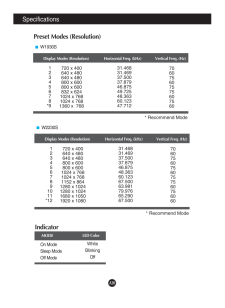
21 .A20SpecificationsPreset M...A20SpecificationsPreset Modes (Resolution)Display Modes (Resolution) Horizontal Freq. (kHz) Vertical Freq. (Hz)12345678*9720 x 400640 x 480640 x 480800 x 600800 x 600832 x 6241024 x 7681024 x 7681360 x 76831.46831.46937.50037.87946.87549.72548.36360.12347...
