
W2286L-PFの取扱説明書・マニュアル [全33ページ 2.33MB]


5


11 / 33 ページ

11 / 33 ページ


現在のページURL
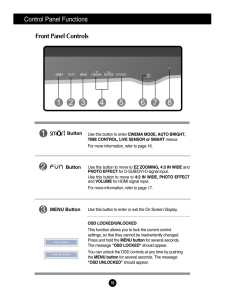
10Control Panel FunctionsFront Panel ControlsButtonUse this button to move to EZ ZOOMING, 4:3 IN WIDE andPHOTO EFFECTfor D-SUB/DVI-D signal input.Use this button to move to 4:3 IN WIDE, PHOTO EFFECTand VOLUMEfor HDMI signal input.For more information, refer to page 17.MENU ButtonUse this button to enter or exit the On Screen Display.OSD LOCKED/UNLOCKEDThis function allows you to lock the current controlsettings, so that they cannot be inadvertently changed.Press and hold the MENU buttonfor several seconds.The message "OSD LOCKED"should appear.You can unlock the OSD controls at any time by pushingthe MENU buttonfor several seconds. The message"OSD UNLOCKED" should appear.1 2 3 5 7 4 8 6ButtonUse this button to enter CINEMA MODE, AUTO BRIGHT,TIME CONTROL, LIVE SENSOR or SMART menus.For more information, refer to p age 16.
参考になったと評価  5人が参考になったと評価しています。
このマニュアルの目次
-
1 .M ake sure to read the Im...M ake sure to read the Important Precautions before using theproduct. Keep the User's Guide(CD) in an accessible place for futurereference.See the label attached on the product and give the information toyour dealer when you ask for service.W2286LW2486LUse...
-
2 .1This unit has been engin...1This unit has been engineered and manufactured to ensure your personal safety,however improper use may result in potential electrical shock or fire hazards. Inorder to allow the proper operation of all safeguards incorporated in this display,observe the ...
-
3 .2Important PrecautionsOn ...2Important PrecautionsOn InstallationDo not allow anything to rest upon or roll over the power cord, and do not placethe display where the power cord is subject to damage.Do not use this display near water such as near a bathtub, washbowl, kitchensink, lau...
-
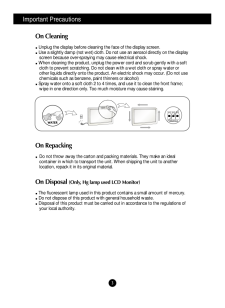
4 .Important Precautions3On ...Important Precautions3On CleaningUnplug the display before cleaning the face of the display screen.Use a slightly damp (not wet) cloth. Do not use an aerosol directly on the displayscreen because over-spraying may cause electrical shock.When cleaning the p...
-
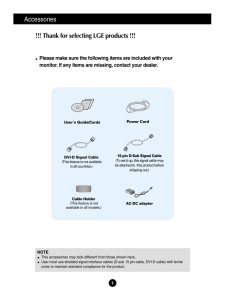
5 .4Accessories!!! Thank for...4Accessories!!! Thank for selecting LGE products !!! Please make sure the following items are included with yourmonitor. If any items are missing, contact your dealer.User's Guide/CardsPower Cord15-pin D-Sub Signal Cable(To set it up, this signal cable may...
-
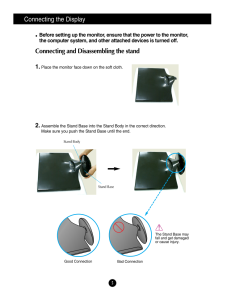
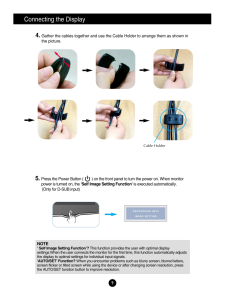
6 .5Connecting the DisplayBe...5Connecting the DisplayBefore setting up the monitor, ensure that the power to the monitor,the computer system, and other attached devices is turned off. Connecting and Disassembling the stand1. Place the monitor face down on the soft cloth.2. Assemble the...
-
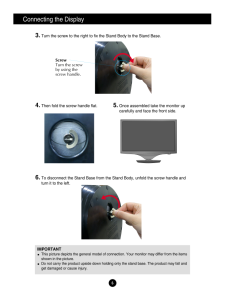
7 .6Connecting the DisplayIM...6Connecting the DisplayIMPORTANTThis picture depicts the general model of connection. Your monitor may differ from the itemsshown in the picture.Do not carry the product upside down holding only the stand base. The product may fall andget damaged or cause ...
-
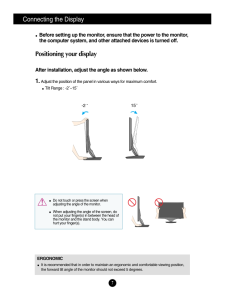
8 .7Connecting the DisplayBe...7Connecting the DisplayBefore setting up the monitor, ensure that the power to the monitor,the computer system, and other attached devices is turned off. Positioning your displayAfter installation, adjust the angle as shown below. 1. Adjust the position of...
-
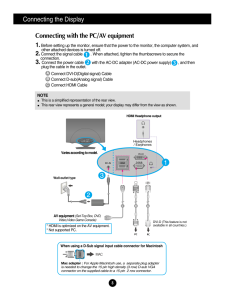
9 .8Connecting the DisplayAB...8Connecting the DisplayABConnect DVI-D(Digital signal) CableConnect D-sub(Analog signal) Cable Connect HDMI Cable 1. Before setting up the monitor, ensure that the power to the monitor, the computer system, andother attached devices is turned off. 2. Conn...
-
10 .9Connecting the DisplayNO...9Connecting the DisplayNOTE' Self Image Setting Function'? This function provides the user with optimal displaysettings.When the user connects the monitor for the first time, this function automatically adjuststhe display to optimal settings for individua...
-
11 .10Control Panel Functions...10Control Panel FunctionsFront Panel ControlsButtonUse this button to move to EZ ZOOMING, 4:3 IN WIDE andPHOTO EFFECTfor D-SUB/DVI-D signal input.Use this button to move to 4:3 IN WIDE, PHOTO EFFECTand VOLUMEfor HDMI signal input.For more information, re...
-
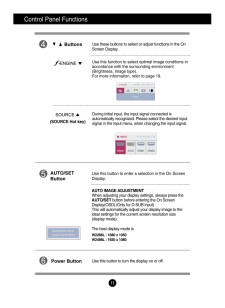
12 .11Control Panel Functions...11Control Panel FunctionsUse this button to enter a selection in the On Screen Display.AUTO/SETButtonAUTO IMAGE ADJUSTMENTWhen adjusting your display settings, always press theAUTO/SETbutton before entering the On ScreenDisplay(OSD).(Only for D-SUB input)T...
-
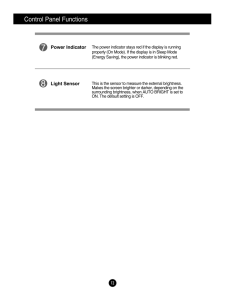
13 .Control Panel FunctionsTh...Control Panel FunctionsThe power indicator stays red if the display is runningproperly (On Mode). If the display is in Sleep Mode(Energy Saving), the power indicator is blinking red. Power IndicatorThis is the sensor to measure the external brightness. Ma...
-
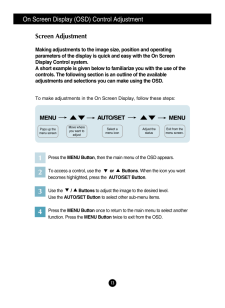
14 .On Screen Display (OSD) C...On Screen Display (OSD) Control AdjustmentScreen AdjustmentMaking adjustments to the image size, position and operatingparameters of the display is quick and easy with the On ScreenDisplay Control system. A short example is given below to familiarize you w...
-
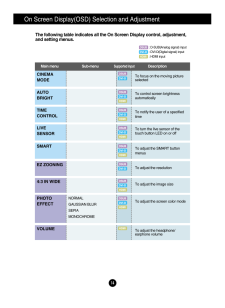
15 .On Screen Display(OSD) Se...On Screen Display(OSD) Selection and Adjustment The following table indicates all the On Screen Display control, adjustment,and setting menus.CINEMAMODETo focus on the moving pictureselectedDSUBAUTOBRIGHTTo control screen brightnessautomaticallyTIMECONTROL...
-
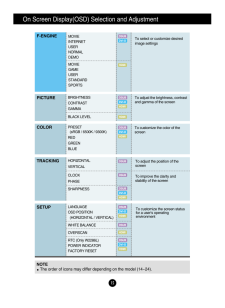
16 .15On Screen Display(OSD) ...15On Screen Display(OSD) Selection and Adjustment LANGUAGEOSD POSITION (HORIZONTAL / VERTICAL)WHITE BALANCEOVERSCANRTC (Only W2286L)POWER INDICATORFACTORY RESETTo customize the screen statusfor a user's operatingenvironmentSETUPHORIZONTALVERTICALCLOCKPH...
-
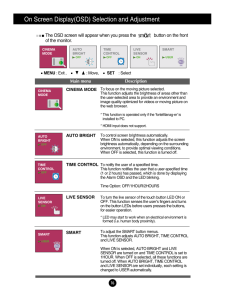
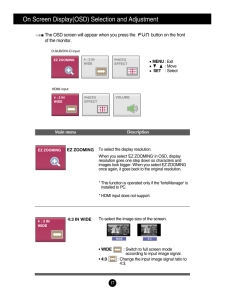
17 .On Screen Display(OSD) Se...On Screen Display(OSD) Selection and Adjustment The OSD screen will appear when you press the button on the frontof the monitor.Main menu DescriptionMENU: Exit , : Move, SET : SelectCINEMA MODETo focus on the moving picture selected.This func...
-
18 .On Screen Display(OSD) Se...On Screen Display(OSD) Selection and Adjustment The OSD screen will appear when you press the button on the frontof the monitor.Main menu DescriptionMENU: Exit: MoveSET : Select4:3 IN WIDETo select the image size of the screen.*WIDE : Switch to ...
-
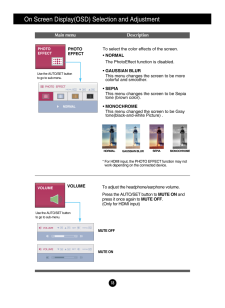
19 .18On Screen Display(OSD) ...18On Screen Display(OSD) Selection and Adjustment PHOTO EFFECTTo select the color effects of the screen.*NORMAL The PhotoEffect function is disabled.*GAUSSIAN BLURThis menu changes the screen to be morecolorful and smoother. *SEPIAThis menu changes the sc...
-
20 .19On Screen Display(OSD) ...19On Screen Display(OSD) Selection and Adjustment The OSD screen will appear when you touch the button on the left bottomof the monitor. These features let you easily select the best desired image conditionoptimized to the environment (...
-
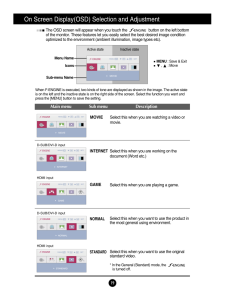
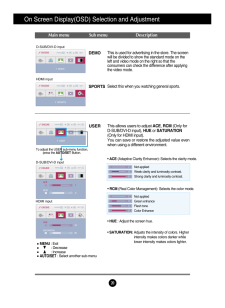
21 .20On Screen Display(OSD) ...20On Screen Display(OSD) Selection and Adjustment Main menu Sub menu DescriptionD-SUB/DVI-D inputHDMI inputDEMOSPORTSThis is used for advertising in the store. The screenwill be divided to show the standard mode on theleft and video mode on the right so th...
-
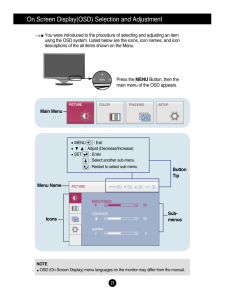
22 .On Screen Display(OSD) Se...On Screen Display(OSD) Selection and Adjustment You were introduced to the procedure of selecting and adjusting an itemusing the OSD system. Listed below are the icons, icon names, and icondescriptions of the all items shown on the Menu.Sub-menusNOTEOSD (O...
-
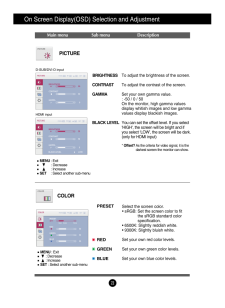
23 .On Screen Display(OSD) Se...On Screen Display(OSD) Selection and Adjustment Main menu Sub menu DescriptionPICTUREMENU: Exit: Decrease: IncreaseSET : Select another sub-menuBRIGHTNESSCONTRAST GAMMABLACK LEVELTo adjust the brightness of the screen. To adjust the contrast of the scre...
-
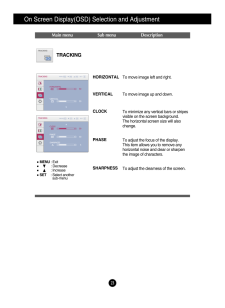
24 .On Screen Display(OSD) Se...On Screen Display(OSD) Selection and Adjustment TRACKINGMain menu Sub menu DescriptionMENU: Exit: Decrease: IncreaseSET : Select anothersub-menuCLOCKPHASESHARPNESSTo minimize any vertical bars or stripesvisible on the screen background.The horizontal sc...
-
25 .24On Screen Display(OSD) ...24On Screen Display(OSD) Selection and Adjustment Press the , buttons to reset immediately.SETUPMENU: Exit: Adjust: AdjustSET : Select another sub-menuMain menu Sub menu DescriptionTo choose the language in which the controlnames are displaye...
-
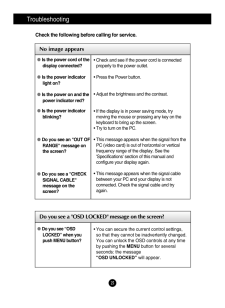
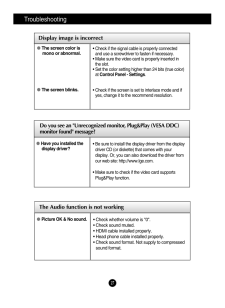
26 .25TroubleshootingNo image...25TroubleshootingNo image appearsCheck the following before calling for service.No image appearsDo you see a "OSD LOCKED" message on the screen?Is the power cord of thedisplay connected?Is the power indicatorlight on?Is the power on and thepower indicator ...
-
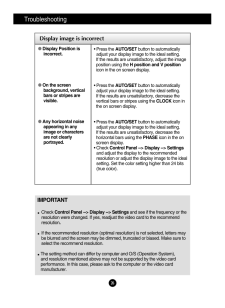
27 .TroubleshootingDisplay im...TroubleshootingDisplay image is incorrectDisplay Position isincorrect.On the screenbackground, verticalbars or stripes arevisible.Any horizontal noiseappearing in anyimage or charactersare not clearlyportrayed.* Press the AUTO/SETbutton to automaticallyadj...
-
28 .TroubleshootingDo you see...TroubleshootingDo you see an "Unrecognized monitor, Plug&Play (VESA DDC)monitor found" message? Have you installed thedisplay driver?* Be sure to install the display driver from the displaydriver CD (or diskette) that comes with yourdisplay. Or, you can al...
-
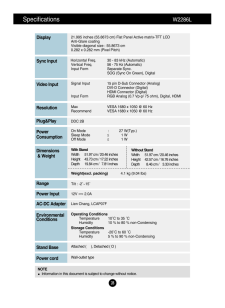
29 .Specifications W2286L21...Specifications W2286L21.995 inches (55.8673 cm) Flat Panel Active matrix-TFT LCD Anti-Glare coating Visible diagonal size : 55.8673 cm0.282 x 0.282 mm (Pixel Pitch)DisplayHorizontal Freq. 30 - 83 kHz (Automatic)Vertical Freq. 56 - 75 Hz (Automatic)Input...
-
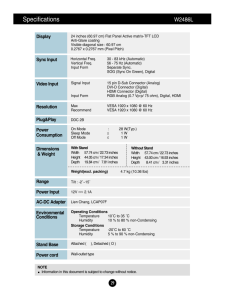
30 .Specifications W2486L 2...Specifications W2486L 2924 inches (60.97 cm) Flat Panel Active matrix-TFT LCD Anti-Glare coating Visible diagonal size : 60.97 cm0.2767 x 0.2767 mm (Pixel Pitch)DisplayHorizontal Freq. 30 - 83 kHz (Automatic)Vertical Freq. 56 - 75 Hz (Automatic)Input Fo...
-
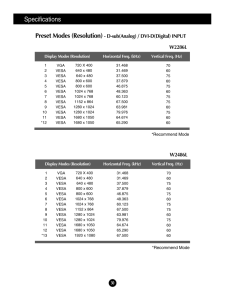
31 .SpecificationsPreset Mode...SpecificationsPreset Modes (Resolution) - D-sub(Analog) / DVI-D(Digital) INPUTDisplay Modes (Resolution) Horizontal Freq. (kHz) Vertical Freq. (Hz)1234567891011*12720 X 400640 x 480640 x 480800 x 600800 x 6001024 x 7681024 x 7681152 x 8641280 x 10241280 x...
-
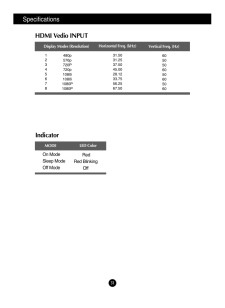
32 .Specifications31Indicator...Specifications31IndicatorOn ModeSleep ModeOff ModeRedRed Blinking OffLED ColorMODEDisplay Modes (Resolution)Horizontal Freq. (kHz)Vertical Freq. (Hz)12345678480p576p720P720p1080i1080i1080P1080P31.5031.2537.5045.0028.1233.7556.2567.506050506050605060HDMI Ve...
