
W2442PA-BFの取扱説明書・マニュアル [全26ページ 1.15MB]


1


5 / 26 ページ


現在のページURL
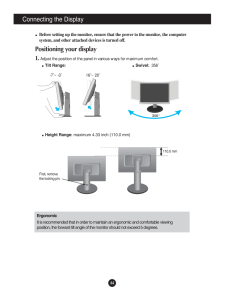
A4Connecting the DisplayBefore setting up the monitor, ensure that the power to the monitor, the computersystem, and other attached devices is turned off. Positioning your display1. Adjust the position of the panel in various ways for maximum comfort.Tilt Range: Swivel: 356 ErgonomicIt is recommended that in order to maintain an ergonomic and comfortable viewingposition, the forward tilt angle of the monitor should not exceed 5 degrees.Height Range: maximum 4.33 inch (110.0 mm)110.0 mmFirst, removethe locking pin.-7~ -3 16~ 20
参考になったと評価  8人が参考になったと評価しています。
このマニュアルの目次
-
1 .M ake sure to read the Im...M ake sure to read the Important Precautionsbefore using the product. Keep the User's Guide(CD) in an accessible place for future reference.See the label attached on the product and give the information to yourdealer when you ask for service.W2442PAUser's ...
-
2 .A1This unit has been engi...A1This unit has been engineered and manufactured to ensure your personalsafety, however improper use may result in potential electrical shock or firehazards. In order to allow the proper operation of all safeguardsincorporated in this display, observe the...
-
3 .A2Important PrecautionsOn...A2Important PrecautionsOn InstallationDo not allow anything to rest upon or roll over the power cord, and do not place thedisplay where the power cord is subject to damage.Do not use this display near water such as near a bathtub, washbowl, kitchen sink,la...
-
4 .A3Connecting the DisplayI...A3Connecting the DisplayImportantThis illustration depicts the general model of connection. Your monitor may differ fromthe items shown in the picture.Do not carry the product upside down holding only the stand base. The product mayfall and get damaged or ...
-
5 .A4Connecting the DisplayB...A4Connecting the DisplayBefore setting up the monitor, ensure that the power to the monitor, the computersystem, and other attached devices is turned off. Positioning your display1. Adjust the position of the panel in various ways for maximum comfort.Tilt ...
-
6 .A5Connecting the Display1...A5Connecting the Display1.Lift the monitor to its highest height to utilize the Pivot function.2.Landscape & Portrait : You can rotate the panel 90o clockwise. Please be cautious and avoid contact between the monitor head and the Stand Base when rotating ...
-
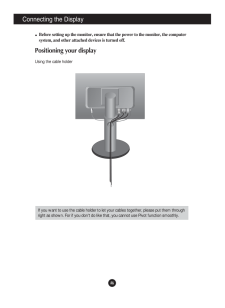
7 .A6Connecting the DisplayB...A6Connecting the DisplayBefore setting up the monitor, ensure that the power to the monitor, the computersystem, and other attached devices is turned off.Positioning your display Using the cable holderIf you want to use the cable holder to let your cables ...
-
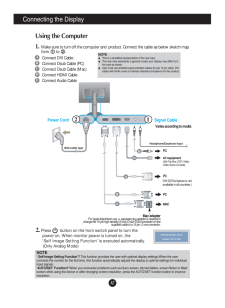
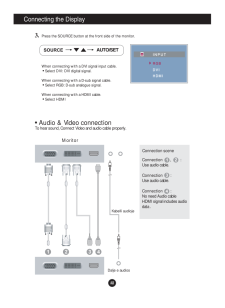
8 .Connect DVI CableConnect ...Connect DVI CableConnect Dsub Cable (PC)Connect Dsub Cable (Mac)Connect HDMI CableConnect Audio Cable A7Using the Computer1. Make sure to turn off the computer and product. Connect the cable as below sketch mapform to .12. Press button on the front...
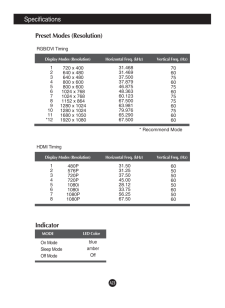
-
9 .A8Connecting the Display3...A8Connecting the Display3. Press the SOURCEbutton at the front side of the monitor.When connecting with a DVI signal input cable.* Select DVI: DVI digital signal.When connecting with a D-sub signal cable.* Select RGB: D-sub analogue signal.When connecting ...
-
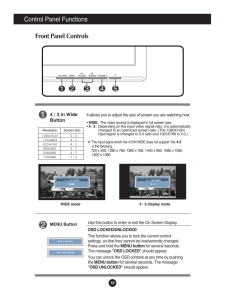
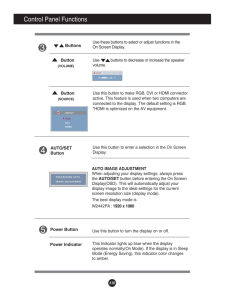
10 .A9Control Panel Functions...A9Control Panel FunctionsMENU ButtonUse this button to enter or exit the On Screen Display.OSD LOCKED/UNLOCKEDThis function allows you to lock the current controlsettings, so that they cannot be inadvertently changed.Press and hold the MENU buttonfor sever...
-
11 .A10Control Panel Function...A10Control Panel FunctionsThis Indicator lights up blue when the displayoperates normally(On Mode). If the display is in SleepMode (Energy Saving), this indicator color changes to amber.Use this button to turn the display on or off.Power ButtonPower Indica...
-
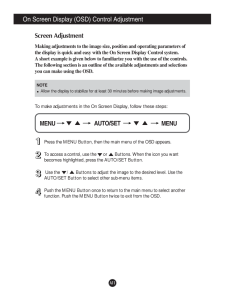
12 .A11On Screen Display (OSD...A11On Screen Display (OSD) Control AdjustmentScreen AdjustmentMaking adjustments to the image size, position and operating parameters ofthe display is quick and easy with the On Screen Display Control system. A short example is given below to familiarize y...
-
13 .A12On Screen Display(OSD)...A12On Screen Display(OSD) Selection and Adjustment The following table indicates all the On Screen Display control, adjustment,and setting menus.● : Adjustable R : RGB Input * : only for RGB/DVI Input D : DVI Input** : only for HDMI Input H : HDMI Input...
-
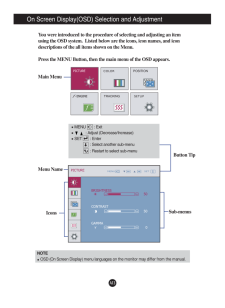
14 .A13On Screen Display(OSD)...A13On Screen Display(OSD) Selection and Adjustment Menu NameNOTEOSD (On Screen Display) menu languages on the monitor may differ from the manual.You were introduced to the procedure of selecting and adjusting an itemusing the OSD system. Listed below are ...
-
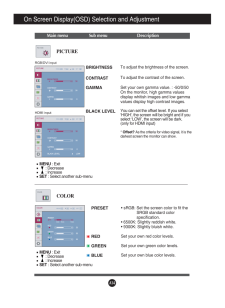
15 .A14On Screen Display(OSD)...A14On Screen Display(OSD) Selection and Adjustment Main menu Sub menu DescriptionPICTUREPRESETREDGREENBLUE* sRGB: Set the screen color to fit theSRGB standard colorspecification.* 6500K: Slightly reddish white.* 9300K: Slightly bluish white.Set your own re...
-
16 .A15On Screen Display(OSD)...A15On Screen Display(OSD) Selection and Adjustment Main menu Sub menu DescriptionPOSITIONPOSITIONMENU: Exit: DecreaseSET: Select another sub-menuHORIZONTALVERTICALTo move image left and right.To move image up and down.POSITIONMENU: Exit: DecreaseSET: Selec...
-
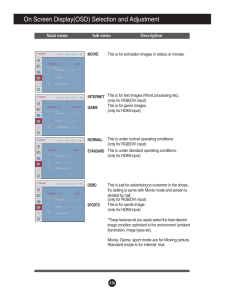
17 .A16On Screen Display(OSD)...A16On Screen Display(OSD) Selection and Adjustment Main menu Sub menu DescriptionMOVIEINTERNETDEMONORMALMOVIEINTERNETGAMENORMALSTANDARDDEMOSPORTSThis is for animation images in videos or movies.This is for text images (Word processing etc).(only for RGB/DV...
-
18 .On Screen Display(OSD) Se...On Screen Display(OSD) Selection and Adjustment A17Main menu Sub menu DescriptionCLOCKPHASESHARPNESSTo minimize any vertical bars orstripes visible on the screenbackground.The horizontal screen size will alsochange.To adjust the focus of the display. any h...
-
19 .A18On Screen Display(OSD)...A18On Screen Display(OSD) Selection and Adjustment Main menu Sub menu DescriptionIf this does not improve the screen image, restore the factory default settings. If necessary, perform the white balance function again. This function will be enabled onlywhen...
-
20 .A19TroubleshootingNo imag...A19TroubleshootingNo image appearsCheck the following before calling for service.No image appearsDo you see a "OSD LOCKED" message on the screen?●Is the power cord of thedisplay connected?●Is the power on and thepower indicator blue orgreen?●Is the power i...
-
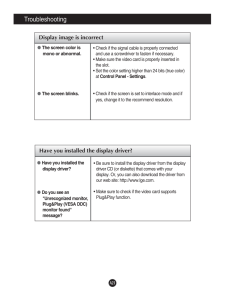
21 .A20TroubleshootingDisplay...A20TroubleshootingDisplay image is incorrect●Display Position isincorrect.●On the screenbackground, verticalbars or stripes arevisible.●Any horizontal noiseappearing in anyimage or charactersare not clearlyportrayed.* Press the AUTO/SETbutton to automatica...
-
22 .A21TroubleshootingHave yo...A21TroubleshootingHave you installed the display driver?●Have you installed thedisplay driver?●Do you see an"Unrecognized monitor,Plug&Play (VESA DDC)monitor found"message?* Be sure to install the display driver from the displaydriver CD (or diskette) that...
-
23 .A22Specifications ...A22Specifications W2442PADisplaySync InputVideo InputResolutionPlug&PlayPowerConsumptionDimensions& WeightTilt RangePower InputEnvironmentalConditionsStand Base Power cord 24 inches (60.9 cm) Flat Panel Activ...
-
24 .A23SpecificationsIndicato...A23SpecificationsIndicatorOn ModeSleep ModeOff ModeblueamberOffLED ColorMODEPreset Modes (Resolution)Display Modes (Resolution) Horizontal Freq. (kHz) Vertical Freq. (Hz)1234567891011*12720 x 400640 x 480640 x 480800 x 600800 x 6001024 x 7681024 x 7681152 ...
-
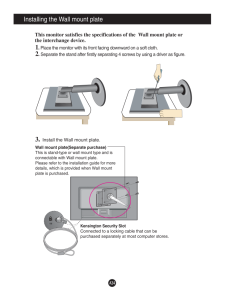
25 .A24Installing the Wall mo...A24Installing the Wall mount plateThis monitor satisfies the specifications of the Wall mount plate orthe interchange device.1. Place the monitor with its front facing downward on a soft cloth.2.Separate the stand after firstly separating 4 screws by usin...
