
L204WT-BFの取扱説明書・マニュアル [全32ページ 4.74MB]


4


23 / 32 ページ


現在のページURL
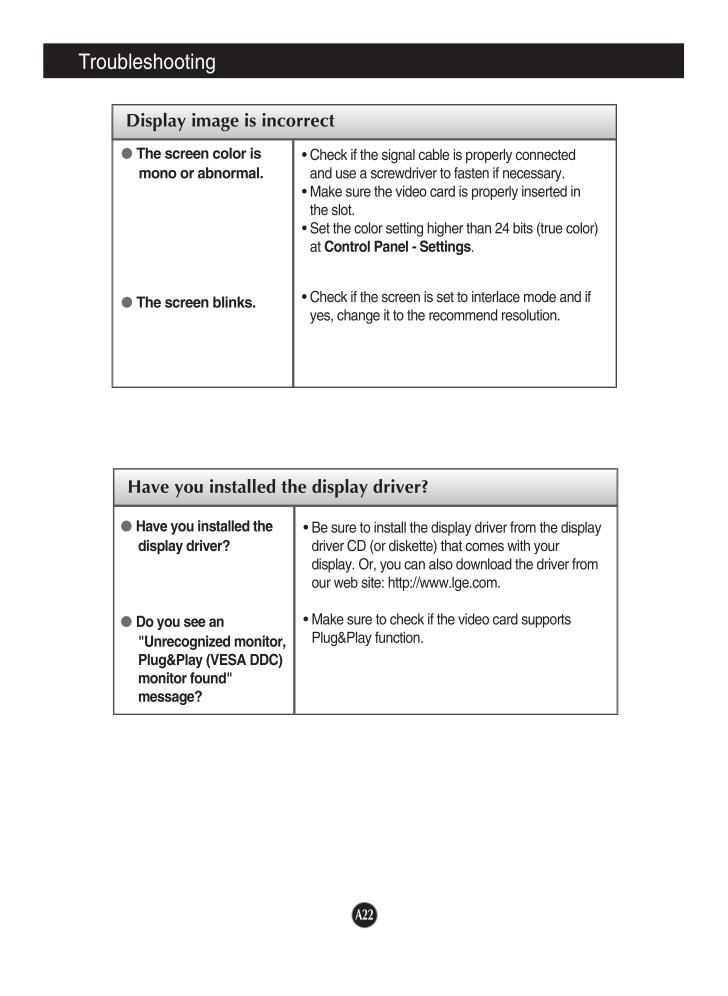
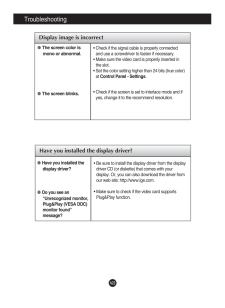
A22TroubleshootingHave you installed the display driver? Have you installed thedisplay driver? Do you see an"Unrecognized monitor,Plug&Play (VESA DDC)monitor found"message?* Be sure to install the display driver from the displaydriver CD (or diskette) that comes with yourdisplay. Or, you can also download the driver fromour web site: http://www.lge.com.* Make sure to check if the video card supportsPlug&Play function.Display image is incorrectThe screen color ismono or abnormal.The screen blinks.* Check if the signal cable is properly connectedand use a screwdriver to fasten if necessary.* Make sure the video card is properly inserted inthe slot.* Set the color setting higher than 24 bits (true color)at Control Panel - Settings .* Check if the screen is set to interlace mode and ifyes, change it to the recommend resolution.
参考になったと評価  14人が参考になったと評価しています。
その他の取扱説明書

10953 view
このマニュアルの目次
-
1 .M ake sure to read the Im...M ake sure to read the Important Precautionsbefore using the product. Keep the User's Guide(CD) in an accessible place for furture reference.See the label attached on the product and give the information to yourdealer when you ask for service.L194WTL194WTM...
-
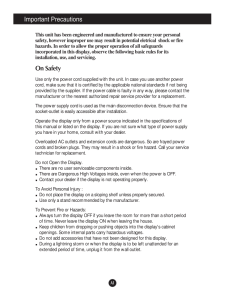
2 .A1This unit has been engi...A1This unit has been engineered and manufactured to ensure your personalsafety, however improper use may result in potential eletrical shock or firehazards. In order to allow the proper operation of all safeguardsincorporated in this display, observe the ...
-
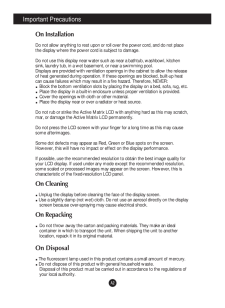
3 .A2Important PrecautionsOn...A2Important PrecautionsOn InstallationDo not allow anything to rest upon or roll over the power cord, and do not placethe display where the power cord is subject to damage.Do not use this display near water such as near a bathtub, washbowl, kitchensink, la...
-
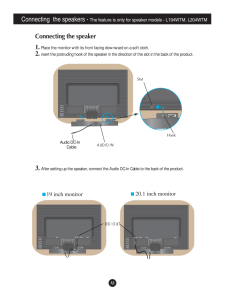
4 .A3Connecting the speaker1...A3Connecting the speaker1. Place the monitor with its front facing downward on a soft cloth.2. nsert the protruding hook of the speaker in the direction of the slot in the back of the product.Connecting the speakers - The feature is only for speaker mod...
-
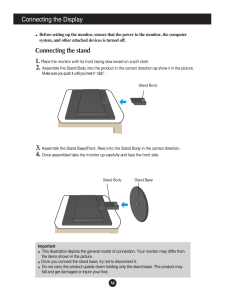
5 .A4Connecting the DisplayI...A4Connecting the DisplayImportantThis illustration depicts the general model of connection. Your monitor may differ fromthe items shown in the picture.Once you connect the stand base, try not to disconnect it.Do not carry the product upside down holding on...
-
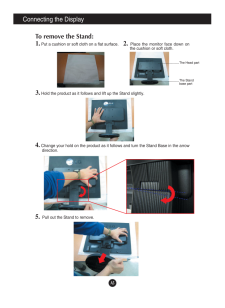
6 .Connecting the DisplayA51...Connecting the DisplayA51. Put a cushion or soft cloth on a flat surface.To remove the Stand: 2. Place the monitor face down onthe cushion or soft cloth. 3. Hold the product as it follows and lift up the Stand slightly.4. Change your hold on the produ...
-
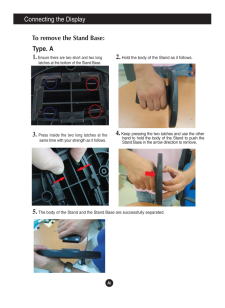
7 .A6Connecting the DisplayT...A6Connecting the DisplayTo remove the Stand Base: 2.Hold the body of the Stand as it follows.Type. A3. Press inside the two long latches at thesame time with your strength as it follows.5. The body of the Stand and the Stand Base are successfully separated...
-
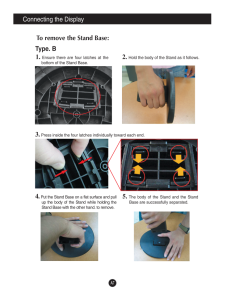
8 .Connecting the DisplayA7T...Connecting the DisplayA7To remove the Stand Base: 2. Hold the body of the Stand as it follows.Type. B3. Press inside the four latches individually toward each end.4. Put the Stand Base on a flat surface and pullup the body of the Stand while holding theSta...
-
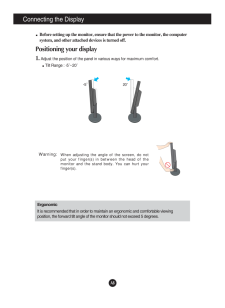
9 .A8Connecting the Display2A8Connecting the Display20Before setting up the monitor, ensure that the power to the monitor, the computersystem, and other attached devices is turned off. Positioning your display1. Adjust the position of the panel in various ways for maximum comfort.Til...
-
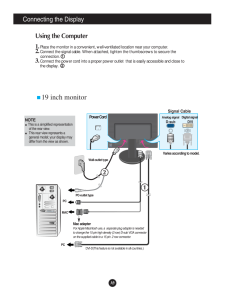
10 .A921Connecting the Displa...A921Connecting the DisplayUsing the Computer1. Place the monitor in a convenient, well-ventilated location near your computer. 2. Connect the signal cable. When attached, tighten the thumbscrews to secure the connection.3. Connect the power cord into a pr...
-
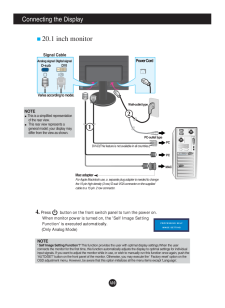
11 .A10Connecting the Display...A10Connecting the Display4. Press button on the front switch panel to turn the power on.When monitor power is turned on, the 'Self Image SettingFunction' is executed automatically.(Only Analog Mode)NOTE' Self Image Setting Function'? This function...
-
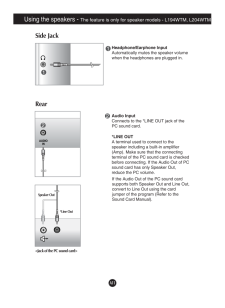
12 .A11Using the speakers - ...A11Using the speakers - The feature is only for speaker models - L194WTM, L204WTMSide JackRearAUDIOINHeadphone/Earphone Input Automatically mutes the speaker volumewhen the headphones are plugged in.Audio InputConnects to the *LINE OUT jack of thePC sound...
-
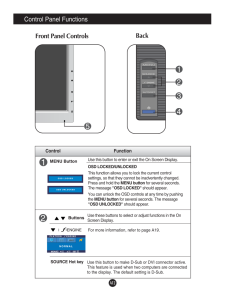
13 .A12Control Panel Function...A12Control Panel FunctionsMENU ButtonUse this button to enter or exit the On Screen Display.Control FunctionOSD LOCKED/UNLOCKEDThis function allows you to lock the current controlsettings, so that they cannot be inadvertently changed.Press and hold the MEN...
-
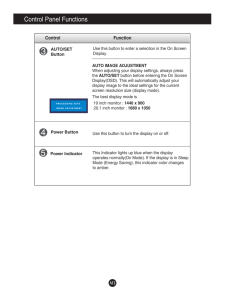
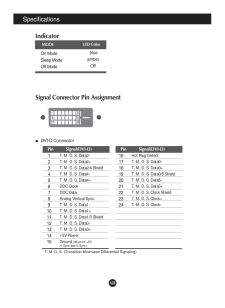
14 .A13Control Panel Function...A13Control Panel FunctionsThis Indicator lights up blue when the displayoperates normally(On Mode). If the display is in SleepMode (Energy Saving), this indicator color changes to amber.Use this button to turn the display on or off.Power ButtonPower Indica...
-
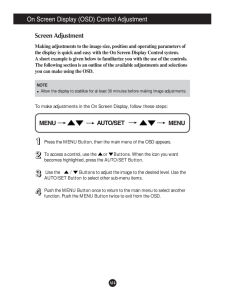
15 .A14On Screen Display (OSD...A14On Screen Display (OSD) Control AdjustmentScreen AdjustmentMaking adjustments to the image size, position and operating parameters ofthe display is quick and easy with the On Screen Display Control system. A short example is given below to familiarize y...
-
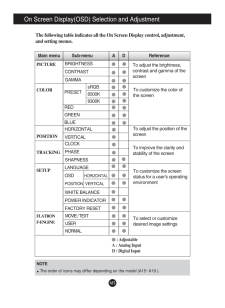
16 .A15NOTEThe order of icons...A15NOTEThe order of icons may differ depending on the model (A15~A19 ).On Screen Display(OSD) Selection and Adjustment The following table indicates all the On Screen Display control, adjustment,and setting menus.To adjust the brightness,contrast and gamma...
-
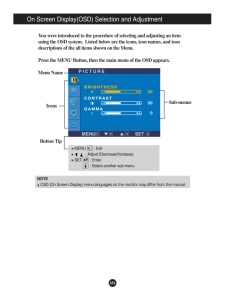
17 .A16On Screen Display(OSD)...A16On Screen Display(OSD) Selection and Adjustment NOTEOSD (On Screen Display) menu languages on the monitor may differ from the manual.You were introduced to the procedure of selecting and adjusting an itemusing the OSD system. Listed below are the icons...
-
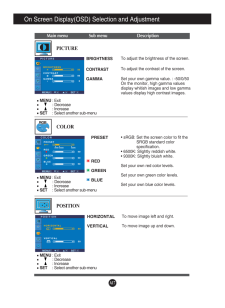
18 .A17On Screen Display(OSD)...A17On Screen Display(OSD) Selection and Adjustment Main menu Sub menu DescriptionBRIGHTNESSCONTRAST GAMMATo adjust the brightness of the screen. To adjust the contrast of the screen.Set your own gamma value. : -50/0/50On the monitor, high gamma valuesdispl...
-
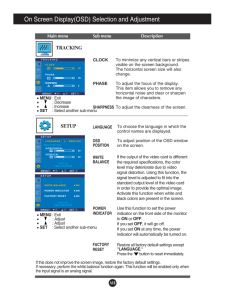
19 .A18On Screen Display(OSD)...A18On Screen Display(OSD) Selection and Adjustment Main menu Sub menu DescriptionCLOCKPHASESHARPNESSTo minimize any vertical bars or stripesvisible on the screen background.The horizontal screen size will alsochange.To adjust the focus of the display. This...
-
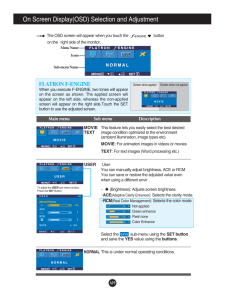
20 .A19On Screen Display(OSD)...A19On Screen Display(OSD) Selection and Adjustment IconsMenu NameSub-menu NameMain menu Sub menu DescriptionTo adjust the USER sub-menu function,Press the SET ButtonMOVIETEXTNORMALUSERWhen you execute F-ENGINE, two tones will appearon the screen as shown. ...
-
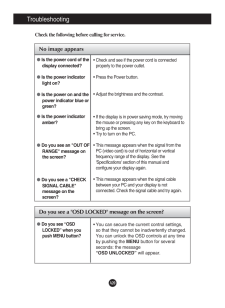
21 .A20TroubleshootingNo imag...A20TroubleshootingNo image appearsCheck the following before calling for service.No image appearsDo you see a "OSD LOCKED" message on the screen?Is the power cord of thedisplay connected?Is the power indicatorlight on?Is the power on and thepower indicator...
-
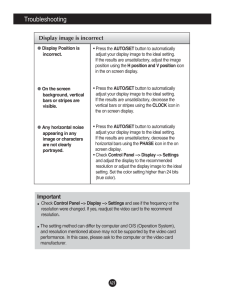
22 .A21TroubleshootingDisplay...A21TroubleshootingDisplay image is incorrectDisplay Position isincorrect.On the screenbackground, verticalbars or stripes arevisible.Any horizontal noiseappearing in anyimage or charactersare not clearlyportrayed.* Press the AUTO/SETbutton to automatically...
-
23 .A22TroubleshootingHave yo...A22TroubleshootingHave you installed the display driver? Have you installed thedisplay driver? Do you see an"Unrecognized monitor,Plug&Play (VESA DDC)monitor found"message?* Be sure to install the display driver from the displaydriver CD (or diskette) that...
-
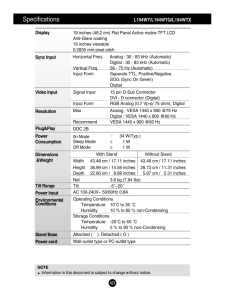
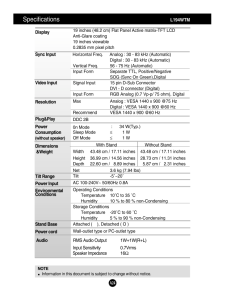
24 .A23Specifications ...A23Specifications L194WT/L194WTQ/L194WTXNOTEInformation in this document is subject to change without notice.DisplaySync InputVideo InputResolutionPlug&PlayPowerConsumptionDimensions&WeightTilt RangePower InputE...
-
25 .A24Specifications ...A24Specifications L194WTMDisplaySync InputVideo InputResolutionPlug&PlayPowerConsumption(without speaker)Dimensions&WeightTilt RangePower InputEnvironmentalConditionsStand Base Power cord 1...
-
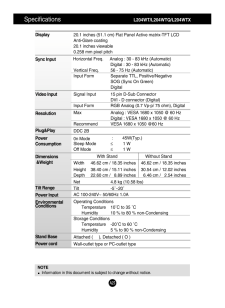
26 .A25Specifications ...A25Specifications L204WT/L204WTQ/L204WTXNOTEInformation in this document is subject to change without notice.DisplaySync InputVideo InputResolutionPlug&PlayPowerConsumptionDimensions&WeightTilt RangePower InputEn...
-
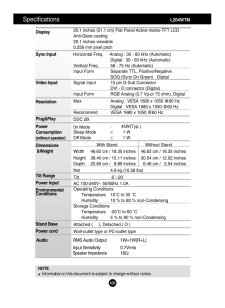
27 .A26Specifications ...A26Specifications L204WTMDisplaySync InputVideo InputResolutionPlug&PlayPowerConsumption(without speaker)Dimensions&WeightTilt RangePower InputEnvironmentalConditionsStand Base Power cord 2
-
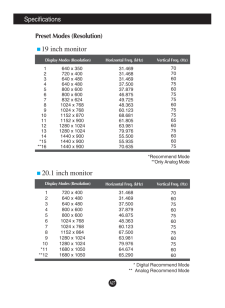
28 .A27SpecificationsPreset M...A27SpecificationsPreset Modes (Resolution)Display Modes (Resolution) Horizontal Freq. (kHz) Vertical Freq. (Hz)1234567891011121314*15**16640 x 350720 x 400640 x 480640 x 480800 x 600800 x 600832 x 6241024 x 7681024 x 7681152 x 8701152 x 9001280 x 10241280 ...
-
29 .A28Signal Connector Pin A...A28Signal Connector Pin Assignment189172416Pin Signal(DVI-D)123456789101112131415T. M. D. S. Data2-T. M. D. S. Data2+T. M. D. S. Data2/4 ShieldT. M. D. S. Data4-T. M. D. S. Data4+DDC ClockDDC DataAnalog Vertical Sync.T. M. D. S. Data1-T. M. D. S....
-
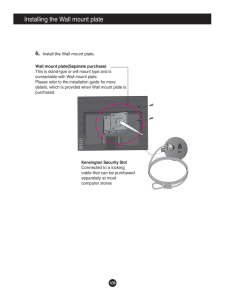
30 .Installing the Wall mount...Installing the Wall mount plateA29This monitor satisfies the specifications of the Wall mount plate orthe interchange device.1. Put a cushion or soft cloth on a flat surface. 2. Place the monitor face down onthe cushion or soft cloth. 3. Hold the pro...
-
31 .A30Installing the Wall mo...A30Installing the Wall mount plateWall mount plate(Separate purchase)This is stand-type or will mount type and isconnectable with Wall mount plate.Please refer to the installation guide for moredetails, which is provided when Wall mount plate ispurchased.K...
