
FP92Wの取扱説明書・マニュアル [全37ページ 1.58MB]


1


1 / 37 ページ
1 / 37 ページ


現在のページURL
1. WelcomeFP92W19" Wide-Screen LCD MonitorUser Manual
参考になったと評価  5人が参考になったと評価しています。
このマニュアルの目次
-
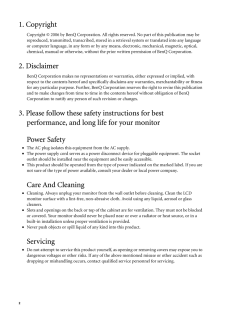
2 .2 1. CopyrightCopyright...2 1. CopyrightCopyright (C) 2006 by BenQ Corporation. All rights reserved. No part of this publication may be reproduced, transmitted, transcribed, stored in a retrieval system or translated into any language or computer language, in any form or by any m...
-
3 .Table of Contents 3Table ...Table of Contents 3Table of ContentsGetting started ......................................................................................................................4Getting to know your monitor .. ........................................................
-
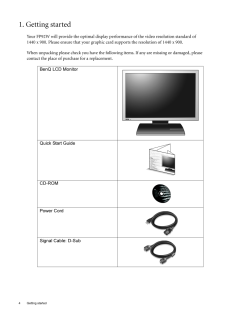
4 .4 Getting started 1. Ge...4 Getting started 1. Getting startedYour FP92W will provide the op timal display performance of th e video resolution standard of 1440 x 900. Please ensure that your graphic card supports the resolution of 1440 x 900. When unpacking please check you have...
-
5 .5 Getting startedCons...5 Getting startedConsider keeping the box and packaging in storage for use in the future when you may need to transport the monitor. The fitted foam packing is ideal for protecting the monitor during transport.Signal Cable: DVI-D (optional)
-
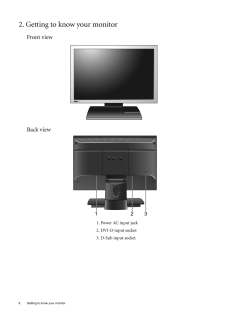
6 .6 Getting to know your m...6 Getting to know your monitor 2. Getting to know your monitorFront viewBack view1. Power AC input jack2. DVI-D input socket3. D-Sub input socket
-
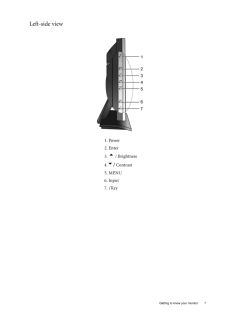
7 .7 Getting to know you...7 Getting to know your monitorLeft-side view1. Power2. Enter3. t / Brightness4.u/ Contrast 5. MENU6. Input7. i Key
-
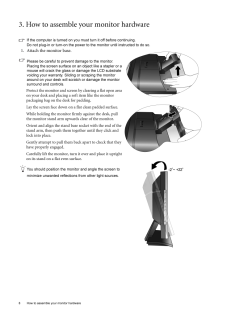
8 .8 How to assemble your m...8 How to assemble your monitor hardware 3. How to assemble your monitor hardwareIf the computer is turned on you must turn it off before continuing. Do not plug-in or turn-on the power to the monitor until instructed to do so. 1. Attach the monitor base....
-
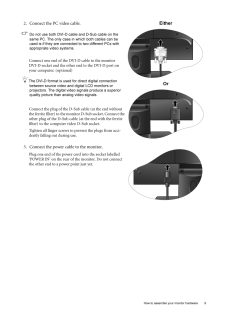
9 .9 How to assemble you...9 How to assemble your monitor hardware2. Connect the PC video cable. Do not use both DVI-D cable and D-Sub cable on the same PC. The only case in which both cables can be used is if they are connecte d to two different PCs with appropriate video sys...
-
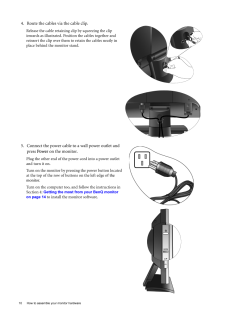
10 .10 How to assemble your ...10 How to assemble your monitor hardware 4. Route the cables via the cable clip.Release the cable retaining clip by squeezing the clip inwards as illustrated. Position the cables together and reinsert the clip over them to retain the cables neatly in pla...
-
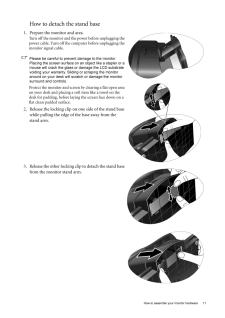
11 .11 How to assemble yo...11 How to assemble your monitor hardwareHow to detach the stand base1. Prepare the monitor and area.Turn off the monitor and the power before unplugging the power cable. Turn off the computer before unplugging the monitor signal cable.Please be careful...
-
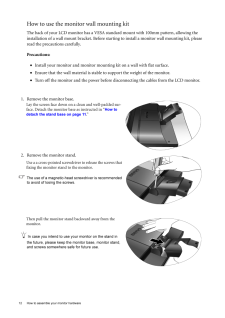
12 .12 How to assemble your ...12 How to assemble your monitor hardware How to use the monitor wall mounting kit The back of your LCD monitor has a VESA st andard mount with 100mm pattern, allowing the installation of a wall mount bracket. Before star ting to install a monitor wall mo...
-
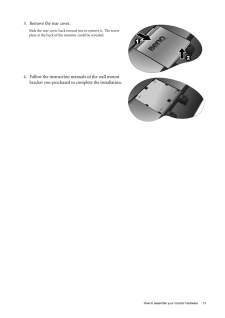
13 .13 How to assemble yo...13 How to assemble your monitor hardware3. Remove the rear cover.Slide the rear cover back toward you to remove it. The screw plate at the back of the monitor could be revealed. 4. Follow the instruction manuals of the wall mount bracket you purchased ...
-
14 .14 Getting the most from...14 Getting the most from your BenQ monitor 4. Getting the most from your BenQ monitorTo gain the most benefit from your new BenQ c olor LCD flat screen monitor, you should set the graphics card to the native resolution of 1440 x 900 at first, and then yo...
-
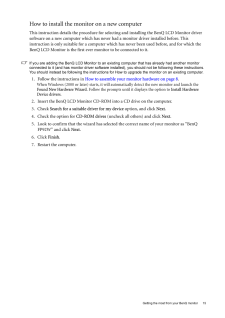
15 .15 Getting the most f...15 Getting the most from your BenQ monitorHow to install the monitor on a new computerThis instruction details the procedure for select ing and installing the BenQ LCD Monitor driver software on a new computer which has never had a monitor driver inst...
-
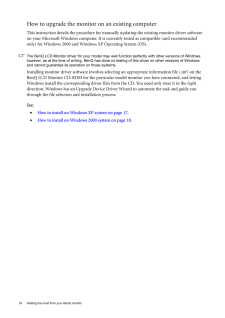
16 .16 Getting the most from...16 Getting the most from your BenQ monitor How to upgrade the monitor on an existing computerThis instruction details the procedure for manual ly updating the existing monitor driver software on your Microsoft Windows computer. It is curr ently tested as...
-
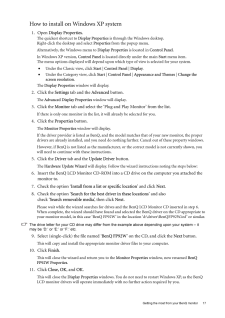
17 .17 Getting the most f...17 Getting the most from your BenQ monitorHow to install on Windows XP system1. Open Display Properties.The quickest shortcut to Display Properties is through the Windows desktop. Right-click the desktop and select Properties from the popup menu.Alter...
-
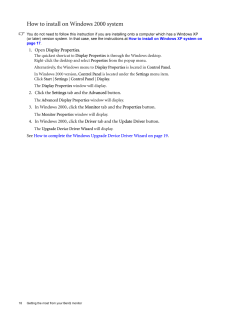
18 .18 Getting the most from...18 Getting the most from your BenQ monitor How to install on Windows 2000 systemYou do not need to follow this in struction if you are installing onto a computer which has a Windows XP (or later) version system. In that case, see the instructions at H...
-
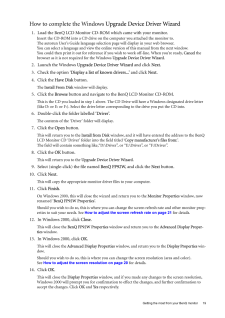
19 .19 Getting the most f...19 Getting the most from your BenQ monitorHow to complete the Windows Upgrade Device Driver Wizard1. Load the BenQ LCD Monitor CD-ROM which came with your monitor.Insert the CD-ROM into a CD drive on the computer you attached the monitor to.The autorun...
-
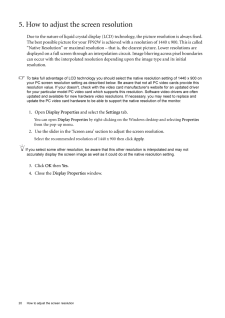
20 .20 How to adjust the scr...20 How to adjust the screen resolution 5. How to adjust the screen resolutionDue to the nature of liquid crysta l display (LCD) technology, the pict ure resolution is always fixed. The best possible picture for your FP92W is achieved with a resoluti on ...
-
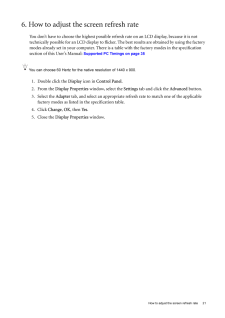
21 .21 How to adjust the ...21 How to adjust the screen refresh rate6. How to adjust the screen refresh rate You don't have to choose the highest possible refresh rate on an LCD display, because it is not technically possible for an LCD display to flicker. The best results are ...
-
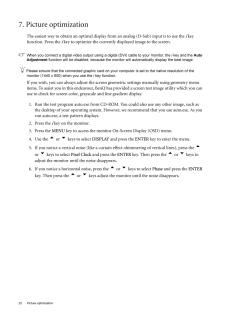
22 .22 Picture optimization ...22 Picture optimization 7. Picture optimization The easiest way to obtain an optimal displa y from an analog (D-Sub) input is to use the i key function. Press the i key to optimize the currently displayed image to the screen. When you connect a digital ...
-
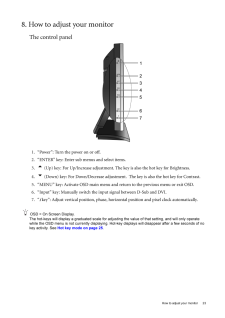
23 .23 How to adjust your...23 How to adjust your monitor8. How to adjust your monitorThe control panel1. "Power": Turn the power on or off.2. "ENTER" key: Enter sub menus and select items.3.t (Up) key: For Up/Increase adjustment. The key is also the hot key for Brightness.4.u ...
-
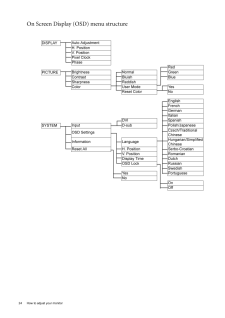
24 .24 How to adjust your mo...24 How to adjust your monitor On Screen Display (OSD) menu structure DISPLAYAuto AdjustmentH. PositionV. PositionPixel ClockPhaseRedPICTUREBrightnessNormal GreenContrastBluish BlueSharpnessReddishColorUser Mode YesReset Color NoEnglishFrenchGermanItalian...
-
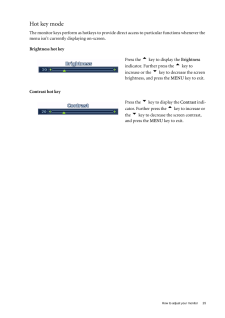
25 .25 How to adjust your...25 How to adjust your monitorHot key modeThe monitor keys perform as hotkeys to provide di rect access to particular functions whenever the menu isn't currently displaying on-screen.Brightness hot keyContrast hot key Press the t key to display the Bri...
-
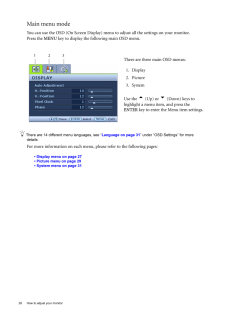
26 .26 How to adjust your mo...26 How to adjust your monitor Main menu modeYou can use the OSD (On Screen Display) menu to adjust all the settings on your monitor. Press the MENU key to display the following main OSD menu. There are 14 different menu languages, see " Language on page...
-
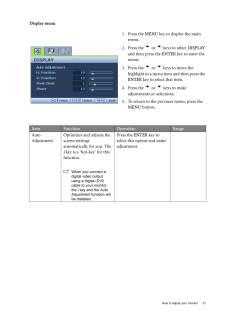
27 .27 How to adjust your...27 How to adjust your monitorDisplay menu1. Press the MENU key to display the main menu.2. Press the t or u keys to select DISPLAY and then press the ENTER key to enter the menu.3. Press the t or u keys to move the highlight to a menu item and th...
-
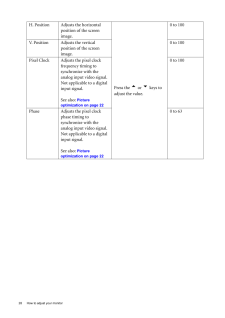
28 .28 How to adjust your mo...28 How to adjust your monitor H. Position Adjusts the horizontal position of the screen image. Press the t or u keys to adjust the value.0 to 100V. Position Adjusts the vertical position of the screen image.0 to 100Pixel Clock Adjusts the pixel clock ...
-
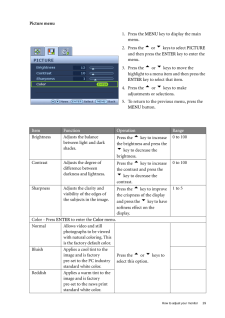
29 .29 How to adjust your...29 How to adjust your monitorPicture menu1. Press the MENU key to display the main menu.2. Press the t or u keys to select PICTURE and then press the ENTER key to enter the menu.3. Press the t or u keys to move the highlight to a menu item and th...
-
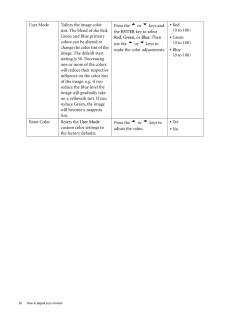
30 .30 How to adjust your mo...30 How to adjust your monitor User Mode Tailors the image color tint. The blend of the Red, Green and Blue primary colors can be altered to change the color tint of the image. The default start setting is 50. Decreasing one or more of the colors will red...
-
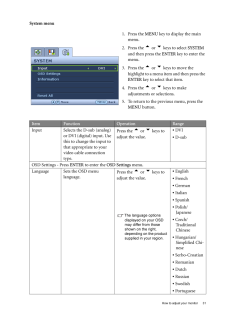
31 .31 How to adjust your...31 How to adjust your monitorSystem menu1. Press the MENU key to display the main menu.2. Press the t or u keys to select SYSTEM and then press the ENTER key to enter the menu.3. Press the t or u keys to move the highlight to a menu item and then...
-
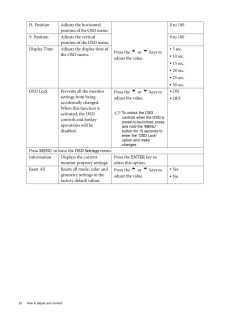
32 .32 How to adjust your mo...32 How to adjust your monitor H. Position Adjusts the horizontal position of the OSD menu. Press the t or u keys to adjust the value.0 to 100V. Position Adjusts the vertical position of the OSD menu.0 to 100Display Time Adjusts the display time of the...
-
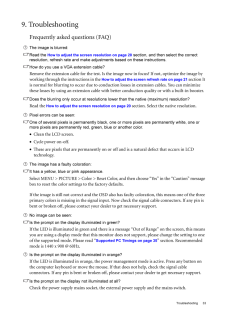
33 .33 Troubleshooting9. ...33 Troubleshooting9. TroubleshootingFrequently asked questions (FAQ)The image is blurred:Read the How to adjust the screen resolution on page 20 section, and then select the correct resolution, refresh rate and make adjustments based on these instruc...
-
34 .34 Troubleshooting The i...34 Troubleshooting The image is distorted, flashes or flickers:Read the How to adjust the screen resolution on page 20 section and then select the correct resolution, refresh rate and make adjustments based on these instructions.The image is displaced in...
-
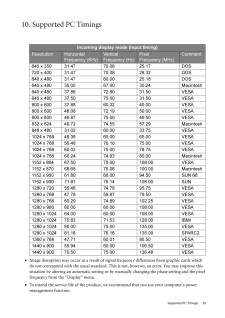
35 .35 Supported PC Timin...35 Supported PC Timings10. Supported PC Timings•Image disruption may occur as a result of sig nal frequency differences from graphic cards which do not correspond with the usual standard. This is not, however, an error. You may improve this situation ...
-
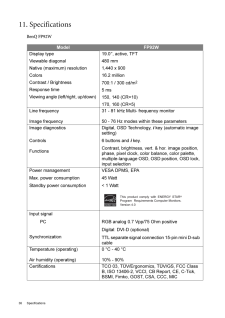
36 .36 Specifications 11. Sp...36 Specifications 11. SpecificationsBenQ FP92WModel FP92WDisplay type Viewable diagonal Native (maximum) resolutionColorsContrast / BrightnessResponse time Viewing angle (left/right, up/down) 19.0", active, TFT480 mm1,440 x 90016.2 million700:1 / 300 cd/m...
-
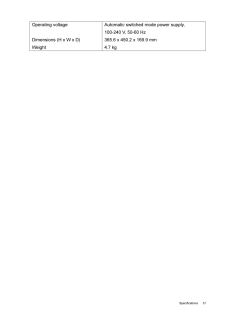
37 .37 SpecificationsOper...37 SpecificationsOperating voltage Dimensions (H x W x D) WeightAutomatic switched mode power supply, 100-240 V, 50-60 Hz365.6 x 450.2 x 169.9 mm4.7 kg
