
FP93Gの取扱説明書・マニュアル [全40ページ 1.36MB]


3


24 / 40 ページ
24 / 40 ページ


現在のページURL
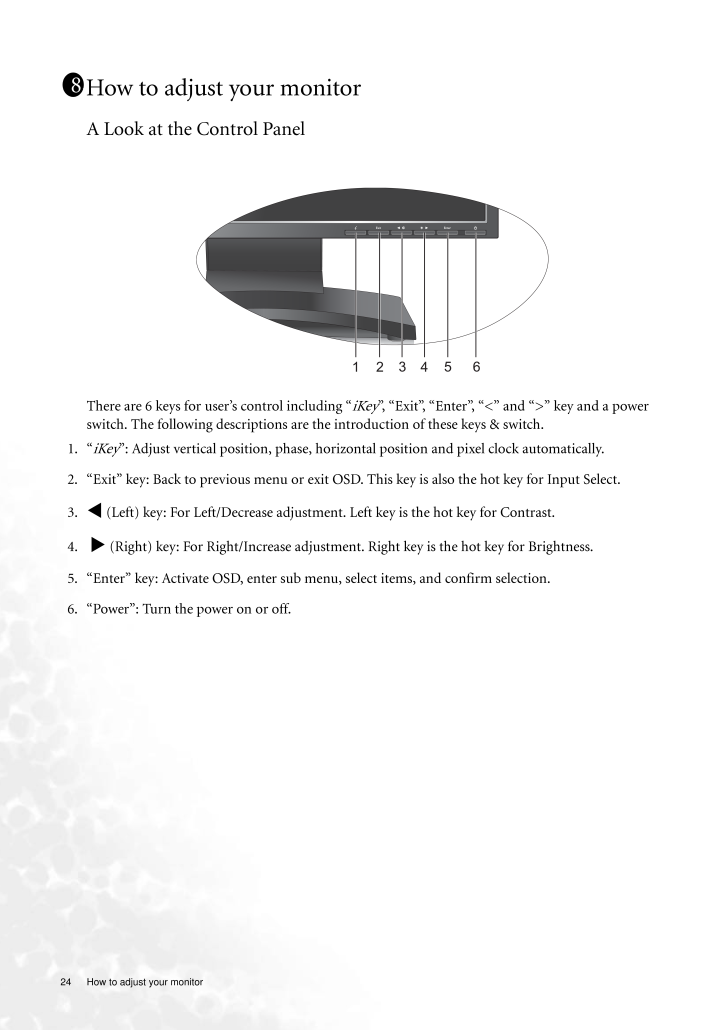
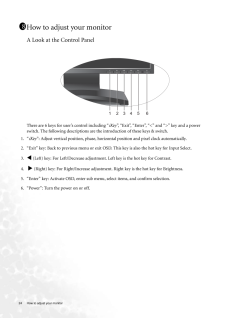
24 How to adjust your monitor How to adjust your monitorA Look at the Control PanelThere are 6 keys for user's control including " iKey ", "Exit", "Enter", "<" and ">" key and a power switch. The following descriptions are the introduction of these keys & switch.1. "iKey ": Adjust vertical position, phase, horizontal position and pixel clock automatically.2. "Exit" key: Back to previous menu or exit OSD. This key is also the hot key for Input Select.3.v (Left) key: For Left/Decrease adjustment. Left key is the hot key for Contrast.4. w (Right) key: For Right/Increase adjustment . Right key is the hot key for Brightness.5. "Enter" key: Activate OSD, enter sub me nu, select items, and confirm selection.6. "Power": Turn the power on or off.118
参考になったと評価  4人が参考になったと評価しています。
このマニュアルの目次
-
1 .WelcomeFP93G/FP93GXLCD Co...WelcomeFP93G/FP93GXLCD Color Monitor19.0" LCD Panel SizeUser's Manual
-
2 .2 CopyrightCopyright (C...2 CopyrightCopyright (C) 2006 by BenQ Corporation. All rights reserved. No part of this publication may be reproduced, transmitted, transcribed, stored in a retrieval system or translated into any language or computer language, in any form or by any me a...
-
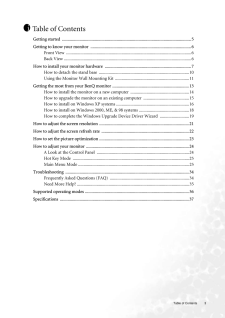
3 .Table of Contents 3Table ...Table of Contents 3Table of ContentsGetting started ......................................................................................................................5Getting to know your monitor .. ........................................................
-
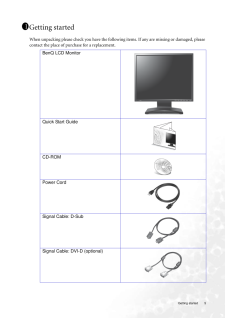
5 .5 Getting startedGett...5 Getting startedGetting startedWhen unpacking please check you have the follow ing items. If any are missing or damaged, please contact the place of purchase for a replacement. 111BenQ LCD Monitor Quick Start Guide CD-ROM Power CordSignal Cable: D-Sub...
-
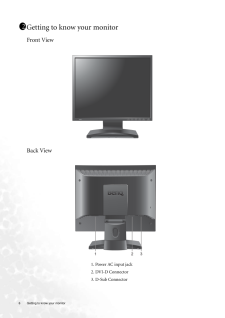
6 .6 Getting to know your m...6 Getting to know your monitor Getting to know your monitorFront ViewBack View 1. Power AC input jack2. DVI-D Connector3. D-Sub Connector112
-
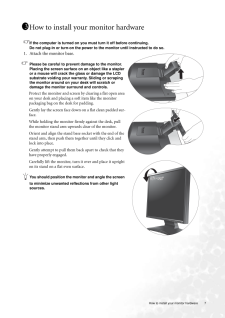
7 .7 How to install your...7 How to install your monitor hardwareHow to install your monitor hardwareIf the computer is turned on you must turn it off before continuing. Do not plug-in or turn-on the power to the monitor until instructed to do so. 1. Attach the monitor base.Plea...
-
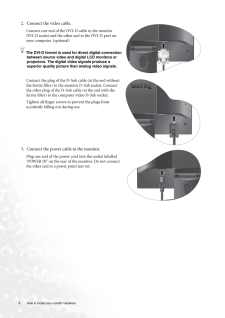
8 .8 How to install your mo...8 How to install your monitor hardware 2. Connect the video cable. Connect one end of the DVI-D cable to the monitor DVI-D socket and the other end to the DVI-D port on your computer. (optional)The DVI-D format is used for direct digital connection bet...
-
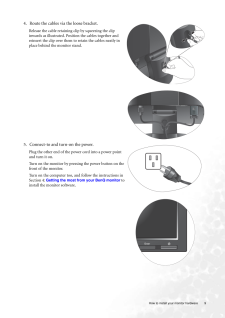
9 .9 How to install your...9 How to install your monitor hardware4. Route the cables via the loose bracket.Release the cable retaining clip by squeezing the clip inwards as illustrated. Positi on the cables together and reinsert the clip over them to retain the cables neatly in ...
-
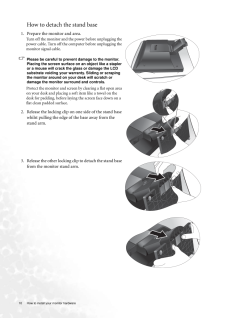
10 .10 How to install your m...10 How to install your monitor hardware How to detach the stand base1. Prepare the monitor and area.Turn off the monitor and the power before unplugging the power cable. Turn off the computer before unplugging the monitor signal cable.Please be careful t...
-
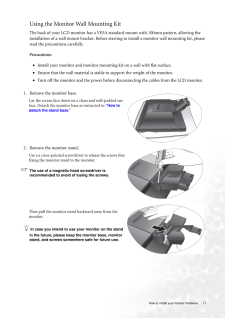
11 .11 How to install you...11 How to install your monitor hardwareUsing the Monitor Wall Mounting Kit The back of your LCD monitor has a VESA standard mount with 100mm pattern, allowing the installation of a wall mount bracket. Before starting to install a monitor wall mounting ...
-
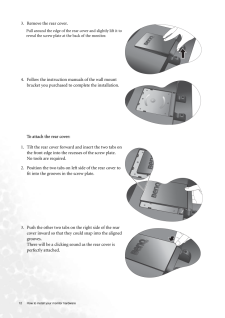
12 .12 How to install your m...12 How to install your monitor hardware To attach the rear cover:3. Remove the rear cover.Pull around the edge of the rear cover and slightly lift it to reveal the screw plate at the back of the monitor.4. Follow the instruction manuals of the wall mount...
-
13 .13 Getting the most f...13 Getting the most from your BenQ monitorGetting the most from your BenQ monitorHow do I gain the most benefit from my new monitor?To gain the most benefit from your new BenQ color LCD flat sc reen monitor, you should install the custom BenQ LCD Moni...
-
14 .14 Getting the most from...14 Getting the most from your BenQ monitor How to install the monitor on a new computerThis instruction details the procedure for select ing and installing the BenQ LCD Monitor driver software on a new computer which has never had a monitor driver insta...
-
15 .15 Getting the most f...15 Getting the most from your BenQ monitorHow to upgrade the monitor on an existing computerThis instruction details the procedure for manual ly updating the existing monitor driver software on your Microsoft Windows computer. It is curr ently tested a...
-
16 .16 Getting the most from...16 Getting the most from your BenQ monitor How to install on Windows XP systems1. Open Display Properties.The quickest shortcut to Display Properties is through the Windows desktop. Right-click the desktop and select Properties from the popup menu.Alter...
-
17 .17 Getting the most f...17 Getting the most from your BenQ monitorThis will close the Display Properties windows. You do not need to restart Windows XP, as the BenQ LCD monitor drivers will operate immediately with no further action required by you.
-
18 .18 Getting the most from...18 Getting the most from your BenQ monitor How to install on Windows 2000, ME, & 98 systemsYou do not need to follow this instruction if you are installing onto a computer which has a Windows XP (or later) version system. In that case, see the instructio...
-
19 .19 Getting the most f...19 Getting the most from your BenQ monitorHow to complete the Windows Upgrade Device Driver Wizard1. Load the BenQ LCD Monitor CD-ROM which came with your monitor.Insert the CD-ROM into a CD drive on the computer you attached the monitor to.The autorun...
-
20 .20 Getting the most from...20 Getting the most from your BenQ monitor Should you wish to do so, this is where you can change the screen resolution (area and color). See How to adjust the screen resolution for details.14. Click OK.This will close the Display Properties window, and...
-
21 .21 How to adjust the ...21 How to adjust the screen resolutionHow to adjust the screen resolutionDue to the nature of liquid crystal display (LCD) technology, the picture resolution is always fixed. The best possible picture for your FP 93G/FP93GX is achieved with a resoluti...
-
22 .22 How to adjust the scr...22 How to adjust the screen refresh rate How to adjust the screen refresh rate You don't have to choose the highest possible refr esh rate on an LCD display, because it is not technically possible for an LCD di splay to flicker. The best resu lts are obt...
-
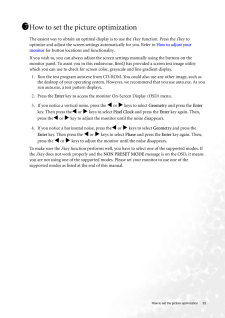
23 .23 How to set the pic...23 How to set the picture optimizationHow to set the picture optimization The easiest way to obtain an optimal display is to use the i key function. Press the i key to optimize and adjust the screen setti ngs automatically for you. Refer to How to a...
-
24 .24 How to adjust your mo...24 How to adjust your monitor How to adjust your monitorA Look at the Control PanelThere are 6 keys for user's control including " iKey ", "Exit", "Enter", "<" and ">" key and a power switch. The following descriptions are the introduction of these keys ...
-
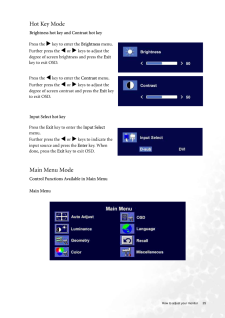
25 .25 How to adjust your...25 How to adjust your monitorHot Key ModeBrightness hot key and Contrast hot key Input Select hot keyMain Menu ModeControl Functions Available in Main MenuPress the w key to enter the Brightness menu. Further press the v or w keys to adjust the deg...
-
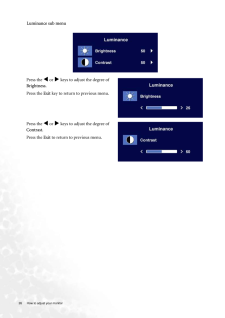
26 .26 How to adjust your mo...26 How to adjust your monitor Luminance sub menuPress the v or w keys to adjust the degree of Brightness.Press the Exit key to return to previous menu. Press the v or w keys to adjust the degree of Contrast.Press the Exit to return to previous men...
-
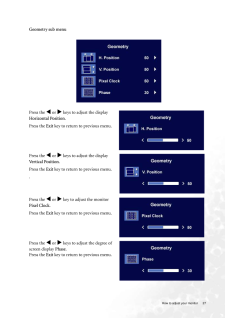
27 .27 How to adjust your...27 How to adjust your monitor Geometry sub menuPress the v or w keys to adjust the display Horizontal Position.Press the Exit key to return to previous menu.Press the v or w keys to adjust the display Vertical Position.Press the Exit key to...
-
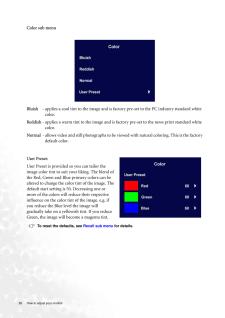
28 .28 How to adjust your mo...28 How to adjust your monitor Color sub menuBluish - applies a cool tint to the image and is factory pre-set to the PC industry standard white color.Reddish - applies a warm tint to the image and is fa ctory pre-set to the news print standard white c...
-
29 .29 How to adjust your...29 How to adjust your monitor OSD sub menuPress the v or w keys to adjust the Horizontal Position of the OSD.Press the Exit key to return to previous menu.Press thev or w keys to adjust the Vertical Position of the OSD.Press the Exit key to retur...
-
30 .30 How to adjust your mo...30 How to adjust your monitor Languages Sub menuPress the v or w keys to select a language to have the OSD display menus in that language.Press the Exit key to return to previous menu.Picture may differ from the Language menu on your monitor, dependi...
-
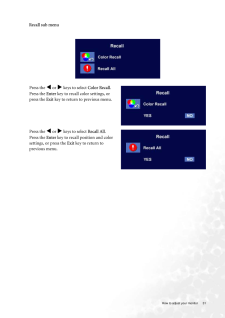
31 .31 How to adjust your...31 How to adjust your monitor Recall sub menuPress the v or w keys to select Color Recall.Press the Enter key to recall color settings, or press the Exit key to return to previous menu.Press the v or w keys to select Recall All.Press the Enter...
-
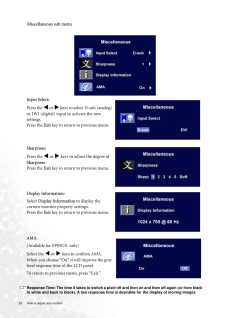
32 .32 How to adjust your mo...32 How to adjust your monitor Response Time: The time it takes to switch a pixel off and then on and then off again (or from black to white and back to black). A low response time is desirable for the display of moving images Miscellaneous sub menuInput...
-
33 .33 How to adjust your...33 How to adjust your monitorwithout ghosting. The Response Time quoted for ma ny LCD monitors is specific to transitions from black to white and back again, it does not specify the time required to switch between the many gray levels or colors that ma...
-
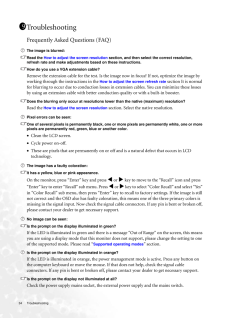
34 .34 Troubleshooting Troub...34 Troubleshooting TroubleshootingFrequently Asked Questions (FAQ)The image is blurred:Read the How to adjust the screen resolution section, and then select the correct resolution, refresh rate and make adjustments based on these instructions.How do you ...
-
35 .35 TroubleshootingThe...35 TroubleshootingThe image is distorted, flashes or flickers:Read the How to adjust the screen resolution section and then select the correct resolution, refresh rate and make adjustments based on these instructions.The image is displaced in one dire...
-
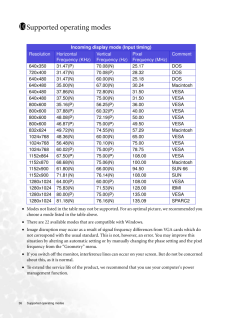
36 .36 Supported operating m...36 Supported operating modes Supported operating modes•Modes not listed in the table may not be supporte d. For an optimal picture, we recommended you choose a mode listed in the table above.•There are 22 available modes that are compatible with Windows....
-
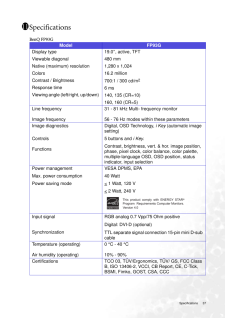
37 .37 SpecificationsSpec...37 SpecificationsSpecificationsBenQ FP93G1111Model FP93GDisplay type Viewable diagonal Native (maximum) resolutionColorsContrast / BrightnessResponse time Viewing angle (left/right, up/down) 19.0", active, TFT480 mm1,280 x 1,02416.2 million700:1 / 300 ...
-
38 .38 Specifications Operat...38 Specifications Operating voltage Dimensions (H x W x D) WeightAutomatic switched mode power supply, 90-264 V, 47-63 Hz410.1 x 404.2 x 168.2 mm5.0 kg
-
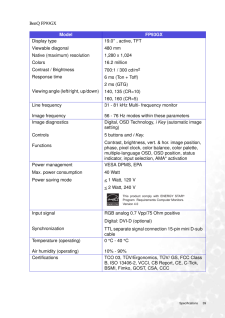
39 .39 SpecificationsBenQ...39 SpecificationsBenQ FP93GXModel FP93GXDisplay type Viewable diagonal Native (maximum) resolutionColorsContrast / BrightnessResponse time Viewing angle (left/right, up/down) 19.0" , active, TFT480 mm1,280 x 1,02416.2 million700:1 / 300 cd/m26 ms (Ton ...
-
40 .40 Specifications *Respo...40 Specifications *Response Time: The time it takes to switch a pixel off and then on and then off again (or from black to white and back to black). A low response time is desirable for the display of moving images without ghosting. The Response Time quot...
