
FP94VWの取扱説明書・マニュアル [全43ページ 1.14MB]


3


16 / 43 ページ
16 / 43 ページ


現在のページURL
16 Getting the most from your BenQ monitor How to install the monitor on a new computerThis instruction details the procedure for select ing and installing the BenQ LCD Monitor driver software on a new computer which has never had a monitor driver installed before. This instruction is only suitable for a computer which has never been used before, and for which the BenQ LCD Monitor is the first ever monitor to be connected to it.If you are adding the BenQ LCD Monitor to an exis ting computer that has already had another monitor connected to it (and has monitor driver software inst alled), you should not be following these instructions. You should instead be following the instructions for How to upgrade the monitor on an existing computer.1. Follow the instructions in How to assemble your monitor hardware on page 8 . When Windows starts, it will automaticall y detect the new monitor and launch the Found New Hard-ware Wizard. Follow the prompts until it displays the option to Install Hardware Device drivers .2. Insert the BenQ LCD Monitor CD-ROM into a CD drive on the computer.3. Check Search for a suitable driver for my device option, and click Next.4. Check the option for CD-ROM drives (uncheck all others) and click Next.5. Look to confirm that the wizard has selected the correct name of your monitor as "BenQ FP94VW" and click Next.6. Click Finish.7. Restart the computer.
参考になったと評価  5人が参考になったと評価しています。
このマニュアルの目次
-
2 .2 CopyrightCopyright (C...2 CopyrightCopyright (C) 2007 by BenQ Corporation. All rights reserved. No part of this publication may be reproduced, transmitted, transcribed, stored in a retrieval system or translated into any language or computer language, in any form or by any me a...
-
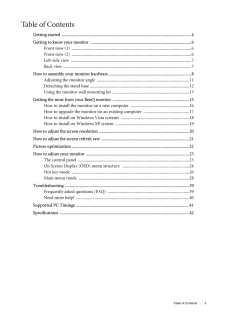
3 .Table of Contents 3Table ...Table of Contents 3Table of ContentsGetting started ......................................................................................................................4Getting to know your monitor .. ........................................................
-
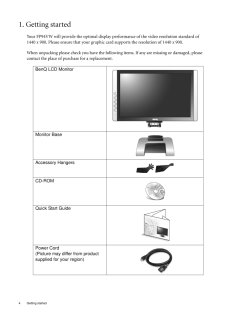
4 .4 Getting started 1. Ge...4 Getting started 1. Getting startedYour FP94VW will provide the opti mal display performance of the video resolution standard of 1440 x 900. Please ensure that your graphic card supports the resolution of 1440 x 900. When unpacking please check you have...
-
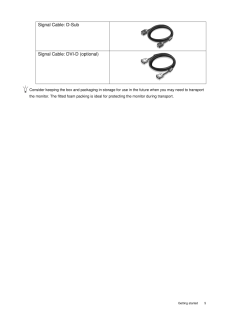
5 .5 Getting startedCons...5 Getting startedConsider keeping the box and packaging in storage for use in the future when you may need to transport the monitor. The fitted foam packing is ideal for protecting the monitor during transport.Signal Cable: D-SubSignal Cable: DVI-D (o...
-
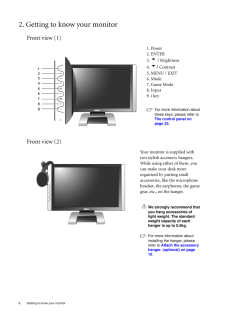
6 .6 Getting to know your m...6 Getting to know your monitor 2. Getting to know your monitorFront view (1)Front view (2)1. Power2. ENTER3. t / Brightness4. u/ Contrast 5. MENU / EXIT6. Mode7. Game Mode8. Input9. i keyFor more information about these keys, please refer to The contro...
-
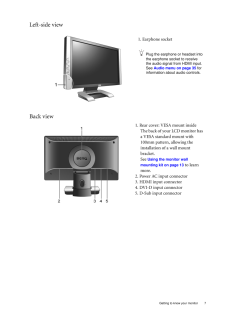
7 .7 Getting to know you...7 Getting to know your monitorLeft-side viewBack view1. Earphone socketPlug the earphone or headset into the earphone socket to receive the audio signal from HDMI input. See Audio menu on page 35 for information about audio controls.1. Rear cover: VES...
-
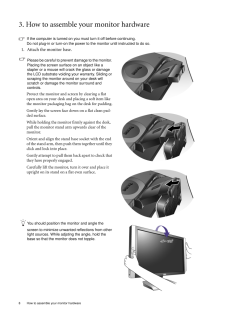
8 .8 How to assemble your m...8 How to assemble your monitor hardware 3. How to assemble your monitor hardwareIf the computer is turned on you must turn it off before continuing. Do not plug-in or turn-on the power to the monitor until instructed to do so. 1. Attach the monitor base....
-
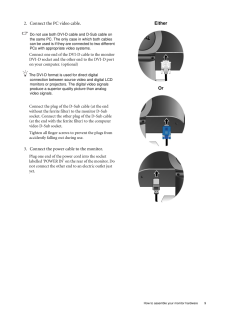
9 .9 How to assemble you...9 How to assemble your monitor hardware2. Connect the PC video cable. Do not use both DVI-D cable and D-Sub cable on the same PC. The only case in which both cables can be used is if they are connected to two different PCs with appropriate video syst...
-
10 .10 How to assemble your ...10 How to assemble your monitor hardware 4. Route the cables via the cable clip.Release the cable retaining clip by squeezing the clip inwards as illustrated. Position the cables together and reinsert the clip over them to retain the cables neatly in pla...
-
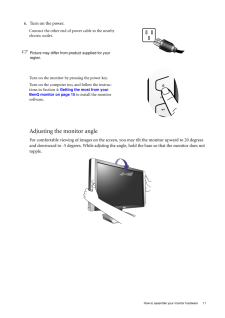
11 .11 How to assemble yo...11 How to assemble your monitor hardwareAdjusting the monitor angleFor comfortable viewing of images on the screen, you may tilt the monitor upward to 20 degrees and downward to -5 degrees. While adjsting the ang le, hold the base so that the monitor ...
-
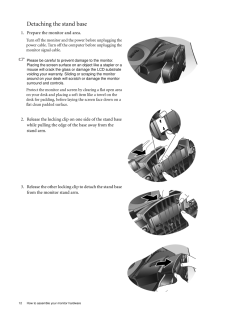
12 .12 How to assemble your ...12 How to assemble your monitor hardware Detaching the stand base1. Prepare the monitor and area.Turn off the monitor and the power before unplugging the power cable. Turn off the computer before unplugging the monitor signal cable.Please be careful to p...
-
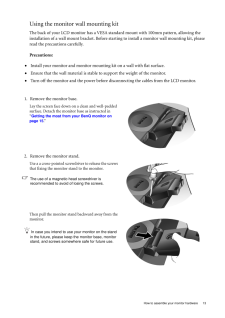
13 .13 How to assemble yo...13 How to assemble your monitor hardwareUsing the monitor wall mounting kitThe back of your LCD monitor has a VESA standard mount with 100mm pattern, allowing the installation of a wall mount bracket. Before starting to install a monitor wall mounting ...
-
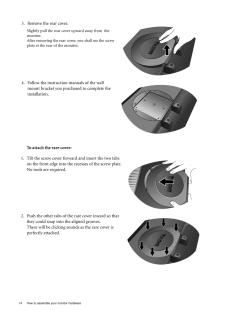
14 .14 How to assemble your ...14 How to assemble your monitor hardware To attach the rare cover:3. Remove the rear cover.Slightly pull the rear cover upward away from the monitor. After removing the rear cover, you shall see the screw plate at the rear of the monitor.4. Follow the i...
-
15 .15 Getting the most f...15 Getting the most from your BenQ monitor4. Getting the most from your BenQ monitorTo gain the most benefit from your new BenQ color LCD flat sc reen monitor, you should install the custom BenQ LCD Monitor driver software as provided on the BenQ LCD...
-
16 .16 Getting the most from...16 Getting the most from your BenQ monitor How to install the monitor on a new computerThis instruction details the procedure for select ing and installing the BenQ LCD Monitor driver software on a new computer which has never had a monitor driver insta...
-
17 .17 Getting the most f...17 Getting the most from your BenQ monitorHow to upgrade the monitor on an existing computerThis instruction details the procedure for manual ly updating the existing monitor driver software on your Microsoft Windows computer. It is curr ently tested a...
-
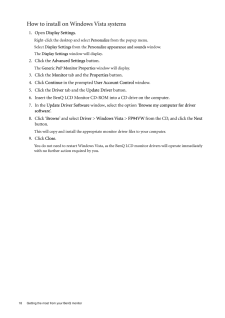
18 .18 Getting the most from...18 Getting the most from your BenQ monitor How to install on Windows Vista systems1. Open Display Settings.Right-click the desktop and select Personalize from the popup menu.Select Display Settings from the Personalize appearance and sounds window. The...
-
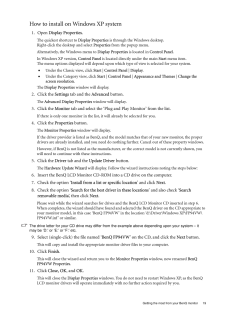
19 .19 Getting the most f...19 Getting the most from your BenQ monitorHow to install on Windows XP system1. Open Display Properties.The quickest shortcut to Display Properties is through the Windows desktop. Right-click the desktop and select Properties from the popup menu.Alter...
-
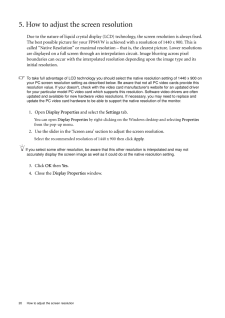
20 .20 How to adjust the scr...20 How to adjust the screen resolution 5. How to adjust the screen resolutionDue to the nature of liquid crystal display (LCD) technology, the screen resolution is always fixed. The best possible picture for your FP94VW is achi eved with a resolution of ...
-
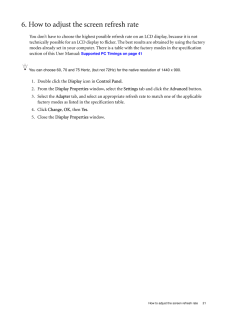
21 .21 How to adjust the ...21 How to adjust the screen refresh rate6. How to adjust the screen refresh rate You don't have to choose the highest possible refresh rate on an LCD display, because it is not technically possible for an LCD display to flicker. The best results are ...
-
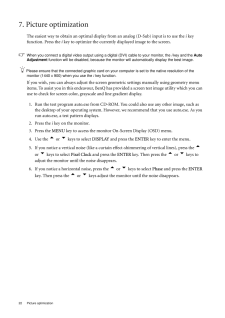
22 .22 Picture optimization ...22 Picture optimization 7. Picture optimization The easiest way to obtain an optimal displa y from an analog (D-Sub) input is to use the i key function. Press the i key to optimize the currently displayed image to the screen. When you connect a digital...
-
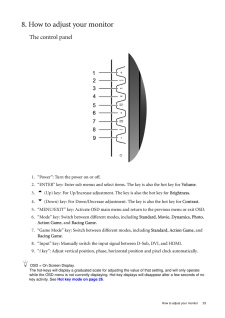
23 .23 How to adjust your...23 How to adjust your monitor8. How to adjust your monitorThe control panel1. "Power": Turn the power on or off.2. "ENTER" key: Enter sub menus and select items. The key is also the hot key for Volume.3. t (Up) key: For Up/Increase adjustment. The ke...
-
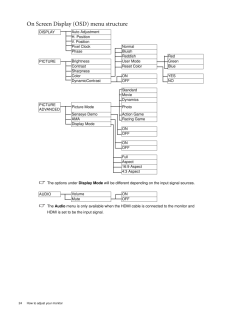
24 .24 How to adjust your mo...24 How to adjust your monitor On Screen Display (OSD) menu structure DISPLAYAuto AdjustmentH. PositionV. PositionPixel ClockNormalPhaseBluishReddish RedPICTUREBrightnessUser Mode GreenContrastReset Color BlueSharpnessColor ON YESDynamicContrast OFF NOSta...
-
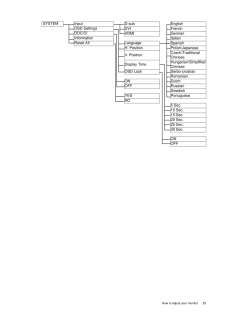
25 .25 How to adjust your...25 How to adjust your monitor SYSTEMInputD-sub EnglishOSD SettingsDVI FrenchDDC/CIHDMI GermanInformationItalianReset All LanguageSpanishH. Position Polish/JapaneseV. PositionCzech/Traditional ChineseDisplay TimeHungarian/Simplified ChineseOSD Lock Ser...
-
26 .26 How to adjust your mo...26 How to adjust your monitor Hot key modeThe monitor keys perform as hot keys to provide direct access to particular functions whenever the menu isn't currently displaying on-screen.Brightness hot keyContrast hot keyVolume hot keyMode hot keyPress the ...
-
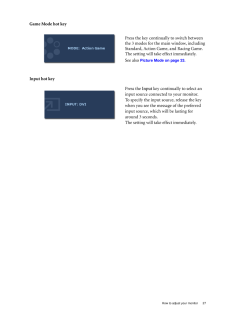
27 .27 How to adjust your...27 How to adjust your monitorGame Mode hot keyInput hot keyPress the key continually to switch between the 3 modes for the main window, including Standard, Action Game, and Racing Game. The setting will take effect immediately.See also Picture Mode on ...
-
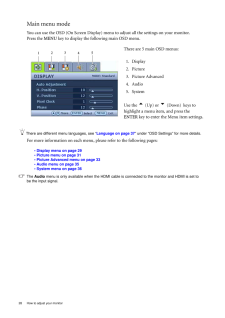
28 .28 How to adjust your mo...28 How to adjust your monitor Main menu modeYou can use the OSD (On Screen Display) menu to adjust all the settings on your monitor. Press the MENU key to display the following main OSD menu. There are different menu languages, see " Language on page 37...
-
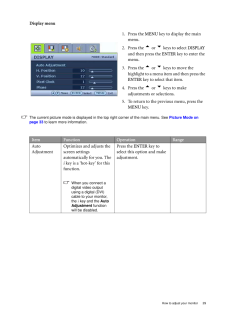
29 .29 How to adjust your...29 How to adjust your monitorDisplay menuThe current picture mode is displayed in the top right corner of the main menu. See Picture Mode on page 33 to learn more information.1. Press the MENU key to display the main menu.2. Press the t or u keys t...
-
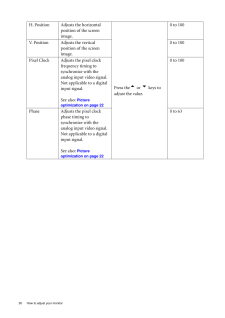
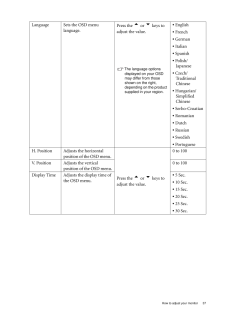
30 .30 How to adjust your mo...30 How to adjust your monitor H. Position Adjusts the horizontal position of the screen image. Press thet or u keys to adjust the value.0 to 100V. Position Adjusts the vertical position of the screen image.0 to 100Pixel Clock Adjusts the pixel clock f...
-
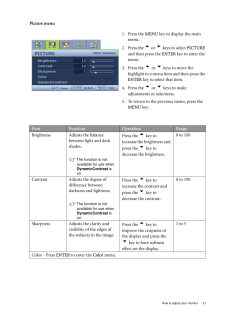
31 .31 How to adjust your...31 How to adjust your monitorPicture menu1. Press the MENU key to display the main menu.2. Press the t or u keys to select PICTURE and then press the ENTER key to enter the menu.3. Press the t or u keys to move the highlight to a menu item and th...
-
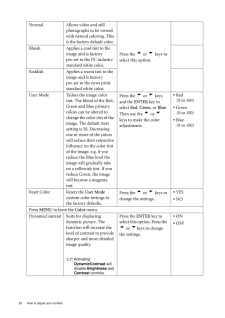
32 .32 How to adjust your mo...32 How to adjust your monitor Normal Allows video and still photographs to be viewed with natural coloring. This is the factory default color. Press the t or u keys to select this option.Bluish Applies a cool tint to the image and is factory pre-set t...
-
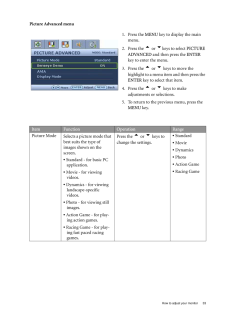
33 .33 How to adjust your...33 How to adjust your monitorPicture Advanced menu1. Press the MENU key to display the main menu.2. Press the t or u keys to select PICTURE ADVANCED and then press the ENTER key to enter the menu.3. Press the t or u keys to move the highlight to a...
-
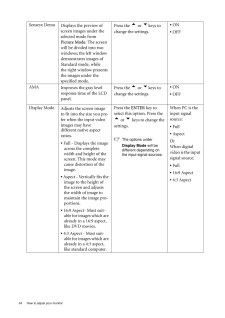
34 .34 How to adjust your mo...34 How to adjust your monitor Senseye DemoDisplays the preview of screen images under the selected mode from Picture Mode. The screen will be divided into two windows; the left windowdemonstrates images of Standard mode, whilethe right window presents th...
-
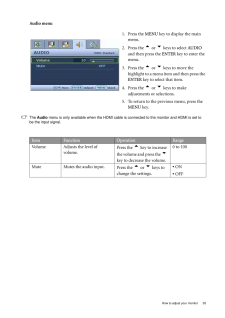
35 .35 How to adjust your...35 How to adjust your monitorAudio menuThe Audio menu is only available when the HDMI cable is connected to the moni tor and HDMI is set to be the input signal.1. Press the MENU key to display the main menu.2. Press the t or u keys to select AUDIO ...
-
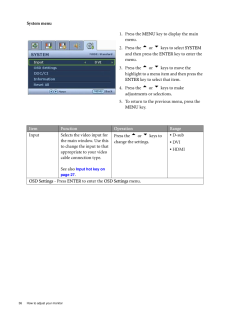
36 .36 How to adjust your mo...36 How to adjust your monitor System menu1. Press the MENU key to display the main menu.2. Press the t or u keys to select SYSTEM and then press the ENTER key to enter the menu.3. Press the t or u keys to move the highlight to a menu item and then ...
-
37 .37 How to adjust your...37 How to adjust your monitorLanguage Sets the OSD menu language.Press the t or u keys to adjust the value.The language options displayed on your OSD may differ from those shown on the right, depending on the product supplied in your region.* Englis...
-
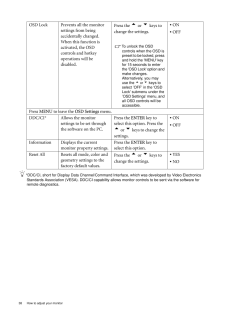
38 .38 How to adjust your mo...38 How to adjust your monitor *DDC/CI, short for Display Data Channel/Command Inte rface, which was developed by Video Electronics Standards Association (VESA). DDC/CI capability allows monito r controls to be sent via the software for remote diagnostic...
-
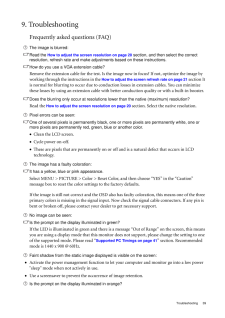
39 .39 Troubleshooting9. ...39 Troubleshooting9. TroubleshootingFrequently asked questions (FAQ)The image is blurred:Read the How to adjust the screen resolution on page 20 section, and then select the correct resolution, refresh rate and make adjustments based on these instruc...
-
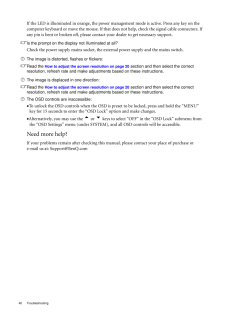
40 .40 Troubleshooting If th...40 Troubleshooting If the LED is illuminated in orange, the power management mode is active. Press any key on the computer keyboard or move the mouse. If that does not help, check the signal cable connectors. If any pin is bent or broken off, please cont...
-
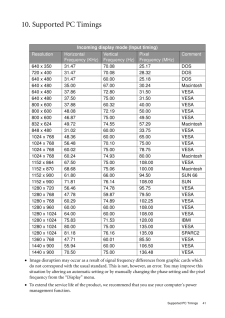
41 .41 Supported PC Timin...41 Supported PC Timings10. Supported PC Timings•Image disruption may occur as a result of sig nal frequency differences from graphic cards which do not correspond with the usual standard. This is not, however, an error. You may improve this situation ...
-
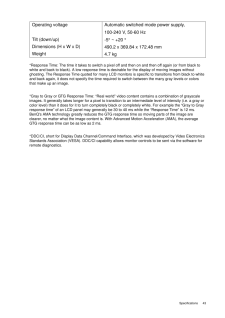
42 .42 Specifications 11. Sp...42 Specifications 11. SpecificationsModel FP94VWDisplay type Viewable diagonal Native (maximum) resolutionColorsContrast / BrightnessDynamic contrast ratioResponse time*Viewing angle (left/right, up/down) 19.0", active, TFT480 mm1,440 x 90016.7 million800...
-
43 .43 Specifications*Res...43 Specifications*Response Time: The time it takes to switch a pixel off and then on and then off again (or from black to white and back to black). A low response time is desirable for the display of moving images without ghosting. The Response Time q...
