
M2400HDの取扱説明書・マニュアル [全35ページ 1.61MB]


3


18 / 35 ページ
18 / 35 ページ


現在のページURL
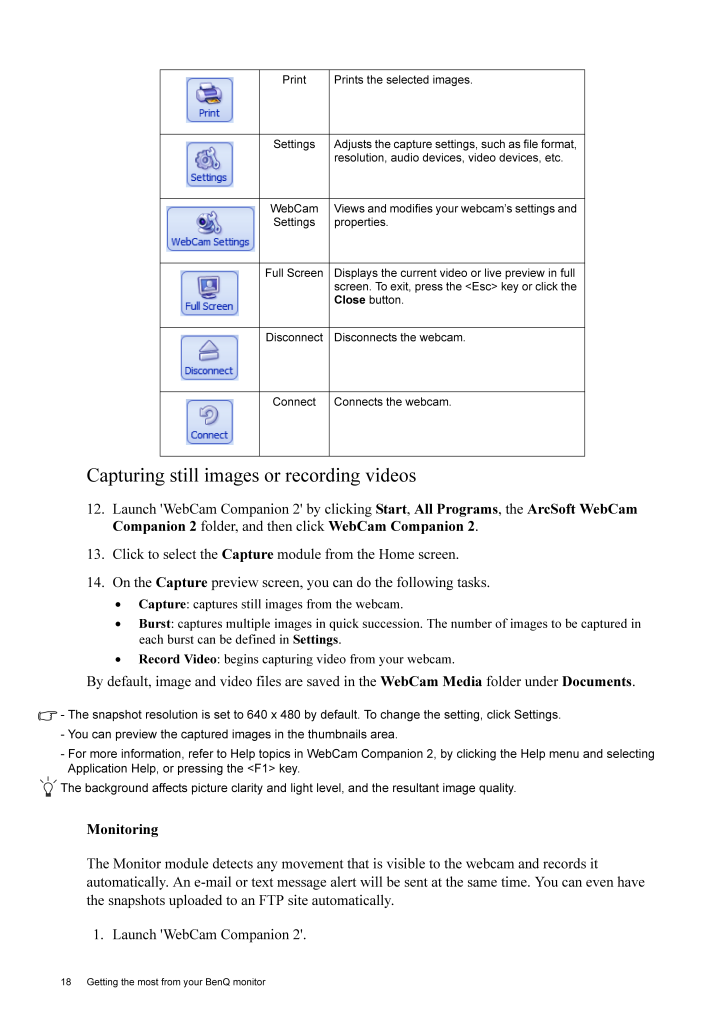
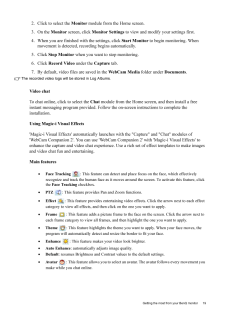
18 Getting the most from your BenQ monitor Capturing still images or recording videos12. Launch 'WebCam Companion 2' by clicking Start, All Programs, the ArcSoft WebCam Companion 2 folder, and then click WebCam Companion 2.13. Click to select the Capture module from the Home screen.14. On the Capture preview screen, you can do the following tasks.•Capture: captures still images from the webcam.•Burst: captures multiple images in quick succession. The number of images to be captured in each burst can be defined in Settings.•Record Video: begins capturing video from your webcam.By default, image and video files are saved in the WebCam Media folder under Documents.- The snapshot resolution is set to 640 x 480 by default. To change the setting, click Settings.- You can preview the captured images in the thumbnails area.- For more information, refer to Help topics in WebCam Companion 2, by clicking the Help menu and selecting Application Help, or pressing the <F1> key.The background affects picture clarity and light level, and the resultant image quality.MonitoringThe Monitor module detects any movement that is visible to the webcam and records it automatically. An e-mail or text message alert will be sent at the same time. You can even have the snapshots uploaded to an FTP site automatically.1. Launch 'WebCam Companion 2'.Print Prints the selected images.Settings Adjusts the capture settings, such as file format, resolution, audio devices, video devices, etc.WebCam SettingsViews and modifies your webcam's settings and properties.Full Screen Displays the current video or live preview in full screen. To exit, press the <Esc> key or click the Close button.Disconnect Disconnects the webcam.Connect Connects the webcam.
参考になったと評価  6人が参考になったと評価しています。
このマニュアルの目次
-
1 .LCD MonitorUser ManualE90LCD MonitorUser ManualE900HD/E900HDA E2200HD/E2200HDAM2200HD M2400HD/E2400HD
-
2 .2 CopyrightCopyright (C...2 CopyrightCopyright (C) 2008 by BenQ Corporat ion. All rights reserved. No part of this publication may be reproduced, transmitted, transcribed, stored in a re trieval system or translated into any language or computer language, in any form or by any m...
-
3 .Table of ContentsCopyrigh...Table of ContentsCopyright ..................................................................................................................... ...2Disclaimer ...................................................................................................
-
4 .4 Getting started 1. Ge...4 Getting started 1. Getting startedWhen unpacking please check you have the foll owing items. If any are missing or damaged, please contact the place of purchase for a replacement. BenQ LCD MonitorMonitor BaseQuick Start Guide CD-ROM Power Cord(Picture ...
-
5 .5 Getting startedCons...5 Getting startedConsider keeping the box and packaging in storage for use in the future when you may need to transport the monitor. The fitted foam packing is ideal for protecting the monitor during transport.Video Cable: DVI-D (Optional accessory fo...
-
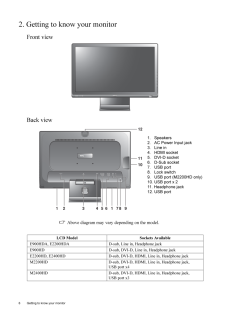
6 .6 Getting to know your m...6 Getting to know your monitor 2. Getting to know your monitorFront viewBack view Above diagram may vary depending on the model.LCD Model Sockets AvailableE900HDA, E2200HDA D-sub, Line in, Headphone jackE900HD D-sub, DVI-D, Line in, Headphone jackE2200HD...
-
7 .7 How to assemble you...7 How to assemble your monitor hardware3. How to assemble your monitor hardwareIf the computer is turned on you must turn it off before continuing. Do not plug-in or turn-on the power to the monitor until instructed to do so. 1. Attach the monitor base...
-
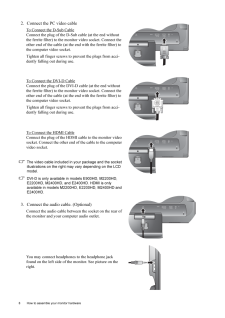
8 .8 How to assemble your m...8 How to assemble your monitor hardware 2. Connect the PC video cable To Connect the D-Sub CableConnect the plug of the D-S ub cable (at the end without the ferrite filter) to the mon itor video socket. Connect the other end of the cable (at the end wit...
-
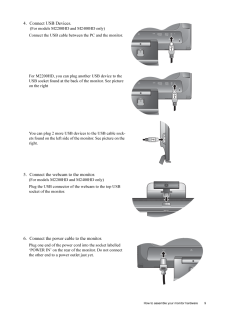
9 .9 How to assemble you...9 How to assemble your monitor hardware4. Connect USB Devices. (For models M2200HD and M2400HD only)Connect the USB cable betwee n the PC and the monitor. For M2200HD, you can plug another USB device to the USB socket found at the back of the monitor. ...
-
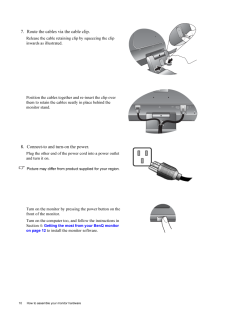
10 .10 How to assemble your ...10 How to assemble your monitor hardware 7. Route the cables via the cable clip.Release the cable retaining cl ip by squeezing the clip inwards as illustrated. Position the cables together and re-insert the clip over them to retain the cables neatly in p...
-
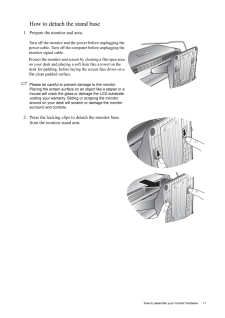
11 .11 How to assemble yo...11 How to assemble your monitor hardwareHow to detach the stand base1. Prepare the monitor and area.Turn off the monitor and the power before unplugging the power cable. Turn off the computer before unplugging the monitor signal cable.Protect the monit...
-
12 .12 Getting the most from...12 Getting the most from your BenQ monitor 4. Getting the most from your BenQ monitorTo gain the most benefit from your new BenQ co lor LCD flat screen monitor, you should install the custom BenQ LCD Monitor driver softwa re as provided on the BenQ LCD M...
-
13 .13 Getting the most f...13 Getting the most from your BenQ monitorHow to install the monitor on a new computerThis instruction details the procedure for select ing and installing the BenQ LCD Monitor driver software on a new computer which has never ha d a monitor driver inst...
-
14 .14 Getting the most from...14 Getting the most from your BenQ monitor How to upgrade the monitor on an existing computerThis instruction details the pr ocedure for manually updating the existing monitor driver software on your Microsoft Windows computer. It is curren tly tested as...
-
15 .15 Getting the most f...15 Getting the most from your BenQ monitorHow to install on Windows Vista systems1. Open Display Settings.Right-click the desktop and select Personalize from the popup menu.Select Display Settings from the Personalize appearance and sounds window. Th...
-
16 .16 Getting the most from...16 Getting the most from your BenQ monitor How to install on Windows XP system1. Open Display Properties.The quickest shortcut to Display Properties is through the Windows desktop. Right-click the desktop and select Properties from the popup menu.Altern...
-
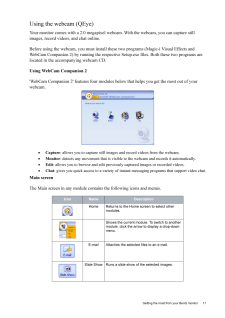
17 .17 Getting the most f...17 Getting the most from your BenQ monitorUsing the webcam (QEye)Your monitor comes with a 2.0 megapixel web cam. With the webcam, you can capture still images, record videos, and chat online.Before using the webcam, you must install thes e two program...
-
18 .18 Getting the most from...18 Getting the most from your BenQ monitor Capturing still images or recording videos12. Launch 'WebCam Companion 2' by clicking Start, All Programs, the ArcSoft WebCam Companion 2 folder, and then click WebCam Companion 2.13. Click to select the Captur...
-
19 .19 Getting the most f...19 Getting the most from your BenQ monitor2. Click to select the Monitor module from the Home screen.3. On the Monitor screen, click Monitor Settings to view and modify your settings first.4. When you are finished with the settings, click Start Monito...
-
20 .20 Getting the most from...20 Getting the most from your BenQ monitor Adjusting resolutionWhen the CPU performance is low, the message below may appear on the screen.To make 'Magic-i Visual Effects' run correct ly, please change the default resolution "640 x 480 (VGA)" to a lower...
-
21 .21 Picture optimizati...21 Picture optimization5. Picture optimization The easiest way to obtain an optimal display from an analog (D-Sub) input is to use the AUTO key function. Press the AUTO key to optimize the currently displayed image to the screen. When you connect a d...
-
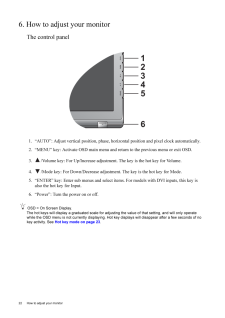
22 .22 How to adjust your mo...22 How to adjust your monitor 6. How to adjust your monitorThe control panel1. "AUTO": Adjust vertical pos ition, phase, horizontal position and pixel clock automatically.2. "MENU" key: Activate OSD main menu and return to the previous menu or exit OSD...
-
23 .23 How to adjust your...23 How to adjust your monitorHot key modeThe monitor keys perform as hot keys to provide direct access to particular functions whenever the menu isn't currently displaying on-screen.Volume hot keysMode hot keyInput hot key (not available for analog-on...
-
24 .24 How to adjust your mo...24 How to adjust your monitor Main menu modeYou can use the OSD (On Screen Display) menu to adjust all the settings on your monitor. Press the MENU key to display the following main OSD menu. The OSD menu languages may differ from the product supplied t...
-
25 .25 How to adjust your...25 How to adjust your monitorDisplay menu1. Press the MENU key to display the main menu.2. Press the or keys to select DISPLAY and then press the ENTER key to enter the menu.3. Press the or keys to move the highlight to a menu item and then pre...
-
26 .26 How to adjust your mo...26 How to adjust your monitor H. Position Adjusts the horizontal position of the screen image. Press the or keys to adjust the value.0 to 100V. Position Adjusts the vertical position of the screen image.0 to 100Pixel Clock Adjusts the pixel clock fre...
-
27 .27 How to adjust your...27 How to adjust your monitorPicture menu1. Press the MENU key to display the main menu.2. Press the or keys to select PICTURE and then press the ENTER key to enter the menu.3. Press the or keys to move the highlight to a menu item and then pre...
-
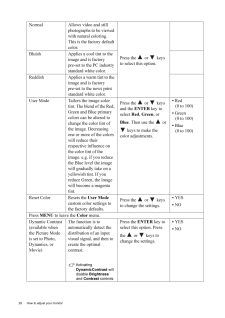
28 .28 How to adjust your mo...28 How to adjust your monitor Normal Allows video and still photographs to be viewed with natural coloring. This is the factory default color. Press the or keys to select this option.Bluish Applies a cool tint to the image and is factory pre-set to t...
-
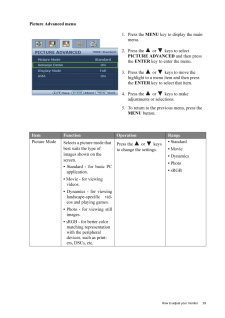
29 .29 How to adjust your...29 How to adjust your monitorPicture Advanced menu1. Press the MENU key to display the main menu.2. Press the or keys to select PICTURE ADVANCED and then press the ENTER key to enter the menu.3. Press the or keys to move the highlight to a menu...
-
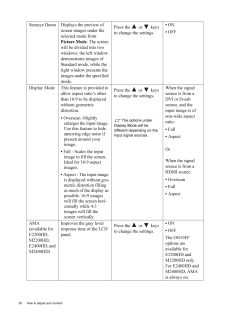
30 .30 How to adjust your mo...30 How to adjust your monitor Senseye Demo Displays the preview of screen images under the selected mode from Picture Mode. The screen will be divided into two windows; the left window demonstrates images of Standard mode, while the right window presents...
-
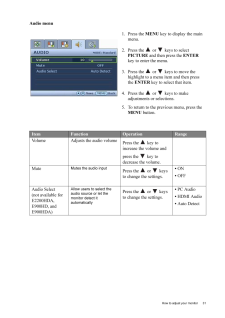
31 .31 How to adjust your...31 How to adjust your monitorAudio menu1. Press the MENU key to display the main menu.2. Press the or keys to select PICTURE and then press the ENTER key to enter the menu.3. Press the or keys to move the highlight to a menu item and then press...
-
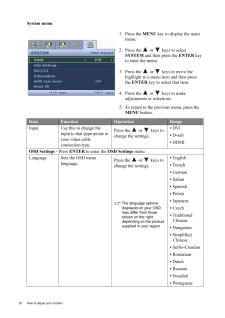
32 .32 How to adjust your mo...32 How to adjust your monitor System menu1. Press the MENU key to display the main menu.2. Press the or keys to select SYSTEM and then press the ENTER key to enter the menu.3. Press the or keys to move the highlight to a menu item and then press ...
-
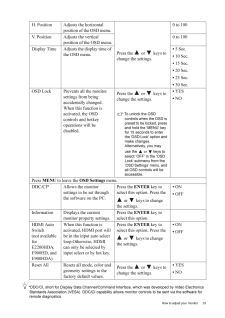
33 .33 How to adjust your...33 How to adjust your monitor*DDC/CI, short for Display Data Channel/Command Inte rface, which was developed by Video Electronics Standards Association (VESA). DDC/CI capability allows monito r controls to be sent via the software for remote diagnosti...
-
34 .34 Troubleshooting 7. Tr...34 Troubleshooting 7. TroubleshootingFrequently asked questions (FAQ)The image is blurred:Read the instructions on the link " Adjusting the Screen Resolution " on the CD, and then select the correct resolution, refresh rate and make adjustments based on t...
-
35 .35 TroubleshootingIs ...35 TroubleshootingIs the prompt on the display illuminated in orange?If the LED is illuminated in or ange, the power management mode is active. Press any button on the computer keyboard or move the mouse. If that does not help, check the signal cable ...
