
XL2410Tの取扱説明書・マニュアル [全40ページ 2.59MB]


-1


21 / 40 ページ

21 / 40 ページ


現在のページURL
21 Getting the most from your BenQ monitorHow to watch 3D content on your monitorYour monitor supports playing three-dimensional (3D) content transferred through DVI-D Dual Link cable. Yet you need to have the appropriate hardware equipment and software programs that are compatible with 3D playback.System requirements* BenQ LCD Monitor XL2410T* Compatible 3D glasses* PC with Microsoft Windows Vista or Windows 7 Operating System* Compatible graphics processing units (GPU) with the latest driver files or the drivers on the provided NVIDIA driver CD installed* Compatible software programs that play 3D playbackFor the compatible accessories, visit http://www.nvidia.com/object/3d-vision-requirements.html . For the appropriate 3D players, check with the 3D content providers.Safety information for watching 3D content* You may experience eye strain after watching 3D content for certain period of time. Take off the 3D glasses (purchased separately) and take a rest to relieve the eye strain.* If you experience headaches, dizziness, or nausea, stop watching 3D content immediately. You might need to consult a doctor if the symptoms last.* Watching 3D content for a long period of time may increase health risks. For small children, the elderly, the pregnant women or people who have high blood pressure or other health concerns, consult a doctor before watching 3D content.Not all menu options are available for 3D playback.* Contact NVIDIA or visit NVIDIA website ( http://www.nvidia.com/page/home.html) for the purchase and the settings of the compatible GPU.* Visit the NVIDIA website for the latest GPU driver files.
参考になったと評価  5人が参考になったと評価しています。
このマニュアルの目次
-
2 .CopyrightCopyright (C) 20...CopyrightCopyright (C) 2010 by BenQ Corporation. All rights reserved. No part of this publication may be reproduced, transmitted, transcribed, stored in a retrieval system or translated into any language or computer language, in any form or by any me ans, ...
-
3 .Table of ContentsCopyrigh...Table of ContentsCopyright ..........................................................................................................................2Disclaimer ..................................................................................................
-
4 .4 Getting started 1. Ge...4 Getting started 1. Getting startedWhen unpacking please check you have the follow ing items. If any are missing or damaged, please contact the place of purchase for a replacement. BenQ LCD MonitorMonitor BaseQuick Start Guide Manual CD NVIDIA Driver CD...
-
5 .5 Getting startedCons...5 Getting startedConsider keeping the box and packaging in storage for use in the future when you may need to transport the monitor. The fitted foam packing is ideal for protecting the monitor during transport.Video Cable: D-Sub Video Cable: DVI-D Dual...
-
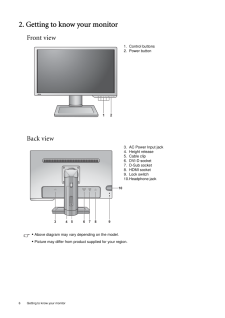
6 .6 Getting to know your m...6 Getting to know your monitor 2. Getting to know your monitorFront viewBack view1. Control buttons2. Power button3. AC Power Input jack4. Height release5. Cable clip6. DVI-D socket7. D-Sub socket8. HDMI socket9. Lock switch10.Headphone jack21395678104* ...
-
7 .7 How to assemble you...7 How to assemble your monitor hardware3. How to assemble your monitor hardwareIf the computer is turned on you must turn it off before continuing. Do not plug-in or turn-on the power to the monitor until instructed to do so.1. Attach the monitor base....
-
8 .8 How to assemble your m...8 How to assemble your monitor hardware You might want to adjust the monitor stand height. See Adjusting the monitor stand height on page 11 for more information.You should position the monitor and angle the screen to minimize unwanted reflections from...
-
9 .9 How to assemble you...9 How to assemble your monitor hardwareTo Connect the DVI-D Dual Link CableConnect the plug of the DVI-D Dual Link cable to the monitor video socket. Connect the other end of the cable to the computer video socket.Tighten all finger screws to prevent t...
-
10 .10 How to assemble your ...10 How to assemble your monitor hardware 5. Route the cables via the cable clip.6. Connect-to and turn-on the power.Plug the other end of the power cord into a power outlet and turn it on.Picture may differ from product supplied for your region.Turn on t...
-
11 .11 How to assemble yo...11 How to assemble your monitor hardwareAdjusting the monitor stand heightIf you prefer to lower the monitor stand height, pull the monitor downward while holding both left and right sides of the monitor.Avoid placing hands near the bottom of the monit...
-
12 .12 How to assemble your ...12 How to assemble your monitor hardware Rotating the monitor1. Pivot the display.Before rotating the monitor with a portrait viewing orientation, the display has to be rotated 90 degrees.Go to Start and Control Panel on your computer, select the prop...
-
13 .13 How to assemble yo...13 How to assemble your monitor hardwareViewing angle adjustmentYou may position the screen to the desired angle with -5 to +20 monitor tilt, 90 (left and right total) monitor swivel, and 130 mm monitor height.How to detach the stand base-45 4 5O ~ ...
-
14 .14 How to assemble your ...14 How to assemble your monitor hardware Using the monitor wall mounting kitThe back of your LCD monitor has a VESA st andard mount with 100mm pattern, allowing the installation of a wall mount bracket. Before star ting to install a monitor wall mounting...
-
15 .15 Getting the most f...15 Getting the most from your BenQ monitor4. Getting the most from your BenQ monitorTo gain the most benefit from your new BenQ color LCD flat screen monitor, you should install the custom BenQ LCD Monitor driver software as provided on the BenQ LCD M...
-
16 .16 Getting the most from...16 Getting the most from your BenQ monitor How to install the monitor on a new computerThis instruction details the procedure for select ing and installing the BenQ LCD Monitor driver software on a new computer which has never had a monitor driver insta...
-
17 .17 Getting the most f...17 Getting the most from your BenQ monitorHow to upgrade the monitor on an existing computerThis instruction details the procedure for manual ly updating the existing monitor driver software on your Microsoft Windows computer. It is currently tested as...
-
18 .18 Getting the most from...18 Getting the most from your BenQ monitor How to install on Windows 7 system1. Open Display Properties .Go to Start , Control Panel , Hardware and Sound, Devices and Printers and right-click the name of your monitor from the menu.Alternatively, righ...
-
19 .19 Getting the most f...19 Getting the most from your BenQ monitorHow to install on Windows Vista systems1. Open Display Settings .Right-click the desktop and select Personalize from the popup menu.Select Display Settings from the Personalize appearance and sounds window. ...
-
20 .20 Getting the most from...20 Getting the most from your BenQ monitor How to install on Windows XP system1. Open Display Properties .The quickest shortcut to Display Properties is through the Windows desktop. Right-click the desktop and select Properties from the popup menu.Alte...
-
21 .21 Getting the most f...21 Getting the most from your BenQ monitorHow to watch 3D content on your monitorYour monitor supports playing three-dimensional (3D) content transferred through DVI-D Dual Link cable. Yet you need to have the appropriate hardware equipment and softwa...
-
22 .22 Picture optimization ...22 Picture optimization 5. Picture optimizationThe easiest way to obtain an optimal display from an analog (D-Sub) input is to use the AUTO key function. Press the AUTO key to optimize the currently displayed image to the screen. When you connect a di...
-
23 .23 How to adjust your...23 How to adjust your monitor6. How to adjust your monitorThe control panel1. AUTO : Adjusts vertical position, phase, horizontal position and pixel clock automatically.2.MENU key: Activates OSD main menu and return to the previous menu or exit OSD.3....
-
24 .24 How to adjust your mo...24 How to adjust your monitor Hot key modeThe monitor keys perform as hot keys to provide direct access to particular functions whenever the menu isn't currently displaying on-screen.Smart Scaling hot keyDisplay Mode hot keyInput hot keyPress the key ...
-
25 .25 How to adjust your...25 How to adjust your monitorMain menu modeYou can use the OSD (On Screen Display) menu to adjust all the settings on your monitor. Available menu options may vary depending on the input sources, functions and settings.Press the MENU key to display ...
-
26 .26 How to adjust your mo...26 How to adjust your monitor Display menuAvailable menu options may vary depending on the input sources, functions and settings.1. Press the MENU key to display the main menu.2. Press the or keys to select DISPLAY and then press the ENTER key to ...
-
27 .27 How to adjust your...27 How to adjust your monitorH. Position Adjusts the horizontal position of the screen image. Press the or keys to adjust the value.0 to 100V. Position Adjusts the vertical position of the screen image.0 to 100Pixel Clock Adjusts the pixel clock fr...
-
28 .28 How to adjust your mo...28 How to adjust your monitor Picture menuAvailable menu options may vary depending on the input sources, functions and settings.1. Press the MENU key to display the main menu.2. Press the or keys to select PICTURE and then press the ENTER key to...
-
29 .29 How to adjust your...29 How to adjust your monitorColor - Press ENTER to enter the Color menuColor Temperature Normal: Allows video and still photographs to be viewed with natural coloring. This is the factory default color. Press the or keys to select this option.Bl...
-
30 .30 How to adjust your mo...30 How to adjust your monitor Picture Advanced menuAvailable menu options may vary depending on the input sources, functions and settings.1. Press the MENU key to display the main menu.2. Press the or keys to select PICTURE ADVANCED and then press ...
-
31 .31 How to adjust your...31 How to adjust your monitorItem Function Operation RangePicture ModeSelects a picture mode that best suits the type of images shown on the screen. * Standard - for basic PC application.* FPS (First Person Shooting) - for playing FPS games.* User Game...
-
32 .32 How to adjust your mo...32 How to adjust your monitor Display Mode(*)This feature is provided to allow aspect ratios other than 16:9 to be displayed without geometric distortion.* Overscan - Slightly enlarges the input image. Use this feature to hide annoying edge noise if pre...
-
33 .33 How to adjust your...33 How to adjust your monitorSmart Scaling(available when the Display Mode is set to 17", 19"W, or 1:1)Resizes the display. You can press the Smart Scaling hot key to resize the display by a digit number. Alternatively, press and hold the Smart Scaling...
-
34 .34 How to adjust your mo...34 How to adjust your monitor *To avoid image distortion, you are advised to adjust the resolution of the input source (on the output device) to best suit the selected display mode. Color Format Determines the color space (RGB or YUV) based on the follo...
-
35 .35 How to adjust your...35 How to adjust your monitorAudio menuAvailable menu options may vary depending on the input sources, functions and settings.1. Press the MENU key to display the main menu.2. Press the or keys to select AUDIO and then press the ENTER key to ent...
-
36 .36 How to adjust your mo...36 How to adjust your monitor System menuAvailable menu options may vary depending on the input sources, functions and settings.1. Press the MENU key to display the main menu.2. Press the or keys to select SYSTEM and then press the ENTER key to e...
-
37 .37 How to adjust your...37 How to adjust your monitorOSD Settings - Press ENTER to enter the OSD Settings menu.Language Sets the OSD menu language.Press the or keys to change the settings. The language options displayed on your OSD may differ from those shown on the ...
-
38 .38 How to adjust your mo...38 How to adjust your monitor *DDC/CI, short for Display Data Channel/Command Interface, which was developed by Video Electronics Standards Association (VESA). DDC/CI capability allows monitor controls to be sent via the software for remote diagnostics.O...
-
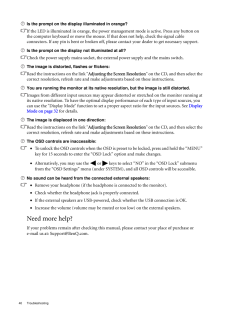
39 .39 Troubleshooting7. ...39 Troubleshooting7. TroubleshootingFrequently asked questions (FAQ)The image is blurred:Read the instructions on the link "Adjusting the Screen Resolution" on the CD, and then select the correct resolution, refresh rate and make adjustments based on ...
-
40 .40 Troubleshooting Is th...40 Troubleshooting Is the prompt on the display illuminated in orange?If the LED is illuminated in orange, the power management mode is active. Press any button on the computer keyboard or move the mouse. If that does not help, check the signal cable conn...
