
MX-1の取扱説明書・マニュアル [全244ページ 14.71MB]


10


1 / 244 ページ

1 / 244 ページ


現在のページURL
Digital CameraOperating ManualTo ensure the best performance from your camera, please read the Operating Manual before using the camera.* Specifications and external dimensions are subject to change without notice.54852 Copyright (C) PENTAX RICOH IMAGING CO., LTD. 2012R02AYA13 Printed in IndonesiaPENTAX RICOH IMAGING CO., LTD.2-35-7, Maeno-cho, Itabashi-ku, Tokyo 174-8639, JAPAN(http://www.pentax.jp)PENTAX RICOH IMAGING FRANCE S.A.S.(European Headquarters)112 Quai de Bezons, B.P. 204, 95106 Argenteuil Cedex, FRANCE(HQ - http://www.pentax.eu)(France - http://www.pentax.fr)PENTAX RICOH IMAGING DEUTSCHLAND GmbHJulius-Vosseler-Strasse 104, 22527 Hamburg, GERMANY(http://www.pentax.de)PENTAX RICOH IMAGING UK LTD.PENTAX House, Heron Drive, Langley, Slough, Berks SL3 8PN, U.K.(http://www.pentax.co.uk)PENTAX RICOH IMAGING AMERICAS CORPORATION633 17th Street, Suite 2600, Denver, Colorado 80202, U.S.A.(http://www.pentaximaging.com)PENTAX RICOH IMAGING CANADA INC.1770 Argentia Road Mississauga, Ontario L5N 3S7, CANADA (http://www.pentax.ca)PENTAX RICOH IMAGINGCHINA CO., LTD.23D, Jun Yao International Plaza, 789 Zhaojiabang Road, Xu Hui District, Shanghai, 200032, CHINA(http://www.pentax.com.cn)http://www.pentax.jp/english
参考になったと評価  23人が参考になったと評価しています。
このマニュアルの目次
-
1 .Digital CameraOperating M...Digital CameraOperating ManualTo ensure the best performance from your camera, please read the Operating Manual before using the camera.* Specifications and external dimensions are subject to change without notice.54852 Copyright (C) PENTAX RICOH IMAGING C...
-
2 .Thank you for purchasing ...Thank you for purchasing the PENTAX MX-1.Please read this manual before using the camera in order to get the most out of all the features and functions. Keep this manual safe, as it can be a valuable tool in helping you to understand all the camera's capab...
-
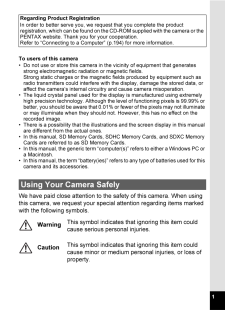
3 .1To users of this camera*...1To users of this camera* Do not use or store this camera in the vicinity of equipment that generates strong electromagnetic radiat ion or magnetic fields. Strong static charges or the magnetic fi elds produced by equipment such as radio transmitters could...
-
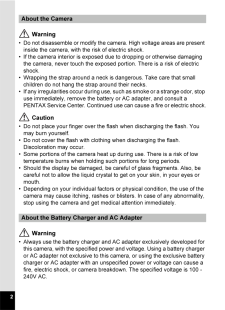
4 .2 Warning* Do not disasse...2 Warning* Do not disassemble or modify the camera. High voltage areas are present inside the camera, with the risk of electric shock.* If the camera interior is exposed due to dropping or otherwise damaging the camera, never touch the exposed portion. The...
-
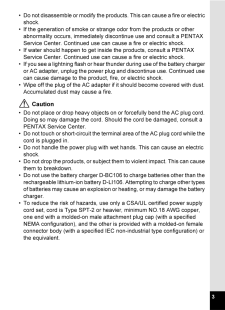
5 .3* Do not disassemble or ...3* Do not disassemble or modify the products. This can cause a fire or electric shock.* If the generation of smoke or strange odor from the products or other abnormality occurs, immediately discontinue use and consult a PENTAX Service Center. Continued use...
-
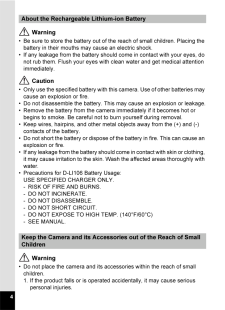
6 .4 Warning* Be sure to sto...4 Warning* Be sure to store the battery out of the reach of small children. Placing the battery in their mouths may cause an electric shock.* If any leakage from the battery should come in contact with your eyes, do not rub them. Flush your eyes with clean...
-
7 .52. Wrapping the strap ar...52. Wrapping the strap around a neck may cause suffocation.3. To avoid the risk of a small accessory such as the battery or SD Memory Cards from being swallowed by mistake, keep them out of the reach of small children. Seek medical attention immediately if...
-
8 .6* The temperature range ...6* The temperature range for camera use is 0C to 40C (32F to 104F).* The display may appear black at high temperatures, but will return to normal at normal temperatures.* The display may respond more slowly at low temperatures. This is due to liquid crysta...
-
9 .7* The SD Memory Card is ...7* The SD Memory Card is equipped with a write-protect switch. Setting the switch to LOCK prevents new data from being recorded on the card, the stored data from being deleted, and the card from being formatted by the camera or computer.r appears on the di...
-
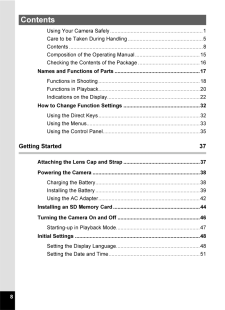
10 .8Using Your Camera Safely...8Using Your Camera Safely...............................................................1Care to be Taken During Handling...................................................5Contents..............................................................................
-
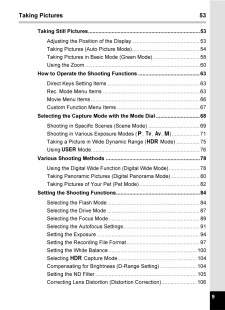
11 .9Taking Pictures 53Taking...9Taking Pictures 53Taking Still Pictures............................................................................53Adjusting the Position of the Display..............................................53Taking Pictures (Auto Picture Mode).....................
-
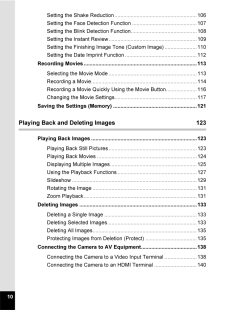
12 .10Setting the Shake Reduc...10Setting the Shake Reduction........................................................106Setting the Face Detection Function ............................................107Setting the Blink Detection Function.............................................108S...
-
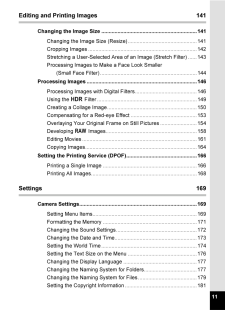
13 .11Editing and Printing Im...11Editing and Printing Images 141Changing the Image Size .................................................................141Changing the Image Size (Resize)...............................................141Cropping Images.....................................
-
14 .12Changing the Video Outp...12Changing the Video Output Format..............................................183Selecting the HDMI Output Format ..............................................184Setting Eye-Fi Communication.....................................................185Adjusti...
-
15 .13Appendix 204Functions A...13Appendix 204Functions Available for Each Shooting Mode................................204Messages...........................................................................................212Troubleshooting...................................................
-
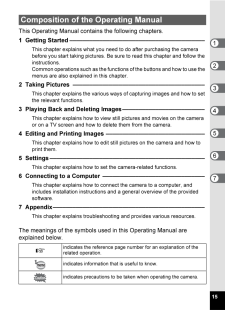
17 .15This Operating Manual c...15This Operating Manual contains the following chapters.The meanings of the symbols used in this Operating Manual are explained below.Composition of the Operating Manual1 Getting Started-----------------------------------------This chapter explains what yo...
-
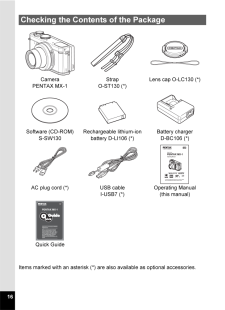
18 .16Items marked with an as...16Items marked with an asterisk (*) are also available as optional accessories.Checking the Contents of the PackageCameraPENTAX MX-1StrapO-ST130 (*)Lens cap O-LC130 (*)Software (CD-ROM)S-SW130Rechargeable lithium-ion battery D-LI106 (*)Battery chargerD-BC1
-
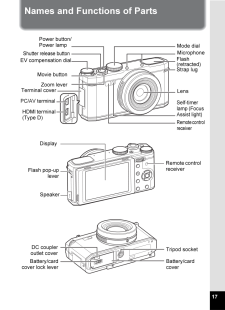
19 .17Names and Functions of ...17Names and Functions of PartsZoom leverPC/AV terminalSelf-timer lamp (Focus Assist light)Mode dialLensEV compensation dialShutter release buttonFlash (retracted)Movie buttonStrap lugPower button/Power lampHDMI terminal (Type D)Remote control receiverTermi...
-
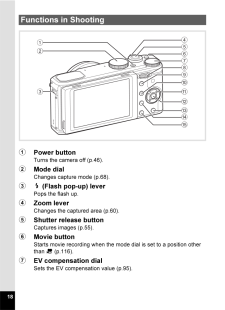
20 .181Power buttonTurns the ...181Power buttonTurns the camera off (p.46).2Mode dialChanges capture mode (p.68).3b (Flash pop-up) leverPops the flash up.4Zoom leverChanges the captured area (p.60).5Shutter release buttonCaptures images (p.55).6Movie buttonStarts movie recording when the...
-
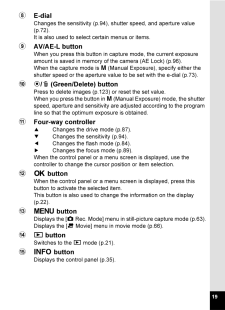
21 .198E-dialChanges the sens...198E-dialChanges the sensitivity (p.94), shutter speed, and aperture value (p.72).It is also used to select certain menus or items.9AV/AE-L buttonWhen you press this button in capture mode, the current exposure amount is saved in memory of the camera (AE L...
-
22 .201Power buttonTurns the ...201Power buttonTurns the camera off (p.46).2Zoom leverEnlarges the playback image (p.131) or activates the multi-image display (p.125).Adjusts the sound volume in movie playback (p.124).3Shutter release buttonSwitches to A mode (p.21).4E-dialEnlarges the p...
-
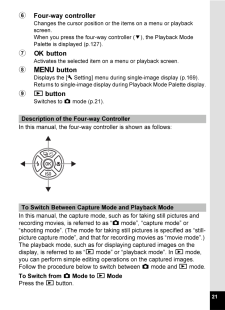
23 .216Four-way controllerCha...216Four-way controllerChanges the cursor position or the items on a menu or playback screen.When you press the four-way controller ( 3), the Playback Mode Palette is displayed (p.127).7 4 buttonActivates the selected item on a menu or playback screen.83 b...
-
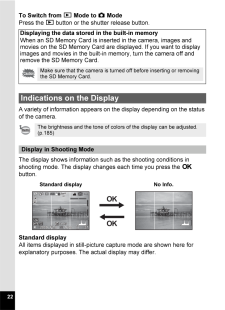
24 .22To Switch from Q Mode t...22To Switch from Q Mode to A ModePress the Q button or the shutter release button.A variety of information appears on the display depending on the status of the camera.The display shows information such as the shooting conditions in shooting mode. The disp...
-
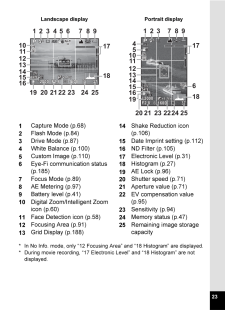
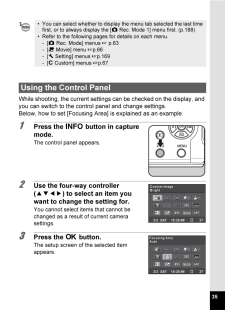
25 .23* In No Info. mode, onl...23* In No Info. mode, only "12 Focusing Area" and "18 Histogr am" are displayed.* During movie recording, "17 Electroni c Level" and "18 Histogram" are not displayed.1Capture Mode (p.68)14Shake Reduction icon (p.106)2Flash Mode (p.84)3Drive Mode (p.87)15D...
-
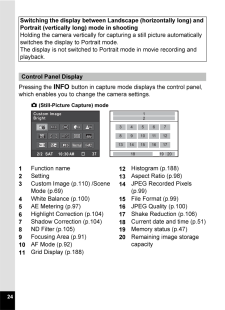
26 .24Pressing the M button i...24Pressing the M button in capture mode displays the control panel, which enables you to change the camera settings.Switching the display between Landscape (horizontally long) and Portrait (vertically long) mode in shootingHolding the camera vertically for...
-
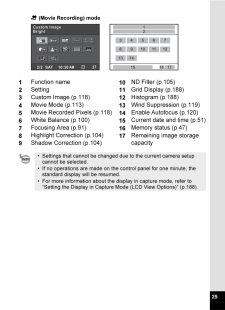
27 .251Function name10ND Filt...251Function name10ND Filter (p.105)2Setting11Grid Display (p.188)3Custom Image (p.118)12Histogram (p.188)4Movie Mode (p.113)13Wind Suppression (p.119)5Movie Recorded Pixels (p.118)14Enable Autofocus (p.120)6White Balance (p.100)15Current date and time (p.5...
-
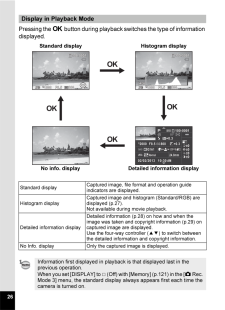
28 .26Pressing the 4 button d...26Pressing the 4 button during playback switches the type of information displayed.Display in Playback ModeStandard displayCaptured image, file format and operation guide indicators are displayed.Histogram displayCaptured image and histogram (Standard/RGB)...
-
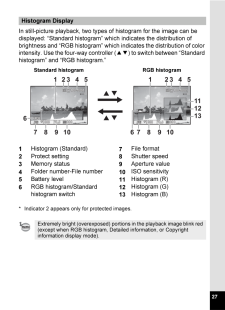
29 .27In still-picture playba...27In still-picture playback, two types of histogram for the image can be displayed: "Standard histogram" which indicates the distribution of brightness and "RGB histogram" which indicates the distribution of color intensity. Use the four-way controller ( 2...
-
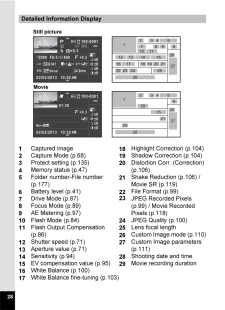
30 .28Detailed Information Di...28Detailed Information Display1Captured image18Highlight Correction (p.104)2Capture Mode (p.68)19Shadow Correction (p.104)3Protect setting (p.135)20Distortion Corr. (Correction) (p.106)4Memory status (p.47)5Folder number-File number (p.177)21Shake Reductio...
-
31 .29* Indicators 10 and 11 ...29* Indicators 10 and 11 appear only for images taken with the flash.* Indicators 17, 18, 19, and 20 appear only for images taken with the corresponding functions enabled.* Indicators 23 and 24 do not appear for RAW images.A histogram shows the brightness ...
-
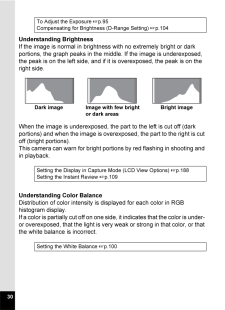
32 .30Understanding Brightnes...30Understanding BrightnessIf the image is normal in brightness with no extremely bright or dark portions, the graph peaks in the middle. If the image is underexposed, the peak is on the left side, and if it is overexposed, the peak is on the right side.Whe...
-
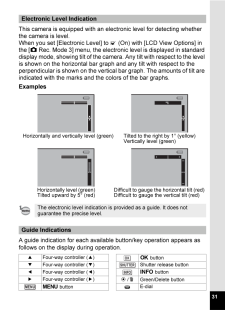
33 .31This camera is equipped...31This camera is equipped with an electronic level for detecting whether the camera is level.When you set [Electronic Level] to O (On) with [LCD View Options] in the [A Rec. Mode 3] menu, the electronic level is displayed in standard display mode, showing...
-
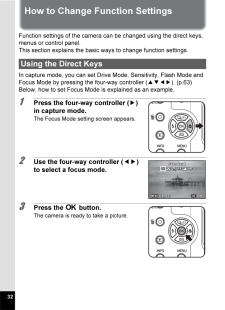
34 .32How to Change Function ...32How to Change Function SettingsFunction settings of the camera can be changed using the direct keys, menus or control panel.This section explains the basic ways to change function settings.In capture mode, you can set Drive Mode, Sensitivity, Flash Mode ...
-
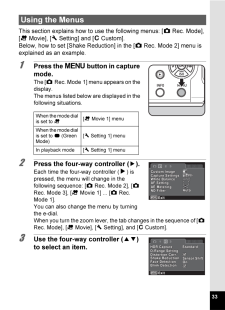
35 .33This section explains h...33This section explains how to use the following menus: [ ARec. Mode], [CMovie], [RSetting] and [ACustom].Below, how to set [Shake Reduction] in the [ ARec. Mode 2] menu is explained as an example.1 Press the 3 button in capture mode.The [ARec. Mode 1] men...
-
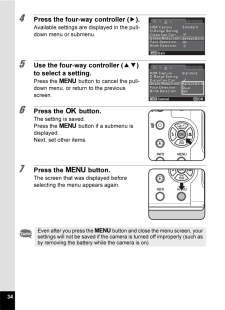
36 .344 Press the four-way co...344 Press the four-way controller ( 5).Available settings are displayed in the pull-down menu or submenu.5 Use the four-way controller ( 23) to select a setting.Press the 3 button to cancel the pull-down menu, or return to the previous screen.6 Press the 4...
-
37 .35While shooting, the cur...35While shooting, the current settings can be checked on the display, and you can switch to the control panel and change settings.Below, how to set [Focusing Area] is explained as an example.1 Press the M button in capture mode.The control panel appears.2 ...
-
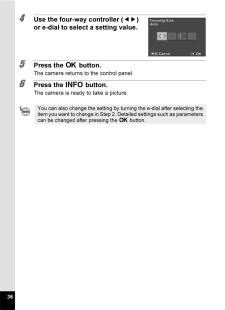
38 .364 Use the four-way cont...364 Use the four-way controller ( 45) or e-dial to select a setting value.5 Press the 4 button.The camera returns to the control panel.6 Press the M button.The camera is ready to take a picture.You can also change the setting by turning the e-dial after se...
-
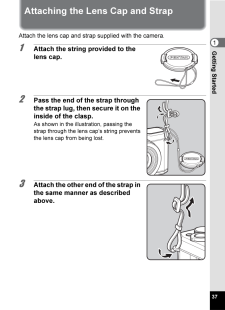
39 .371Getting StartedGetting...371Getting StartedGetting StartedAttaching the Lens Cap and StrapAttach the lens cap and strap supplied with the camera.1 Attach the string provided to the lens cap.2 Pass the end of the strap through the strap lug, then secure it on the inside of the clas...
-
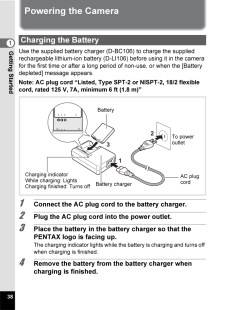
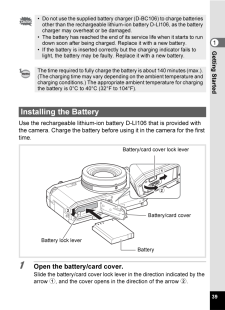
40 .381Getting StartedPowerin...381Getting StartedPowering the CameraUse the supplied battery charger (D-BC106) to charge the supplied rechargeable lithium-ion battery (D-LI106) before using it in the camera for the first time or after a long period of non-use, or when the [Battery deple...
-
41 .391Getting StartedUse the...391Getting StartedUse the rechargeable lithium-ion battery D-LI106 that is provided with the camera. Charge the battery before using it in the camera for the first time.1 Open the battery/card cover.Slide the battery/card cover lock lever in the direction ...
-
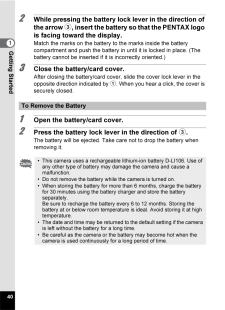
42 .401Getting Started2 While...401Getting Started2 While pressing the battery lock lever in the direction of the arrow 3, insert the battery so that the PENTAX logo is facing toward the display.Match the marks on the battery to the marks inside the battery compartment and push the batte...
-
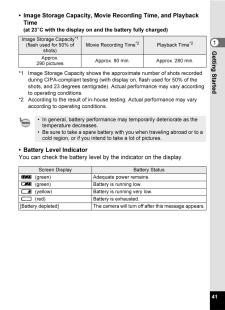
43 .411Getting Started* Image...411Getting Started* Image Storage Capacity, Movie Recording Time, and Playback Time(at 23 C with the display on and the battery fully charged)*1 Image Storage Capacity shows the approximate number of shots recorded during CIPA-compliant testing (with displ...
-
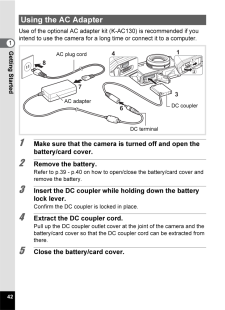
44 .421Getting StartedUse of ...421Getting StartedUse of the optional AC adapter kit (K-AC130) is recommended if you intend to use the camera for a long time or connect it to a computer.1 Make sure that the camera is turned off and open the battery/card cover.2 Remove the battery.Refer t...
-
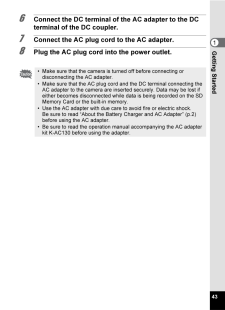
45 .431Getting Started6 Conne...431Getting Started6 Connect the DC terminal of the AC adapter to the DC terminal of the DC coupler.7 Connect the AC plug cord to the AC adapter.8 Plug the AC plug cord into the power outlet.* Make sure that the camera is turned off before connecting or di...
-
46 .441Getting StartedInstall...441Getting StartedInstalling an SD Memory CardThis camera uses a commercially available SD Memory Card, SDHC Memory Card, or SDXC Memory Card. Captured images are saved on the SD Memory Card when a card is inserted in the camera. They are saved in the buil...
-
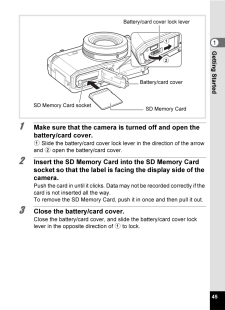
47 .451Getting Started1 Make ...451Getting Started1 Make sure that the camera is turned off and open the battery/card cover.1 Slide the battery/card cover lock lever in the direction of the arrow and 2 open the battery/card cover.2 Insert the SD Memory Card into the SD Memory Card socke...
-
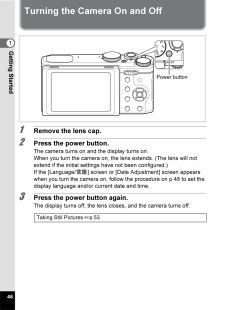
48 .461Getting StartedTurning...461Getting StartedTurning the Camera On and Off1 Remove the lens cap.2 Press the power button.The camera turns on and the display turns on.When you turn the camera on, the lens extends. (The lens will not extend if the initial settings have not been config...
-
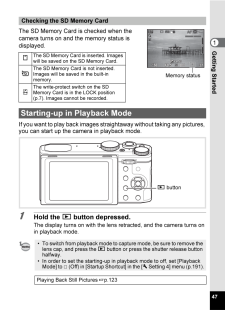
49 .471Getting StartedThe SD ...471Getting StartedThe SD Memory Card is checked when the camera turns on and the memory status is displayed.If you want to play back images straightaway without taking any pictures, you can start up the camera in playback mode.1 Hold the Q button depressed...
-
50 .481Getting StartedInitial...481Getting StartedInitial SettingsThe [Language/u] screen appears when the camera is turned on for the first time (p.46). Perform the operations in "Setting the Display Language" below to set the language, and in "Setting the Date and Time" (p.51) to set t...
-
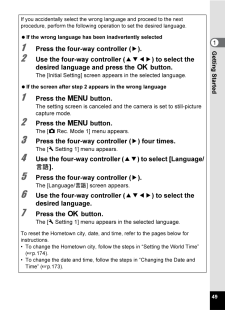
51 .491Getting StartedIf you ...491Getting StartedIf you accidentally select the wrong language and proceed to the next procedure, perform the following operation to set the desired language.?If the wrong language has been inadvertently selected1 Press the four-way controller ( 5).2 Use...
-
52 .501Getting Started3 Press...501Getting Started3 Press the four-way controller ( 3).The frame moves to [ W Hometown].4 Press the four-way controller ( 5).The [W Hometown] screen appears.5 Use the four-way controller ( 45) to choose a city.6 Press the four-way controller ( 3).The frame...
-
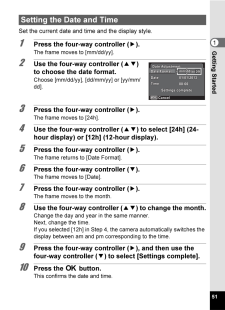
53 .511Getting StartedSet the...511Getting StartedSet the current date and time and the display style.1 Press the four-way controller ( 5).The frame moves to [mm/dd/yy].2 Use the four-way controller ( 23) to choose the date format.Choose [mm/dd/yy], [dd/mm/yy] or [yy/mm/dd].3 Press the f...
-
54 .521Getting StartedIf you ...521Getting StartedIf you press the 4 button in Step 10, the camera clock is reset to 0 seconds. To set the exact time, press the 4 button when the time signal (on the TV, radio, etc.) reaches 0 seconds.When the [Initial Setting] or [Date Adjustment] scree...
-
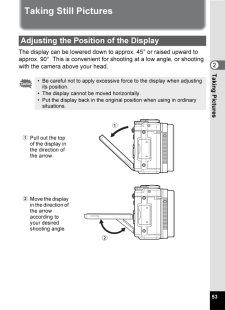
55 .532Taking PicturesTaking ...532Taking PicturesTaking PicturesTaking Still PicturesThe display can be lowered down to approx. 45 or raised upward to approx. 90. This is convenient for shooting at a low angle, or shooting with the camera above your head.Adjusting the Position of the Di...
-
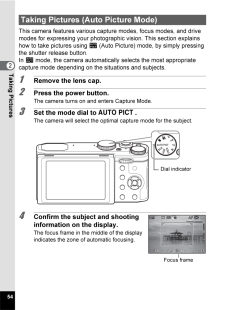
56 .542Taking PicturesThis ca...542Taking PicturesThis camera features various capture modes, focus modes, and drive modes for expressing your photographic vision. This section explains how to take pictures using b (Auto Picture) mode, by simply pressing the shutter release button.In b ...
-
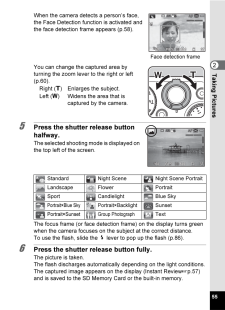
57 .552Taking PicturesWhen th...552Taking PicturesWhen the camera detects a person's face, the Face Detection function is activated and the face detection frame appears (p.58).You can change the captured area by turning the zoom lever to the right or left (p.60).Right (5) Enlarges the su...
-
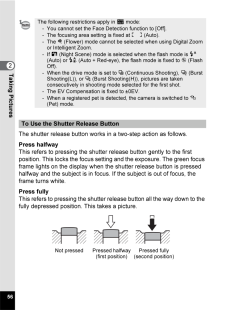
58 .562Taking PicturesThe shu...562Taking PicturesThe shutter release button works in a two-step action as follows.Press halfwayThis refers to pressing the shutter release button gently to the first position. This locks the focus setting and the exposure. The green focus frame lights on ...
-
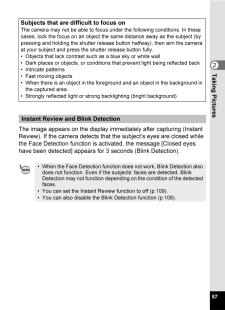
59 .572Taking PicturesThe ima...572Taking PicturesThe image appears on the display immediately after capturing (Instant Review). If the camera detects that the subject's eyes are closed while the Face Detection function is activated, the message [Closed eyes have been detected] appears f...
-
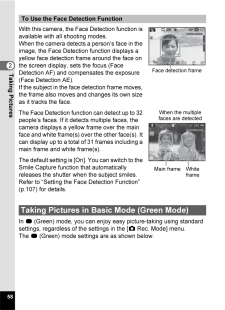
60 .582Taking PicturesWith th...582Taking PicturesWith this camera, the Face Detection function is available with all shooting modes.When the camera detects a person's face in the image, the Face Detection function displays a yellow face detection frame around the face on the screen disp...
-
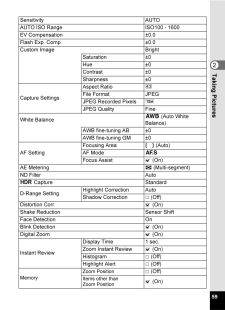
61 .592Taking PicturesSensiti...592Taking PicturesSensitivity AUTOAUTO ISO Range ISO100 - 1600EV Compensation +-0.0Flash Exp. Comp. +-0.0Custom Image BrightSaturation +-0Hue +-0Contrast +-0Sharpness +-0Capture SettingsAspect Ratio DFile Format JPEGJPEG Recorded Pixels EJPEG Quality FineW...
-
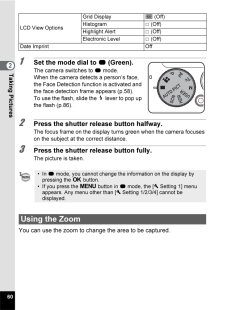
62 .602Taking Pictures1 Set t...602Taking Pictures1 Set the mode dial to 9 (Green).The camera switches to 9 mode.When the camera detects a person's face, the Face Detection function is activated and the face detection frame appears (p.58).To use the flash, slide the b lever to pop up ...
-
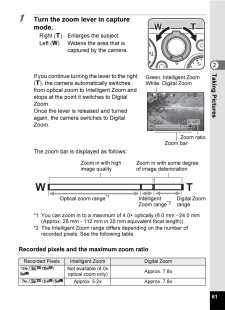
63 .612Taking Pictures1 Turn ...612Taking Pictures1 Turn the zoom lever in capture mode.Right (5) Enlarges the subject.Left (6) Widens the area that is captured by the camera.If you continue turning the lever to the right (5), the camera automatically switches from optical zoom to Intell...
-
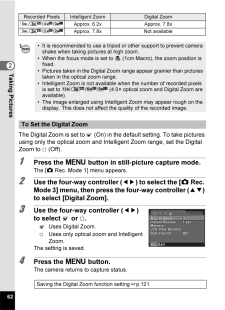
64 .622Taking PicturesThe Dig...622Taking PicturesThe Digital Zoom is set to O (On) in the default setting. To take pictures using only the optical zoom and Intelligent Zoom range, set the Digital Zoom to P (Off).1 Press the 3 button in still-picture capture mode.The [A Rec. Mode 1] men...
-
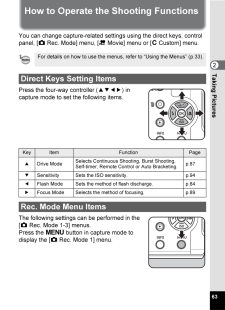
65 .632Taking PicturesHow to ...632Taking PicturesHow to Operate the Shooting FunctionsYou can change capture-related settings using the direct keys, control panel, [A Rec. Mode] menu, [ C Movie] menu or [A Custom] menu.Press the four-way controller ( 2345) in capture mode to set the fol...
-
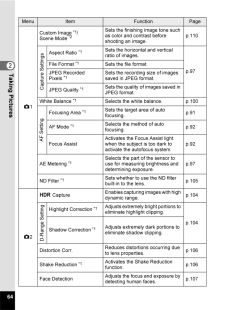
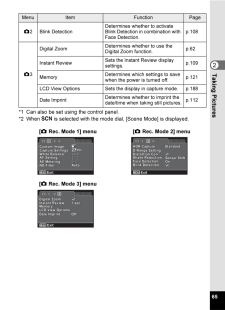
66 .642Taking PicturesMenu It...642Taking PicturesMenu Item Function PageA1Custom Image *1/Scene Mode *2Sets the finishing image tone such as color and contrast before shooting an image.p.110Capture SettingsAspect Ratio *1Sets the horizontal and vertical ratio of images.p.97File Format *...
-
67 .652Taking Pictures*1 Can ...652Taking Pictures*1 Can also be set using the control panel.*2 When ! is selected with the mode dial, [Scene Mode] is displayed.A2 Blink DetectionDetermines whether to activate Blink Detection in combination with Face Detection.p.108A3Digital ZoomDetermin...
-
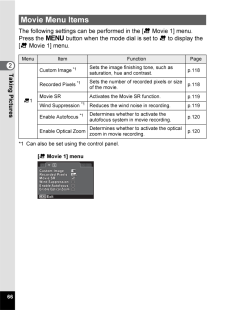
68 .662Taking PicturesThe fol...662Taking PicturesThe following settings can be performed in the [ C Movie 1] menu.Press the 3 button when the mode dial is set to C to display the [C Movie 1] menu.*1 Can also be set using the control panel.Movie Menu ItemsMenu Item Function PageC1Custom...
-
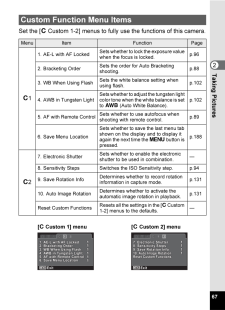
69 .672Taking PicturesSet the...672Taking PicturesSet the [A Custom 1-2] menus to fully use the functions of this camera.Custom Function Menu ItemsMenu Item Function PageA11. AE-L with AF LockedSets whether to lock the exposure value when the focus is locked.p.962. Bracketing OrderSets t...
-
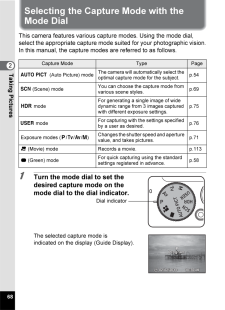
70 .682Taking PicturesSelecti...682Taking PicturesSelecting the Capture Mode with the Mode DialThis camera features various capture modes. Using the mode dial, select the appropriate capture mode suited for your photographic vision.In this manual, the capture modes are referred to as fol...
-
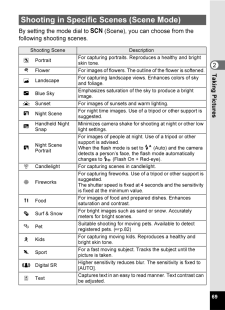
71 .692Taking PicturesBy sett...692Taking PicturesBy setting the mode dial to ! (Scene), you can choose from the following shooting scenes.Shooting in Specific Scenes (Scene Mode)Shooting Scene DescriptionFPortraitFor capturing portraits. Reproduces a healthy and bright skin tone.bFlowe...
-
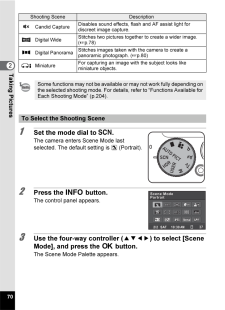
72 .702Taking Pictures1 Set t...702Taking Pictures1 Set the mode dial to !.The camera enters Scene Mode last selected. The default setting is F (Portrait).2 Press the M button.The control panel appears.3 Use the four-way controller ( 2345) to select [Scene Mode], and press the 4 butto...
-
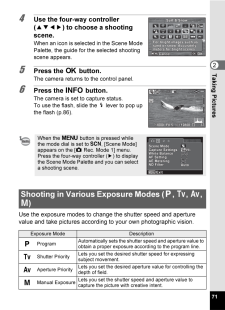
73 .712Taking Pictures4 Use t...712Taking Pictures4 Use the four-way controller (2345) to choose a shooting scene.When an icon is selected in the Scene Mode Palette, the guide for the selected shooting scene appears.5 Press the 4 button.The camera returns to the control panel.6 Press the...
-
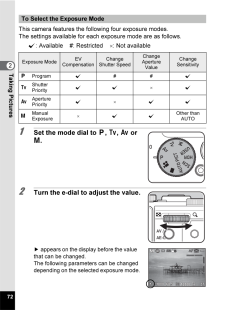
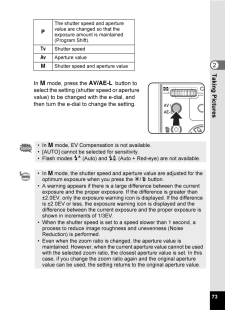
74 .722Taking PicturesThis ca...722Taking PicturesThis camera features the following four exposure modes.The settings available for each exposure mode are as follows.z: Available #: Restricted ×: Not available1 Set the mode dial to e, b, c or a.2 Turn the e-dial to adjust the val...
-
75 .732Taking PicturesIn a mo...732Taking PicturesIn a mode, press the A button to select the setting (shutter speed or aperture value) to be changed with the e-dial, and then turn the e-dial to change the setting.eThe shutter speed and aperture value are changed so that the exposure amo...
-
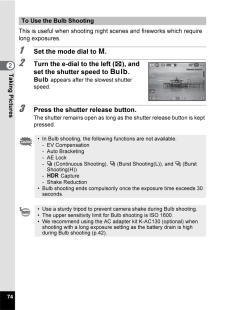
76 .742Taking PicturesThis is...742Taking PicturesThis is useful when shooting night scenes and fireworks which require long exposures.1 Set the mode dial to a.2 Turn the e-dial to the left ( f), and set the shutter speed to h.h appears after the slowest shutter speed.3 Press the shutt...
-
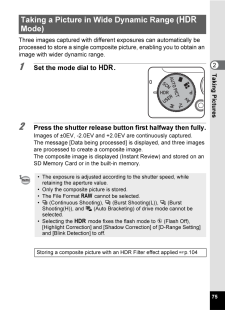
77 .752Taking PicturesThree i...752Taking PicturesThree images captured with different exposures can automatically be processed to store a single composite picture, enabling you to obtain an image with wider dynamic range.1 Set the mode dial to p. 2 Press the shutter release button firs...
-
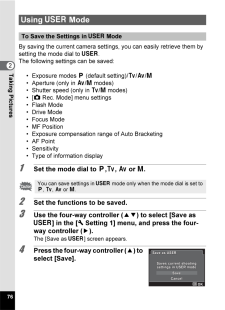
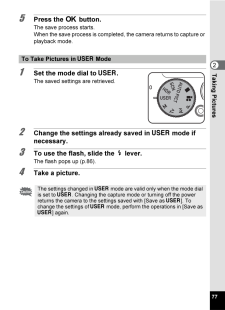
78 .762Taking PicturesBy savi...762Taking PicturesBy saving the current camera settings, you can easily retrieve them by setting the mode dial to #.The following settings can be saved:* Exposure modes e (default setting)/b/c/a* Aperture (only in c/a modes)* Shutter speed (only in b/a m...
-
79 .772Taking Pictures5 Press...772Taking Pictures5 Press the 4 button.The save process starts.When the save process is completed, the camera returns to capture or playback mode.1 Set the mode dial to #.The saved settings are retrieved.2 Change the settings already saved in # mode if n...
-
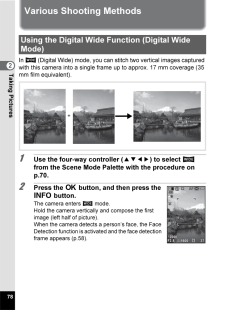
80 .782Taking PicturesVarious...782Taking PicturesVarious Shooting MethodsIn X (Digital Wide) mode, you can stitch two vertical images captured with this camera into a single frame up to approx. 17 mm coverage (35 mm film equivalent).1 Use the four-way controller ( 2345) to select X from...
-
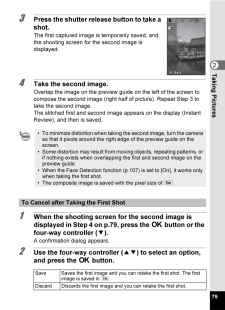
81 .792Taking Pictures3 Press...792Taking Pictures3 Press the shutter release button to take a shot.The first captured image is temporarily saved, and the shooting screen for the second image is displayed.4 Take the second image.Overlap the image on the preview guide on the left of the s...
-
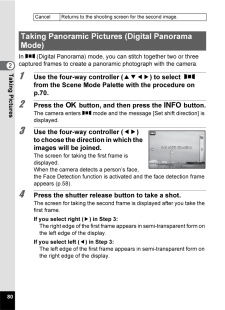
82 .802Taking PicturesIn F (D...802Taking PicturesIn F (Digital Panorama) mode, you can stitch together two or three captured frames to create a panoramic photograph with the camera.1 Use the four-way controller ( 2345) to select F from the Scene Mode Palette with the procedure on p.70....
-
83 .812Taking Pictures5 Take ...812Taking Pictures5 Take the second frame.Move the camera so that the semi-transparent image and the actual view overlap and press the shutter release button.6 Take the third frame.Repeat Steps 4 and 5 to take the third frame.The panorama images are joined...
-
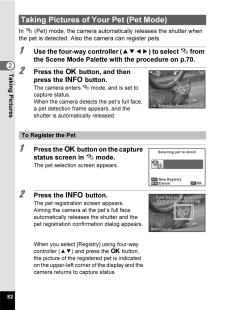
84 .822Taking PicturesIn e (P...822Taking PicturesIn e (Pet) mode, the camera automatically releases the shutter when the pet is detected. Also the camera can register pets.1 Use the four-way controller ( 2345) to select e from the Scene Mode Palette with the procedure on p.70.2 Press th...
-
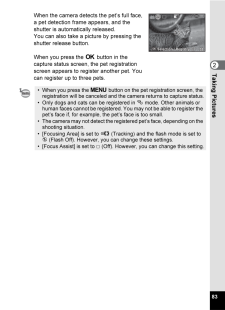
85 .832Taking PicturesWhen th...832Taking PicturesWhen the camera detects the pet's full face, a pet detection frame appears, and the shutter is automatically released.You can also take a picture by pressing the shutter release button.When you press the 4 button in the capture status sc...
-
86 .842Taking PicturesSetting...842Taking PicturesSetting the Shooting FunctionsSelecting the Flash ModeCAutoThe flash discharges automatically depending on the light conditions. If the Face Detection function is activated, the flash mode is automatically set to F.aFlash OffThe flash do...
-
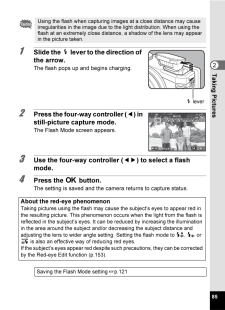
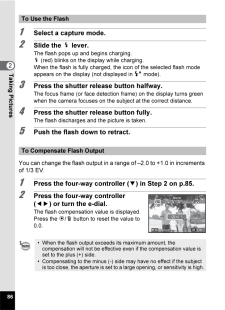
87 .852Taking Pictures1 Slide...852Taking Pictures1 Slide the b lever to the direction of the arrow.The flash pops up and begins charging.2 Press the four-way controller ( 4) in still-picture capture mode.The Flash Mode screen appears.3 Use the four-way controller ( 45) to select a flash...
-
88 .862Taking Pictures1 Selec...862Taking Pictures1 Select a capture mode.2 Slide the b lever.The flash pops up and begins charging.b (red) blinks on the display while charging.When the flash is fully charged, the icon of the selected flash mode appears on the display (not displayed in ...
-
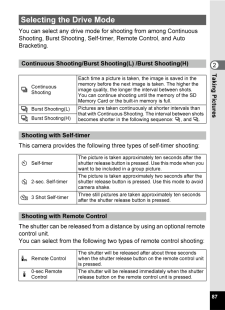
89 .872Taking PicturesYou can...872Taking PicturesYou can select any drive mode for shooting from among Continuous Shooting, Burst Shooting, Self-timer, Remote Control, and Auto Bracketing.This camera provides the following three types of self-timer shooting:The shutter can be released f...
-
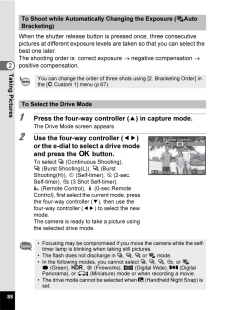
90 .882Taking PicturesWhen th...882Taking PicturesWhen the shutter release button is pressed once, three consecutive pictures at different exposure levels are taken so that you can select the best one later.The shooting order is: correct exposure → negative compensation → positive comp...
-
91 .892Taking Pictures* For m...892Taking Pictures* For movies using the self-timer, recording will start ten seconds or two seconds after the shutter release button or the Movie button is pressed.* Press the shutter release button halfway while the self-timer is running to stop the coun...
-
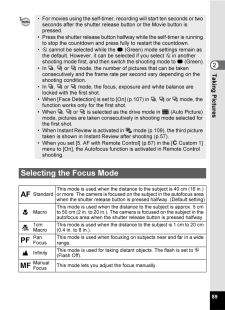
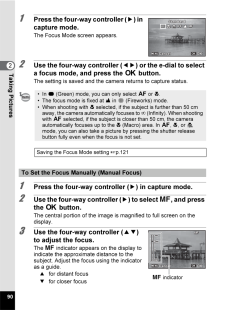
92 .902Taking Pictures1 Press...902Taking Pictures1 Press the four-way controller ( 5) in capture mode.The Focus Mode screen appears.2 Use the four-way controller ( 45) or the e-dial to select a focus mode, and press the 4 button.The setting is saved and the camera returns to capture st...
-
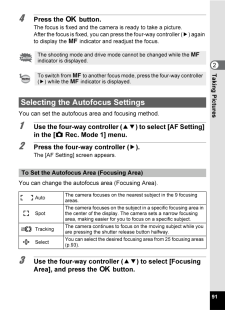
93 .912Taking Pictures4 Press...912Taking Pictures4 Press the 4 button.The focus is fixed and the camera is ready to take a picture.After the focus is fixed, you can press the four-way controller ( 5) again to display the \ indicator and readjust the focus.You can set the autofocus area ...
-
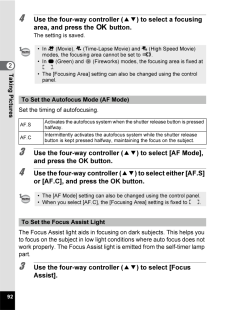
94 .922Taking Pictures4 Use t...922Taking Pictures4 Use the four-way controller ( 23) to select a focusing area, and press the 4 button.The setting is saved.Set the timing of autofocusing.3 Use the four-way controller ( 23) to select [AF Mode], and press the OK button.4 Use the four-way ...
-
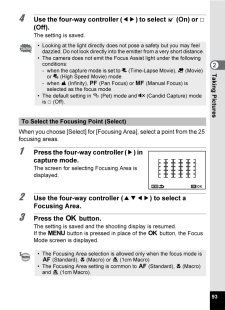
95 .932Taking Pictures4 Use t...932Taking Pictures4 Use the four-way controller ( 45) to select O (On) or P (Off).The setting is saved.When you choose [Select] for [Focusing Area], select a point from the 25 focusing areas.1 Press the four-way controller ( 5) in capture mode.The screen f...
-
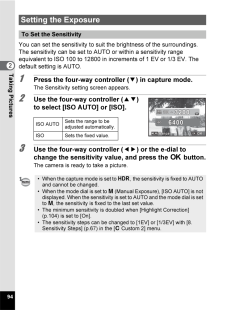
96 .942Taking PicturesYou can...942Taking PicturesYou can set the sensitivity to suit the brightness of the surroundings.The sensitivity can be set to AUTO or within a sensitivity range equivalent to ISO 100 to 12800 in increments of 1 EV or 1/3 EV. The default setting is AUTO.1 Press th...
-
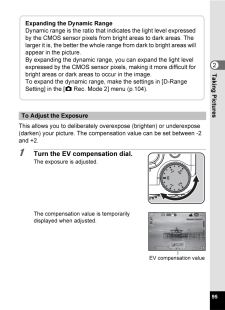
97 .952Taking PicturesThis al...952Taking PicturesThis allows you to deliberately overexpose (brighten) or underexpose (darken) your picture. The compensation value can be set between -2 and +2.1 Turn the EV compensation dial.The exposure is adjusted.The compensation value is temporarily...
-
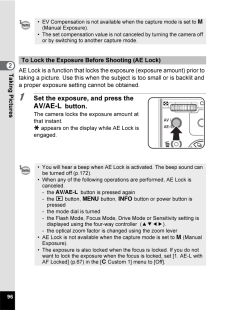
98 .962Taking PicturesAE Lock...962Taking PicturesAE Lock is a function that locks the exposure (exposure amount) prior to taking a picture. Use this when the subject is too small or is backlit and a proper exposure setting cannot be obtained.1 Set the exposure, and press the A button.Th...
-
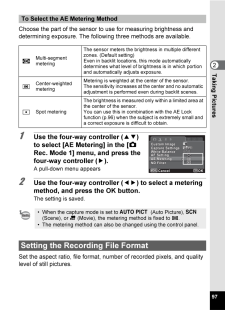
99 .972Taking PicturesChoose ...972Taking PicturesChoose the part of the sensor to use for measuring brightness and determining exposure. The following three methods are available.1 Use the four-way controller ( 23) to select [AE Metering] in the [ A Rec. Mode 1] menu, and press the four...
-
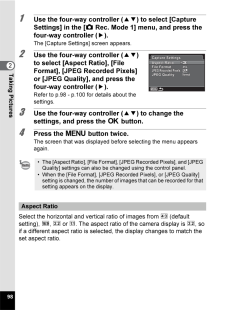
100 .982Taking Pictures1 Use t...982Taking Pictures1 Use the four-way controller ( 23) to select [Capture Settings] in the [A Rec. Mode 1] menu, and press the four-way controller ( 5).The [Capture Settings] screen appears.2 Use the four-way controller ( 23) to select [Aspect Ratio], [File...
