
Optio E75の取扱説明書・マニュアル [全63ページ 1.49MB]


5


6 / 63 ページ
6 / 63 ページ


現在のページURL
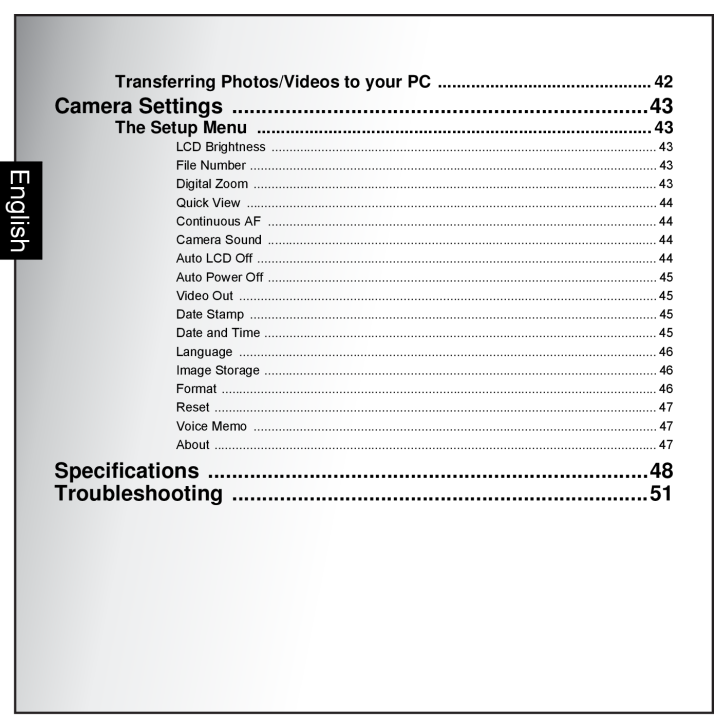
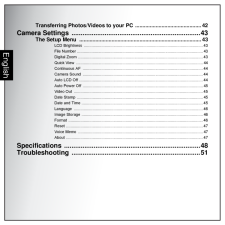
EnglishTransferring Photos/Videos to your PC .............................................42Camera Settings ...................... ................................................43The Setup Menu ...................................................................................43LCD Brightness ............................................................................................................43File Number ..................................................................................................................4 3Digital Zoom .................................................................................................................4 3Quick View ...................................................................................................................4 4Continuous AF .............................................................................................................44Camera Sound .............................................................................................................44Auto LCD Off ................................................................................................................44Auto Power Off .............................................................................................................45Video Out ..................................................................................................................... 45Date Stamp ..................................................................................................................45Date and Time ..............................................................................................................45Language .....................................................................................................................4 6Image Storage ..............................................................................................................46Format ........................................................................................................................ ..46Reset ......................................................................................................................... ...47Voice Memo .................................................................................................................47About ......................................................................................................................... ...47Specifications .......................... ................................................48Troubleshooting ......... .............................................................51
参考になったと評価  18人が参考になったと評価しています。
その他の取扱説明書

73886 view
このマニュアルの目次
-
1 .Digital CameraOperating M...Digital CameraOperating ManualTo ensure the best performance from your camera, please read the Operating Manual before using the camera.EN
-
2 .2 ページ目のマニュアル
-
3 .EnglishTable of ContentsP...EnglishTable of ContentsPreface ........................................................................................iAbout this Manual ...................................................................................iRegarding Copyrights ..............
-
4 .EnglishCamera Setup ........EnglishCamera Setup ..........................................................................15Attaching the Wrist Strap ....................................................................15Inserting the Battery ............................................
-
5 .EnglishISO Speed ...........EnglishISO Speed ....................................................................................................................2 8AE Metering ..............................................................................................................
-
6 .EnglishTransferring Photo...EnglishTransferring Photos/Videos to your PC .............................................42Camera Settings ...................... ................................................43The Setup Menu ..............................................................
-
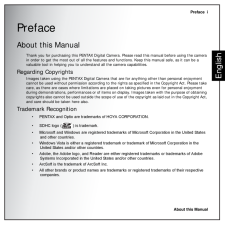
7 .Preface iAbout this Manu...Preface iAbout this ManualEnglishPrefaceAbout this ManualThank you for purchasing this PENTAX Digital Camera. Please read this manual before using the camera in order to get the most out of all the features and functions. Keep this manual safe, as it can ...
-
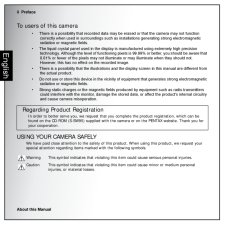
8 .ii PrefaceAbout this Man...ii PrefaceAbout this ManualEnglishTo users of this camera* There is a possibility that recorded data may be erased or that the camera may not function correctly when used in surroundings such as installations generating strong electromagnetic radiation or...
-
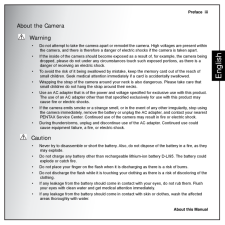
9 .Preface iiiAbout this Ma...Preface iiiAbout this ManualEnglishAbout the Camera Warning* Do not attempt to take the camera apart or remodel the camera. High voltages are present within the camera, and there is therefor e a danger of electric shocks if the camera is taken apart.* If...
-
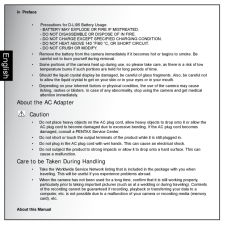
10 .iv PrefaceAbout this Man...iv PrefaceAbout this ManualEnglish* Precautions for D-LI95 Battery Usage:- BATTERY MAY EXPLODE OR FIRE IF MISTREATED.- DO NOT DISASSEMBLE OR DISPOSE OF IN FIRE.- DO NOT CHARGE EXCEPT SPECIFIED CHARGING CONDITION.- DO NOT HEAT ABOVE 140 F/60 C, OR SHORT C...
-
11 .Preface vAbout this Manu...Preface vAbout this ManualEnglish* The lens on this camera is not interchangeable. The lens is not removable.* Do not clean the product with organic solvents such as thinner, alcohol or benzene.* Places of high temperature and humidity should be avoided. ...
-
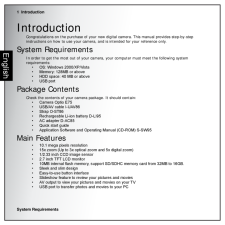
12 .1 IntroductionSystem Req...1 IntroductionSystem RequirementsEnglishIntroductionCongratulations on the purchase of your new di gital camera. This manual provides step-by-step instructions on how to use your camera, and is intended for your reference only.System RequirementsIn order ...
-
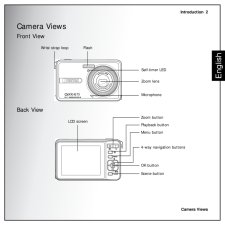
13 .Introduction 2Camera Vie...Introduction 2Camera ViewsEnglishCamera ViewsFront ViewBack ViewFlashZoom lensWrist strap loopSelf-timer LEDMicrophoneLCD screenScene buttonOK buttonMenu button4-way navigation buttonsPlayback buttonZoom button
-
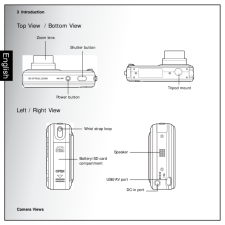
14 .3 IntroductionCamera Vie...3 IntroductionCamera ViewsEnglishTop View / Bottom ViewLeft / Right ViewON / OFF3X OPTICAL ZOOMShutter buttonPower buttonZoom lensTripod mountUSB/AV portWrist strap loopSpeakerBattery/SD card compartmentDC-in port
-
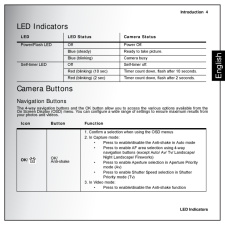
15 .Introduction 4LED Indica...Introduction 4LED IndicatorsEnglishLED IndicatorsCamera ButtonsNavigation ButtonsThe 4-way navigation buttons and the OK button allow you to access the various options available from theOn Screen Display (OSD) menu. You can configure a wide range of setti...
-
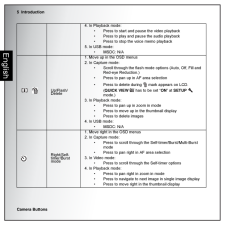
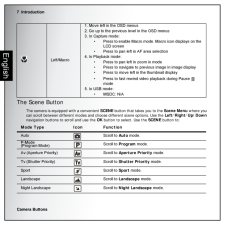
16 .5 IntroductionCamera But...5 IntroductionCamera ButtonsEnglish4. In Playback mode:* Press to start and pause the video playback* Press to play and pause the audio playback* Press to stop the voice memo playback 5. In USB mode:* MSDC: N/AUp/Flash/Delete 1. Move up in the OSD menu...
-
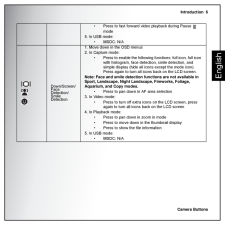
17 .Introduction 6Camera But...Introduction 6Camera ButtonsEnglish * Press to fast forward video playback during Pause mode5. In USB mode: * MSDC: N/ADown/Screen/FaceDetection/SmileDetection1. Move down in the OSD menus2. In Capture mode: * Press to enable the following functions: ...
-
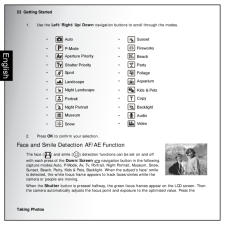
18 .7 IntroductionCamera But...7 IntroductionCamera ButtonsEnglishThe Scene ButtonThe camera is equipped with a convenient SCENE button that takes you to the Scene Menu where you can scroll between different modes and choose different scene options. Use the Left/Right/Up/Down navig...
-
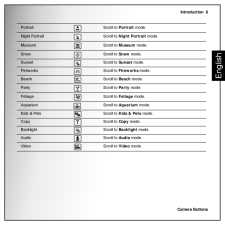
19 .Introduction 8Camera But...Introduction 8Camera ButtonsEnglishPortrait Scroll to Portrait mode.Night Portrait Scroll to Night Portrait mode.Museum Scroll to Museum mode.Snow Scroll to Snow mode.Sunset Scroll to Sunset mode.Fireworks Scroll to Fireworks mode.Beach Scroll to Beach m...
-
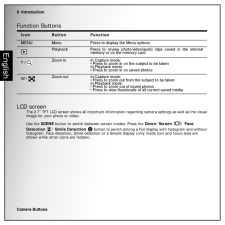
20 .9 IntroductionCamera But...9 IntroductionCamera ButtonsEnglishFunction ButtonsLCD screenThe 2.7" TFT LCD screen shows all important information regarding camera settings as well as the visual image for your photo or video.Use the SCENE button to switch between screen modes. Press ...
-
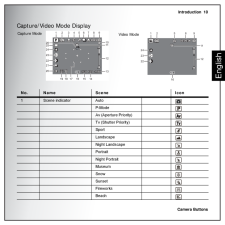
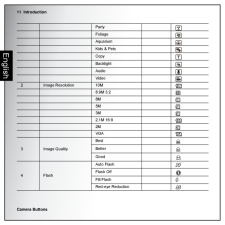
21 .Introduction 10Camera Bu...Introduction 10Camera ButtonsEnglishCapture/Video Mode Display No. Name Scene Icon1 Scene indicator AutoP-ModeAv (Aperture Priority)Tv (Shutter Priority)SportLandscapeNight LandscapePortraitNight PortraitMuseumSnowSunsetFireworksBeachVideo ModeCapture Mo...
-
22 .11 IntroductionCamera Bu...11 IntroductionCamera ButtonsEnglishParty FoliageAquariumKids & PetsCopyBacklightAudioVideo2Image Resolution 10M8.9M 3:28M5M3M2.1M 16:92MVGA3Image QualityBestBetterGood4FlashAuto FlashFlash OffFill FlashRed-eye Reduction
-
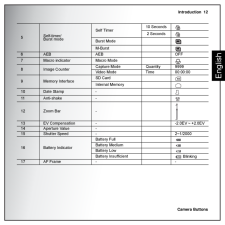
23 .Introduction 12Camera Bu...Introduction 12Camera ButtonsEnglish5Self-timer/Burst modeSelf Timer10 Seconds 2 SecondsBurst ModeM-Burst6AEB AEB OFF7Macro indicator Macro Mode8Image CounterCapture Mode Quantity 9999Video Mode Time 00:00:009Memory InterfaceSD CardInternal Memory10 Date ...
-
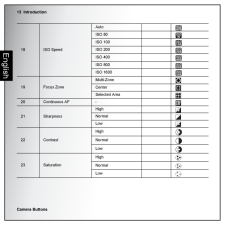
24 .13 IntroductionCamera Bu...13 IntroductionCamera ButtonsEnglish18 ISO SpeedAutoISO 80ISO 100ISO 200ISO 400ISO 800ISO 160019 Focus ZoneMulti-ZoneCenterSelected Area20 Continuous AF -21 SharpnessHighNormalLow22 ContrastHighNormalLow23 SaturationHighNormalLow
-
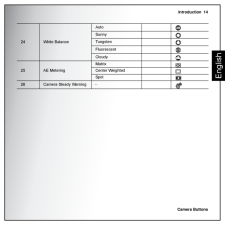
25 .Introduction 14Camera Bu...Introduction 14Camera ButtonsEnglish24 White BalanceAutoSunnyTungstenFluorescentCloudy25 AE MeteringMatrixCenter WeightedSpot26 Camera Steady Warning -
-
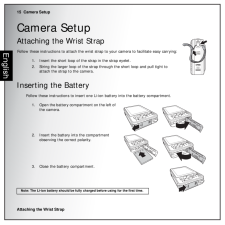
26 .15 Camera SetupAttaching...15 Camera SetupAttaching the Wrist StrapEnglishCamera SetupAttaching the Wrist StrapFollow these instructions to attach the wrist strap to your camera to facilitate easy carrying:1. Insert the short loop of the strap in the strap eyelet.2. String the larg...
-
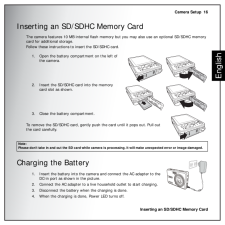
27 .Camera Setup 16Inserting...Camera Setup 16Inserting an SD/SDHC Memory CardEnglishInserting an SD/SDHC Memory CardThe camera features 10 MB internal flash memory but you may also use an optional SD/SDHC memory card for additional storage. Follow these instructions to insert the SD/S...
-
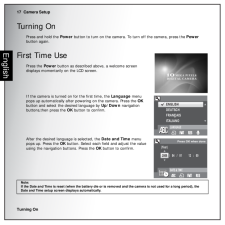
28 .17 Camera SetupTurning O...17 Camera SetupTurning OnEnglishTurning OnPress and hold the Power button to turn on the camera. To turn off the camera, press the Power button again.First Time UsePress the Power button as described above, a welcome screen displays momentarily on the L...
-
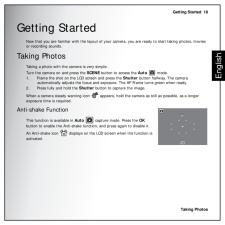
29 .Getting Started 18Taking...Getting Started 18Taking PhotosEnglishGetting StartedNow that you are familiar with the layout of your camera, you are ready to start taking photos, movies or recording sounds.Taking PhotosTaking a photo with the camera is very simple.Turn the camera on a...
-
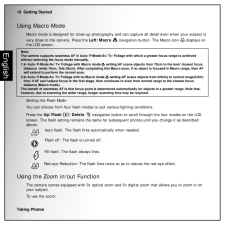
30 .19 Getting StartedTaking...19 Getting StartedTaking PhotosEnglishUsing Macro ModeMacro mode is designed for close-up photography an d can capture all detail even when your subject is very close to the camera. Press the Left/Macro navigation button. The Macro icon displays on t...
-
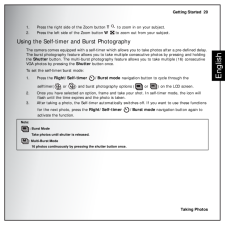
31 .Getting Started 20Taking...Getting Started 20Taking PhotosEnglish1. Press the right side of the Zoom button T to zoom in on your subject.2. Press the left side of the Zoom button W to zoom out from your subject.Using the Self-timer and Burst PhotographyThe camera comes equi...
-
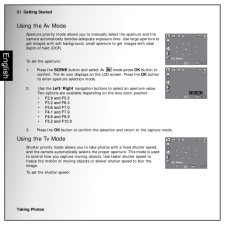
32 .21 Getting StartedTaking...21 Getting StartedTaking PhotosEnglishUsing the Av ModeAperture priority mode allows you to manually select the aperture and the camera automatically decides adequate exposure time. Use large aperture to get images with soft background, small aperture to ...
-
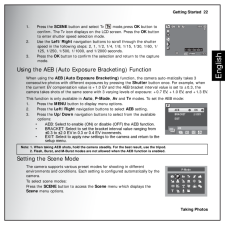
33 .Getting Started 22Taking...Getting Started 22Taking PhotosEnglish1. Press the SCENE button and select Tv mode,press OK button to confirm. The Tv icon displays on the LCD screen. Press the OK button to enter shutter speed selection mode.2. Use the Left/Right navigation buttons...
-
34 .23 Getting StartedTaking...23 Getting StartedTaking PhotosEnglish1. Use the Left/Right/Up/Down navigation buttons to scroll through the modes.2. Press OK to confirm your selection.Face and Smile Detection AF/AE FunctionThe face ( ) and smile ( ) detection functions can be set on...
-
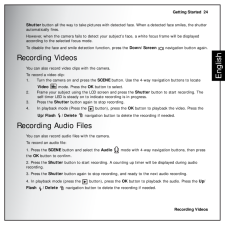
35 .Getting Started 24Record...Getting Started 24Recording VideosEnglishShutter button all the way to take pictures with detected face. When a detected face smiles, the shutter automatically fires.However, when the camera fails to detect your subject's face, a white focus frame will be...
-
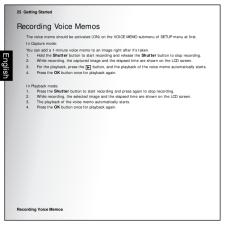
36 .25 Getting StartedRecord...25 Getting StartedRecording Voice MemosEnglishRecording Voice MemosThe voice memo should be activated (ON) on th e VOICE MEMO submenu of SETUP menu at first.In Capture mode:You can add a 1-minute voice memo to an image right after it's taken.1. Hold the ...
-
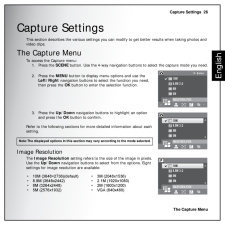
37 .Capture Settings 26The C...Capture Settings 26The Capture MenuEnglishCapture SettingsThis section describes the various settings you can modify to get better results when taking photos and video clips.The Capture MenuTo access the Capture menu:1. Press the SCENE button. Use the 4-...
-
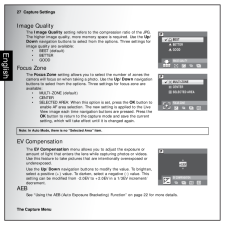
38 .27 Capture SettingsThe C...27 Capture SettingsThe Capture MenuEnglishImage QualityThe Image Quality setting refers to the compression ratio of the JPG. The higher image quality, more memory space is required. Use the Up/Down navigation buttons to select from the options. Three se...
-
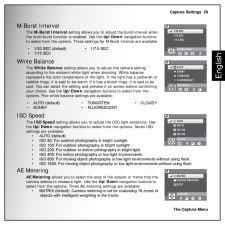
39 .Capture Settings 28The C...Capture Settings 28The Capture MenuEnglishM-Burst IntervalThe M-Burst Interval setting allows you to adjust the burst interval when the multi-burst function is enabled. Use the Up/Down navigation buttons to select from the options. Three settings for M-...
-
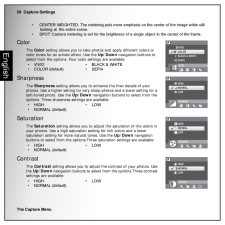
40 .29 Capture SettingsThe C...29 Capture SettingsThe Capture MenuEnglish* CENTER WEIGHTED: The metering puts more emphasis on the center of the image while still looking at the entire scene.* SPOT: Camera metering is set for the brightness of a single object in the center of the fram...
-
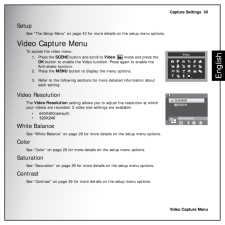
41 .Capture Settings 30Video...Capture Settings 30Video Capture MenuEnglishSetupSee "The Setup Menu" on page 43 for more details on the setup menu options.Video Capture MenuTo access the video menu:1. Press the SCENE button and scroll to Video mode and press the OK button to enabl...
-
42 .31 Capture SettingsVideo...31 Capture SettingsVideo Capture MenuEnglishSetupSee "The Setup Menu" on page 43 for more details on the setup menu options.Note: The displayed options in the Capture Menu may vary according to the mode selected.
-
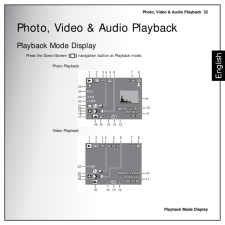
43 .Photo, Video & Audio Play...Photo, Video & Audio Playback 32Playback Mode DisplayEnglishPhoto, Video & Audio PlaybackPlayback Mode DisplayPress the Down/Screen navigation button at Playback mode.1/1401/1401/140IMGP0123.JPGIMGP0123.JPG2008/01/012008/04/012009/04/0100:00:0000:00:000
-
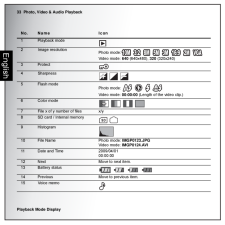
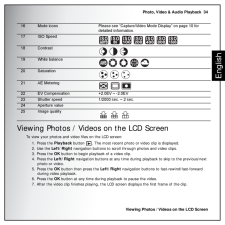
44 .33 Photo, Video & Audio ...33 Photo, Video & Audio PlaybackPlayback Mode DisplayEnglishNo. Name Icon1 Playback mode2 Image resolutionPhoto mode: Video mode: 640 (640x480), 320 (320x240)3Protect4 Sharpness 5Flash modePhoto mode: Video mode: 00:00:00 (Length of ...
-
45 .Photo, Video & Audio Play...Photo, Video & Audio Playback 34Viewing Photos / Videos on the LCD ScreenEnglishViewing Photos / Videos on the LCD ScreenTo view your photos and video files on the LCD screen:1. Press the Playback button . The most recent photo or video clip is displayed...
-
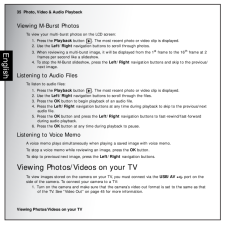
46 .35 Photo, Video & Audio ...35 Photo, Video & Audio PlaybackViewing Photos/Videos on your TVEnglishViewing M-Burst PhotosTo view your multi-burst photos on the LCD screen:1. Press the Playback button . The most recent photo or video clip is displayed.2. Use the Left/Right navigatio...
-
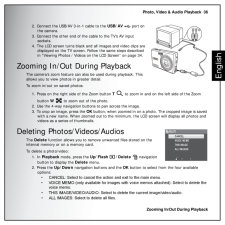
47 .Photo, Video & Audio Play...Photo, Video & Audio Playback 36Zooming In/Out During PlaybackEnglish2. Connect the USB/AV 3-in-1 cable to the USB/AV port on the camera.3. Connect the other end of the cable to the TV's AV input sockets. 4. The LCD screen turns black and all images an...
-
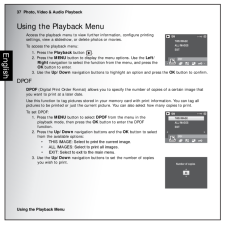
48 .37 Photo, Video & Audio ...37 Photo, Video & Audio PlaybackUsing the Playback MenuEnglishUsing the Playback MenuAccess the playback menu to view further information, configure printing settings, view a slideshow, or delete photos or movies.To access the playback menu:1. Press the P...
-
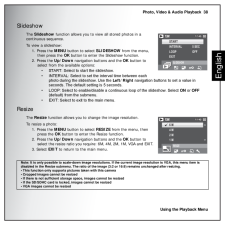
49 .Photo, Video & Audio Play...Photo, Video & Audio Playback 38Using the Playback MenuEnglishSlideshowThe Slideshow function allows you to view all stored photos in a continuous sequence.To view a slideshow:1. Press the MENU button to select SLIDESHOW from the menu, then press the OK...
-
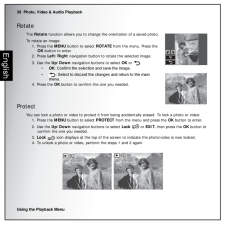
50 .39 Photo, Video & Audio ...39 Photo, Video & Audio PlaybackUsing the Playback MenuEnglishRotateThe Rotate function allows you to change the orientation of a saved photo.To rotate an image:1. Press the MENU button to select ROTATE from the menu. Press the OK button to enter.2. Pres...
-
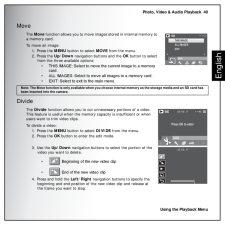
51 .Photo, Video & Audio Play...Photo, Video & Audio Playback 40Using the Playback MenuEnglishMoveThe Move function allows you to move images stored in internal memory to a memory card.To move an image:1. Press the MENU button to select MOVE from the menu.2. Press the Up/Down navigati...
-
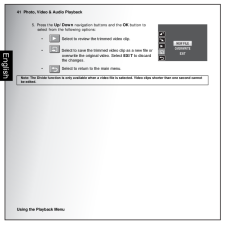
52 .41 Photo, Video & Audio ...41 Photo, Video & Audio PlaybackUsing the Playback MenuEnglish5. Press the Up/Down navigation buttons and the OK button to select from the following options:* Select to review the trimmed video clip.* Select to save the trimmed video clip as a new file...
-
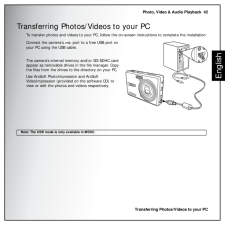
53 .Photo, Video & Audio Play...Photo, Video & Audio Playback 42Transferring Photos/Videos to your PCEnglishTransferring Photos/Videos to your PCTo transfer photos and videos to your PC, follow the on-screen instructions to complete the installation:Connect the camera's port to a fre...
-
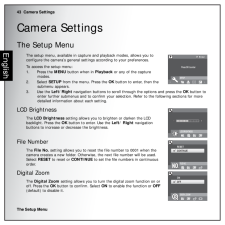
54 .43 Camera SettingsThe Se...43 Camera SettingsThe Setup MenuEnglishCamera SettingsThe Setup MenuThe setup menu, available in capture and playback modes, allows you to configure the camera's general setti ngs according to your preferences.To access the setup menu:1. Press the MENU b...
-
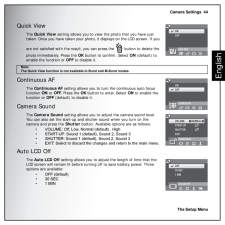
55 .Camera Settings 44The Se...Camera Settings 44The Setup MenuEnglishQuick ViewThe Quick View setting allows you to view the photo that you have just taken. Once you have taken your photo, it displays on the LCD screen. If you are not satisfied with the result, you can press the but...
-
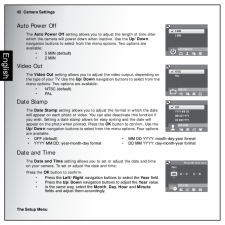
56 .45 Camera SettingsThe Se...45 Camera SettingsThe Setup MenuEnglishAuto Power OffThe Auto Power Off setting allows you to adjust the length of time after which the camera will power down when inactive. Use the Up/Down navigation buttons to select from the menu options. Two options...
-
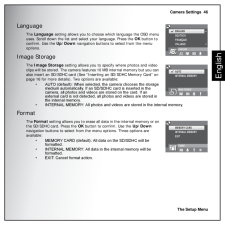
57 .Camera Settings 46The Se...Camera Settings 46The Setup MenuEnglishLanguageThe Language setting allows you to choose which language the OSD menu uses. Scroll down the list and select your language. Press the OK button to confirm. Use the Up/Down navigation buttons to select from t...
-
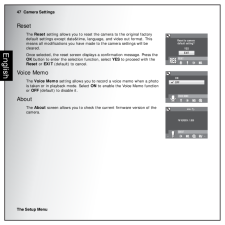
58 .47 Camera SettingsThe Se...47 Camera SettingsThe Setup MenuEnglishResetThe Reset setting allows you to reset the camera to the original factory default settings except date&time, language, and video out format. This means all modifications you have made to the camera settings will ...
-
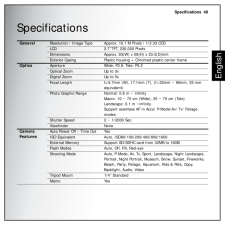
59 .Specifications 48English...Specifications 48EnglishSpecificationsGeneral Resolution / Image Type Approx. 10.1 M Pixels / 1/2.33 CCDLCD 2.7"TFT, 230,000 PixelsDimensions Approx. 93(W) x 58(H) x 23.5 (D)mmExterior Casing Plastic housing + Chromed plastic center frameOptics Aperture W...
-
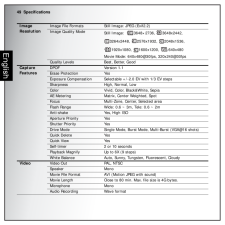
60 .49 SpecificationsEnglish...49 SpecificationsEnglishImage ResolutionImage File Formats Still Image: JPEG (Exif2.2)Image Quality ModeStill Image: 3648*2736, 3648 x2442, 3264x2448, 2576x1932, 2048x1536, 1920x1080, 1600x1200, 640x480Movie Mode: 640x480@30fps, 320x240@30fps Quality...
-
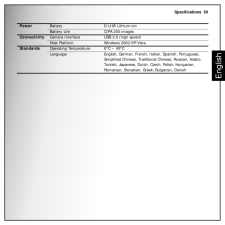
61 .Specifications 50English...Specifications 50EnglishPower Battery D-LI95 Lithium-ionBattery Life CIPA 200 imagesConnectivity Camera Interface USB 2.0 (high speed)Host Platform Windows 2000/XP/VistaStandards Operating Temperature 0C ~ 40CLanguage English, German, French, Italian, Spa...
-
62 .51 TroubleshootingEnglis...51 TroubleshootingEnglishTroubleshootingProblem ActionCamera does not turn on * The battery may be exhausted. Charge or replace the battery.* The battery is installed inco rrectly. Reinsert the battery observing the correct polarity.Camera turns off autom...
-
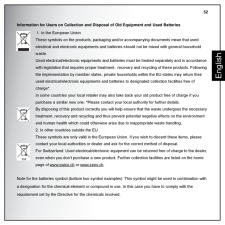
63 .Troubleshooting 52Engl...Troubleshooting 52EnglishInformation for Users on Collection and Dispos al of Old Equipment and Used Batteries 1. In the European UnionThese symbols on the products, packaging and/or accompanying documents mean that used electrical and electronic equipm...
