12 / 186 ページ
12 / 186 ページ


現在のページURL
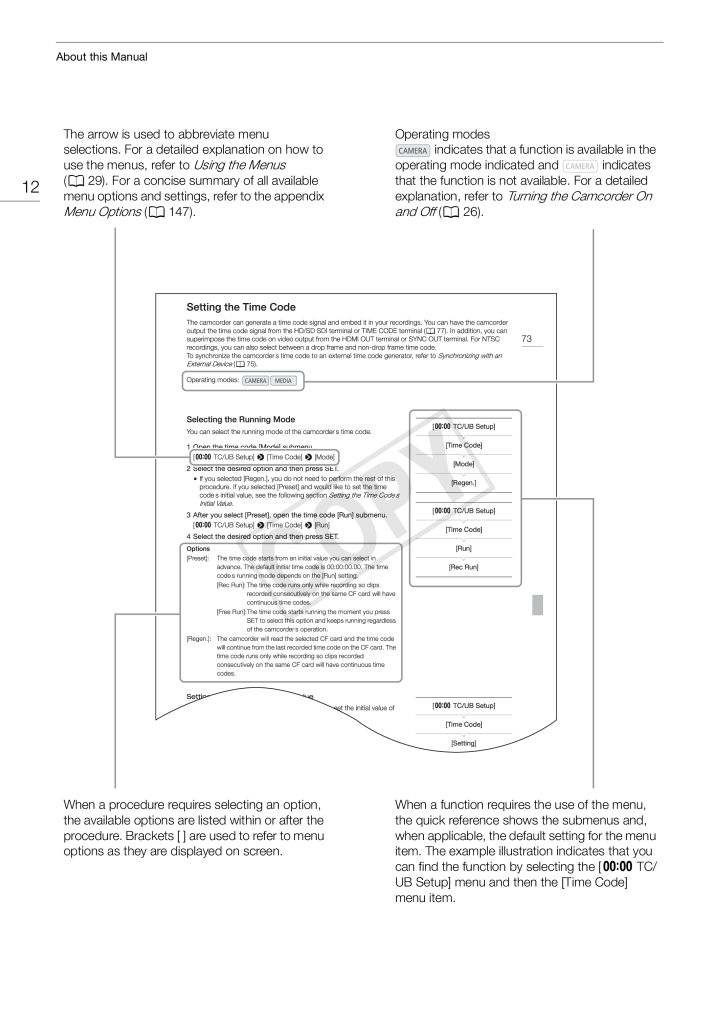
About this Manual12The arrow is used to abbreviate menuselections. For a detailed explanation on how touse the menus, refer to Using the Menus(A 29). For a concise summary of all availablemenu options and settings, refer to the appendixMenu Options (A 147).CWhen a procedure requires selecting an option,the available options are listed within or after theprocedure. Brackets [ ] are used to refer to menuoptions as they are displayed on screen.Operating modesindicates that a function is available in theoperating mode indicated andindicatesthat the function is not available. For a detailedexplanation, refer to Turning the Camcorder Onand Off (A 26).YPOWhen a function requires the use of the menu,the quick reference shows the submenus and,when applicable, the default setting for the menuitem. The example illustration indicates that youcan find the function by selecting the [¤ TC/UB Setup] menu and then the [Time Code]menu item.
参考になったと評価  48人が参考になったと評価しています。
このマニュアルの目次
-
1 .PUB. DIE-0406-001CHD Camc...PUB. DIE-0406-001CHD CamcorderCYPOThe warranty information for Australia and New Zealand is at the end of this Instruction Manual.
-
2 .Important Usage Instructi...Important Usage Instructions2WARNINGTO REDUCE THE RISK OF FIRE OR ELECTRIC SHOCK, DO NOT EXPOSE THIS PRODUCT TO RAIN ORMOISTURE.WARNINGTO REDUCE THE RISK OF ELECTRIC SHOCK, DO NOT EXPOSE THIS PRODUCT TO DRIPPING ORSPLASHING.WARNINGTO REDUCE THE RISK OF ELE...
-
3 .CAUTIONRISK OF ELECTRIC S...CAUTIONRISK OF ELECTRIC SHOCKDO NOT OPENCAUTION:TO REDUCE THE RISK OF ELECTRICSHOCK, DO NOT REMOVE COVER (ORBACK). NO USER-SERVICEABLEPARTS INSIDE. REFER SERVICING TOQUALIFIED SERVICE PERSONNEL.The lightning flash with arrowhead symbol, within anequilatera...
-
4 .Important Safety Instruct...Important Safety Instructions4In these safety instructions the word “apparatus”refers to the Canon HD Camcorder EOS C300 / EOSC300 PL and all its accessories.1.2.3.4.5.6.7.Read these instructions.Keep these instructions.Heed all warnings.Follow all instruc...
-
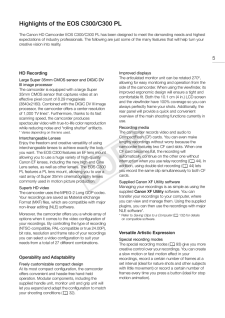
5 .Highlights of the EOS C30Highlights of the EOS C300/C300 PLThe Canon HD Camcorder EOS C300/C300 PL has been designed to meet the demanding needs and highestexpectations of industry professionals. The following are just some of the many features that will help turn yourcreative vis...
-
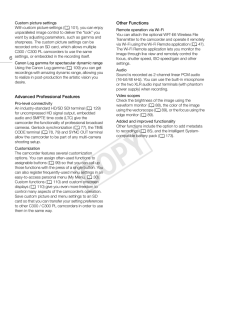
6 .6Custom picture settingsW...6Custom picture settingsWith custom picture settings (A 101), you can enjoyunparalleled image control to deliver the “look” youwant by adjusting parameters, such as gamma andsharpness. The custom picture settings can berecorded onto an SD card, which allow...
-
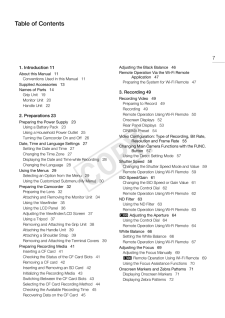
7 .Table of Contents71. Intr...Table of Contents71. Introduction 11Adjusting the Black Balance 46Remote Operation Via the Wi-Fi RemoteApplication 47Preparing the System for Wi-Fi Remote 47About this Manual 11Conventions Used in this Manual 11Supplied Accessories 13Names of Parts 14Grip ...
-
8 .8Setting the Time Code 73...8Setting the Time Code 73Selecting the Running Mode 73Selecting Drop or Non-Drop Frame 74Putting the Time Code Display on Hold 74Setting the User Bit 76Synchronizing with an External Device 77Connecting an External Device 77Reference Video Signal Input (Ge...
-
9 .9Clip Operations 118Using...9Clip Operations 118Using the Clip Menu 118Displaying Clip Information 119Adding $ Marks or % Marks 120Deleting $ Marks or % Marks 120Copying Clips 121Deleting Clips 122Deleting the User Memo and GPSInformation 122Copying a Custom Picture File Embedded in ...
-
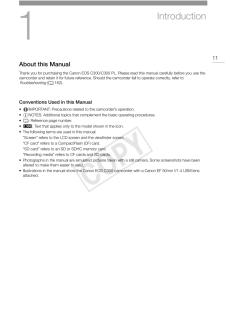
11 .1Introduction11About this...1Introduction11About this ManualThank you for purchasing the Canon EOS C300/C300 PL. Please read this manual carefully before you use thecamcorder and retain it for future reference. Should the camcorder fail to operate correctly, refer toTroubleshooting (...
-
12 .About this Manual12The ar...About this Manual12The arrow is used to abbreviate menuselections. For a detailed explanation on how touse the menus, refer to Using the Menus(A 29). For a concise summary of all availablemenu options and settings, refer to the appendixMenu Options (A 147)...
-
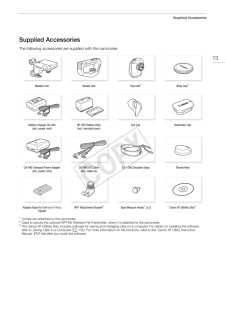
13 .Supplied AccessoriesSuppl...Supplied AccessoriesSupplied AccessoriesThe following accessories are supplied with the camcorder.13Monitor UnitHandle UnitGrip Unit1Body Cap1Battery Charger CG-940(incl. power cord)BP-955 Battery Pack(incl. terminal cover)Eye CupViewfinder CapCCA-940 Comp...
-
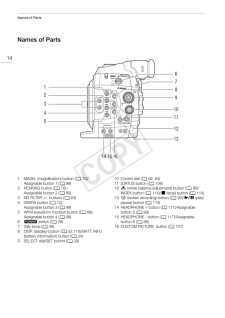
14 .Names of PartsNames of Pa...Names of PartsNames of Parts14671829310114512YPO1314 15 16123456789CMAGN. (magnification) button (A 70)/Assignable button 1 (A 99)PEAKING button (A 70) /Assignable button 2 (A 99)ND FILTER +/- buttons (A 63)ZEBRA button (A 72)/Assignable button 3 (A 99)WFM...
-
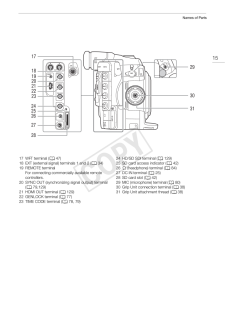
15 .Names of Parts17152918192Names of Parts17152918192021222330242526312728YPO17 WFT terminal (A 47)18 EXT (external signal) terminals 1 and 2 (A 34)19 REMOTE terminalFor connecting commercially available remotecontrollers.20 SYNC OUT (synchronizing signal output) terminal(A 79,129)21...
-
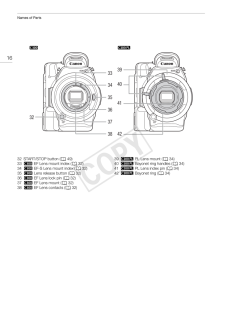
16 .Names of Parts#$16333934 ...Names of Parts#$16333934 40353632413738 4232333435363738START/STOP button (A 49)# EF Lens mount index (A 32)# EF-S Lens mount index (A 32)# Lens release button (A 32)# EF Lens lock pin (A 32)# EF Lens mount (A 32)# EF Lens contacts (A 32)CYPO39404142$ PL L...
-
17 .Names of Parts54174355564...Names of Parts541743555644454647484950575859515253604344454647484950515253545556C61YPO62 63Viewfinder unitViewfinder unit LOCK/RELEASE screw (A 171)(rear panel’s backlight) button (A 53)FUNC. (main functions) button (A 57)START/STOP button (A 49)Joystick (...
-
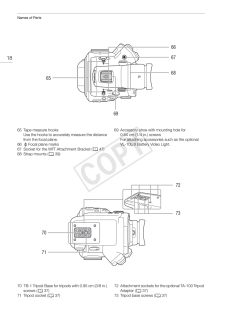
18 .Names of Parts66671868656...Names of Parts66671868656965 Tape measure hooksUse the hooks to accurately measure the distancefrom the focal plane.66Focal plane marks67 Socket for the WFT Attachment Bracket (A 47)68 Strap mounts (A 39)C69 Accessory shoe with mounting hole for0.64 cm (1/...
-
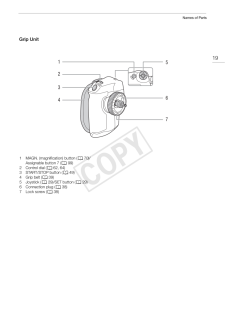
19 .Names of PartsGrip Unit15...Names of PartsGrip Unit15236471234567MAGN. (magnification) button (A 70)/Assignable button 7 (A 99)Control dial (A 62, 64)START/STOP button (A 49)Grip belt (A 39)Joystick (A 29)/SET button (A 29)Connection plug (A 38)Lock screw (A 38)CYPO19
-
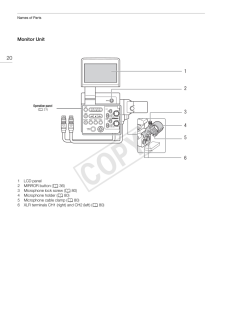
20 .Names of PartsMonitor Uni...Names of PartsMonitor Unit2012Operation panel(A 21)34123456CLCD panelMIRROR button (A 36)Microphone lock screw (A 80)Microphone holder (A 80)Microphone cable clamp (A 80)XLR terminals CH1 (right) and CH2 (left) (A 80)YPO56
-
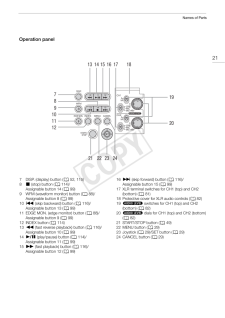
21 .Names of PartsOperation p...Names of PartsOperation panel2113 14 15 16 17187891011121920YPO21 22 23 24789101112131415CDISP. (display) button (A 52, 115)Ñ (stop) button (A 114)/Assignable button 14 (A 99)WFM (waveform monitor) button (A 88)/Assignable button 8 (A 99)Ú (skip backward) ...
-
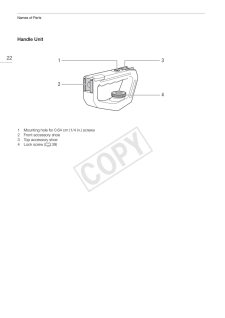
22 .Names of PartsHandle Unit...Names of PartsHandle Unit2213241234Mounting hole for 0.64 cm (1/4 in.) screwsFront accessory shoeTop accessory shoeLock screw (A 39)CYPO
-
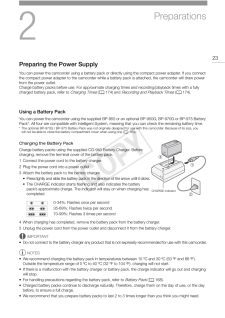
23 .2Preparations23Preparing ...2Preparations23Preparing the Power SupplyYou can power the camcorder using a battery pack or directly using the compact power adapter. If you connectthe compact power adapter to the camcorder while a battery pack is attached, the camcorder will draw powerf...
-
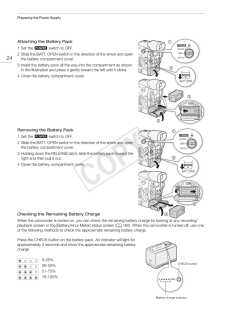
24 .Preparing the Power Suppl...Preparing the Power SupplyAttaching the Battery Pack1 Set the Q switch to OFF.242 Slide the BATT. OPEN switch in the direction of the arrow and openthe battery compartment cover.3 Insert the battery pack all the way into the compartment as shownin the illu...
-
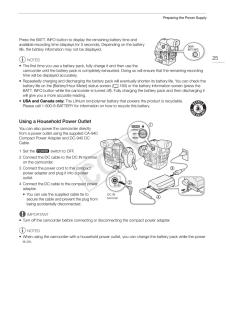
25 .Preparing the Power Suppl...Preparing the Power SupplyPress the BATT. INFO button to display the remaining battery time andavailable recording time (displays for 5 seconds). Depending on the batterylife, the battery information may not be displayed.NOTES• The first time you use a bat...
-
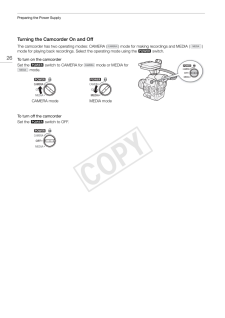
26 .Preparing the Power Suppl...Preparing the Power SupplyTurning the Camcorder On and OffThe camcorder has two operating modes: CAMERA () mode for making recordings and MEDIA (mode for playing back recordings. Select the operating mode using the Q switch.26To turn on the camcorderSet th...
-
27 .Date, Time and Language S...Date, Time and Language SettingsDate, Time and Language SettingsSetting the Date and TimeYou will need to set the date and time of the camcorder before you can start using it. When the camcorder’sclock is not set, the [Date/Time] screen will appear automat...
-
28 .Date, Time and Language S...Date, Time and Language SettingsDisplaying the Date and Time while Recording[£ LCD/VF Setup]You can display the date and time on the screen.28[Custom Display 2]Operating modes:[Date/Time]1 Press the MENU button.2 Push the joystick up/down or turn the SELEC...
-
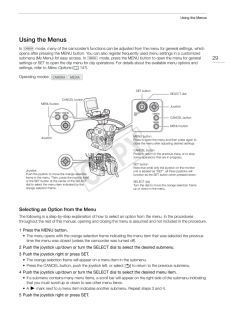
29 .Using the MenusUsing the ...Using the MenusUsing the MenusInmode, many of the camcorder’s functions can be adjusted from the menu for general settings, whichopens after pressing the MENU button. You can also register frequently used menu settings in a customizedsubmenu (My Menu) for ...
-
30 .Using the Menus• The oran...Using the Menus• The orange selection frame will appear on a setting option.• Press the CANCEL button to return to the previous submenu.306 Push the joystick up/down or turn the SELECT dial to select the desired setting option and thenpress SET.• Depending...
-
31 .Using the MenusResetting ...Using the MenusResetting the My Menu Submenu[1 Reset all the menu settings registered to the My Menu submenu.[ My Menu] > [Edit] > [Reset All]My Menu][Edit]2 Select [OK] and then press SET twice.[Reset All]CYPO31
-
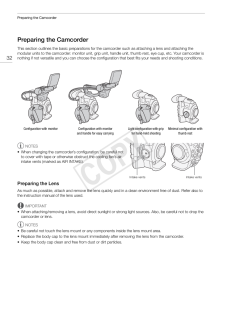
32 .Preparing the CamcorderPr...Preparing the CamcorderPreparing the Camcorder32This section outlines the basic preparations for the camcorder such as attaching a lens and attaching themodular units to the camcorder: monitor unit, grip unit, handle unit, thumb rest, eye cup, etc. Your ca...
-
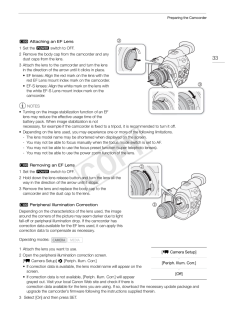
33 .Preparing the Camcorder# ...Preparing the Camcorder# Attaching an EF Lens1 Set the Q switch to OFF.2 Remove the body cap from the camcorder and anydust caps from the lens.3 Attach the lens to the camcorder and turn the lensin the direction of the arrow until it clicks in place.• EF l...
-
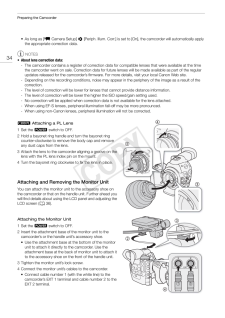
34 .Preparing the Camcorder• ...Preparing the Camcorder• As long as [~ Camera Setup] > [Periph. Illum. Corr.] is set to [On], the camcorder will automatically applythe appropriate correction data.34NOTES• About lens correction data:- The camcorder contains a register of correction data f...
-
35 .Preparing the CamcorderRe...Preparing the CamcorderRemoving the Monitor Unit1 Set the Q switch to OFF.2 Disconnect the monitor unit’s cables from the camcorder’s EXT 1 and EXT 2 terminals.• Pull back the metallic tips of the cable to release the cable and then disconnect the cable.35...
-
36 .Preparing the CamcorderDi...Preparing the CamcorderDioptric AdjustmentTurn on the camcorder and adjust the dioptric adjustment dial.Dioptricadjustmentdial36Attaching the Viewfinder CapPointing the viewfinder lens at the sun or other strong light sources maycause damage to internal co...
-
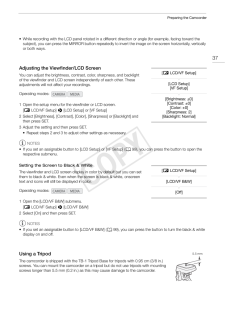
37 .Preparing the Camcorder• ...Preparing the Camcorder• While recording with the LCD panel rotated in a different direction or angle (for example, facing toward thesubject), you can press the MIRROR button repeatedly to invert the image on the screen horizontally, verticallyor both ways...
-
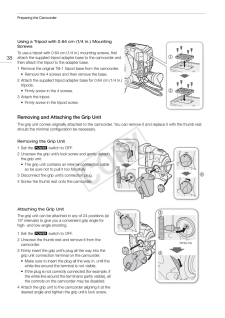
38 .Preparing the CamcorderUs...Preparing the CamcorderUsing a Tripod with 0.64 cm (1/4 in.) MountingScrews38To use a tripod with 0.64 cm (1/4 in.) mounting screws, firstattach the supplied tripod adapter base to the camcorder andthen attach the tripod to the adapter base.1 Remove the or...
-
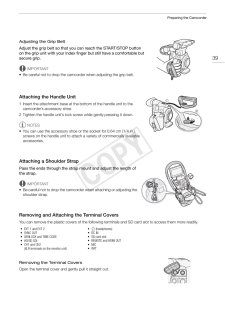
39 .Preparing the CamcorderAd...Preparing the CamcorderAdjusting the Grip BeltAdjust the grip belt so that you can reach the START/STOP buttonon the grip unit with your index finger but still have a comfortable butsecure grip.39IMPORTANT• Be careful not to drop the camcorder when adjusti...
-
40 .Preparing the CamcorderAt...Preparing the CamcorderAttaching the Terminal CoversInsert the connecting strip into the opening to attach the terminal cover.40NOTES• If the connecting strip is difficult to grasp, use a pair of tweezers or similartool.CYPO
-
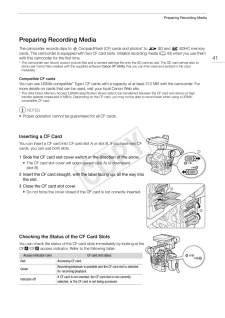
41 .Preparing Recording Media...Preparing Recording MediaPreparing Recording MediaThe camcorder records clips to 1 CompactFlash (CF) cards and photos* to . SD and / SDHC memorycards. The camcorder is equipped with two CF card slots. Initialize recording media (A 43) when you use themwith...
-
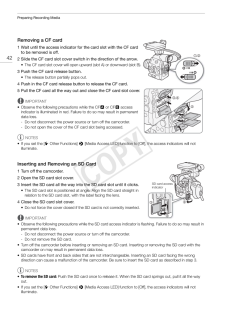
42 .Preparing Recording Media...Preparing Recording MediaRemoving a CF card1 Wait until the access indicator for the card slot with the CF cardto be removed is off.42,2 Slide the CF card slot cover switch in the direction of the arrow.• The CF card slot cover will open upward (slot A) or...
-
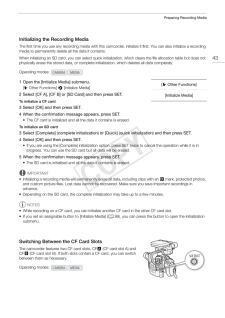
43 .Preparing Recording Media...Preparing Recording MediaInitializing the Recording MediaThe first time you use any recording media with this camcorder, initialize it first. You can also initialize a recordingmedia to permanently delete all the data it contains.When initializing an SD ca...
-
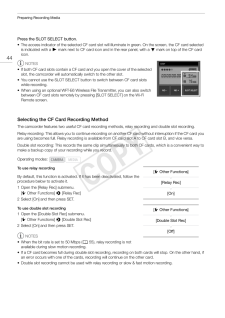
44 .Preparing Recording Media...Preparing Recording MediaPress the SLOT SELECT button.44• The access indicator of the selected CF card slot will illuminate in green. On the screen, the CF card selectedis indicated with a Ð mark next to CF card icon and in the rear panel, with a Î mark on...
-
45 .Preparing Recording Media...Preparing Recording MediaChecking the Available Recording TimeWhen the camcorder is inmode, the display on the upper left of the screen indicates which CF card slotis in use and the available recording time (in minutes*) that remains on each CF card. The s...
-
46 .Adjusting the Black Balan...Adjusting the Black BalanceAdjusting the Black BalanceYou can have the camcorder adjust the black balance automatically when ambient temperature changesconsiderably or if there is a noticeable change in a true black video signal.46Operating modes:1 Open th...
-
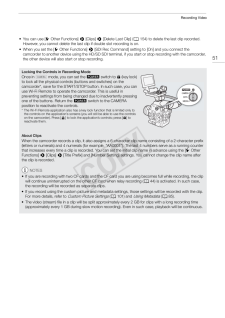
47 .Remote Operation Via the ...Remote Operation Via the Wi-Fi Remote ApplicationRemote Operation Via the Wi-Fi Remote ApplicationYou can attach an optional WFT-E6 Wireless File Transmitter to the camcorder and operatethe camcorder remotely via Wi-Fi Remote, a Web browser application tha...
-
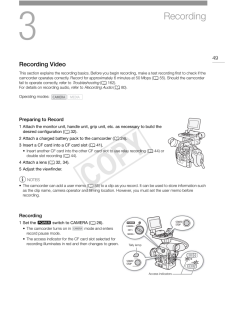
49 .3Recording49Recording Vid...3Recording49Recording VideoThis section explains the recording basics. Before you begin recording, make a test recording first to check if thecamcorder operates correctly. Record for approximately 6 minutes at 50 Mbps (A 55). Should the camcorderfail to op...
-
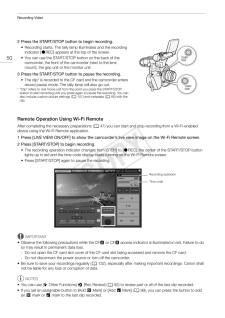
50 .Recording Video2 Press th...Recording Video2 Press the START/STOP button to begin recording.50• Recording starts. The tally lamp illuminates and the recordingindicator [ÜREC] appears at the top of the screen.• You can use the START/STOP button on the back of thecamcorder, the front o...
-
51 .Recording Video• You can ...Recording Video• You can use [w Other Functions] > [Clips] > [Delete Last Clip] (A 154) to delete the last clip recorded.However, you cannot delete the last clip if double slot recording is on.• When you set the [w Other Functions] > [SDI Rec Command] sett...
-
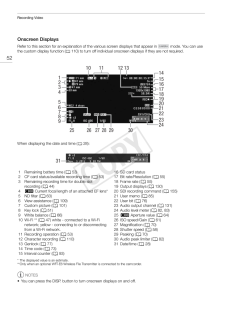
52 .Recording VideoOnscreen D...Recording VideoOnscreen DisplaysRefer to this section for an explanation of the various screen displays that appear inmode. You can usethe custom display function (A 110) to turn off individual onscreen displays if they are not required.52101112 1314151617...
-
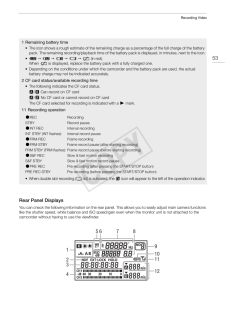
53 .Recording Video1 Remainin...Recording Video1 Remaining battery time• The icon shows a rough estimate of the remaining charge as a percentage of the full charge of the batterypack. The remaining recording/playback time of the battery pack is displayed, in minutes, next to the icon.• è...
-
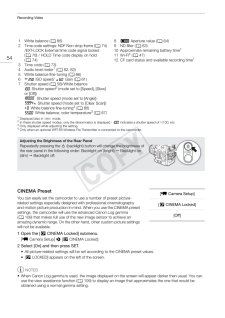
54 .Recording Video1254345671...Recording Video1254345671234White balance (A 66)Time code settings: NDF Non-drop frame (A 74)/EXT-LOCK External time code signal locked(A 78) / HOLD Time code display on hold(A 74)Time code (A 73)Audio level meter1 (A 82, 83)White balance fine-tuning (A 66...
-
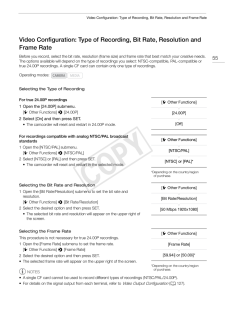
55 .Video Configuration: Type...Video Configuration: Type of Recording, Bit Rate, Resolution and Frame RateVideo Configuration: Type of Recording, Bit Rate, Resolution andFrame RateBefore you record, select the bit rate, resolution (frame size) and frame rate that best match your creativ...
-
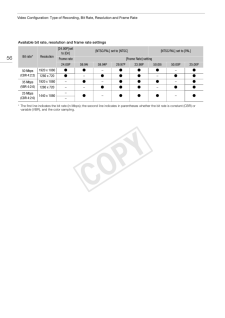
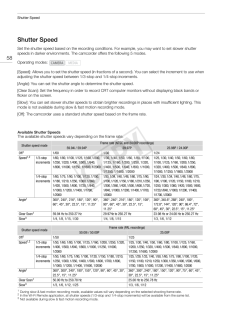
56 .Video Configuration: Type...Video Configuration: Type of Recording, Bit Rate, Resolution and Frame RateAvailable bit rate, resolution and frame rate settings[24.00P] setto [On]56Bit rate*Resolution[NTSC/PAL] set to [NTSC]Frame rate[NTSC/PAL] set to [PAL][Frame Rate] setting24.00P59.9...
-
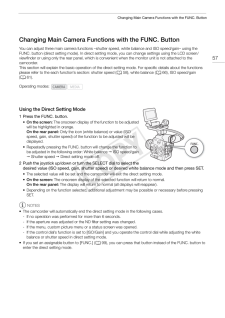
57 .Changing Main Camera Func...Changing Main Camera Functions with the FUNC. ButtonChanging Main Camera Functions with the FUNC. ButtonYou can adjust three main camera functions –shutter speed, white balance and ISO speed/gain– using theFUNC. button (direct setting mode). In direct sett...
-
58 .Shutter SpeedShutter Spee...Shutter SpeedShutter SpeedSet the shutter speed based on the recording conditions. For example, you may want to set slower shutterspeeds in darker environments. The camcorder offers the following 5 modes.58Operating modes:[Speed]: Allows you to set the shu...
-
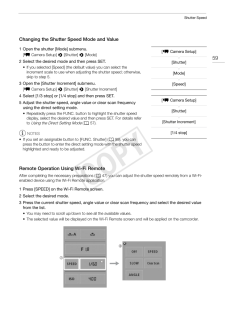
59 .Shutter SpeedChanging the...Shutter SpeedChanging the Shutter Speed Mode and Value1 Open the shutter [Mode] submenu.[~ Camera Setup][~ Camera Setup] > [Shutter] > [Mode]2 Select the desired mode and then press SET.• If you selected [Speed] (the default value) you can select theincrem...
-
60 .Shutter SpeedUsing Slow S...Shutter SpeedUsing Slow Shutter Mode60When recording in dark surroundings, you can obtain a brighter picture by using slow shutter mode. You canalso use this mode when you wish to add certain effects to your recordings, such as blurring the backgrounddurin...
-
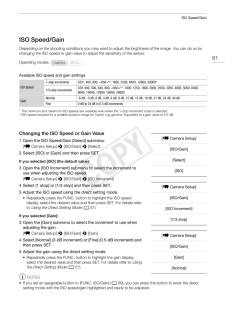
61 .ISO Speed/GainISO Speed/G...ISO Speed/GainISO Speed/GainDepending on the shooting conditions you may want to adjust the brightness of the image. You can do so bychanging the ISO speed or gain value to adjust the sensitivity of the sensor.61Operating modes:Available ISO speed and gain...
-
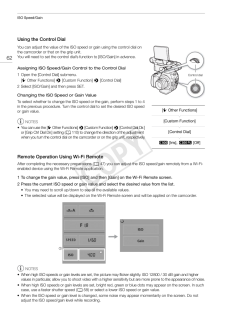
62 .ISO Speed/GainUsing the C...ISO Speed/GainUsing the Control Dial62You can adjust the value of the ISO speed or gain using the control dial onthe camcorder or that on the grip unit.You will need to set the control dial’s function to [ISO/Gain] in advance.Assigning ISO Speed/Gain Contr...
-
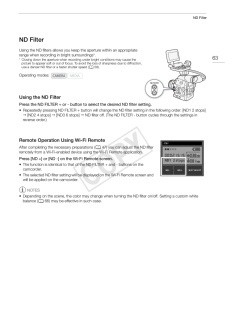
63 .ND FilterND FilterUsing t...ND FilterND FilterUsing the ND filters allows you keep the aperture within an appropriaterange when recording in bright surroundings*.* Closing down the aperture when recording under bright conditions may cause thepicture to appear soft or out of focus. To...
-
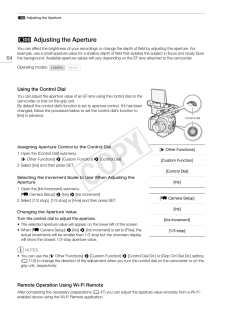
64 .# Adjusting the Aperture#...# Adjusting the Aperture# Adjusting the Aperture64You can affect the brightness of your recordings or change the depth of field by adjusting the aperture. Forexample, use a small aperture value for a shallow depth of field that isolates the subject in focu...
-
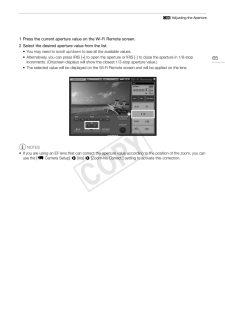
65 .# Adjusting the Aperture1...# Adjusting the Aperture1 Press the current aperture value on the Wi-Fi Remote screen.2 Select the desired aperture value from the list.• You may need to scroll up/down to see all the available values.• Alternatively, you can press IRIS [+] to open the ape...
-
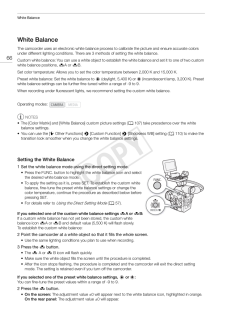
66 .White BalanceWhite Balanc...White BalanceWhite BalanceThe camcorder uses an electronic white balance process to calibrate the picture and ensure accurate colorsunder different lighting conditions. There are 3 methods of setting the white balance.66Custom white balance: You can use a ...
-
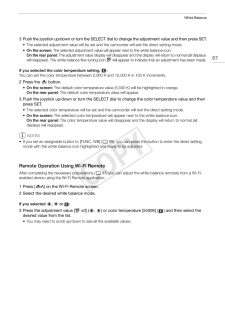
67 .White Balance3 Push the j...White Balance3 Push the joystick up/down or turn the SELECT dial to change the adjustment value and then press SET.• The selected adjustment value will be set and the camcorder will exit the direct setting mode.• On the screen: The selected adjustment valu...
-
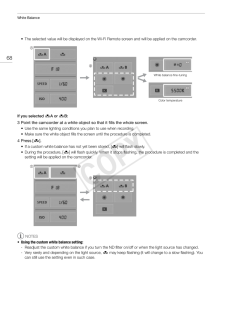
68 .White Balance• The select...White Balance• The selected value will be displayed on the Wi-Fi Remote screen and will be applied on the camcorder.68White balance fine-tuningColor temperatureIf you selected ÅA or ÅB:3 Point the camcorder at a white object so that it fills the whole scre...
-
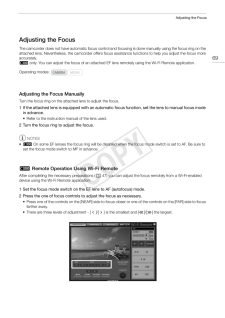
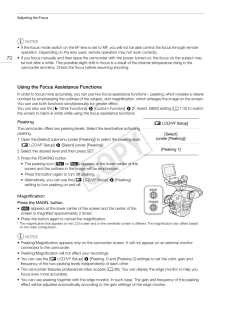
69 .Adjusting the FocusAdjust...Adjusting the FocusAdjusting the FocusThe camcorder does not have automatic focus control and focusing is done manually using the focus ring on theattached lens. Nevertheless, the camcorder offers focus assistance functions to help you adjust the focus mor...
-
70 .Adjusting the Focus70NOTE...Adjusting the Focus70NOTES• If the focus mode switch on the EF lens is set to MF, you will not be able control the focus through remoteoperation. Depending on the lens used, remote operation may not work correctly.• If you focus manually and then leave the...
-
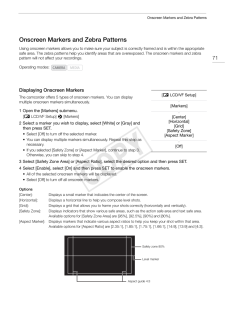
71 .Onscreen Markers and Zebr...Onscreen Markers and Zebra PatternsOnscreen Markers and Zebra PatternsUsing onscreen markers allows you to make sure your subject is correctly framed and is within the appropriatesafe area. The zebra patterns help you identify areas that are overexposed. T...
-
72 .Onscreen Markers and Zebr...Onscreen Markers and Zebra PatternsGrid72Center markerNOTES• If you set an assignable button to [Markers] (A 99), you can press the button to turn the onscreen markers onand off.Displaying Zebra PatternsThe camcorder has a zebra pattern feature that shows ...
-
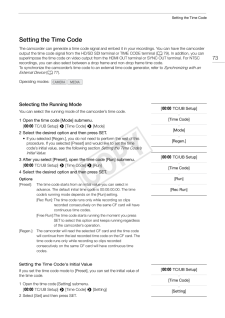
73 .Setting the Time CodeSett...Setting the Time CodeSetting the Time CodeThe camcorder can generate a time code signal and embed it in your recordings. You can have the camcorderoutput the time code signal from the HD/SD SDI terminal or TIME CODE terminal (A 79). In addition, you cansup...
-
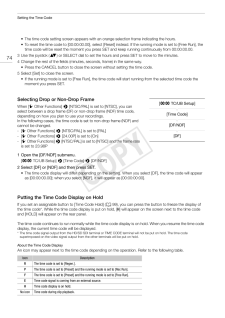
74 .Setting the Time Code• Th...Setting the Time Code• The time code setting screen appears with an orange selection frame indicating the hours.• To reset the time code to [00:00:00.00], select [Reset] instead. If the running mode is set to [Free Run], thetime code will be reset the mome...
-
75 .Setting the Time CodeNOTE...Setting the Time CodeNOTES• When [w Other Functions] > [24.00P] is set to [On] or [w Other Functions] > [Frame Rate] is set to[23.98P], the frames value in the time code runs from 0 to 23. When [Frame Rate] is set to [25.00P], [50.00i] or[50.00P], it runs ...
-
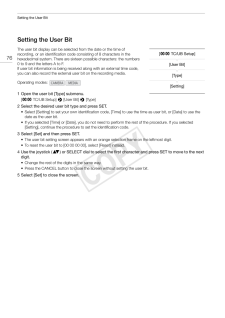
76 .Setting the User BitSetti...Setting the User BitSetting the User Bit76The user bit display can be selected from the date or the time ofrecording, or an identification code consisting of 8 characters in thehexadecimal system. There are sixteen possible characters: the numbers0 to 9 an...
-
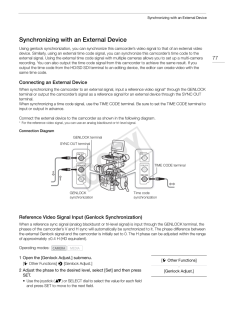
77 .Synchronizing with an Ext...Synchronizing with an External DeviceSynchronizing with an External DeviceUsing genlock synchronization, you can synchronize this camcorder’s video signal to that of an external videodevice. Similarly, using an external time code signal, you can synchroniz...
-
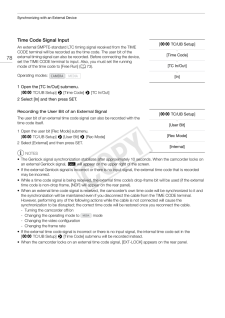
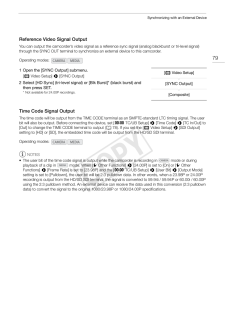
78 .Synchronizing with an Ext...Synchronizing with an External DeviceTime Code Signal Input78An external SMPTE-standard LTC timing signal received from the TIMECODE terminal will be recorded as the time code. The user bit of theexternal timing signal can also be recorded. Before connecti...
-
79 .Synchronizing with an Ext...Synchronizing with an External DeviceReference Video Signal OutputYou can output the camcorder’s video signal as a reference sync signal (analog blackburst or tri-level signal)through the SYNC OUT terminal to synchronize an external device to this camcorde...
-
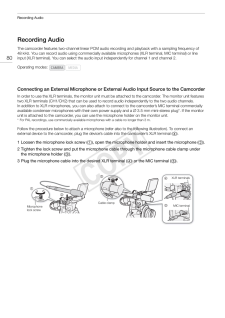
80 .Recording AudioRecording ...Recording AudioRecording Audio80The camcorder features two-channel linear PCM audio recording and playback with a sampling frequency of48 kHz. You can record audio using commercially available microphones (XLR terminal, MIC terminal) or lineinput (XLR term...
-
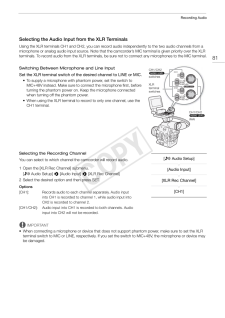
81 .Recording AudioSelecting ...Recording AudioSelecting the Audio Input from the XLR TerminalsUsing the XLR terminals CH1 and CH2, you can record audio independently to the two audio channels from amicrophone or analog audio input source. Note that the camcorder’s MIC terminal is given ...
-
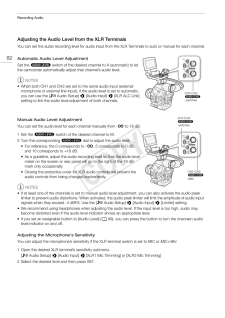
82 .Recording AudioAdjusting ...Recording AudioAdjusting the Audio Level from the XLR TerminalsYou can set the audio recording level for audio input from the XLR Terminals to auto or manual for each channel.82Automatic Audio Level AdjustmentSet the ã switch of the desired channel to A (a...
-
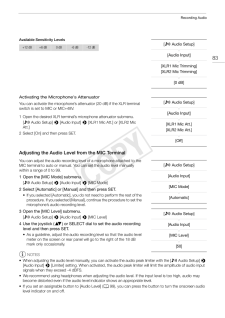
83 .Recording AudioAvailable ...Recording AudioAvailable Sensitivity Levels+12 dB+6 dB0 dB-6 dB[¡ Audio Setup]-12 dB[Audio Input][XLR1 Mic Trimming][XLR2 Mic Trimming][0 dB]Activating the Microphone’s AttenuatorYou can activate the microphone’s attenuator (20 dB) if the XLR terminalswitc...
-
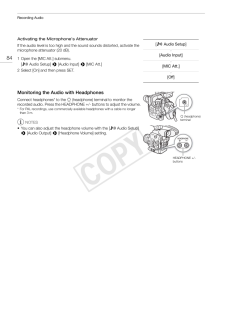
84 .Recording AudioActivating...Recording AudioActivating the Microphone’s AttenuatorIf the audio level is too high and the sound sounds distorted, activate themicrophone attenuator (20 dB).84[¡ Audio Setup][Audio Input]1 Open the [MIC Att.] submenu.[¡ Audio Setup] > [Audio Input] > [MIC...
-
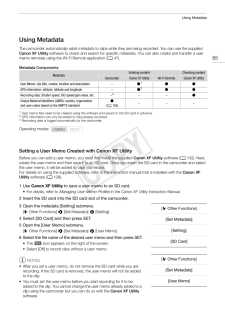
85 .Using MetadataUsing Metad...Using MetadataUsing MetadataThe camcorder automatically adds metadata to clips while they are being recorded. You can use the suppliedCanon XF Utility software to check and search for specific metadata. You can also create and transfer a usermemo remotely ...
-
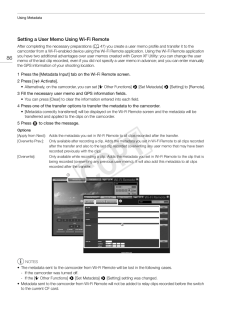
86 .Using MetadataSetting a U...Using MetadataSetting a User Memo Using Wi-Fi Remote86After completing the necessary preparations (A 47) you create a user memo profile and transfer it to thecamcorder from a Wi-Fi-enabled device using the Wi-Fi Remote application. Using the Wi-Fi Remote a...
-
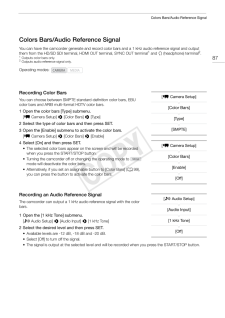
87 .Colors Bars/Audio Referen...Colors Bars/Audio Reference SignalColors Bars/Audio Reference SignalYou can have the camcorder generate and record color bars and a 1 kHz audio reference signal and outputthem from the HD/SD SDI terminal, HDMI OUT terminal, SYNC OUT terminal1 and × (headph...
-
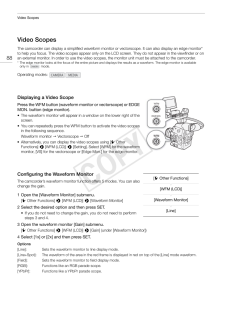
88 .Video ScopesVideo Scopes8...Video ScopesVideo Scopes88The camcorder can display a simplified waveform monitor or vectorscope. It can also display an edge monitor*to help you focus. The video scopes appear only on the LCD screen. They do not appear in the viewfinder or onan external m...
-
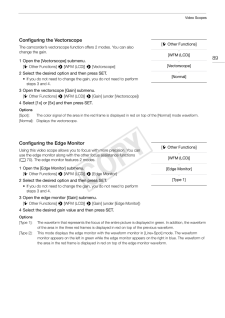
89 .Video ScopesConfiguring t...Video ScopesConfiguring the VectorscopeThe camcorder’s vectorscope function offers 2 modes. You can alsochange the gain.[w Other Functions][WFM (LCD)]1 Open the [Vectorscope] submenu.[w Other Functions] > [WFM (LCD)] > [Vectorscope]2 Select the desired opt...
-
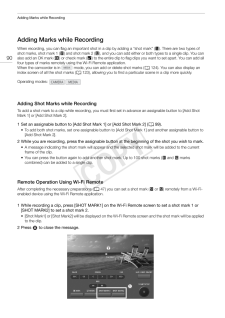
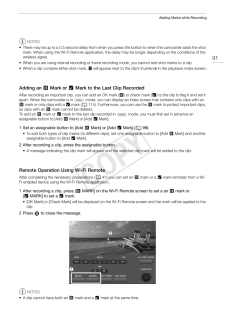
90 .Adding Marks while Record...Adding Marks while RecordingAdding Marks while Recording90When recording, you can flag an important shot in a clip by adding a “shot mark” (!). There are two types ofshot marks, shot mark 1 (") and shot mark 2 (#), and you can add either or both types to a...
-
91 .Adding Marks while Record...Adding Marks while RecordingNOTES• There may be up to a 0.5 second delay from when you press the button to when the camcorder adds the shotmark. When using the Wi-Fi Remote application, the delay may be longer depending on the conditions of thewireless sig...
-
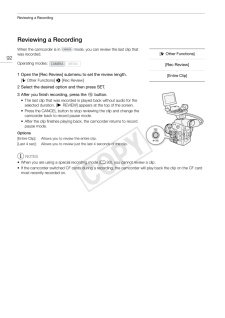
92 .Reviewing a RecordingRevi...Reviewing a RecordingReviewing a Recording92When the camcorder is inwas recorded.mode, you can review the last clip that[w Other Functions]Operating modes:[Rec Review]1 Open the [Rec Review] submenu to set the review length.[Entire Clip][w Other Functions]...
-
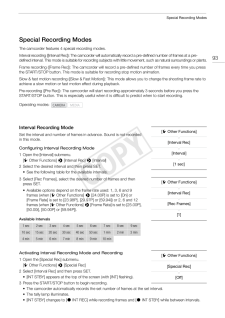
93 .Special Recording ModesSp...Special Recording ModesSpecial Recording ModesThe camcorder features 4 special recording modes.Interval recording ([Interval Rec]): The camcorder will automatically record a pre-defined number of frames at a predefined interval. This mode is suitable for r...
-
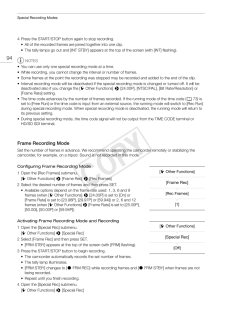
94 .Special Recording Modes4 ...Special Recording Modes4 Press the START/STOP button again to stop recording.• All of the recorded frames are joined together into one clip.• The tally lamps go out and [INT STBY] appears at the top of the screen (with [INT] flashing).94NOTESYou can use on...
-
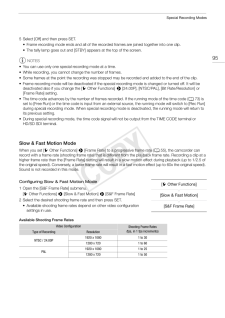
95 .Special Recording Modes5 ...Special Recording Modes5 Select [Off] and then press SET.• Frame recording mode ends and all of the recorded frames are joined together into one clip.• The tally lamp goes out and [STBY] appears at the top of the screen.••••••NOTESYou can use only one spec...
-
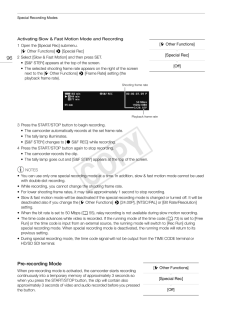
96 .Special Recording ModesAc...Special Recording ModesActivating Slow & Fast Motion Mode and Recording[w Other Functions]1 Open the [Special Rec] submenu.[w Other Functions] > [Special Rec]96[Special Rec]2 Select [Slow & Fast Motion] and then press SET.• [S&F STBY] appears at the top of...
-
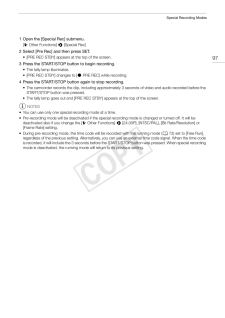
97 .Special Recording Modes1 ...Special Recording Modes1 Open the [Special Rec] submenu.[w Other Functions] > [Special Rec]2 Select [Pre Rec] and then press SET.• [PRE REC STBY] appears at the top of the screen.3 Press the START/STOP button to begin recording.• The tally lamp illuminates...
-
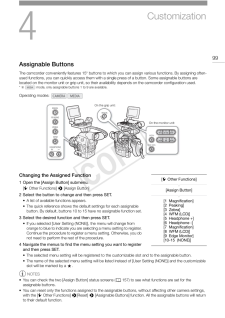
99 .4Customization99Assignabl...4Customization99Assignable ButtonsThe camcorder conveniently features 15* buttons to which you can assign various functions. By assigning oftenused functions, you can quickly access them with a single press of a button. Some assignable buttons arelocated o...
-
100 .Assignable ButtonsUsing a...Assignable ButtonsUsing an Assignable ButtonAfter you assign a function to one of the buttons, press the button to activate the function. For some functions,an options menu may appear. In such case, select the desired option and then press SET.100Assignabl...