97 / 268 ページ

97 / 268 ページ


現在のページURL
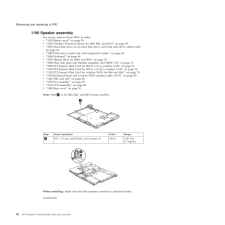
1180 Base cover For access, remove these FRUs, in order: v 1010 Battery pack on page 58 v 1020 Ultrabay Enhanced device for R60, R61, and R61i on page 59 v 1030 Hard disk drive cover, hard disk drive, and hard disk drive rubber rails on page 60 v 1040 Palm rest or palm rest with fingerprint reader on page 64 v 1060 Keyboard on page 68 v 1070 Optical drive for R60e and R61i on page 70 v 1080 Heat sink plate and Modem daughter card (MDC-1.5) on page 71 v 1090 PCI Express Mini Card for 802.11 a/b/g wireless LAN on page 74 v 1100 PCI Express Mini Card for 802.11 a/b/g/n wireless LAN on page 76 v 1110 PCI Express Mini Card for wireless WAN for R60 and R61i on page 78 v 1130 Keyboard bezel and wireless WAN antenna cable (AUX) on page 80 v 1140 SIM card slot on page 82 v 1150 Fan assembly on page 83 v 1170 LCD assembly on page 8822221 Step Screw (quantity) Color Torque 1 M2 3.5 mm, big flat-head, nylon-coated (1) Black 0.167 Nm(1.7 kgfcm) 2 M2 5 mm, flat-head, nylon-coated (4) Black 0.167 Nm(1.7 kgfcm) (continued) Removing and replacing a FRU ThinkPad R60, R60e, R61, and R61i 91
参考になったと評価  41人が参考になったと評価しています。
このマニュアルの目次
-
1 .ThinkPad® R60, R60e, R...ThinkPad® R60, R60e, R61, and R61iHardware Maintenance Manual November 2007 This manual supports: ThinkPad R60 (MT 9455, 9456, 9457, 9458, 9459, 9444, 9445, 9460, 9461, 9462, 9463, 9464, 9446, and 9447) ThinkPad R60e ...
-
2 .2 ページ目のマニュアル
-
4 .Note Before using this...Note Before using this information and the product it supports, be sure to read the general information under Notices on page 260.Third Edition (November 2007) (C) Copyright Lenovo 2007. All rights reserved. LENOVO products...
-
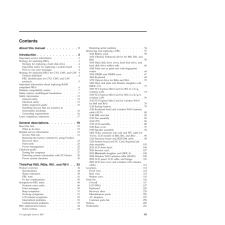
5 .Contents About this ma...Contents About this manual . . . . . . . . . .1 Introduction . . . . . . . . . . . . .3 Important service information . . . . . . . .3 Strategy for replacing FRUs . . . . . . . . .3 Strat...
-
7 .About this manual This...About this manual This manual contains service and reference information for ThinkPadfi R60, R60e, R61, and R61i (MT 0656, 0657, 0658, 0659, 9455, 9456, 9457, 9458, 9459, 9444, 9445, 9460, 9461, 9462, 9463, 9464, 9446, 94...
-
9 .Introduction Important ...Introduction Important service information Important BIOS and device driver fixes are customer-installable. The BIOS and device drivers are posted on the customer support site http://www.lenovo.com/support Advise customers to co...
-
10 .Attention: The setup ...Attention: The setup configuration on the computer you are servicing may have been customized. Running Automatic Configuration may alter the settings. Note the current configuration settings (using the View Configuration opti...
-
11 .v The PEW record is ...v The PEW record is the 4-digit MT and 3-digit model, where model = CTO (Example: 1829-CTO). v eSupport will show both the CTO and CMV machine type models (Example: 1829-CTO and 1829-W15 will be found on the eSupport ...
-
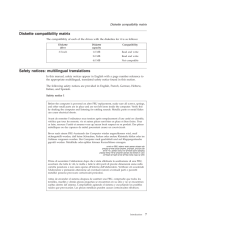
12 .For the Remaining FRUs...For the Remaining FRUs (the complete list of FRUs at the MT Model level) v eSupport can be used to view the complete list of FRUs for a machine type and model. v To view the complete list of FRUs, type in the mach...
-
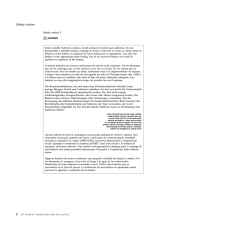
13 .Diskette compatibility ...Diskette compatibility matrix The compatibility of each of the drives with the diskettes for it is as follows: Diskettedrive Diskettecapacity Compatibility 3.5-inch 1.0 MB Read and write 2.0 MB Read and write 4.0 MB Not...
-
14 .Safety notice 2 DANGER...Safety notice 2 DANGER Some standby batteries contain a small amount of nickel and cadmium. Do not disassemble a standby battery, recharge it, throw it into fire or water, or short-circuit it. Dispose of the battery as ...
-
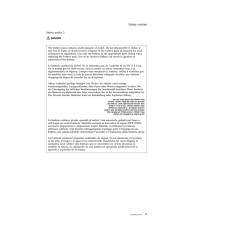
15 .Safety notice 3 DANGER...Safety notice 3 DANGER The battery pack contains small amounts of nickel. Do not disassemble it, throw it into fire or water, or short-circuit it. Dispose of the battery pack as required by local ordinances or regulatio...
-
16 .Safety notice 4 DANGER...Safety notice 4 DANGER The lithium battery can cause a fire, an explosion, or a severe burn. Do not recharge it, remove its polarized connector, disassemble it, heat it above 100C (212F), incinerate it, or expose its c...
-
17 .Safety notice 5 Safe...Safety notice 5 Safety notice 6 DANGER If the LCD breaks and the fluid from inside the LCD gets into your eyes or on your hands, immediately wash the affected areas with water for at least 15 minutes. Seek medical ...
-
18 .Safety notice 7 DANGER...Safety notice 7 DANGER Safety notice 8 DANGER Though the main batteries have low voltage, a shorted or grounded battery can produce enough current to burn personnel or combustible materials. Bien que le voltage des bat...
-
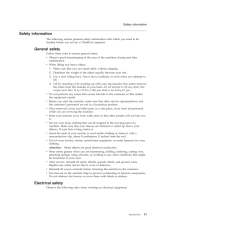
19 .Safety information The ...Safety information The following section presents safety information with which you need to be familiar before you service a ThinkPad computer. General safety Follow these rules to ensure general safety: v Observe good hous...
-
20 .Important Use only app...Important Use only approved tools and test equipment. Some hand tools have handles covered with a soft material that does not insulate you when working with live electrical currents. Many customers have, near their equipme...
-
21 .v Do not service the ...v Do not service the following parts with the power on when they are removed from their normal operating places in a machine: Power supply units Pumps Blowers and fans Motor generatorsand similar units. (This pract...
-
22 .9. Check that the pow...9. Check that the power-supply cover fasteners (screws or rivets) have not been removed or tampered with.Handling devices that are sensitive to electrostatic discharge Any computer part containing transistors or integrated ci...
-
23 .Laser compliance statem...Laser compliance statement Some models of ThinkPad computer are equipped from the factory with an optical storage device such as a CD-ROM drive or a DVD-ROM drive. Such devices are also sold separately as options. If one...
-
24 .A CD-ROM drive, a DVD...A CD-ROM drive, a DVD-ROM drive, or any other storage device installed may contain an embedded Class 3A or Class 3B laser diode. Note the following: DANGER Emits visible and invisible laser radiation when open. Do not ...
-
25 .General descriptions Th...General descriptions The descriptions in this chapter apply to any ThinkPad model that has the PC-Doctorfi for DOS diagnostics program. Some descriptions might not apply to your particular computer. Read this first Before y...
-
26 .Following is a list o...Following is a list of some common items that are not covered under warranty and some symptoms that might indicate that the system was subjected to stress beyond normal use. Before checking problems with the computer, de...
-
27 .Related service informa...Related service information This section provides information about the following: v Service Web site v Restoring the factory contents by using Product Recovery discs v Passwords on page 23 v Power management on page 25Ser...
-
28 .A total progress bar ...A total progress bar allows you to audit this process, which will take about 8 minutes. The final recovery disc may be safely removed during this time, but may also be left in the optical drive since it is not bootab...
-
29 .Passwords As many as ...Passwords As many as three passwords may be needed for any ThinkPad computer: the power-on password (POP), the hard-disk password (HDP), and the supervisor password (SVP). If any of these passwords has been set, a prompt ...
-
30 .After the POST ends, ...After the POST ends, the password prompt does not appear. The POP has been removed. 5. Reinstall the backup battery and the battery pack. (B) If an SVP has been set and is known by the servicer: 1. Turn on the compu...
-
31 .7. Select Master HDP. ...7. Select Master HDP. 8. Type the current master HDP in the Enter Current Password field. then leave the Enter New Password field blank, and press Enter twice. 9. Press F10. 10. Select Yes in the Setup Configuration ...
-
32 .To cause the computer ...To cause the computer to return from standby mode and resume operation, do one of the following: v Press the Fn key. v Open the LCD cover. v Turn on the power switch. Also, in either of the following events, the com...
-
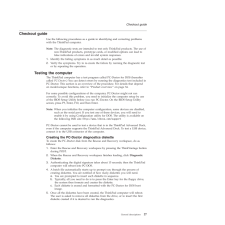
33 .Checkout guide Use the...Checkout guide Use the following procedures as a guide in identifying and correcting problems with the ThinkPad computer. Note: The diagnostic tests are intended to test only ThinkPad products. The use of non-ThinkPad produ...
-
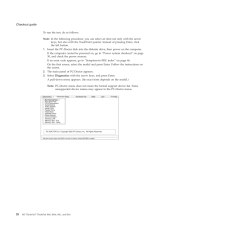
34 .To run the test, do ...To run the test, do as follows: Note: In the following procedure, you can select an item not only with the arrow keys, but also with the TrackPoint pointer. Instead of pressing Enter, click the left button. 1. Insert ...
-
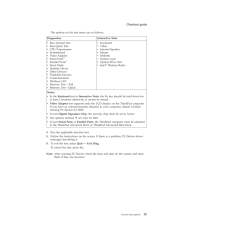
35 .The options on the te...The options on the test menu are as follows: Diagnostics Interactive Tests v Run Normal Test v Run Quick Test v CPU/Coprocessor v Systemboard v Video Adapter v Serial Ports*1 v Parallel Ports*1 v Fixed Disks v Diskett...
-
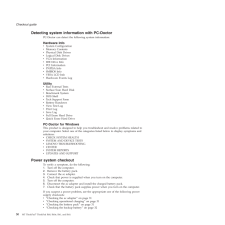
36 .Detecting system inform...Detecting system information with PC-Doctor PC-Doctor can detect the following system information: Hardware Info v System Configuration v Memory Contents v Physical Disk Drives v Logical Disk Drives v VGA Information v IDE ...
-
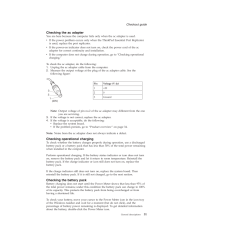
37 .Checking the ac adapte...Checking the ac adapter You are here because the computer fails only when the ac adapter is used. v If the power problem occurs only when the ThinkPad Essential Port Replicator is used, replace the port replicator. v I...
-
38 .Note: If the battery ...Note: If the battery pack becomes hot, it may not be able to charge. Remove it from the computer and leave it at room temperature for a while. After it cools down, reinstall and recharge it. To check the battery pack...
-
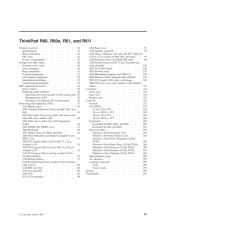
39 .ThinkPad R60, R60e, R6...ThinkPad R60, R60e, R61, and R61i Product overview . . . . . . . . . . . .34 Specifications . . . . . . . . . . . . .34 Status indicators . . . . . . . . . . . .38 FRU tests...
-
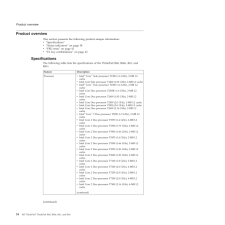
40 .Product overview This ...Product overview This section presents the following product-unique information: v Specifications v Status indicators on page 38 v FRU tests on page 41 v Fn key combinations on page 43Specifications The following table list...
-
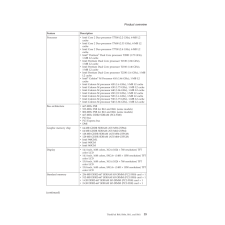
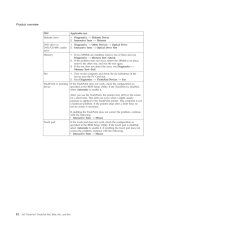
41 .Feature Description Pr...Feature Description Processor v Intel Core 2 Duo processor T7500 (2.2 GHz), 4-MB L2 cache v Intel Core 2 Duo processor T7600 (2.33 GHz), 4-MB L2 cache v Intel Core 2 Duo processor T7700 (2.4 GHz), 4-MB L2 cache v I...
-
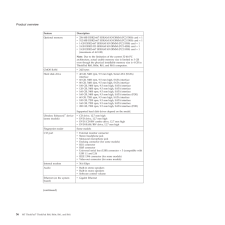
42 .Feature Description Op...Feature Description Optional memory v 256-MB DDR2-667 SDRAM SO-DIMM (PC2-5300) card 1 v 512-MB DDR2-667 SDRAM SO-DIMM (PC2-5300) card 1 v 1-GB DDR2-667 SDRAM SO-DIMM (PC2-5300) card 1 v 2-GB DDR2-533 SDRAM SO-DIMM (...
-
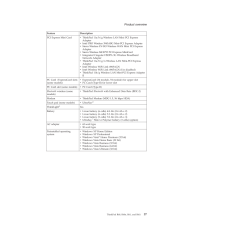
43 .Feature Description PC...Feature Description PCI Express Mini Card v ThinkPad 11a/b/g Wireless LAN Mini PCI Express Adapter v Intel PRO Wireless 3945ABG Mini-PCI Express Adapter v Sierra Wireless EV-DO Wireless WAN Mini PCI Express Adapter v Sie...
-
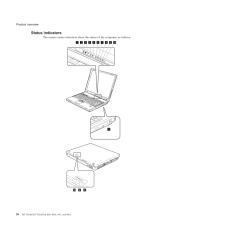
44 .Status indicators The ...Status indicators The system status indicators show the status of the computer, as follows: 111 2 3 4 5 6 7 8 9 10 8 9 10 Product overview 38 MT ThinkPadfi ThinkPad R60, R60e, R61, and R61i
-
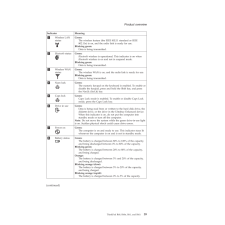
45 .Indicator Meaning 1 ...Indicator Meaning 1 Wireless LAN status Green: The wireless feature (the IEEE 802.11 standard or IEEE 802.11n) is on, and the radio link is ready for use. Blinking green: Data is being transmitted. 2 Bluetooth statusR G...
-
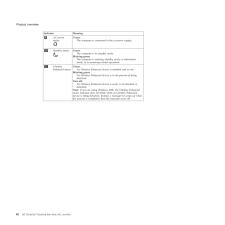
46 .Indicator Meaning 9 ...Indicator Meaning 9 AC power status Green: The computer is connected to the ac power supply. 10 Standby status Green: The computer is in standby mode. Blinking green: The computer is entering standby mode or hibernation ...
-
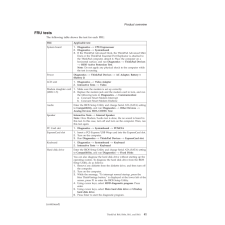
47 .FRU tests The followin...FRU tests The following table shows the test for each FRU. FRU Applicable test System board 1. Diagnostics --> CPU/Coprocessor 2. Diagnostics --> Systemboard 3. If the ThinkPad Advanced Dock, the ThinkPad Advanced Mini ...
-
48 .FRU Applicable test D...FRU Applicable test Diskette drive 1. Diagnostics --> Diskette Drives 2. Interactive Tests --> Diskette DVD drive or DVD/CD-RW combo drive 1. Diagnostics --> Other Devices --> Optical Drive 2. Interactive Tests --> Optica...
-
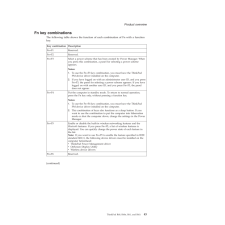
49 .Fn key combinations Th...Fn key combinations The following table shows the function of each combination of Fn with a function key. Key combination Description Fn+F1 Reserved. Fn+F2 Reserved. Fn+F3 Select a power scheme that has been created by...
-
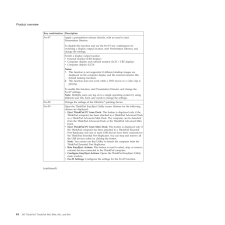
50 .Key combination Descrip...Key combination Description Fn+F7 Apply a presentation scheme directly, with no need to start Presentation Director. To disable this function and use the Fn+F7 key combination for switching a display output location, start ...
-
51 .Key combination Descrip...Key combination Description Fn+F10 Reserved. Fn+F11 Reserved. Fn+F12 Put the computer into hibernation mode. To return to normal operation, press the power button for less than four seconds. Note: To use Fn+F12 for hiber...
-
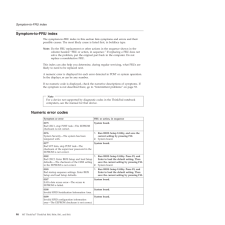
52 .Symptom-to-FRU index Th...Symptom-to-FRU index The symptom-to-FRU index in this section lists symptoms and errors and their possible causes. The most likely cause is listed first, in boldface type. Note: Do the FRU replacement or other actions in ...
-
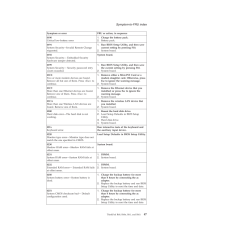
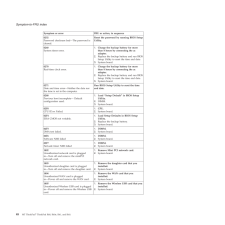
53 .Symptom or error FRU ...Symptom or error FRU or action, in sequence 0190Critical low-battery error 1. Charge the battery pack. 2. Battery pack. 0191System SecurityInvalid Remote Change requested. 1. Run BIOS Setup Utility, and then save current set...
-
54 .Symptom or error FRU ...Symptom or error FRU or action, in sequence 0252Password checksum badThe password is cleared. Reset the password by running BIOS Setup Utility. 0260System timer error. 1. Charge the backup battery for more than 8 hours by ...
-
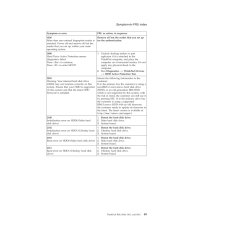
55 .Symptom or error FRU ...Symptom or error FRU or action, in sequence 1820More than one external fingerprint reader is attached. Power off and remove all but the reader that you set up within your main operating system. Remove all but the reader...
-
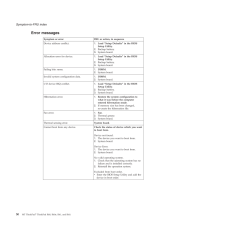
56 .Error messages Symptom...Error messages Symptom or error FRU or action, in sequence Device address conflict. 1. Load "Setup Defaults" in the BIOS Setup Utility. 2. Backup battery. 3. System board. Allocation error for device. 1. Load "Setup D...
-
57 .Beep symptoms Symptom ...Beep symptoms Symptom or error FRU or action, in sequence One beep and a blank, unreadable, or flashing LCD. 1. Reseat the LCD connector. 2. LCD assembly. 3. External CRT. 4. System board. One long and two short beep...
-
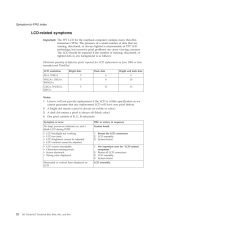
58 .LCD-related symptoms Im...LCD-related symptoms Important: The TFT LCD for the notebook computer contains many thin-film transistors (TFTs). The presence of a small number of dots that are missing, discolored, or always lighted is characteristic of T...
-
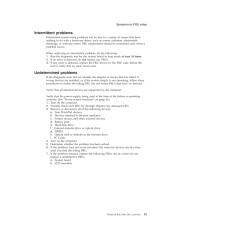
59 .Intermittent problems I...Intermittent problems Intermittent system hang problems can be due to a variety of causes that have nothing to do with a hardware defect, such as cosmic radiation, electrostatic discharge, or software errors. FRU replacemen...
-
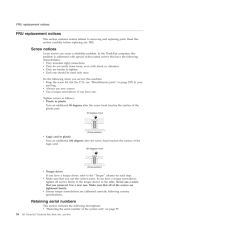
60 .FRU replacement notices...FRU replacement notices This section contains notices related to removing and replacing parts. Read this section carefully before replacing any FRU. Screw notices Loose screws can cause a reliability problem. In the ThinkPad...
-
61 .v Retaining the UUID ...v Retaining the UUID v Reading or writing the ECA informationRestoring the serial number of the system unit When the computer was manufactured, the EEPROM on the system board was loaded with the serial numbers of the sy...
-
62 .To check what ECAs ha...To check what ECAs have been previously applied to the machine, use the ECA Information Read/Write function on the ThinkPad Hardware Maintenance Diskette Version 1.73 or later. 1. Insert the ThinkPad Hardware Maintenance Di...
-
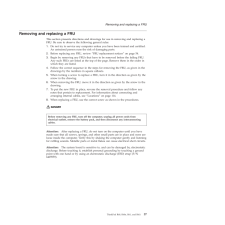
63 .Removing and replacing ...Removing and replacing a FRU This section presents directions and drawings for use in removing and replacing a FRU. Be sure to observe the following general rules: 1. Do not try to service any computer unless you have ...
-
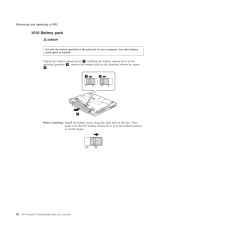
64 .1010 Battery pack DANG...1010 Battery pack DANGER Unlock the battery release lever 1 . Holding the battery release lever in the unlocked position 2 , remove the battery pack in the direction shown by arrow 3 . 213 When installing: Install the ...
-
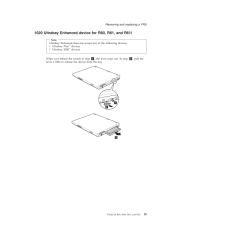
65 .1020 Ultrabay Enhanced ...1020 Ultrabay Enhanced device for R60, R61, and R61i Note Ultrabay Enhanced does not accept any of the following devices: v Ultrabay Plus devices v Ultrabay 2000 devices When you release the switch in step 1 , the lever...
-
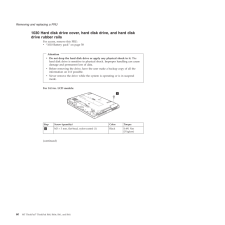
66 .1030 Hard disk drive ...1030 Hard disk drive cover, hard disk drive, and hard disk drive rubber rails For access, remove this FRU: v 1010 Battery pack on page 58 Attention v Do not drop the hard disk drive or apply any physical shock to it...
-
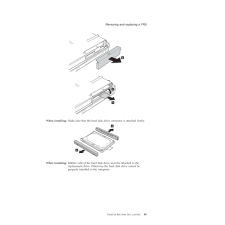
67 .243When installing: Mak...243When installing: Make sure that the hard disk drive connector is attached firmly.55 When installing: Rubber rails of the hard disk drive must be attached to the replacement drive. Otherwise the hard disk drive cannot b...
-
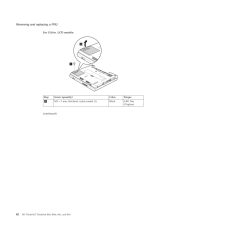
68 .For 15.0-in. LCD model...For 15.0-in. LCD models: 12 Step Screw (quantity) Color Torque 1 M3 3 mm, flat-head, nylon-coated (1) Black 0.491 Nm(5 kgfcm) (continued) Removing and replacing a FRU 62 MT ThinkPadfi ThinkPad R60, R60e, R61, and R...
-
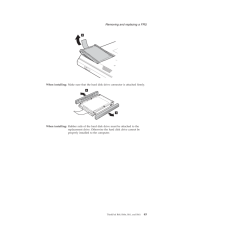
69 .3When installing: Make ...3When installing: Make sure that the hard disk drive connector is attached firmly.44 When installing: Rubber rails of the hard disk drive must be attached to the replacement drive. Otherwise the hard disk drive cannot be ...
-
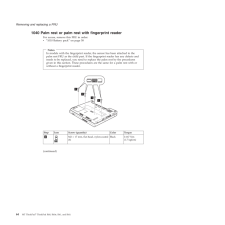
70 .1040 Palm rest or pal...1040 Palm rest or palm rest with fingerprint reader For access, remove this FRU in order: v 1010 Battery pack on page 58 Notes In models with the fingerprint reader, the sensor has been attached to the palm rest FRU ...
-
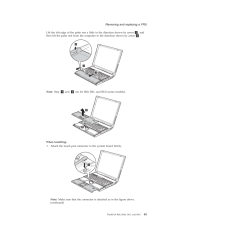
71 .Lift the left edge of...Lift the left edge of the palm rest a little in the direction shown by arrow 2 , and then lift the palm rest from the computer in the direction shown by arrow 3 . 323 Note: Step 4 and 5 are for R60, R61, and R61i ...
-
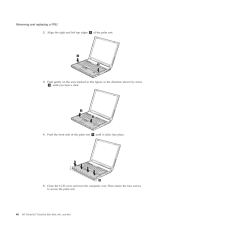
72 .2. Align the right an...2. Align the right and left top edges 2 of the palm rest.22 3. Push gently on the area marked in this figure, in the direction shown by arrow 3 , until you hear a click.33 4. Push the front side of the palm rest ...
-
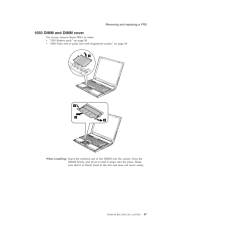
73 .1050 DIMM and DIMM co...1050 DIMM and DIMM cover For access, remove these FRUs in order: v 1010 Battery pack on page 58 v 1040 Palm rest or palm rest with fingerprint reader on page 641 322 When installing: Insert the notched end of the DI...
-
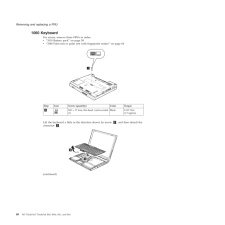
74 .1060 Keyboard For acce...1060 Keyboard For access, remove these FRUs in order: v 1010 Battery pack on page 58 v 1040 Palm rest or palm rest with fingerprint reader on page 641 Step Icon Screw (quantity) Color Torque 1 M2 17 mm, flat-h...
-
75 .When installing: Make ...When installing: Make sure that the keyboard edges a are under the frame as shown in this figure.aaa Removing and replacing a FRU ThinkPad R60, R60e, R61, and R61i 69
-
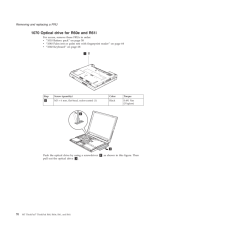
76 .1070 Optical drive for...1070 Optical drive for R60e and R61i For access, remove these FRUs in order: v 1010 Battery pack on page 58 v 1040 Palm rest or palm rest with fingerprint reader on page 64 v 1060 Keyboard on page 681 Step Screw ...
-
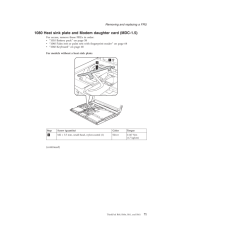
77 .1080 Heat sink plate ...1080 Heat sink plate and Modem daughter card (MDC-1.5) For access, remove these FRUs in order: v 1010 Battery pack on page 58 v 1040 Palm rest or palm rest with fingerprint reader on page 64 v 1060 Keyboard on page ...
-
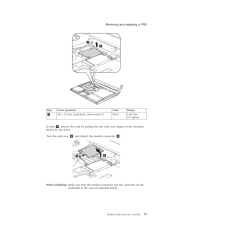
78 .For models with a hea...For models with a heat sink plate: 12 Step Screw (quantity) Color Torque 1 M2 3.5 mm, small-head, nylon-coated (1) Silver 0.167 Nm(1.7 kgfcm) (continued) Removing and replacing a FRU 72 MT ThinkPadfi ThinkPad R60, ...
-
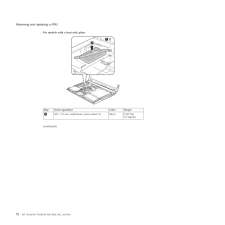
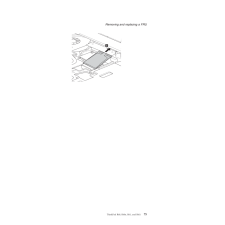
79 .43Step Screw (quantity...43Step Screw (quantity) Color Torque 3 M2 3.5 mm, small-head, nylon-coated (1) Silver 0.167 Nm(1.7 kgfcm) In step 4 , remove the card by pulling the tab with your fingers in the direction shown by the arrow. Turn ...
-
80 .1090 PCI Express Mini ...1090 PCI Express Mini Card for 802.11 a/b/g wireless LAN For access, remove these FRUs in order: v 1010 Battery pack on page 58 v 1040 Palm rest or palm rest with fingerprint reader on page 64 v 1060 Keyboard on pag...
-
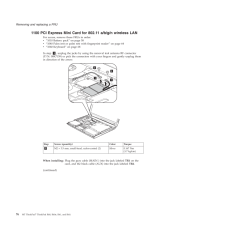
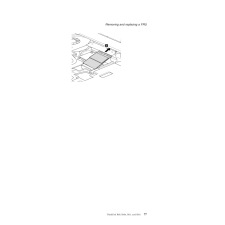
82 .1100 PCI Express Mini ...1100 PCI Express Mini Card for 802.11 a/b/g/n wireless LAN For access, remove these FRUs in order: v 1010 Battery pack on page 58 v 1040 Palm rest or palm rest with fingerprint reader on page 64 v 1060 Keyboard on p...
-
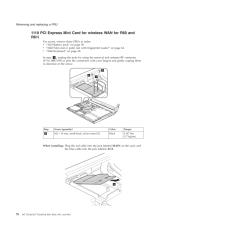
84 .1110 PCI Express Mini ...1110 PCI Express Mini Card for wireless WAN for R60 and R61i For access, remove these FRUs in order: v 1010 Battery pack on page 58 v 1040 Palm rest or palm rest with fingerprint reader on page 64 v 1060 Keyboard o...
-
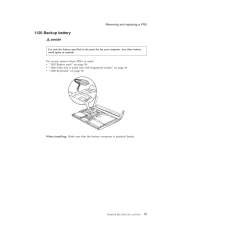
85 .1120 Backup battery DA...1120 Backup battery DANGER For access, remove these FRUs in order: v 1010 Battery pack on page 58 v 1040 Palm rest or palm rest with fingerprint reader on page 64 v 1060 Keyboard on page 68 When installing: Make su...
-
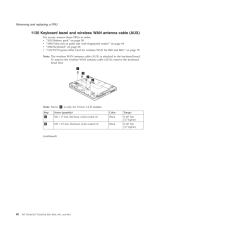
86 .1130 Keyboard bezel an...1130 Keyboard bezel and wireless WAN antenna cable (AUX) For access, remove these FRUs in order: v 1010 Battery pack on page 58 v 1040 Palm rest or palm rest with fingerprint reader on page 64 v 1060 Keyboard on page...
-
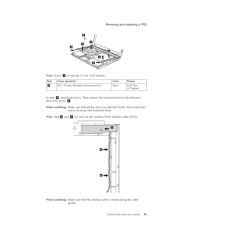
87 .5544443Note: Screw 3 i...5544443Note: Screw 3 is only for 14.1-in. LCD models. Step Screw (quantity) Color Torque 3 M2 14 mm, flat-head, nylon-coated (1) Silver 0.167 Nm(1.7 kgfcm) In step 4 , detach the claws. Then remove the keyboard bezel...
-
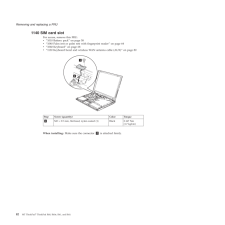
88 .1140 SIM card slot Fo...1140 SIM card slot For access, remove this FRU: v 1010 Battery pack on page 58 v 1040 Palm rest or palm rest with fingerprint reader on page 64 v 1060 Keyboard on page 68 v 1130 Keyboard bezel and wireless WAN ante...
-
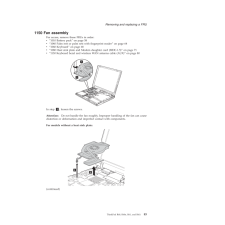
89 .1150 Fan assembly For ...1150 Fan assembly For access, remove these FRUs in order: v 1010 Battery pack on page 58 v 1040 Palm rest or palm rest with fingerprint reader on page 64 v 1060 Keyboard on page 68 v 1080 Heat sink plate and Modem ...
-
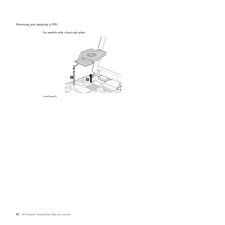
90 .For models with a hea...For models with a heat sink plate: 32 (continued) Removing and replacing a FRU 84 MT ThinkPadfi ThinkPad R60, R60e, R61, and R61i
-
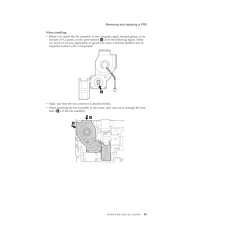
91 .When installing: v Bef...When installing: v Before you attach the fan assembly to the computer, apply thermal grease, at an amount of 0.2 grams, on the part marked a as in the following figure. Either too much or too less application of greas...
-
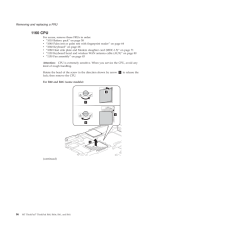
92 .1160 CPU For access, ...1160 CPU For access, remove these FRUs in order: v 1010 Battery pack on page 58 v 1040 Palm rest or palm rest with fingerprint reader on page 64 v 1060 Keyboard on page 68 v 1080 Heat sink plate and Modem daughter ...
-
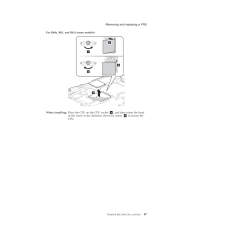
93 .For R60e, R61, and R6...For R60e, R61, and R61i (some models): 31ba2 When installing: Place the CPU on the CPU socket a , and then rotate the head of the screw in the direction shown by arrow b to secure the CPU. Removing and replacing a FR...
-
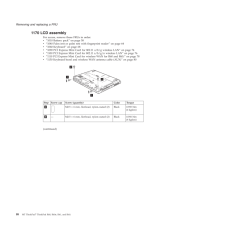
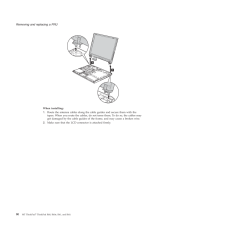
94 .1170 LCD assembly For ...1170 LCD assembly For access, remove these FRUs in order: v 1010 Battery pack on page 58 v 1040 Palm rest or palm rest with fingerprint reader on page 64 v 1060 Keyboard on page 68 v 1090 PCI Express Mini Card for ...
-
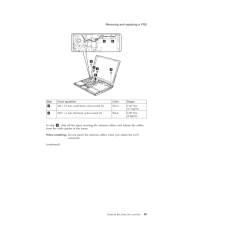
95 .5334466Step Screw (qua...5334466Step Screw (quantity) Color Torque 3 M2 3.5 mm, small-head, nylon-coated (2) Silver 0.167 Nm(1.7 kgfcm) 4 M2.5 6 mm, flat-head, nylon-coated (2) Black 0.392 Nm(4 kgfcm) In step 6 , strip off the tapes secu...
-
96 .77When installing: 1. ...77When installing: 1. Route the antenna cables along the cable guides and secure them with the tapes. When you route the cables, do not tense them. To do so, the cables may get damaged by the cable guides of the fram...
-
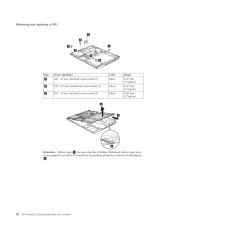
97 .1180 Base cover For a...1180 Base cover For access, remove these FRUs, in order: v 1010 Battery pack on page 58 v 1020 Ultrabay Enhanced device for R60, R61, and R61i on page 59 v 1030 Hard disk drive cover, hard disk drive, and hard disk ...
-
98 .3444454Step Screw (qua...3444454Step Screw (quantity) Color Torque 3 M2 17 mm, flat-head, nylon-coated (1) Black 0.167 Nm(1.7 kgfcm) 4 M2 3.5 mm, small-head, nylon-coated (5) Silver 0.167 Nm(1.7 kgfcm) 5 M2 10 mm, flat-head, nylon-coat...
-
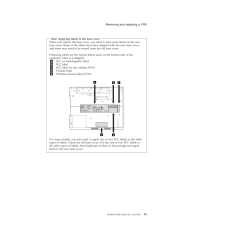
99 .Note: Applying labels ...Note: Applying labels to the base cover When you replace the base cover, you need to stick some labels on the new base cover. Some of the labels have been shipped with the new base cover, and some may need to be re...
-
100 .1190 Speaker assembly ...1190 Speaker assembly For access, remove these FRUs in order: v 1010 Battery pack on page 58 v 1020 Ultrabay Enhanced device for R60, R61, and R61i on page 59 v 1030 Hard disk drive cover, hard disk drive, and hard ...