

Q&A
取扱説明書・マニュアル (文書検索対応分のみ)
13 件の検索結果
20 - 30 件目を表示
全般
質問者が納得アスペクト比の問題です。
ゲームのウインドウ解像度が
16×9(1024×576、1366×768、1600×900、1920×1080)のゲームウインドウの場合は左右に黒枠は出ません。
逆に、4×3(800×600、1024×768、1280×960、1600×1200)のゲームウインドウの場合は左右に黒枠が出ます。
アスペクト比が4×3のゲームをフルスクリーンにした際、
Radeonのドライバーがゲームウインドウのアスペクト比に勝手に合わせる為、両サイドに黒枠が出ます。
これはゲーム側(ソフトウェ...
4551日前view75
全般
質問者が納得それはただの設定ミスですww
LG自体がPS3推薦と発売しているものですからね(^^
まずPS3のサウンド設定の「音声出力設定」を選択します
それからHDMIを選択します→自動設定にします→出来上がり
コレで普通に音が出るはずですよ(^-^)
4647日前view145
全般
質問者が納得仕様を確認してみましたが、可能です。
ただし、LCD-AS171M-Cは一時期多かった5:4の縦横比、W2453V-PFは16:9の横長ですから、つなぎかえた後にPCの解像度もあわせて変えたほうが良いでしょう。1920x1080に設定するのが理想ですが、もし好みに合わないのであれば1280x720などに設定すると良いと思います。
また、LCD-AS171M-Cにはスピーカーが内蔵されているため、PCと接続することで音が出せますが、W2453V-PFにはスピーカーは入っていませんので、これは注意してください...
4656日前view113
全般
質問者が納得入力がDVI-D、ミニd-sub、HDMIを装備しています。
現在お使いの入力がDVI-D、ミニd-subのどちらかを使用しているはずですから使用可能です。
4656日前view88
全般
質問者が納得どちらがいいかは見比べないとわからないですね。
当方G2420HD使っていますが思ったより画質よくて満足しています。
PS3でプレイする分には十分でした。
なので個人的にはG2420HDが値段的にもスペック的にもおすすめです。
G2420HD
http://www.amazon.co.jp/gp/product/B002TKKMA2?ie=UTF8&tag=jgpt01-22
4824日前view106
全般
質問者が納得前の質問を閉めてからの方が良いのではないでしょうか。
とりあえずそこまでの劇的な値引きは無理でしょうね。
秋葉原まで行けるのであれば同じ店舗である程度セットで買うと5000円引きなどはありますが。
がんばって値段下げても15万が関の山でしょうね。
ただし、秋葉原までの交通費を考えてしまうと…
PCパーツというのは大抵現在販売できる底値で売っていることが多いです、
それ以上値引きしたら店舗側の売り上げがなくなってしまいますね。
4853日前view61
全般
質問者が納得何を求めるかしだい。。。
BenQの方が疲れない発色バランスはしてる
LGの液晶は明るさ・コントラスト調整しても気持ち悪いくらいギラギラ画面
中にはギラギラが好きなMもいるらしいけど
4879日前view99
全般
質問者が納得単純な初期不良で、輸送の振動などで故障症状が引っ込んでしまった可能性有りです。
サポートセンターから異常なしで返却される際にマザーボードなど交換処理されて戻って来る可能性も有ります。
(初期不良を余り公表したく無い場合・・やることが有ります)
異常なしで戻って来たら・・前回故障症状が出た時に自分がした事を、何回か繰り返して故障症状が再現されない事を確認して下さい。
「ハードディスクにアクセス中はやらないでね」
5159日前view160
全般
質問者が納得xbox360やPS3はHDMI接続で映像が映りますが
W2453V-PFにスピーカーが付いてませんので音声は別ケーブル+別途スピーカー等になりますね
TVを見るにはチューナーが必要です
PS3があるならtorneが良さそうですかね
http://www.jp.playstation.com/ps3/torne/summary/index.html
W2453V-PFは光沢なしですね
5157日前view93
全般
質問者が納得サポートセンターに問い合わせるのが確実な対処法だと思います。
http://jp.lge.com/prodmodeldetail.do?actType=search&page=1&modelCategoryId=030102&categoryId=030102&parentId=03&modelCodeDisplay=W2453V-PF
5255日前view88
M ake sure to read the Important Precautionsbefore using the product. Keep the User's Guide(CD) in an accessible place for future reference.See the label attached on the product and give the information to yourdealer when you ask for service.W2453VUser's Guide
A2Important PrecautionsDo not use this display near water such as near a bathtub, washbowl, kitchensink, laundry tub, in a wet basement, or near a swimming pool.Displays are provided with ventilation openings in the cabinet to allow the releaseof heat generated during operation. If these openings are blocked, built-up heatcan cause failures which may result in a fire hazard. Therefore, NEVER:Block the bottom ventilation slots by placing the display on a bed, sofa, rug, etc.Place the display in a built-in en...
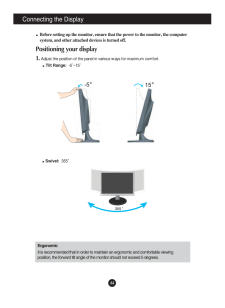
A4Connecting the DisplayBefore setting up the monitor, ensure that the power to the monitor, the computersystem, and other attached devices is turned off. Positioning your display1. Adjust the position of the panel in various ways for maximum comfort.Tilt Range:-5~15 ErgonomicIt is recommended that in order to maintain an ergonomic and comfortable viewingposition, the forward tilt angle of the monitor should not exceed 5 degrees.Swivel:355
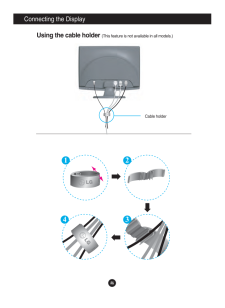
A6Connecting the DisplayOPEN1 23 4EPONNOPEUsing the cable holder (This feature is not available in all models.)Cable holder
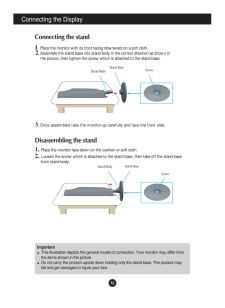
A3Connecting the DisplayDisassembling the stand1. Place the monitor face down on the cushion or soft cloth.2. Loosen the screw which is attached to the stand base, then take off the stand basefrom stand body.ImportantThis illustration depicts the general model of connection. Your monitor may differ fromthe items shown in the picture.Do not carry the product upside down holding only the stand base. The product mayfall and get damaged or injure your foot.Connecting the stand 1.Place the monitor with its fron...
A1This unit has been engineered and manufactured to ensure your personal safety,however improper use may result in potential electrical shock or fire hazards. Inorder to allow the proper operation of all safeguards incorporated in this display,observe the following basic rules for its installation, use, and servicing.On SafetyUse only the power cord supplied with the unit. In case you use another powercord, make sure that it is certified by the applicable national standards if not beingprovided by the supp...
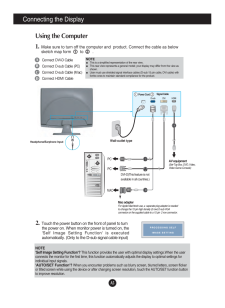
A5Using the Computer1. Make sure to turn off the computer and product. Connect the cable as belowsketch map form to .12Connecting the DisplayWall-outlet typeHeadphone/Earphone InputPower CordABCDConnect DVI-D CableConnect D-sub Cable (PC)Connect D-sub Cable (Mac)Connect HDMI CableMac adapterFor Apple Macintosh use, a separate plug adapter is neededto change the 15 pin high density (3 row) D-sub VGAconnector on the supplied cable to a 15 pin 2 row connector.DVI-D(This feature is not availabl...
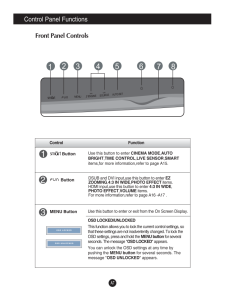
A7Control Panel FunctionsControl FunctionMENU ButtonUse this button to enter or exit from the On Screen Display.DSUB and DVI input,use this button to enter EZZOOMING,4:3 IN WIDE,PHOTO EFFECTitems.HDMI input,use this button to enter 4:3 IN WIDE,PHOTO EFFECT,VOLUMEitems.For more information,refer to page A16 -A17 .OSD LOCKED/UNLOCKEDThis function allows you to lock the current control settings, sothat these settings are not inadvertently changed. To lock theOSD settings, press and hold the MENU buttonfor s...
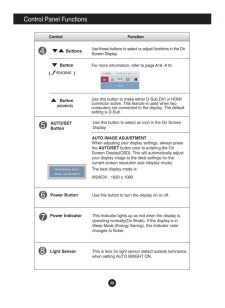
A8Control Panel FunctionsThis Indicator lights up as red when the display isoperating normally(On Mode). If the display is inSleep Mode (Energy Saving), this indicator colorchanges to flicker.Use this button to turn the display on or off.Power ButtonPower IndicatorUse this button to select an icon in the On ScreenDisplay.AUTO/SETButtonAUTO IMAGE ADJUSTMENTWhen adjusting your display settings, always pressthe AUTO/SETbutton prior to entering the OnScreen Display(OSD). This will automatically adjustyour displ...
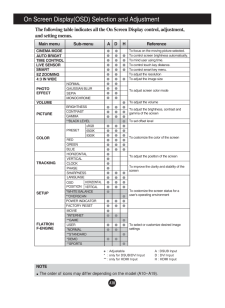
A10NOTEThe order of icons may differ depending on the model (A10~A19).On Screen Display(OSD) Selection and Adjustment The following table indicates all the On Screen Display control, adjustment,and setting menus. : Adjustable A : DSUB Input *: only for DSUB/DVI Input D : DVI Input** : only for HDMI Input H : HDMI InputTo adjust the resolutionTo focus on the moving picture selected.To control screen brightness automatically.To mind user using time.To control touch key distance.To control smart key menu.M...
- 1
- 2

