

Q&A
取扱説明書・マニュアル (文書検索対応分のみ)
"HDMI"20 件の検索結果
"HDMI"9 件の検索結果
全般
質問者が納得ドライバが悪さをしてそういう事があるようです。
CCC10.8~10.9をお使いでしたら10.7以前の物に入れ替えてみてください。
現在10.9のHotfix版が出ていますが、正式版ではないので見送った方が良いでしょう。
10.10で正式対応予定とのアナウンスが出ています。
5515日前view63
全般
質問者が納得>HDMIに対応しているチューナーを買わなければならないのでしょうか?
そうですね。価格コムでHDMI端子のついたチューナーを検索してください。
http://kakaku.com/specsearch/2047/
下手するとチューナー内蔵のモニターを買えるかも知れないようなチューナーの価格です。こんなニュースもありますし。
アキア、22型液晶TV「22HT10J-B」を29,800円に値下げ。エコポイント対象
http://av.watch.impress.co.jp/docs/news/2010
5744日前view31
全般
質問者が納得PS3の音声出力設定で、いくつか音声モードがありますけど、BENQのモニターが対応していない音声モードにチェックが入ってませんか。その対応していないモードで偶々ゲームによって該当する物があって、PS3側はその音声モードで出力をしているのかもしれません。
5779日前view86
全般
質問者が納得E2200HDに限らず通常のモニタには2画面同時に表示する機能はありません。
1台のモニタに2台のPCを繋げて、画面切り替えで使うことは出来ますが
CPU切替器というのが必要です。→http://www.coneco.net/SpecList/01106050.html
VGAに複数のコネクタがあるのは1台のPCに複数のモニタを繋ぐ
マルチモニタの為のモノです。
5804日前view17
全般
質問者が納得対応していないディスプレイは白黒で表示されるんでしたっけね
解決済みの質問に似たようなのがありましたのでどうぞ
http://detail.chiebukuro.yahoo.co.jp/qa/question_detail/q1013904620?fr=rcmd_chie_detail
三菱の上位ディスプレイならケーブル変換だけで表示できるのもあるようですね
http://blogs.yahoo.co.jp/tom_my_way/53197765.html
5835日前view21
全般
質問者が納得はじめまして
当方もPCモニターにHDDレコーダーとPS3(新型)&PS2(アップコンバーター経由)をHDMIで接続して使用しています。
PS3とDVDレコを使うたびにさしなおして使うことは可能ですがはっきりいってめんどくさいですよ。私の場合HDMIセレクター(切り替え器)を利用していますがリモコンもついているので大変楽です。(アマゾンでグリーンハウス社 3,500円位)
申し訳ないのですが因みにアンテナが別途いるとかという質問の意味が分かりませんでした。
HDDレコーダーはヤフオクで中古でも探したら...
5877日前view18
全般
質問者が納得一応こんなページがあったので・・・
http://www20.atwiki.jp/e2200hd/
一応本体の出力の設定も確認してみてください。
5900日前view21
全般
質問者が納得もう少し仕様を確認してから候補を選びましょう。
L2435HWには、HDMIとDVIとD-sub端子しか付いていません。他方AS-1000WHにはコンポジット,S,コンポネントのアナログ系の映像端子しかついていません。これでは接続出来ませんよ!
BenQは、今まで綺麗な画面を見た事がないので確認していませんが・・・
【追記】
5千円でHDMI端子付きのDVDプレーヤーはなさそうです。あれば、既に別の方が回答している筈ですが、別の回答も無いですね。恐らく、パイオニアのDV-410V-S辺りがHDMI端子付き...
5904日前view25
全般
質問者が納得PCモニターとスピーカーを繋ぐのではなく、Xbox360とスピーカーをコードで繋げばOKです。
360に付いてた、コードはコンポジットタイプなので、コンポジットをステレオミニジャックに変更する物を買い、スピーカーと繋ぎます。
追記分
HDMIでは無理です。
HDMIで繋ぐ場合、HDMI対応のAVアンプがいります。
Xbox360→AVアンプ→モニターの順です。(矢印は、HDMIで接続)
パソコンの横に置いてあるようなスピーカーなら、コンポジットで繋いでも音質は同じ。
5.1chサラウンドにするなら、音質が...
5931日前view19
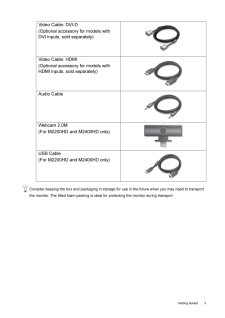
5 Getting startedConsider keeping the box and packaging in storage for use in the future when you may need to transport the monitor. The fitted foam packing is ideal for protecting the monitor during transport.Video Cable: DVI-D (Optional accessory for models with DVI inputs, sold separately)Video Cable: HDMI(Optional accessory for models with HDMI inputs, sold separately)Audio CableWebcam 2.0M(For M2200HD and M2400HD only)USB Cable(For M2200HD and M2400HD only)
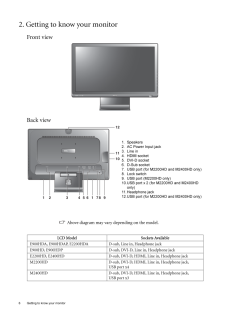
6 Getting to know your monitor 2. Getting to know your monitorFront viewBack view Above diagram may vary depending on the model.LCD Model Sockets AvailableE900HDA, E900HDAP, E2200HDA D-sub, Line in, Headphone jackE900HD, E900HDP D-sub, DVI-D, Line in, Headphone jackE2200HD, E2400HD D-sub, DVI-D, HDMI, Line in, Headphone jackM2200HD D-sub, DVI-D, HDMI, Line in, Headphone jack,USB port x4M2400HD D-sub, DVI-D, HDMI, Line in, Headphone jack,USB port x3AUTO MENU ENTER3 4 5 81211101 1 6 2 7 91. Speakers2. AC Po...

8 How to assemble your monitor hardware 2. Connect the PC video cable To Connect the D-Sub CableConnect the plug of the D-Sub cable (at the end without the ferrite filter) to the monitor video socket. Connect the other end of the cable (at the end with the ferrite filter) to the computer video socket.Tighten all finger screws to prevent the plugs from acci-dently falling out during use.To Connect the DVI-D CableConnect the plug of the DVI-D cable (at the end without the ferrite filter) to the monitor vide...
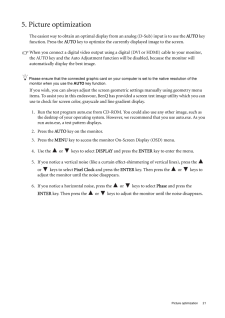
21 Picture optimization5. Picture optimization The easiest way to obtain an optimal display from an anal og (D-Sub) input is to use the AUTO key function. Press the AUTO key to optimize the currently displayed image to the screen. When you connect a digital video output using a digital (DVI or HDMI) cable to your monitor, the AUTO key and the Auto Adjustment fun ction will be disabled, because the monitor will automatically display the best image.Please ensure that the connected graphic card on your co...
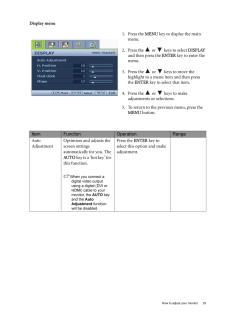
25 How to adjust your monitorDisplay menu1. Press the MENU key to display the main menu.2. Press the or keys to select DISPLAY and then press the ENTER key to enter the menu.3. Press the or keys to move the highlight to a menu item and then press the ENTER key to select that item.4. Press the or keys to make adjustments or selections.5. To return to the previous menu, press the MENU button.Item Function Operation RangeAuto AdjustmentOptimizes and adjusts the screen settings automatically for...
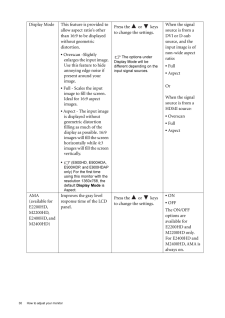
30 How to adjust your monitor Display Mode This feature is provided to allow aspect ratio's other than 16:9 to be displayed without geometric distortion.* Overscan -Slightly enlarges the input image. Use this feature to hide annoying edge noise if present around your image.* Full - Scales the input image to fill the screen. Ideal for 16:9 aspect images.* Aspect - The input image is displayed without geometric distortion filling as much of the display as possible. 16:9 images will fill the screen horizont...
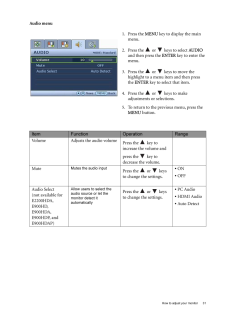
31 How to adjust your monitorAudio menu1. Press the MENU key to display the main menu.2. Press the or keys to select AUDIO and then press the ENTER key to enter the menu.3. Press the or keys to move the highlight to a menu item and then press the ENTER key to select that item.4. Press the or keys to make adjustments or selections.5. To return to the previous menu, press the MENU button.Item Function Operation RangeVolume Adjusts the audio volumePress the key to increase the volume and pres...
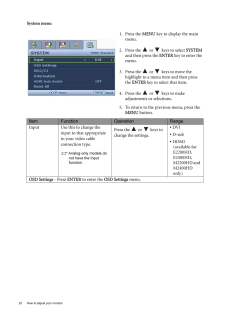
32 How to adjust your monitor System menu1. Press the MENU key to display the main menu.2. Press the or keys to select SYSTEM and then press the ENTER key to enter the menu.3. Press the or keys to move the highlight to a menu item and then press the ENTER key to select that item.4. Press the or keys to make adjustments or selections.5. To return to the previous menu, press the MENU button.Item Function Operation RangeInput Use this to change the input to that appropriate to your video cable co...
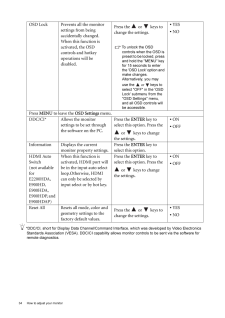
34 How to adjust your monitor *DDC/CI, short for Display Data Channel/Command Interface, which was developed by Video Electronics Standards Association (VESA). DDC/CI capability allows monitor controls to be sent via the software for remote diagnostics.OSD Lock Prevents all the monitor settings from being accidentally changed. When this function is activated, the OSD controls and hotkey operations will be disabled.Press the or keys to change the settings. To unlock the OSD controls when the OSD is pre...
- 1
- 2
- 1

