

Q&A
取扱説明書・マニュアル (文書検索対応分のみ)
81 件の検索結果
20 - 30 件目を表示
全般
質問者が納得テレビに繋ぐと音が出るということはHDMI用のドライバは入っているはず。PCモニタに接続したときにコントロールパネルから「サウンド」の項目を開いてHDMIドライバを既定値に設定してみて下さい。
もう少し情報が欲しいです。パソコンの構成(使っているOS、ビデオカードの有無、マザーボードの種類)を書いた上で質問し直してもらえるとありがたいんですが。
4420日前view256
全般
質問者が納得ブルーレイレコーダーの裏に入力と書いた所にピンジャックを挿して
レコーダーのリモコンの入力切替を押してL1にしたら映像が出るはず
4422日前view202
全般
質問者が納得ちょっと原因はわかりませんが、
Radeon使ってるならCatalystControlCenterから設定してみてはどうでしょうか。
コントロールパネルの画面の解像度から変更できなくても
こっちのユーティリティソフトからなら変更できる場合があります。
4443日前view216
全般
質問者が納得ノーシグナルとは無信号という意味ですので信号がディスプレイに来てません。
接続をいじったりしてみてください。意外と治ったりすることがあります。
4448日前view939
全般
質問者が納得DVIが一番綺麗なはず。
HDMIで接続すると
http://www.4gamer.net/games/095/G009575/20090819064/
こういう事が起こりうるので。
4496日前view196
全般
質問者が納得このような製品を使うのはどうでしょうか。
http://buffalo.jp/product/multimedia/chideji/tv-recorder/dvr-1/#spec
4513日前view108
全般
質問者が納得・・・モニタ側にマイク端子なぞ あるわけないだろが。。。
マイク・スピーカ(ヘッド)別端子のもの使ってるのか
ステレオ端子のもの使ってるのか
携帯電話向けのものなどは使い物にならんぞ。。。
MB上のマイク端子とヘッドフォン端子2個使うのが標準
場合によってはコネクタ自作するか
安いオーディオボードや変換アダプタ使うんだね。。
4513日前view89
全般
質問者が納得LucidLogix Virtuを使わないでのあれば、普通はグラボから出力させる。
補足
そういうことになりますね。
予算の都合でグラボ後回し~とかじゃないのなら。
4519日前view76
全般
質問者が納得横スジはビデオカードのメモリーエラーによるものです。ビデオの部分との事なのである解像度(低解像度?)の時だけ顕著になるのだと思います。高解像度(HDや2000dot以上)になると1Gのメモリの全体を使っているのでエラーになる部分が相対的に小さく見えたり、インタレースモードになるとスジが50%隠れて見えなくなります。
夏場の節電などでガタがきていると思うので、気になるなら買い替えがいいと思いますよ。
4522日前view57
全般
質問者が納得E2251VR-BNですね。
パソコンショップで働いていますが、よく売れます。
まずLEDがついていて電気代が安い。
応答速度も5msあってゲームをするもにも良い数値である。
あときれいである。
コストパフォーマンスが非常に高いです。
お勧めします。
4542日前view104

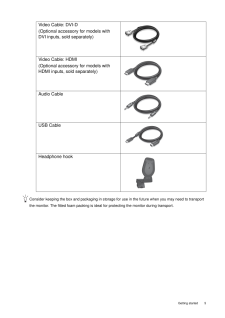
5 Getting startedConsider keeping the box and packaging in storage for use in the future when you may need to transport the monitor. The fitted foam packing is ideal for protecting the monitor during transport.Video Cable: DVI-D (Optional accessory for models with DVI inputs, sold separately)Video Cable: HDMI(Optional accessory for models with HDMI inputs, sold separately)Audio CableUSB Cable Headphone hook

Table of ContentsCopyright ..........................................................................................................................2Disclaimer .........................................................................................................................2Getting started ..................................................................................................................4Getting to know your monitor ........................................................................

CopyrightCopyright (C) 2010 by BenQ Corporation. All rights reserved. No part of this publication may be reproduced, transmitted, transcribed, stored in a retrieval system or translated into any language or computer language, in any form or by any me ans, electronic, mechanical, magnetic, optical, chemical, manual or otherwise, without the pr ior written permission of BenQ Corporation.DisclaimerBenQ Corporation makes no representations or warranties, either expressed or implied, with respect to the content...
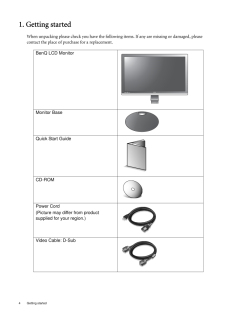
4 Getting started 1. Getting startedWhen unpacking please check you have the follow ing items. If any are missing or damaged, please contact the place of purchase for a replacement. BenQ LCD MonitorMonitor BaseQuick Start Guide CD-ROM Power Cord(Picture may differ from product supplied for your region.)Video Cable: D-Sub E2420HD
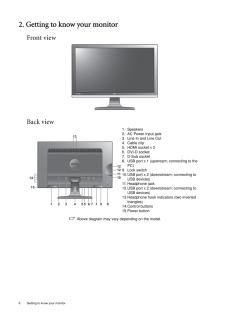
6 Getting to know your monitor 2. Getting to know your monitorFront viewBack view Above diagram may vary depending on the model.1. Speakers2. AC Power Input jack3. Line In and Line Out4. Cable clip5. HDMI socket x 26. DVI-D socket7. D-Sub socket8. USB port x 1 (upstream; connecting to the PC)9. Lock switch10.USB port x 2 (downstream; connecting to USB devices)11.Headphone jack12.USB port x 2 (downstream; connecting to USB devices)13.Headphone hook indicators (two inverted triangles)14.Control buttons15.Po...
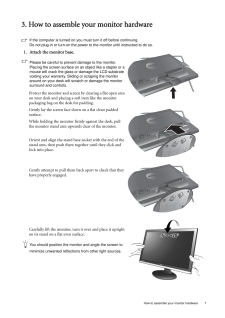
7 How to assemble your monitor hardware3. How to assemble your monitor hardwareIf the computer is turned on you must turn it off before continuing. Do not plug-in or turn-on the power to the monitor until instructed to do so. 1. Attach the monitor base.Please be careful to prevent damage to the monitor. Placing the screen surface on an object like a stapler or a mouse will crack the glass or damage the LCD substrate voiding your warranty. Sliding or scraping the monitor around on your desk will scratch ...
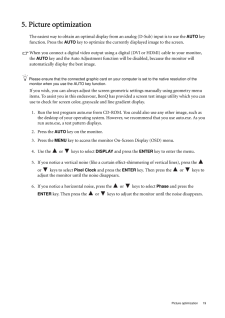
19 Picture optimization5. Picture optimizationThe easiest way to obtain an optimal display from an analog (D-Sub) input is to use the AUTO key function. Press the AUTO key to optimize the currently displayed image to the screen. When you connect a digital video output using a digital (DVI or HDMI) cable to your monitor, the AUTO key and the Auto Adjustment function will be disabled, because the monitor will automatically display the best image.Please ensure that the connected graphic card on your ...
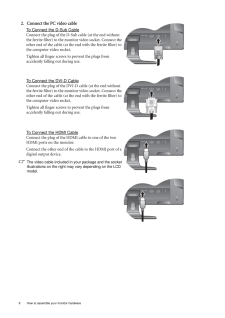
8 How to assemble your monitor hardware 2. Connect the PC video cable To Connect the D-Sub CableConnect the plug of the D-Sub cable (at the end without the ferrite filter) to the monitor video socket. Connect the other end of the cable (at the end with the ferrite filter) to the computer video socket.Tighten all finger screws to prevent the plugs from accidently falling out during use.To Connect the DVI-D CableConnect the plug of the DVI-D cable (at the end without the ferrite filter) to the monitor video...
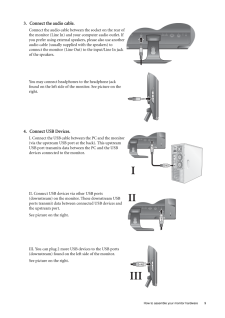
9 How to assemble your monitor hardware3. Connect the audio cable.Connect the audio cable between the socket on the rear of the monitor (Line In) and your computer audio outlet. If you prefer using external speakers, please also use another audio cable (usually supplied with the speakers) to connect the monitor (Line Out) to the input/Line In jack of the speakers.You may connect headphones to the headphone jack found on the left side of the monitor. See picture on the right. 4. Connect USB Devices.I. Co...

