

Q&A
取扱説明書・マニュアル (文書検索対応分のみ)
7 件の検索結果
50 - 60 件目を表示
全般
質問者が納得上記接続で、映像は映りますが、音声が出ません!!
PS3光デジタル端子を活用し、対応スピーカーに出力する必要があります。
5653日前view80
全般
質問者が納得オス オス のミニジャックピンのケーブルを購入すればOKです。
家電量販店で売っています。この前、ダイソーでも売っていたので買いました。
100円だったか、200円だったと思います。家電量販店で買うと800円前後だったと思います。
15ピンのD-subはそのままにしてください。上記ケーブルをもう一本追加すれば良いのです。
5876日前view68
全般
質問者が納得どちらもD-Subコネクタ(3段15ピン)を装備しているので
そのまま繋がるはずです。
ただし、E900HDが1366×768のワイド画面ですが
PCV-J12V5は1024×768までの解像度にしか対応
していないので左右が黒帯状態かでの表示になります。
また、PCV-J12V5がデジタル(DVI-D)非対応なので
アナログ接続のみとなります。
6009日前view90
全般
質問者が納得私は「Prime Galleria」ユーザですが、少しコメントを。
Q1ですが、CPU(i7 920 or i7 940)でビデオキャプチャ・ボードは…ですが、事、映像に関してはグラフィック・ボードも大きく関わってきますので、(とんでもなく重い3D等をやらない限り…これでも差は出ないか)i7 940の恩恵はあまり受けないかと。「i7 920+NVIDIA GeForce GTX275」であれば充分、まして、この選択でビデオキャプチャ・ボードは気にされなくて大丈夫です。地デジが「綺麗に」再生されるかどうかは「...
6013日前view82
全般
質問者が納得ノングレアならWestinghouseのL1975NW。
Amazonで10,800円。
http://www.amazon.co.jp/Westinghouse-19%E3%82%A4%E3%83%B3%E3%83%81%E3%83%AF%E3%82%A4%E3%83%89%E3%83%A2%E3%83%8B%E3%82%BF%E3%83%BC-%E6%B6%B2%E6%99%B6%E3%83%A2%E3%83%8B%E3%82%BF%E3%83%BC-%E3%83%96%E3%83%A9%E3%83%8...
6033日前view63
全般
質問者が納得中小企業の事務職ですが、詳しい人間が他にいないのでシステムの面倒見てます。
PC購入は私が入社前から利用していたという富士通法人かDELL法人を利用してます。
XP、Officeバンドル可能という条件でよかったでしょうか?
オフィス用途とのことですので法人またはSOHOを念頭にした場合のアドバイスになってしまいますがご了承くださいませ。
価格を考えるとDELLですが、
契約では使わなくなったPCはHDDもろとも返却しなくてはいけないという内容だった記憶があり(未確認)
それを理解したうえで購入されるならお...
6034日前view84
Table of ContentsCopyright ..................................................................................................................... ...2Disclaimer .................................................................................................................... ...2Getting started ............................................................................................................... .4Getting to know your monitor ...........................................................................
LCD MonitorUser ManualE900HD/E900HDA E2200HD/E2200HDAM2200HD M2400HD/E2400HD
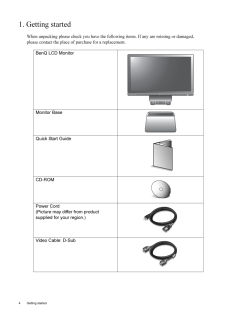
4 Getting started 1. Getting startedWhen unpacking please check you have the foll owing items. If any are missing or damaged, please contact the place of purchase for a replacement. BenQ LCD MonitorMonitor BaseQuick Start Guide CD-ROM Power Cord(Picture may differ from product supplied for your region.)Video Cable: D-Sub AUTO MENU ENTER
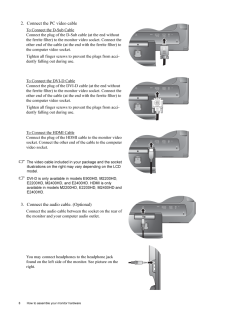
8 How to assemble your monitor hardware 2. Connect the PC video cable To Connect the D-Sub CableConnect the plug of the D-S ub cable (at the end without the ferrite filter) to the mon itor video socket. Connect the other end of the cable (at the end with the ferrite filter) to the computer video socket.Tighten all finger screws to prevent the plugs from acci-dently falling out during use.To Connect the DVI-D CableConnect the plug of the DVI-D cable (at the end without the ferrite filter) to the mon itor...

2 CopyrightCopyright (C) 2008 by BenQ Corporat ion. All rights reserved. No part of this publication may be reproduced, transmitted, transcribed, stored in a re trieval system or translated into any language or computer language, in any form or by any m eans, electronic, mechanical, magnetic, optical, chemical, manual or otherwise, without the prior written permission of BenQ Corporation.DisclaimerBenQ Corporation makes no representations or wa rranties, either expressed or implied, with respect to the ...
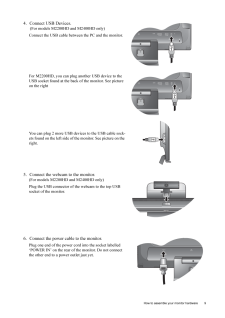
9 How to assemble your monitor hardware4. Connect USB Devices. (For models M2200HD and M2400HD only)Connect the USB cable betwee n the PC and the monitor. For M2200HD, you can plug another USB device to the USB socket found at the back of the monitor. See picture on the rightYou can plug 2 more USB devi ces to the USB cable sock-ets found on the left side of the monitor. See picture on the right.5. Connect the webcam to the monitor. (For models M2200HD and M2400HD only)Plug the USB connector of th e web...
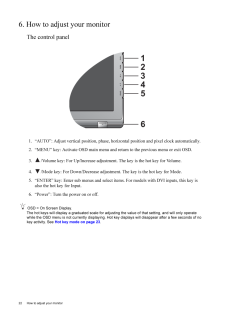
22 How to adjust your monitor 6. How to adjust your monitorThe control panel1. "AUTO": Adjust vertical pos ition, phase, horizontal position and pixel clock automatically.2. "MENU" key: Activate OSD main menu and return to the previous menu or exit OSD.3. /Volume key: For Up/Increase adjustme nt. The key is the hot key for Volume.4. /Mode key: For Down/Decrease adjustme nt. The key is the hot key for Mode. 5. "ENTER" key: Enter sub menus and select item s. For models with DVI inputs, this key is also th...
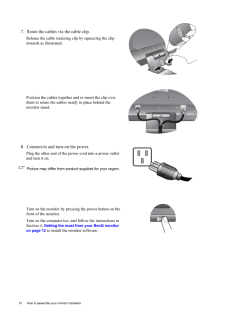
10 How to assemble your monitor hardware 7. Route the cables via the cable clip.Release the cable retaining cl ip by squeezing the clip inwards as illustrated. Position the cables together and re-insert the clip over them to retain the cables neatly in place behind the monitor stand.8. Connect-to and turn-on the power.Plug the other end of the po wer cord into a power outlet and turn it on.Picture may differ from product supplied for your region.Turn on the monitor by pressi ng the power button on the fro...
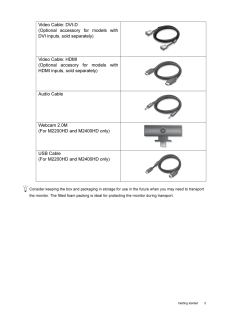
5 Getting startedConsider keeping the box and packaging in storage for use in the future when you may need to transport the monitor. The fitted foam packing is ideal for protecting the monitor during transport.Video Cable: DVI-D (Optional accessory for models withDVI inputs, sold separately)Video Cable: HDMI(Optional accesory for models withHDMI inputs, sold separately)Audio CableWebcam 2.0M(For M2200HD and M2400HD only)USB Cable(For M2200HD and M2400HD only)
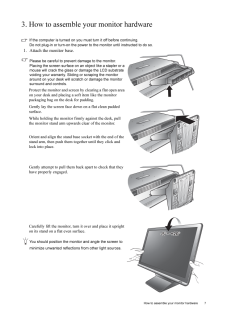
7 How to assemble your monitor hardware3. How to assemble your monitor hardwareIf the computer is turned on you must turn it off before continuing. Do not plug-in or turn-on the power to the monitor until instructed to do so. 1. Attach the monitor base.Please be careful to prevent damage to the monitor. Placing the screen surface on an object like a stapler or a mouse will crack the glass or damage the LCD substrate voiding your warranty. Sliding or scraping the monitor around on your desk will scratch...
- 1

