

Q&A
取扱説明書・マニュアル (文書検索対応分のみ)
85 件の検索結果
20 - 30 件目を表示
全般
質問者が納得そもそもps3とwii Uは60fps以上出ません。
DVIケーブルを使わないといけないのは、60fpsをこえるフレームレートのときなのでこの場合は関係ありません。
4169日前view57
全般
質問者が納得「HDMI セレクター」を使うのがいいと思います。
一つのHDMI入力に接続する外部入力を切り替えるスイッチング機器です
4984日前view112
全般
質問者が納得2万以内でPS2ができるモニターは多分これしかないかと
http://www.amazon.co.jp/gp/product/B005AM8YZQ/ref=as_li_ss_tl?ie=UTF8&tag=jgpt01-22
5042日前view62
全般
質問者が納得MSIからドライバを落としてくるのが一番早いかと。
http://www.msi.com/product/mb/890GXM-G65.html#/?div=Driver&os=All
ATI System Drivers for 7xx/8xx/SB7xx/SB8xx Series (except RS690, 740)
5068日前view116
全般
質問者が納得これですか?
http://www.amazon.co.jp/gp/product/B0051BZE5O/?ie=UTF8&m=AN1VRQENFRJN5&tag=chiebukuroq-22&linkCode=ur2&camp=247&creative=1211
スペック的に大丈夫です。
PCにPCI Express x1が空いていれば取り付け可能です。
マザーボードを見ると3つもあるからひとつくらいは空いてるでしょうね。
http://www.pcparts...
5069日前view36
全般
質問者が納得PS2のキャプチャでCorei7なら楽勝です。
S端子キャプチャをすれば出来ます。
Corei7ならS端子キャプチャは超楽勝。
お薦めキャプチャボードはGV-USB2です。
http://www.amazon.co.jp/gp/product/B00428BF1Y/ref=as_li_ss_tl?ie=UTF8&tag=coolwayairnif-22&linkCode=as2&camp=247&creative=7399&creativeASIN=B00428BF...
5092日前view100
全般
質問者が納得ゲームキューブにWiiはHDMI端子を備えてないので繋げられません。
繋げられるゲーム機はHDMI端子を備えているPS3とXbox360です。
5111日前view66


2 CopyrightCopyright (C) 2009 by BenQ Corporation. All rights reserved. No part of this publication may be reproduced, transmitted, transcribed, stored in a retrieval system or translated into any language or computer language, in any form or by any me ans, electronic, mechanical, magnetic, optical, chemical, manual or otherwise, without the pr ior written permission of BenQ Corporation.DisclaimerBenQ Corporation makes no representations or warranties, either expressed or implied, with respect to the co...

Table of Contents 3Table of ContentsGetting started ......................................................................................................................4Getting to know your monitor ............................................................................................6Front view .................................................................................................................... 6Back view ..................................................................................

17 How to adjust your monitor6. How to adjust your monitorThe control panel1. "AUTO": Adjust vertical position, phase, hori zontal position and pixel clock automatically.2. "MENU" key: Activate OSD main menu and return to the previous menu or exit OSD.3.v /Mode key: For Left/Decrease adjustment. The key is the hot key for Mode.4. w /Contrast/Brightness key: For Right/Increa se adjustment. The key is the hot key for Brightness and Contrast.5. "ENTER" key: Enter sub menus and select items. This key is...

16 Picture optimization 5. Picture optimization The easiest way to obtain an optimal display from an analog (D-Sub) input is to use the AUTO key function. Press the AUTO key to optimize the currently displayed image to the screen. When you connect a digital video output using a digital (DVI or HDMI) cable to your monitor, the AUTO key and the Auto Adjustment function will be disabled, because the mo nitor will automatically display the best image. Please ensure that the connected graphic card on your ...

4 Getting started 1. Getting startedWhen unpacking please check you have the follow ing items. If any are missing or damaged, please contact the place of purchase for a replacement. BenQ LCD MonitorMonitor BaseQuick Start Guide CD-ROM Power Cord(Picture may differ from product supplied for your region)Signal Cable: D-Sub
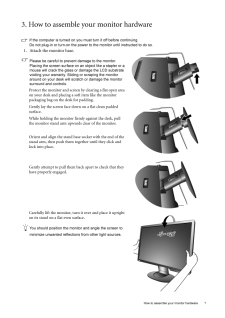
7 How to assemble your monitor hardware3. How to assemble your monitor hardwareIf the computer is turned on you must turn it off before continuing. Do not plug-in or turn-on the power to the monitor until instructed to do so. 1. Attach the monitor base.Please be careful to prevent damage to the monitor. Placing the screen surface on an object like a stapler or a mouse will crack the glass or damage the LCD substrate voiding your warranty. Sliding or scraping the monitor around on your desk will scratch ...

5 Getting startedConsider keeping the box and packaging in storage for use in the future when you may need to transport the monitor. The fitted foam packing is ideal for protecting the monitor during transport.Signal Cable: DVI-D (optional)Signal Cable: HDMI (optional)

15 Getting the most from your BenQ monitorHow to install on Windows XP system1. Open Display Properties.The quickest shortcut to Display Properties is through the Windows desktop. Right-click the desktop and select Properties from the popup menu.Alternatively, the Windows menu to Display Properties is located in Control Panel . In Windows XP version, Control Panel is located directly under the main Start menu item. The menu options displayed will depend upon whic h type of view is selected for your ...

26 How to adjust your monitor Audio menu1. Press the MENU key to display the main menu.2. Press the v or w keys to select AUDIO and then press the ENTER key to enter the menu.3. Press the v or w keys to move the highlight to a menu item and then press the ENTER key to select that item.4. Press the v or w keys to make adjustments or selections.5. To return to the previous menu, press the MENU key.Item Function Operation RangeVolume Adjusts the level of volume. Press the w key to increase the volu...

