

Q&A
取扱説明書・マニュアル (文書検索対応分のみ)
8 件の検索結果
120 - 130 件目を表示
全般
質問者が納得D-sub端子(アナログ)に接続するD-subケーブル
DVI-D端子(デジタル)に接続するDVIケーブル
があります。
発色はDVIケーブルの方が綺麗ですね。
片方の端子しか備えていないモニターも有りますが、ご指摘のモニターは両方の端子があります。
5089日前view91
全般
質問者が納得>HDMLからDIV
DVIは音声が乗りません。
また、そのモニターには
スピーカーが付いていないと思います。
5155日前view92
全般
質問者が納得アップルマーク→システム環境設定→アピアランスで弄ってみてください.
またはターミナルから
defaults -currentHost write -globalDomain AppleFontSmoothing -int 2
最後の「2」が強さ「中」を示し、「1」にすると「軽」、「3」にすると「重 」。スムージングはすでに起動中のプログラムに対しては無効(一度ログアウトするといい)
5308日前view101
全般
質問者が納得BenQ G922HDPLは最大1366x768なのでセーフモードでそれに設定してはどうでしょうか?
5344日前view93
全般
質問者が納得設定をしなければできません。
設定方法
何もない画面のところで右クリック→個人設定→ディスプレイ→ディスプレイの設定の変更→複数のディスプレイ→「下記のいずれかを選択」
①同じ画面を2つ出したいなら「表示画面を複製する」
②画面を拡張したいなら「表示画面を拡張する」
以上で設定は終わりです。
5372日前view82
全般
質問者が納得メーカー(BENQ)のHPで端子の写真を見る限り、ディスプレイ側の端子もミニD-Sub15です。普通に付属のケーブルでつなげるでしょう。
http://www.benq.co.jp/products/LCD/?product=1618
そもそも今時旧D-Sub15の端子を付けた機器は販売されていないと思いますし。
5363日前view35
全般
質問者が納得後者の方が1inch大きくて解像度も広い。
はっきり言ってWXGAじゃ使い物にならんから前者はあり得ない。
どちらがおすすめ?
まぁ、どちらも安物の域を出ない。
4万円未満じゃ何を使っても差はほとんどないよ。
5673日前view115
全般
質問者が納得Windows7に対応
マイクロソフト社が提供するWindows7の動作認定制度である「Compatible with Windows 7」のロゴを取得しています。
http://www.benq.co.jp/products/LCD/?product=1618
快適なPCライフを
5679日前view19
Table of ContentsCopyright ..........................................................................................................................2Disclaimer .........................................................................................................................2Getting started ..................................................................................................................4Getting to know your monitor ........................................................................

5 Getting startedConsider keeping the box and packaging in storage for use in the future when you may need to transport the monitor. The fitted foam packing is ideal for protecting the monitor during transport.Signal Cable: DVI-D (optional accessory for models with DVI inputs, sold separately)

6 Getting to know your monitor 2. Getting to know your monitorFront viewBack view1. AC power input jack2. DVI-D input socket (Analog-only models do not have the DVI-D input socket) 3. D-Sub input socket


2 CopyrightCopyright (C) 2009 by BenQ Corporation. All rights reserved. No part of this publication may be reproduced, transmitted, transcribed, stored in a retrieval system or translated into any language or computer language, in any form or by any me ans, electronic, mechanical, magnetic, optical, chemical, manual or otherwise, without the pr ior written permission of BenQ Corporation.DisclaimerBenQ Corporation makes no representations or warranties, either expressed or implied, with respect to the co...
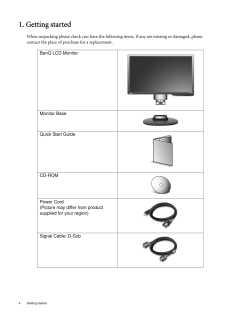
4 Getting started 1. Getting startedWhen unpacking please check you have the follow ing items. If any are missing or damaged, please contact the place of purchase for a replacement. BenQ LCD MonitorMonitor BaseQuick Start Guide CD-ROM Power Cord(Picture may differ from product supplied for your region)Signal Cable: D-Sub

18 How to adjust your monitor 6. How to adjust your monitorThe control panel1. "AUTO": Adjust vertical position, phase, hori zontal position and pixel clock automatically.2. "MENU" key: Activate OSD main menu and return to the previous menu or exit OSD.3.v /Mode key: For Left/Decrease adjustment. The key is the hot key for Mode.4. w /Contrast/Brightness key: For Right/Increase adjustment. The key is the hot key for Brightness and Contrast.5. "ENTER" key: Enter sub menus and select items. For models wit...
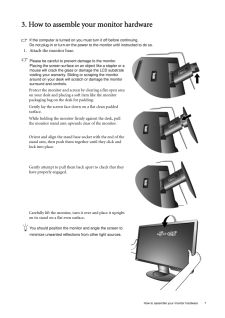
7 How to assemble your monitor hardware3. How to assemble your monitor hardwareIf the computer is turned on you must turn it off before continuing. Do not plug-in or turn-on the power to the monitor until instructed to do so. 1. Attach the monitor base.Please be careful to prevent damage to the monitor. Placing the screen surface on an object like a stapler or a mouse will crack the glass or damage the LCD substrate voiding your warranty. Sliding or scraping the monitor around on your desk will scratch ...
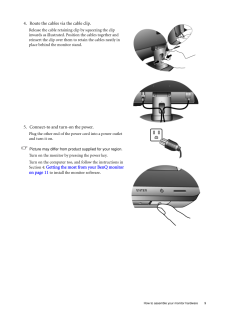
9 How to assemble your monitor hardware4. Route the cables via the cable clip.Release the cable retaining clip by squeezing the clip inwards as illustrated. Position the cables together and reinsert the clip over them to retain the cables neatly in place behind the monitor stand.5. Connect-to and turn-on the power.Plug the other end of the power cord into a power outlet and turn it on.Picture may differ from product supplied for your region.Turn on the monitor by pressing the power key. Turn on the comp...
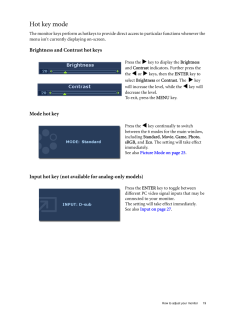
19 How to adjust your monitorHot key modeThe monitor keys perform as hotkeys to provide di rect access to particular functions whenever the menu isn't currently displaying on-screen.Brightness and Contrast hot keysMode hot keyInput hot key (not available for analog-only models)Press the w key to display the Brightness and Contrast indicators. Further press the the v or w keys, then the ENTER key to select Brightness or Contrast. The w key will increase the level, while the v key will decrease ...
- 1

