

Q&A
取扱説明書・マニュアル (文書検索対応分のみ)
"BenQ"7 件の検索結果
"BenQ"10 - 20 件目を表示
全般
質問者が納得パソコンの液晶モニターは、大きすぎず小さすぎずです。
トルネのTVやDVDの映画を見るのには大きいのが良いと思いますが、通常の作業では見る事に疲れます。
オススメは、私も色々考えた末に使っているDiamondcrysta WIDE RDT272WXで、3.5万円と値段も安めです。
LG電子、Benq、三菱をここ3年くらいで購入して使ってますが、LG電子とBenqのモニターと三菱製のモニターでは表示の綺麗さも使い易さも段違いです。
店頭でパッと見だと、Benqとかいいな~と思うんですけど、実際使うと・・・ア...
4717日前view47
全般
質問者が納得http://kakaku.com/prdsearch/prdcompare.asp?PrdKey=K0000282365.K0000295089
スペックだけではほぼ全ての面で E2773HDS-Bが上です。
後はレヴュークチコミを参考に。
4965日前view145
全般
質問者が納得残念ながらWiiはつながりません。PS3はHDMI経由でつながります。
どうしてもWiiをプレイなさりたければ「コンポーネント端子」を搭載した製品をお買い求めください。
■ 27型 LCDワイドモニタ EW2730V
http://amzn.to/zMozNz
メーカー型番:EW2730V
解像度:1920×1080
輝度:300cd/m2
視野角:水平:左右178度/垂直:上下178度
入力端子:D-Sub、DVI-D、HDMI、コンポーネントビデオ入力+RCAオーディオ、ヘッドフォンジャック、オ...
4970日前view191
全般
質問者が納得>xkggj725さんPCスピーカーについて質問です。今BenQのGL2750HMを使ってゲームをしたり、映画を見ています。音が少し物足りないのでスピーカーを購入を考えています。ゲームは主にFPSをやっています。予算は一万円+αくらいを考えています。
でしたらパソコン用の外付けスピーカが利用できます 量販店パソコンショップで
http://kakaku.com/pc/pc-speaker/
4985日前view184
全般
質問者が納得一般的にモニターにはリモコンが付属していない限りリモコンを受信して動作させる機能はついていません。
基本的にパソコンの画面出力と連動して待機状態になるからです。
5012日前view148
全般
質問者が納得iiyamaが液晶やLED作っているはずもなく、買って来て組み立てだけでしょう。 BenQの親は台湾エイサーで大手。
どっちもどっちかな。 残像性も今は5ミリセックぐらいで同じかな。
まあ、リフレッシュサイクル(書き換えサイクル)や残像時間観てくださいよ。 似たようなものでしょうが。
5034日前view94
全般
質問者が納得ノートに外部ディスプレイを接続する場合、ノート搭載のグラボ性能により表示限界があります。
マザー搭載グラボは、WXGA (1280x800)が可能とのスペックですが、それが限界です。
GL2750HMは、1920x1080表示可能ですが、実質1280x800として使用せざるをえないということです。
なのでグラボの負担は増えません。動画再生も同様の品質で可能でしょう。
5104日前view94

2 CopyrightCopyright 2013 by BenQ Corporatio n. All rights reserved. No part of this publication may be reproduced, transmitted, transcribed, stored in a retrieval system or translated into any language or computer language, in any form or by any means, el ectronic, mechanical, magnetic, optical, chemical, manual or otherwise, wi thout the prior written permission of BenQ Corporation.DisclaimerBenQ Corporation makes no repres entations or warranties, either expressed or implied, with respect to the cont...

3ServicingDo not attempt to service this product yourself, as opening or removing covers may expose you to dangerous voltages or other risks. If any of the above mentioned misuse or other accident such as dropping or mishandling occurs, contact qualified service personnel for servicing.BenQ ecoFACTSBenQ has been dedicated to th e design and development of gr eener product as part of its aspiration to realize the ideal of the "Bringing Enjoyment 'N Qu ality to Life" corporate vision with the ultimate ...
4 Table of ContentsCopyright ......................................................................................................................................2Getting started .............................................................................................................................5Getting to know your monitor ................................................................................................7Front view .....................................................................
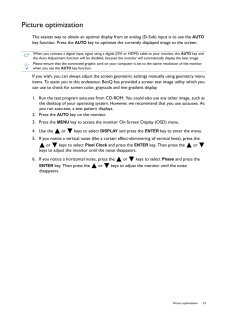
23 Picture optimizationPicture optimizationThe easiest way to obtain an optimal display from an analog (D-Sub) input is to use the AUTO key function. Press the AUTO key to optimize the currently displayed image to the screen.If you wish, you can always adjust the screen ge ometric settings manually using geometry menu items. To assist you in this endeavour, BenQ has provided a screen test image utility which you can use to check for screen color, grayscale and line gradient display.1. Run the tes...
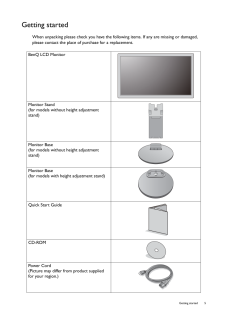
5 Getting startedGetting startedWhen unpacking please check you have the foll owing items. If any are missing or damaged, please contact the place of purchase for a replacement. BenQ LCD MonitorMonitor Stand(for models without height adjustment stand)Monitor Base(for models without height adjustment stand)Monitor Base(for models with height adjustment stand)Quick Start Guide CD-ROM Power Cord(Picture may differ from product supplied for your region.)

16 Getting the most from your BenQ monitor Getting the most from your BenQ monitorTo gain the most benefit from your new BenQ LCD monitor, you should install the custom BenQ LCD Monitor driver software as pr ovided on the BenQ LCD Monitor CD-ROM.The circumstances under which you connect and install your BenQ LCD Monitor will determine which process you need to follow to successfully install the BenQ LCD Monitor driver software. These circumst ances relate to which version of Microsoft Windows you are u...
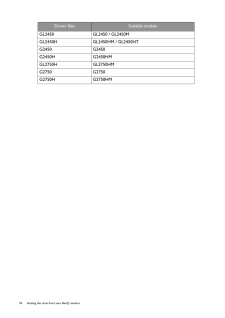
18 Getting the most from your BenQ monitor GL2450 GL2450 / GL2450MGL2450H GL2450HM / GL2450HTG2450 G2450G2450H G2450HMGL2750H GL2750HMG2750 G2750G2750H G2750HMDriver files Suitable models
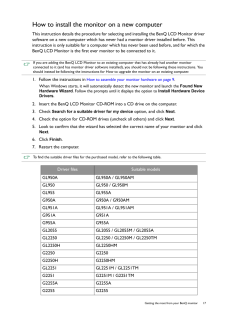
17 Getting the most from your BenQ monitorHow to install the monitor on a new computerThis instruction details the procedure for select ing and installing the BenQ LCD Monitor driver software on a new computer which has never had a monitor dr iver installed before. This instruction is only suitable for a computer which has never been used before, and for which the BenQ LCD Monitor is the first ever monitor to be connected to it.1. Follow the instructions in How to assemble your monitor hardware on pag...

12 How to assemble your monitor hardware You may connect headphones to the headphone jack found next to the Line In jack of the monitor. Location of the Line In and headphone jacks may vary by model. Check Input and output ports on page 8 for details.4. Connect the power cable to the monitor.Plug one end of the power cord into the socket labelled on the rear of the monitor. Do not connect the other end to a power outlet just yet.5. Connect-to and turn-on the power.Plug the other end of the power cord in...

21 Getting the most from your BenQ monitorHow to install on Windows 7 system1. Open Display Properties .Go to Start , Control Panel, Hardware and Sound, Devices and Printers and right-click the name of your monitor from the menu.Alternatively, right-click the desktop and select Personalize , Display, Devices and Printers, and right-click the name of your monitor from the menu.2. Select Properties from the menu.3. Click the Hardware tab.4. Click Generic PnP Monitor , and then the Propertie...
- 1

