

Q&A
取扱説明書・マニュアル (文書検索対応分のみ)
"HDMI"17 件の検索結果
"HDMI"10 件の検索結果
全般
質問者が納得出来るはずです。 HDMIのみで接続してみてください。 普通なら自動で認識してくれるはず。
それでも何も画面が映りませんか?
補足
Q.1
そのほうがいいですね。 なぜなら複数接続したとすると、そっちのみに出力されてしまうことがあるので。
Q.2
どちらもデジタルですので画質はあまり変わらない。
ただし、音声は出力できない。
オーディオジャックから音を出力しなければならない。
4983日前view506
全般
質問者が納得http://kakaku.com/specsearch/0085/
この辺りで探すと2万円位から100万円超まで14機種ヒットしました。それぞれのクチコミを眺めてみてはいかがでしょうか。
5084日前view116
全般
質問者が納得モニタ側の設定で入力はHDMIを選択していますよね?
自動で切り替わらないタイプかも知れません。。
5090日前view170
全般
質問者が納得デスクトップパソコンの取り説を見て。
HDMI端子には絶えず信号が着てるわけぢゃ~無くて、パソコンでモニタ~切り替えをしにゃ~ならない。
僕のはソニ~のPCG-FX77Z/BPってノ~トパソコンだけど、
Fnキ~+F7を押すと切り替わる。
両方つけることも出来る。
5090日前view103
全般
質問者が納得解像度を小さくすればいいだけ。
http://allabout.co.jp/gm/gc/81079/
1024*768とかにすれば?
5111日前view95
全般
質問者が納得所詮はでかいだけで解像度は今では並みの1920x1080 ですから、なんら問題無いでしょう。40インチだろうが50インチだろうが、モニターサイズだけで快適さが変わるものではないですよ。
5112日前view79
全般
質問者が納得M2700HDを使っているので回答しますね。
1.全体を囲うように黒い線が入る
それは最初から物理的についてる線です。
2.黒い線と、外枠の間にゲーム画面らしきものが表示されている
それは外枠に画面が反射して映ってるだけではないですか?。もっと近づいて内側から外側の枠を見るような感じで確かめてみてください。PCと接続してマウスポインタを画面端に持って行くとわかりやすいです。
3.これって不具合?
不具合じゃありません。仕様です。外枠が分厚いのでそう見えるのだと思います。
5148日前view88
全般
質問者が納得PCの音声出力端子からモニタの音声入力端子に出力してください。
オーディオケーブルはモニタに付属しています。
-------------------------
ヘッドホンというかオーディオ出力端子ですね。まあそういうことです。
DVI-Dとオーディオケーブルで2重に接続する感じになります。
5187日前view67
全般
質問者が納得M2700HDを所有しているのでいくつかお答えします
Q1.スピーカーの音質が悪い?
A1.聞くに耐えません。オーディオマニアでなくとも耐えられない。外部スピーカーは必須。
Q2.画質はどうなのか?(と解釈しました)
A2.画質は悪く無いですよ、普通としか言いようがありません。用途を見る限り問題ないんじゃないでしょうかね。
Q3.動画など見てて違和感はないのか?(と解釈しました)
A3.そうですね…普通のTVみたいに倍速機能や最近の液晶みたく120Hzで駆動したりしないので動画のフレームレートや解像度...
5230日前view71
全般
質問者が納得では、あなたの考えを全てぶち壊す回答をしてみましょうか
モニターを購入しようとしているところから、デスクトップPCであろうと仮定します
━━━━━━━━━━━━━━
前提条件、デスクトップPC、性能が結構要る
【最初にまとめます】
[機材]
・HDMIキャプチャー
・HDMIケーブル(足りなければ)
・HDMI分岐アダプター
[ソフト]
・AmarecTV
・XSplitBroadcaster(ニコ生対応版)
━━━━━━━━━━━━━━
調べるタイプのようなので、詳しいことは書かなくていいかな
...
5296日前view33
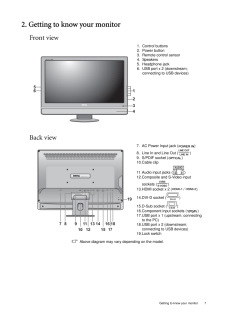
7 Getting to know your monitor2. Getting to know your monitorFront viewBack view Above diagram may vary depending on the model.1. Control buttons2. Power button3. Remote control sensor4. Speakers5. Headphone jack6. USB port x 2 (downstream; connecting to USB devices)7. AC Power Input jack ( )8. Line In and Line Out ( )9. S/PDIF socket ( )10.Cable clip11.Audio input jacks ( )12.Composite and S-Video input sockets ( )13.HDMI socket x 2 ( / )14.DVI-D socket ( )15.D-Sub socket ( )16.Component input socket...
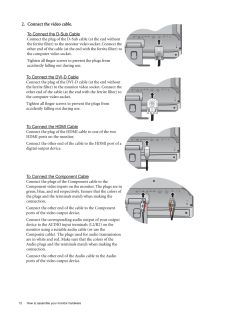
12 How to assemble your monitor hardware 2. Connect the video cable.To Connect the D-Sub CableConnect the plug of the D-Sub cable (at the end without the ferrite filter) to the monitor video socket. Connect the other end of the cable (at the end with the ferrite filter) to the computer video socket.Tighten all finger screws to prevent the plugs from accidently falling out during use.To Connect the DVI-D CableConnect the plug of the DVI-D cable (at the end without the ferrite filter) to the monitor video s...

14 How to assemble your monitor hardware To Output Audio SignalsYou are provided with the following options to output audio from the monitor:* You may connect headphones to the headphone jack found on the left side of the monitor. See picture on the right. * You can use a suitable audio cable (usually purchased separately or came with the audio device your monitor is connecting to) to connect the S/PDIF socket on the monitor to external speakers or headphones that are S/PDIF compatible.This option is avai...
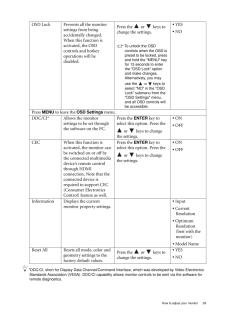
39 How to adjust your monitor*DDC/CI, short for Display Data Channel/Command Interface, which was developed by Video Electronics Standards Association (VESA). DDC/CI capability allows monitor controls to be sent via the software for remote diagnostics.OSD Lock Prevents all the monitor settings from being accidentally changed. When this function is activated, the OSD controls and hotkey operations will be disabled.Press the or keys to change the settings. To unlock the OSD controls when the OSD is pr...
24 Picture optimization 6. Picture optimizationThe easiest way to obtain an optimal display from an analog (D-Sub) input is to use the AUTO key function. Press the AUTO key to optimize the currently displayed image to the screen. When you connect a digital video output using a digital (DVI or HDMI) cable to your monitor, the AUTO key and the Auto Adjustment function wi ll be disabled, because the monitor will automatically display the best image.Please ensure that the connected graphic card on your c...
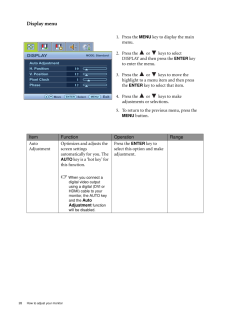
28 How to adjust your monitor Display menu1. Press the MENU key to display the main menu.2. Press the or keys to select DISPLAY and then press the ENTER key to enter the menu.3. Press the or keys to move the highlight to a menu item and then press the ENTER key to select that item.4. Press the or keys to make adjustments or selections.5. To return to the previous menu, press the MENU button.DISPLAYMODE: StandardAuto AdjustmentH. PositionV. PositionPixel ClockPhase1012112ENTER MENUExitSel...
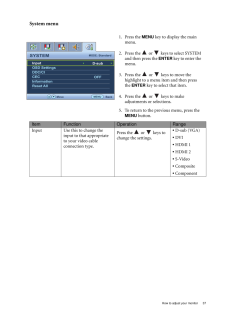
37 How to adjust your monitorSystem menu1. Press the MENU key to display the main menu.2. Press the or keys to select SYSTEM and then press the ENTER key to enter the menu.3. Press the or keys to move the highlight to a menu item and then press the ENTER key to select that item.4. Press the or keys to make adjustments or selections.5. To return to the previous menu, press the MENU button.SYSTEMMODE: StandardInputOSD SettingsDDC/CICECInformationReset AllMENUBackD-subOFFMoveItem Function Op...
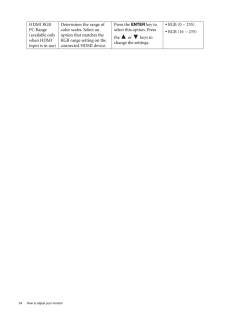
34 How to adjust your monitor HDMI RGB PC Range(available only when HDMI input is in use)Determines the range of color scales. Select an option that matches the RGB range setting on the connected HDMI device.Press the ENTER key to select this option. Press the or keys to change the settings.* RGB (0 ~ 255)* RGB (16 ~ 235)
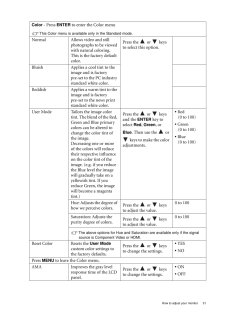
31 How to adjust your monitorColor - Press ENTER to enter the Color menuThis Color menu is available only in the Standard mode.Normal Allows video and still photographs to be viewed with natural coloring. This is the factory default color. Press the or keys to select this option.Bluish Applies a cool tint to the image and is factory pre-set to the PC industry standard white color.Reddish Applies a warm tint to the image and is factory pre-set to the news print standard white color.User Mode Tailo...
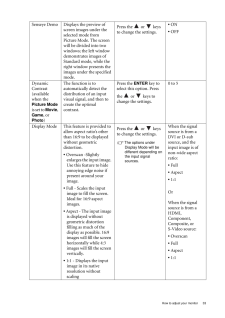
33 How to adjust your monitorSenseye Demo Displays the preview of screen images under the selected mode from Picture Mode. The screen will be divided into two windows; the left window demonstrates images of Standard mode, while the right window presents the images under the specified mode.Press the or keys to change the settings.* ON* OFFDynamic Contrast(available when the Picture Mode is set to Movie, Game , or Photo )The function is to automatically detect the distribution of an input visual sign...
- 1
- 2
- 1

