

Q&A
取扱説明書・マニュアル (文書検索対応分のみ)
20 件の検索結果
90 - 100 件目を表示
全般
質問者が納得http://www.benq.co.jp/products/LCD/?product=1694&page=specifications
下の方に書いてあるけどこれ?
4888日前view120
全般
質問者が納得BENQは台湾のAcer系列会社。実際に最終組み立てしてんのは中国でしょうからメイド・イン・チャイナとなるでしょうね。そんなこと言ったら日本メーカーのPCも中国製。
V2420HPはアマゾンで16000円台まで下がったのを見たこと有る感じが。 今は世間に知られたのか人気が出て値があがった感じですが。
今度買う新しいディスプレイも、中国製になってしまうでしょう。あるいは韓国かな。
何で買い替えるか知りませんが、安い=悪いの心理的問題ではないですか。
4966日前view140
全般
質問者が納得多分回線スピードが追いつかないのだと思います5M以上出てればある程度見れますけどね。
http://www.usen.com/speedtest/top.html
5009日前view101
全般
質問者が納得CATVはパススルーで、壁の端子とアンテナケーブルで繋いで受信しているんですか?それともSTBを経由して赤白黄ケーブルなどで繋いでいるんですか?CATVの受信方法にあったケーブルでモニタと繋いでください。
スキャンコンバータや変換器、変換ケーブルなどがあります。
補足
マンションにお住まいでSTBを置いていないくて、壁端子と繋いで受信していたのではパススルーです。PCモニタにはチューナーがないので、別途地デジチューナーを購入してPCモニタに繋げば受信できます。チューナーを直接モニタに繋ぐ方法もあり、HDM...
5014日前view53
全般
質問者が納得HDMIで接続しても、モニタ側を、HDMI入力に切り換えるのは自動認識なのでしょうか?
ボタン押しで、HDMIとD-subを切り換えるとかはありませんか?
5007日前view101
全般
質問者が納得TVとの接続もHDMIですか?
違っていれば 出力設定が必要です。
〔PS3™本体前面の電源ボタンに5秒以上ふれたままにして電源を入れてください。映像出力設定が標準的な解像度に変更されます〕
http://manuals.playstation.net/document/jp/ps3/current/settings/videooutput.html
5007日前view170
全般
質問者が納得値段と基本的な性能の違いはそれほど無いようですが、発売時期が1年違うので細かい部分が異なっています。
BenQ E2420HD 24型
2009年発売
バックライトが蛍光管タイプ(ただしメーカーでの記載無し)
ノングレア(非光沢/ただしメーカーでの記載無し)
輝度がV2420HPも高い
スピーカー内蔵
重量 約6kg 蛍光管タイプ、スピーカー内蔵のことからやや重い
ミニD-sub15ピン x1 / DVI-D x1 / HDMI x2 / Audio in / ヘッドフォン端子
BenQ V2420HP...
5009日前view67
全般
質問者が納得CPUはゲームのみに限ればほぼ最上位のi5-2500K、
GPUは最上位のGTX580です。
現状最高峰に近いレベルで十分動かないわけがありません。
5043日前view62
iLCD MonitorUser ManualV2220H / V2220HPV2420H / V2420HPV2320H / VW2220HVW2420H

2 Getting started Consider keeping the box and packaging in storage for use in the future when you may need to transport the monitor. The fitted foam packing is ideal for protecting the monitor during transport.Always keep the product and accessor ies out of reach of small children.Video Cable: D-Sub Video Cable: DVI-D (Optional accessory for models with DVI inputs, sold separately)Video Cable: HDMI(Optional accessory for models with HDMI inputs, sold separately)
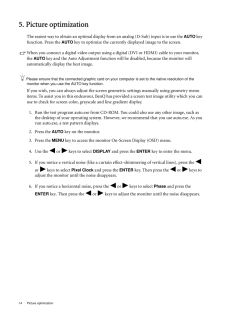
14 Picture optimization 5. Picture optimizationThe easiest way to obtain an optimal display from an analog (D-Sub) input is to use the AUTO key function. Press the AUTO key to optimize the currently displayed image to the screen. When you connect a digital video output using a digital (DVI or HDMI) cable to your monitor, the AUTO key and the Auto Adjustment function wi ll be disabled, because the monitor will automatically display the best image.Please ensure that the connected graphic card on your c...

iiiCare And Cleaning•Cleaning. Always unplug your monitor from th e wall outlet before cleaning. Clean the LCD monitor surface with a lint-free, non-abrasive cl oth. Avoid using any liquid, aerosol or glass cleaners.•Slots and openings on the back or top of the cabinet are for ventilation. They must not be blocked or covered. Your monitor should never be placed near or over a radiator or heat source, or in a built-in installation unless proper ventilation is provided.•Never push objects or spill liquid of...
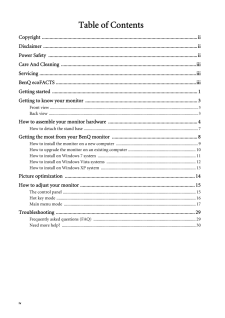
iv Table of ContentsCopyright ..........................................................................................................................iiDisclaimer .........................................................................................................................iiPower Safety .....................................................................................................................iiCare And Cleaning ..........................................................................

ii CopyrightCopyright (C) 2011 by BenQ Corporation. All rights reserved. No part of this publication may be reproduced, transmitted, transcribed, stored in a retrieval system or translated into any language or computer language, in any form or by any means, electronic, mechanical, magnetic, optical, chemical, manual or otherwise, without the prior wr itten permission of BenQ Corporation.DisclaimerBenQ Corporation makes no representations or warr anties, either expressed or implied, with respect to the co...
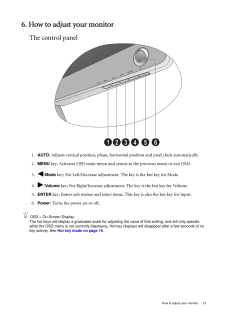
15 How to adjust your monitor6. How to adjust your monitorThe control panel1. AUTO : Adjusts vertical position, phase, horizontal position and pixel clock automatically.2.MENU key: Activates OSD main menu and return to the previous menu or exit OSD.3. /Mode key: For Left/Decrease adjustment. The key is the hot key for Mode.4. /Volume key: For Right/Increase adjustment. The key is the hot key for Volume. 5.ENTER key: Enters sub menus and select items. This key is also the hot key for Input.6.Power : ...

6 How to assemble your monitor hardware 5. Turn on the power.Picture may differ from product supplied for your region.Turn on the monitor by pressing the power button on the right of the monitor. Turn on the computer too, and follow the instructions in Section 4: Getting the most from your BenQ monitor on page 8 to install the monitor software.To extend the service life of the product, we recommend that you use your computer's power management function.

8 Getting the most from your BenQ monitor 4. Getting the most from your BenQ monitorTo gain the most benefit from your new BenQ color LCD flat screen monitor, you should install the custom BenQ LCD Monitor driver software as provided on the BenQ LCD Monitor CD-ROM.The circumstances under which you connect and in stall your BenQ LCD Monitor will determine which process you need to follow to successfully install the BenQ LCD Monitor driver software. These circumstances relate to which version of Microsoft...
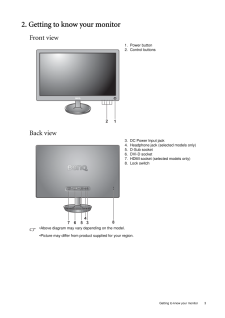
3 Getting to know your monitor2. Getting to know your monitorFront viewBack view1. Power button2. Control buttons3. DC Power Input jack4. Headphone jack (selected models only)5. D-Sub socket6. DVI-D socket7. HDMI socket (selected models only)8. Lock switch*Above diagram may vary depending on the model.*Picture may differ from product supplied for your region.12345 6 78
- 1
- 2

