
PT-LB90NTの取扱説明書・マニュアル [全68ページ 8.58MB]


6


1 / 68 ページ
1 / 68 ページ


現在のページURL
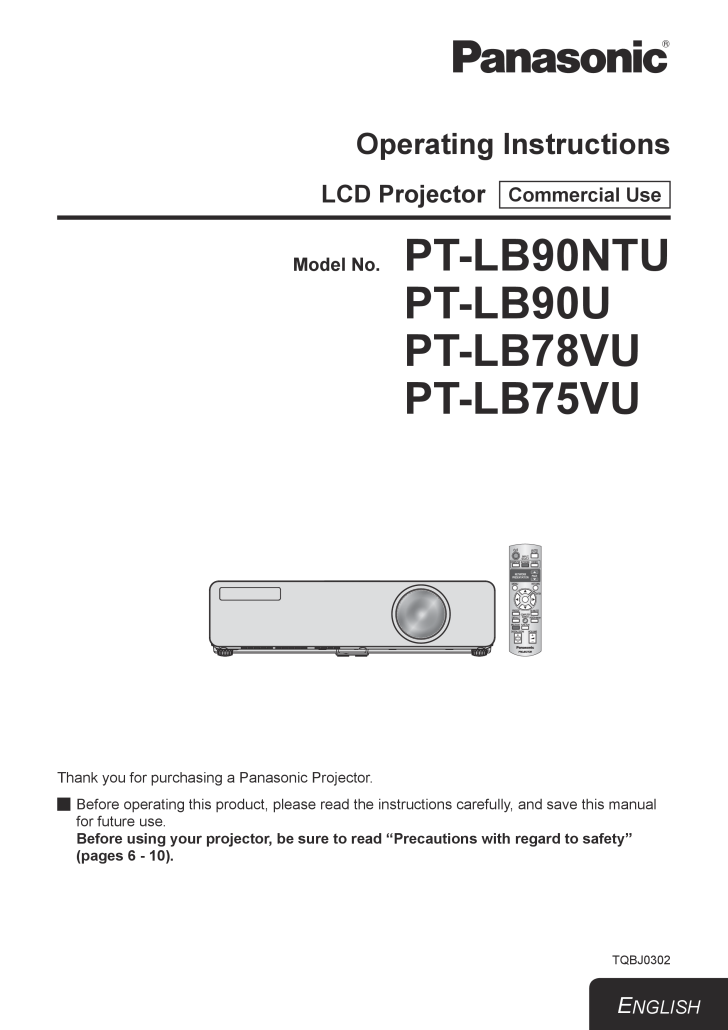
Operating InstructionsLCD Projector Commercial UseThank you for purchasing a Panasonic Projector.Before operating this product, please read the instructions carefully, and save this manual Jfor future use. Before using your projector, be sure to read “Precautions with regard to safety” (pages 6 - 10).TQBJ0302ENGLISHModel No.PT-LB90NTUPT-LB90UPT-LB78VUPT-LB75VU
参考になったと評価  12人が参考になったと評価しています。
その他の取扱説明書

660 view
このマニュアルの目次
-
1 .Operating InstructionsLCD...Operating InstructionsLCD Projector Commercial UseThank you for purchasing a Panasonic Projector.Before operating this product, please read the instructions carefully, and save this manual Jfor future use. Before using your projector, be sure to read “Pr...
-
2 .Important Safety NoticeIm...Important Safety NoticeImportant Information2 - ENGLISHDear Panasonic Customer:The following information should be read and understood as it provides details, which will enable you to operate the projector in a manner which is both safe to you and your env...
-
3 .Important Safety NoticeIm...Important Safety NoticeImportant InformationENGLISH - 3WARNING:This equipment has been tested and found to comply with the limits for a Class B digital device, pursuant to Part 15 of the FCC Rules. These limits are designed to provide reasonable protection...
-
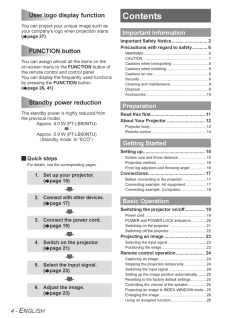
4 .4 - ENGLISHContentsUser l...4 - ENGLISHContentsUser logo display functionYou can project your unique image such as your company’s logo when projection starts.(AEpage 37) FUNCTION buttonYou can assign almost all the items on the on-screen menu to the FUNCTION button of the remote cont...
-
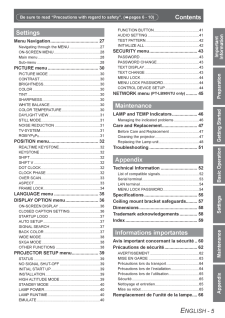
5 .Important InformationPrep...Important InformationPreparationGetting StartedBasic OperationSettingsMaintenanceAppendixENGLISH - 5SettingsMenu Navigation ......................................27Navigating through the MENU .............................27ON-SCREEN MENU ....................
-
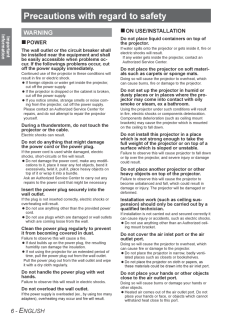
6 .Precautions with regard t...Precautions with regard to safetyImportant Information6 - ENGLISHWARNINGPOWER The wall outlet or the circuit breaker shall be installed near the equipment and shall be easily accessible when problems oc-cur. If the followings problems occur, cut off the p...
-
7 .Precautions with regard t...Precautions with regard to safetyImportant InformationENGLISH - 7Do not look into or touch the lights emit -ted from the lens while the projector is being used. Doing so can cause burns or loss of sight.Strong light is emitted from the projector’s lens. Do...
-
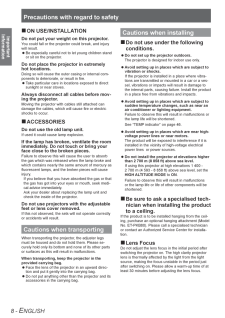
8 .Precautions with regard t...Precautions with regard to safetyImportant Information8 - ENGLISHON USE/INSTALLATION Do not put your weight on this projector.You could fall or the projector could break, and injury will result.Be especially careful not to let young children stand zor si...
-
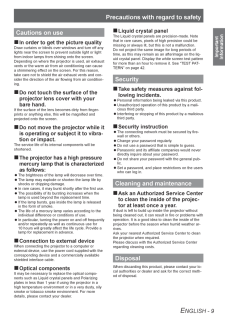
9 .Precautions with regard t...Precautions with regard to safetyImportant InformationENGLISH - 9Cautions on useIn order to get the picture quality Draw curtains or blinds over windows and turn off any lights near the screen to prevent outside light or light from indoor lamps from shini...
-
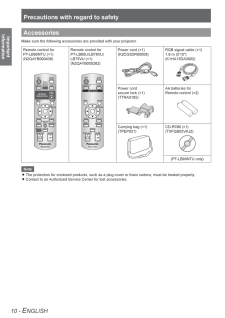
10 .Precautions with regard t...Precautions with regard to safetyImportant Information10 - ENGLISHAccessoriesMake sure the following accessories are provided with your projector.Remote control for PT-LB90NTU (×1) (N2QAYB000436) Remote control for PT-LB90U/LB78VU/ LB75VU (×1) (N2QAYB000...
-
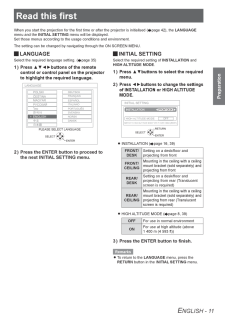
11 .Read this irstPreparation...Read this irstPreparationENGLISH - 11Read this irstWhen you start the projection for the irst time or after the projector is initialised (AEpage 42), the LANGUAGE menu and the INITIAL SETTING menu will be displayed.Set those menus according to the usage c...
-
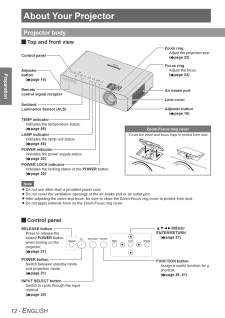
12 .About Your ProjectorPrepa...About Your ProjectorPreparation12 - ENGLISHAbout Your ProjectorProjector body Top and front view JZoom ringAdjust the projection size .(AEpage 23)Adjuster button(AEpage 16)Remote control signal receptorAmbient Luminance Sensor (ALS)TEMP indicatorIndica...
-
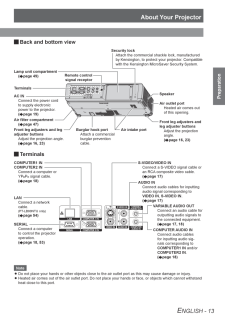
13 .About Your ProjectorPrepa...About Your ProjectorPreparationENGLISH - 13 Back and bottom view JLamp unit compartment(AEpage 49)TerminalsAC INConnect the power cord to supply electronic power to the projector.(AEpage 19)Security lockAttach the commercial shackle lock, manufactured by K...
-
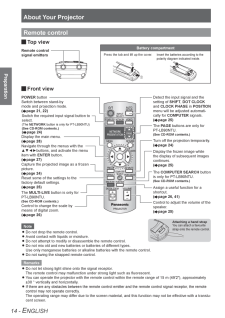
14 .About Your ProjectorPrepa...About Your ProjectorPreparation14 - ENGLISHRemote control JTop viewRemote control signal emittersFront view JPOWER button Switch between stand-by mode and projection mode.(AEpage 21, 2)Switch the required input signal button to select.(The NETWORK button...
-
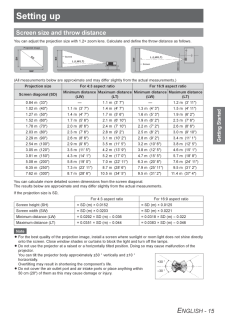
15 .Setting upGetting Started...Setting upGetting StartedENGLISH - 15Setting upScreen size and throw distanceYou can adjust the projection size with 1.2× zoom lens. Calculate and deine the throw distance as follows.SDSWSHL (LW/LT)SH88,6 mmL (LW/LT)SWProjected imageScreenScreen(All measur...
-
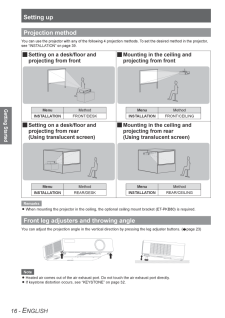
16 .Setting upGetting Started...Setting upGetting Started16 - ENGLISHProjection methodYou can use the projector with any of the following 4 projection methods. To set the desired method in the projector, see “INSTALLATION” on page 39.Setting on a desk/loor and Jprojecting from frontMou...
-
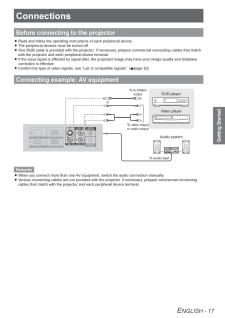
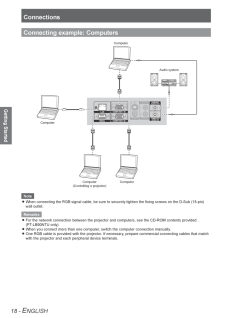
17 .ConnectionsGetting Starte...ConnectionsGetting StartedENGLISH - 17ConnectionsBefore connecting to the projectorRead and follow the operating instructions of each peripheral device. zThe peripheral devices must be turned off. zOne RGB cable is provided with the projector. If necessary...
-
18 .ConnectionsGetting Starte...ConnectionsGetting Started18 - ENGLISHConnecting example: ComputersComputerAudio systemComputerComputerComputer (Controlling a projector)NoteWhen connecting the RGB signal cable, be sure to securely tighten the ixing screws on the D-Sub (15-pin) zwall ou...
-
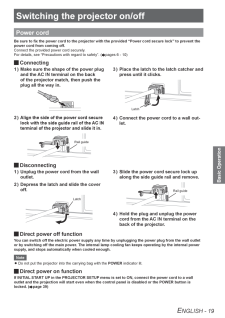
19 .Switching the projector o...Switching the projector on/offBasic OperationENGLISH - 19Switching the projector on/offPower cordBe sure to ix the power cord to the projector with the provided “Power cord secure lock” to prevent the power cord from coming off.Connect the provided power c...
-
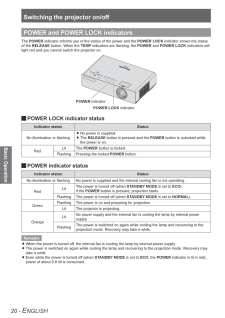
20 .Switching the projector o...Switching the projector on/offBasic Operation20 - ENGLISHPOWER and POWER LOCK indicatorsThe POWER indicator informs you of the status of the power and the POWER LOCK indicator shows the status of the RELEASE button. When the TEMP indicators are lashing, t...
-
21 .Switching the projector o...Switching the projector on/offBasic OperationENGLISH - 21Switching on the projectorBefore switching on the projector, make sure the power cord and all the other devices are connected correctly. (AEpage 17)INPUT SELECTRELEASEPOWER indicatorPOWER LOCK indica...
-
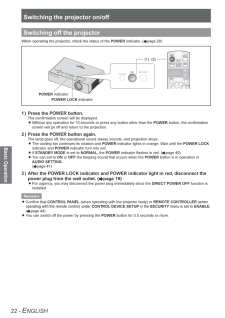
22 .Switching the projector o...Switching the projector on/offBasic Operation22 - ENGLISHSwitching off the projectorWhen operating the projector, check the status of the POWER indicator. (AEpage 20)INPUT SELECTRELEASEPOWER indicatorPOWER LOCK indicator(1), (2)Press the POWER button.1 ) ...
-
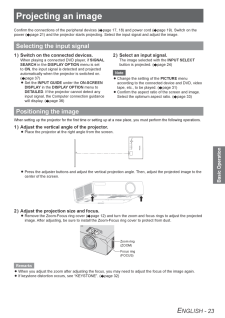
23 .Projecting an imageBasic ...Projecting an imageBasic OperationENGLISH - 23Projecting an imageConirm the connections of the peripheral devices (AEpage 17, 18) and power cord (AEpage 19). Switch on the power (AEpage 21) and the projector starts projecting. Select the input signal and ...
-
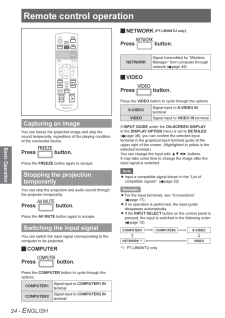
24 .Remote control operationB...Remote control operationBasic Operation24 - ENGLISHRemote control operationCapturing an imageYou can freeze the projected image and stop the sound temporarily, regardless of the playing condition of the connected device.Press button.Press the FREEZE butt...
-
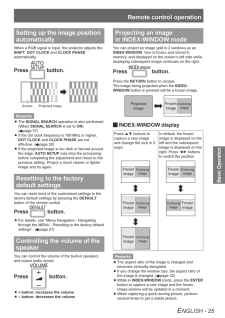
25 .Remote control operationB...Remote control operationBasic OperationENGLISH - 25Setting up the image position automaticallyWhen a RGB signal is input, the projector adjusts the SHIFT, DOT CLOCK and CLOCK PHASE automatically.Press button.Screen Projected imageRemarksThe zSIGNAL SEAR...
-
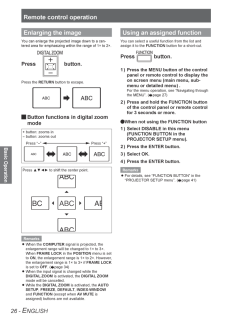
26 .Remote control operationB...Remote control operationBasic Operation26 - ENGLISHEnlarging the imageYou can enlarge the projected image down to a cen-tered area for emphasizing within the range of 1× to 2×.Press button.Press the RETURN button to escape. JButton functions in digital z...
-
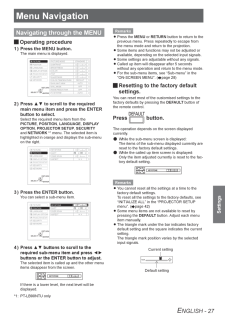
27 .Menu NavigationSettingsEN...Menu NavigationSettingsENGLISH - 27Menu NavigationNavigating through the MENUOperating procedure JPress the MENU button.1 ) The main menu is displayed.PICTUREPOSITIONLANGUAGEDISPLAY OPTIONPROJECTOR SETUPSECURITYNETWORKPICTURE MODECONTRASTBRIGHTNESSCOLORTIN...
-
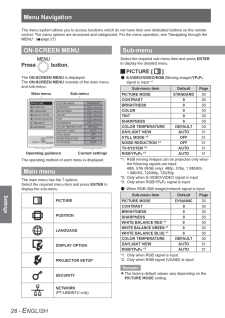
28 .Menu NavigationSettings28...Menu NavigationSettings28 - ENGLISH The menu system allows you to access functions which do not have their own dedicated buttons on the remote control. The menu options are structured and categorized. For the menu operation, see “Navigating through the MEN...
-
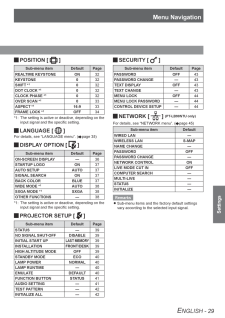
29 .Menu NavigationSettingsEN...Menu NavigationSettingsENGLISH - 29POSITION [ J ]Sub-menu item Default PageREALTIME KEYSTONE ON 3 2KEYSTONE 0 3 2SHIFT *10 3 2DOT CLOCK *10 3 2CLOCK PHASE *10 3 2OVER SCAN *10 3ASPECT *116:9 3FRAME LOCK *1OFF 3 4The setting is active or deactive, dependin...
-
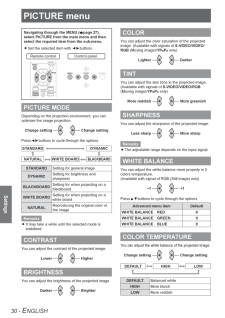
30 .PICTURE menuSettings30 - ...PICTURE menuSettings30 - ENGLISHPICTURE menuNavigating through the MENU (AEpage 27), select PICTURE from the main menu and then select the required item from the sub-menu.Set the selected item with ◄►buttons. zRemote control Control panelPICTURE MODEDep...
-
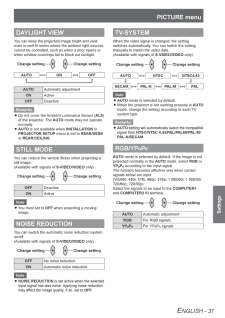
31 .PICTURE menuSettingsENGLI...PICTURE menuSettingsENGLISH - 31DAYLIGHT VIEWYou can keep the projected image bright and vivid even in well-lit rooms where the ambient light sources cannot be controlled, such as when a door opens or when window coverings fail to block out sunlight.Change...
-
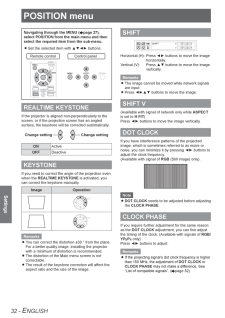
32 .POSITION menuSettings32 -...POSITION menuSettings32 - ENGLISHPOSITION menuNavigating through the MENU (AEpage 27), select POSITION from the main menu and then select the required item from the sub-menu.Set the selected item with ▲▼◄► buttons. zRemote control Control panelREALTIME ...
-
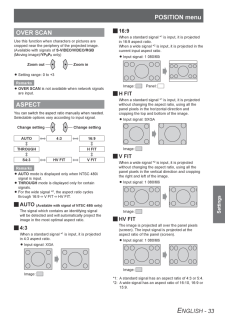
33 .POSITION menuSettingsENGL...POSITION menuSettingsENGLISH - 33OVER SCANUse this function when characters or pictures are cropped near the periphery of the projected image.(Available with signals of S-VIDEO/VIDEO/RGB (Moving image)/YPBPR only)Zoom outZoom inSetting range: 0 to +3 zRe...
-
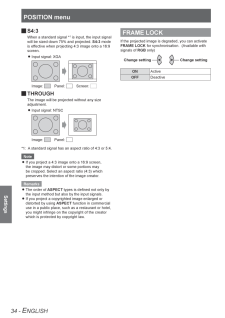
34 .POSITION menuSettings34 -...POSITION menuSettings34 - ENGLISHS4:3 JWhen a standard signal *1 is input, the input signal will be sized down 75% and projected. S4:3 mode is effective when projecting 4:3 image onto a 16:9 screen.Input signal: XGA zImage: Panel: Screen: THROUGH JThe...
-
35 .LANGUAGE menuSettingsENGL...LANGUAGE menuSettingsENGLISH - 35LANGUAGE menuNavigating through the MENU (AEpage 27), select LANGUAGE from the main menu and then display the sub-menu.Select the required language with▲▼buttons zand press the ENTER button to set.Remote controlControl p...
-
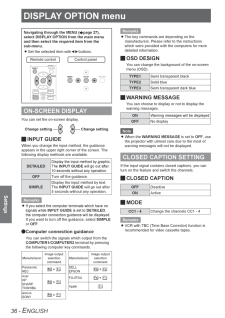
36 .DISPLAY OPTION menuSettin...DISPLAY OPTION menuSettings36 - ENGLISHDISPLAY OPTION menuNavigating through the MENU (AEpage 27), select DISPLAY OPTION from the main menu and then select the required item from the sub-menu.Set the selected item with◄►buttons. zRemote control Control ...
-
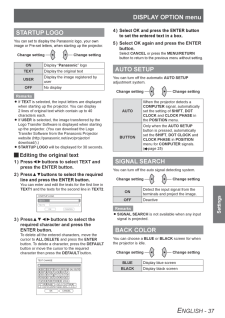
37 .DISPLAY OPTION menuSettin...DISPLAY OPTION menuSettingsENGLISH - 37STARTUP LOGOYou can set to display the Panasonic logo, your own image or Pre-set letters, when starting up the projector.Change setting Change settingONDisplay “Panasonic” logoTEXTDisplay the original textUSERDisplay ...
-
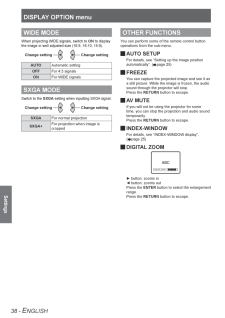
38 .DISPLAY OPTION menuSettin...DISPLAY OPTION menuSettings38 - ENGLISHWIDE MODEWhen projecting WIDE signals, switch to ON to display the image in well adjusted size (16:9, 16:10, 15:9).Change settingChange settingAUTOAutomatic settingOFFFor 4:3 signalsONFor WIDE signalsSXGA MODESwitch...
-
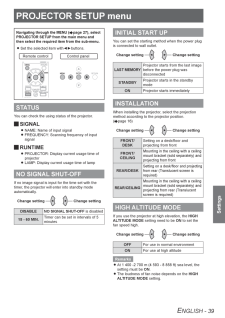
39 .PROJECTOR SETUP menuSetti...PROJECTOR SETUP menuSettingsENGLISH - 39PROJECTOR SETUP menuNavigating through the MENU (AEpage 27) , select PROJECTOR SETUP from the main menu and then select the required item from the sub-menu.Set the selected item with◄►buttons. zRemote control Contro...
-
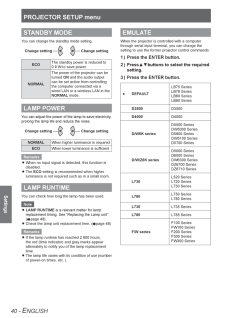
40 .PROJECTOR SETUP menuSetti...PROJECTOR SETUP menuSettings40 - ENGLISHSTANDBY MODEYou can change the standby mode setting.Change settingChange settingECOThe standby power is reduced to 0.9 W to save power.NORMALThe power of the projector can be turned ON and the audio output can be set...
-
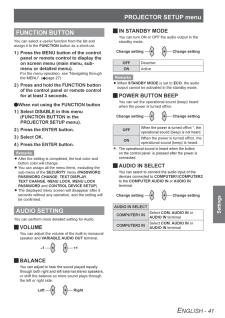
41 .PROJECTOR SETUP menuSetti...PROJECTOR SETUP menuSettingsENGLISH - 41FUNCTION BUTTONYou can select a useful function from the list and assign it to the FUNCTION button as a short-cut.Press the MENU button of the control 1 ) panel or remote control to display the on screen menu (main m...
-
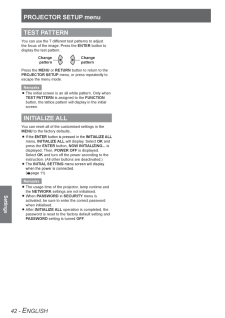
42 .PROJECTOR SETUP menuSetti...PROJECTOR SETUP menuSettings42 - ENGLISHTEST PATTERNYou can use the 7 different test patterns to adjust the focus of the image. Press the ENTER button to display the test pattern.Change patternChange patternPress the MENU or RETURN button to return to the ...
-
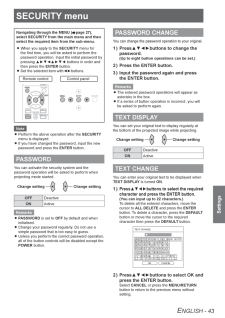
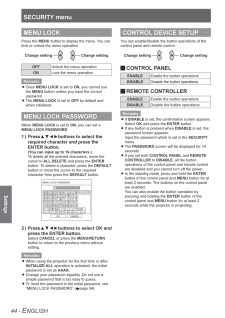
43 .SECURITY menuSettingsENGL...SECURITY menuSettingsENGLISH - 43SECURITY menuNavigating through the MENU (AEpage 27), select SECURITY from the main menu and then select the required item from the sub-menu.When you apply to the zSECURITY menu for the irst time, you will be asked to p...
-
44 .SECURITY menuSettings44 -...SECURITY menuSettings44 - ENGLISHMENU LOCKPress the MENU button to display the menu. You can lock or unlock the menu operation.Change settingChange settingOFFUnlock the menu operationONLock the menu operationRemarksOnce zMENU LOCK is set to ON, you cannot...
-
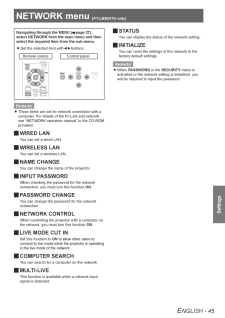
45 .NETWORK menu (PT-LB90NTU ...NETWORK menu (PT-LB90NTU only) SettingsENGLISH - 45NETWORK menu (PT-LB90NTU only) Navigating through the MENU (AEpage 27), select NETWORK from the main menu and then select the required item from the sub-menu.Set the selected item with◄►buttons. zRemote...
-
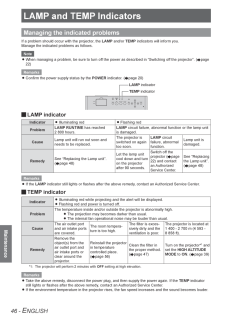
46 .LAMP and TEMP IndicatorsM...LAMP and TEMP IndicatorsMaintenance46 - ENGLISHLAMP and TEMP IndicatorsManaging the indicated problemsIf a problem should occur with the projector, the LAMP and/or TEMP indicators will inform you. Manage the indicated problems as follows.NoteWhen managing...
-
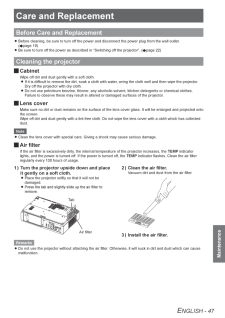
47 .Care and ReplacementMaint...Care and ReplacementMaintenanceENGLISH - 47Care and ReplacementBefore Care and ReplacementBefore cleaning, be sure to turn off the power and disconnect the power plug from the wall outlet. z(AEpage 19)Be sure to turn off the power as described in “Switch...
-
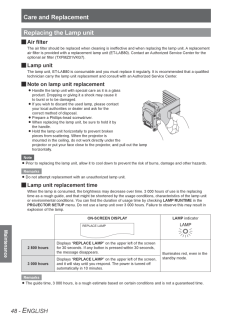
48 .Care and ReplacementMaint...Care and ReplacementMaintenance48 - ENGLISHReplacing the Lamp unitAir ilter JThe air ilter should be replaced when cleaning is ineffective and when replacing the lamp unit. A replacement air ilter is provided with a replacement lamp unit (ET-LAB80). Contac...
-
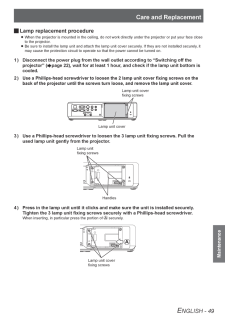
49 .Care and ReplacementMaint...Care and ReplacementMaintenanceENGLISH - 49 JLamp replacement procedureWhen the projector is mounted in the ceiling, do not work directly under the projector or put your face close zto the projector.Be sure to install the lamp unit and attach the lamp uni...
-
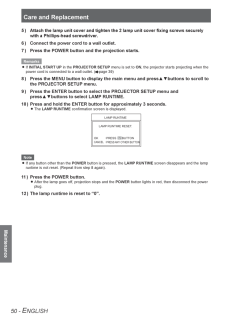
50 .Care and ReplacementMaint...Care and ReplacementMaintenance50 - ENGLISHAttach the lamp unit cover and tighten the 2 lamp unit cover ixing screws securely 5 ) with a Phillips-head screwdriver.Connect the power cord to a wall outlet.6 ) Press the POWER button and the projection starts...
-
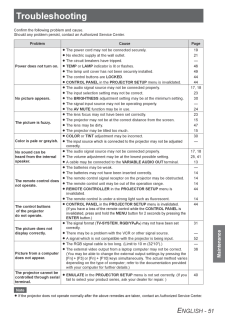
51 .TroubleshootingMaintenanc...TroubleshootingMaintenanceENGLISH - 51TroubleshootingConirm the following problem and cause. Should any problem persist, contact an Authorized Service Center.Problem Cause PagePower does not turn on.The power cord may not be connected securely. z19No elec...
-
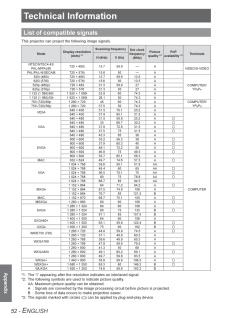
52 .Technical InformationAppe...Technical InformationAppendix52 - ENGLISHTechnical InformationList of compatible signalsThis projector can project the following image signals.ModeDisplay resolution (dots) *1Scanning frequencyDot clock frequency (MHz)Picture quality *2PnP availabili...
-
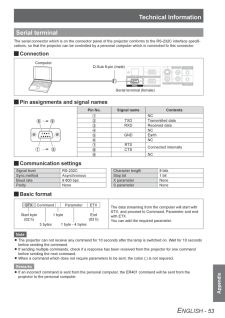
53 .Technical InformationAppe...Technical InformationAppendixENGLISH - 53Serial terminalThe serial connector which is on the connector panel of the projector conforms to the RS-232C interface specii -cations, so that the projector can be controlled by a personal computer which is connect...
-
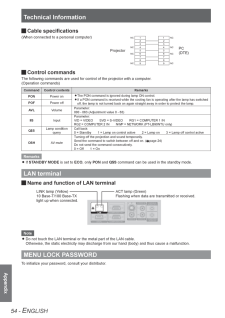
54 .Technical InformationAppe...Technical InformationAppendix54 - ENGLISH JCable speciications(When connected to a personal computer) Control commands JThe following commands are used for control of the projector with a computer.(Operation commands)CommandControl contents RemarksPO...
-
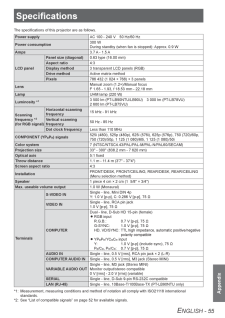
55 .AppendixENGLISH - 55Speci...AppendixENGLISH - 55SpeciicationsThe speciications of this projector are as follows.Power supply AC 100 - 240 V 50 Hz/60 HzPower consumption300 W During standby (when fan is stopped): Approx. 0.9 WAmps 3.7 A - 1.5 ALCD panelPanel size (diagonal) 0.63 type ...
-
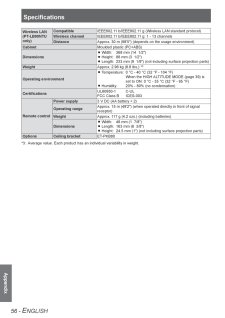
56 .Appendix56 - ENGLISHSpeci...Appendix56 - ENGLISHSpeciicationsWireless LAN (PT-LB90NTU only)Compatible IEEE802.11 b/IEEE802.11 g (Wireless LAN standard protocol)Wireless channel IEEE802.11 b/IEEE802.11 g: 1 - 13 channelsDistance Approx. 30 m (98'5") (depends on the usage environment)C...
-
57 .AppendixENGLISH - 57Ceili...AppendixENGLISH - 57Ceiling mount bracket safeguardsInstallation work of the ceiling mount bracket should only be carried by a qualiied technician. zEven if it is during guaranteed period, the manufacturer is not responsible for any hazard or damage caused...
-
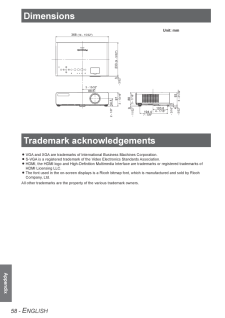
58 .DimensionsAppendix58 - EN...DimensionsAppendix58 - ENGLISHDimensionsUnit: mm233 (9 - 5/32")973 - 13/16"883 - 7/16"933 - 21/32" - 3/16" 54- 5/32"9- 1 1/32"2 - 1/8" 54.53- 3/32"368 (14 - 15/32")3 - 15/32"88.6103.64 - 1/16"194.47 - 5/8" Trademark acknowledgements VGA and XGA are ...
-
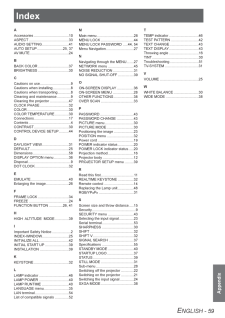
59 .IndexAppendixENGLISH - 59...IndexAppendixENGLISH - 59IndexAAccessories ................................... 10ASPECT ........................................ 3AUDIO SETTING ...........................41AUTO SETUP ..........................25, 37AV MUTE ...................................
-
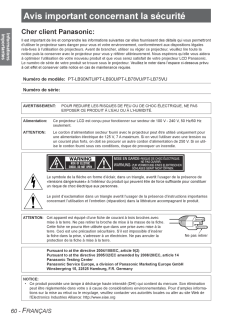
60 .Avis important concernant...Avis important concernant la sécurité60 - FRANÇAISInformations importantesCher client Panasonic:Il est important de lire et comprendre les informations suivantes car elles fournissent des détails qui vous permettront d’utiliser le projecteur sans danger po...
-
61 .Avis important concernant...Avis important concernant la sécuritéFRANÇAIS - 61Informations importantesAVERTISSEMENT:Cet équipement a été soumis à des tests qui ont démontré que celui-ci respectait les limites spéciiées pour les appareils numériques de la classe B aux termes de la p...
-
62 .62 - FRANÇAISInformations...62 - FRANÇAISInformations importantesPrécautions de sécuritéAVERTISSEMENTALIMENTATION La prise de courant ou le disjoncteur doivent être installés à proximité de l’appareil et doivent être d’accès facile en cas de problèmes. Si les problèmes suivants su...
-
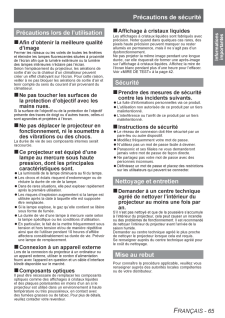
63 .Précautions de sécuritéFR...Précautions de sécuritéFRANÇAIS - 63Informations importantesVeillez à ce que le faisceau lumineux n’éclaire pas directement votre peau pendant que vous utilisez le projecteur.Cela peut entraîner des brûlures ou une perte de la vue.Une lumière intense est é...
-
64 .Précautions de sécurité64...Précautions de sécurité64 - FRANÇAISInformations importantesLORS DE L’UTILISATION/INSTALLATION Ne pas peser de tout son poids sur ce projecteur.On risque de tomber ou de casser l’appareil, ce qui peut causer des blessures.Veiller tout particulièrement à c...
-
65 .Précautions de sécuritéFR...Précautions de sécuritéFRANÇAIS - 65Informations importantesPrécautions lors de l’utilisationAin d’obtenir la meilleure qualité d’imageFermer les rideaux ou les volets de toutes les fenêtres et éteindre les lampes luorescentes situées à proximité de l’éc...
-
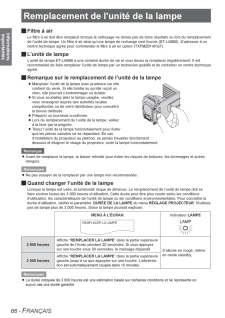
66 .Remplacement de l'unité d...Remplacement de l'unité de la lampe66 - FRANÇAISInformations importantesRemplacement de l'unité de la lampeFiltre à air JLe iltre à air doit être remplacé lorsque le nettoyage ne donne pas de bons résultats ou lors du remplacement de l’unité de lampe. Un i...
-
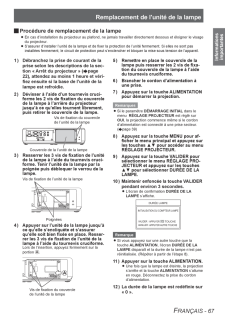
67 .Remplacement de l'unité d...Remplacement de l'unité de la lampeFRANÇAIS - 67Informations importantesProcédure de remplacement de la lampe JEn cas d’installation du projecteur au plafond, ne jamais travailler directement dessous et éloigner le visage zdu projecteur.S’assurer d’instal...
-
68 .F1009-1109BTQBJ0302NOTE:T...F1009-1109BTQBJ0302NOTE:This product contains a CR Coin Cell Lithium Battery which contains Perchlorate Material - special handling may apply.See www.dtsc.ca.gov/hazardouswaste/perchlorate.
