GL2250の取扱説明書・マニュアル [全47ページ 3.15MB]


5


8 / 47 ページ
8 / 47 ページ


現在のページURL
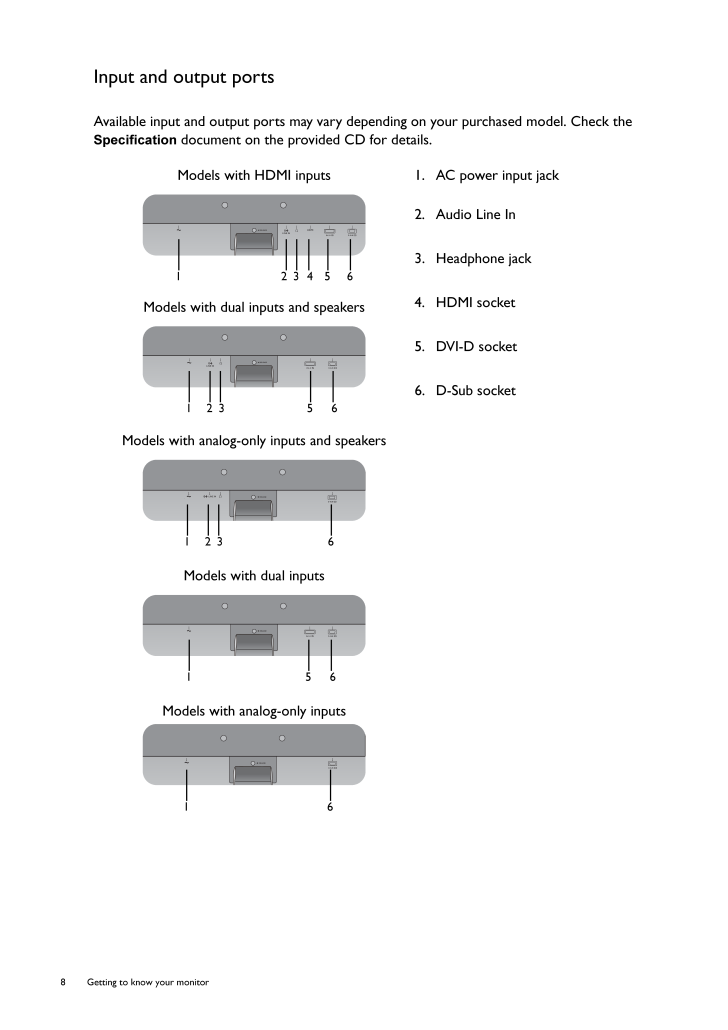
8 Getting to know your monitor Input and output portsAvailable input and output po rts may vary depending on your purchased model. Check the Specification document on the provided CD for details. Models with HDMI inputs 1. AC power input jack2. Audio Line In3. Headphone jack4. HDMI socket5. DVI-D socket6. D-Sub socketModels with dual inputs and speakersModels with analog-only inputs and speakersModels with dual inputsModels with analog-only inputs123456123 5 6123 615616
参考になったと評価  30人が参考になったと評価しています。
このマニュアルの目次
-
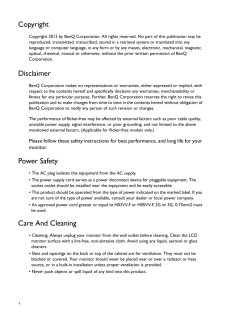
2 .2 CopyrightCopyright 20...2 CopyrightCopyright 2013 by BenQ Corporatio n. All rights reserved. No part of this publication may be reproduced, transmitted, transcribed, stored in a retrieval system or translated into any language or computer language, in any form or by any means...
-
3 .3ServicingDo not attemp...3ServicingDo not attempt to service this product yourself, as opening or removing covers may expose you to dangerous voltages or other risks. If any of the above mentioned misuse or other accident such as dropping or mishandling occurs, contact quali...
-
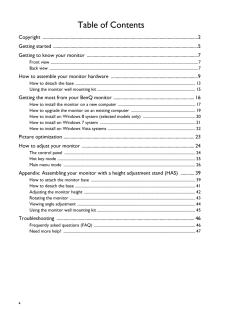
4 .4 Table of ContentsCop...4 Table of ContentsCopyright ......................................................................................................................................2Getting started ............................................................................
-
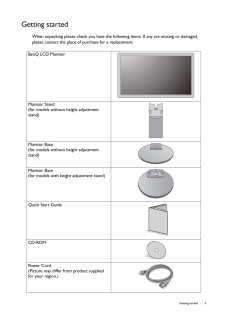
5 .5 Getting startedGett...5 Getting startedGetting startedWhen unpacking please check you have the foll owing items. If any are missing or damaged, please contact the place of purchase for a replacement. BenQ LCD MonitorMonitor Stand(for models without height adjustment stand)M...
-
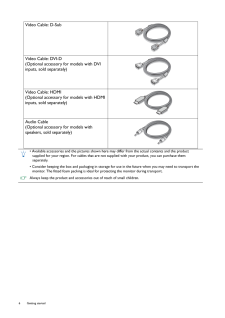
6 .6 Getting started Video...6 Getting started Video Cable: D-Sub Video Cable: DVI-D(Optional accessory for models with DVI inputs, sold separately)Video Cable: HDMI(Optional accessory for models with HDMI inputs, sold separately)Audio Cable(Optional accessory for models with speake...
-
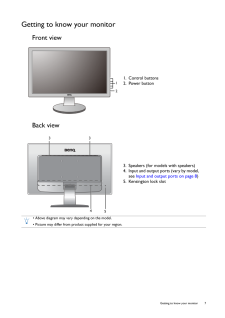
7 .7 Getting to know you...7 Getting to know your monitorGetting to know your monitorFront viewBack view1. Control buttons2. Power button123. Speakers (for models with speakers)4. Input and output ports (vary by model, see Input and output ports on page 8 )5. Kensington lock slo...
-
8 .8 Getting to know your m...8 Getting to know your monitor Input and output portsAvailable input and output po rts may vary depending on your purchased model. Check the Specification document on the provided CD for details. Models with HDMI inputs 1. AC power input jack2. Audio ...
-
9 .9 How to assemble you...9 How to assemble your monitor hardwareHow to assemble your monitor hardware * If your model came with a height adjustment stand (HAS), refer to Appendix: Assembling your monitor with a height adjustment stand (HAS) on page 39 for details on hardware...
-
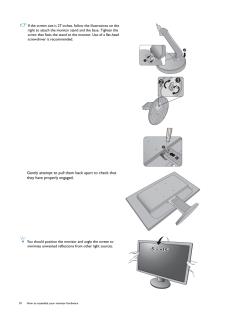
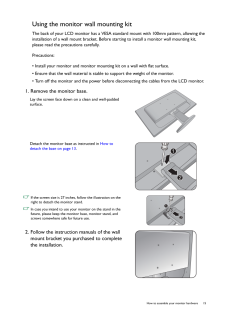
10 .10 How to assemble your ...10 How to assemble your monitor hardware If the screen size is 27 inches , follow the illustrations on the right to attach the monitor st and and the base. Tighten the screw that fixes the stand to the monitor. Use of a flat-head screwdriver is recommen...
-
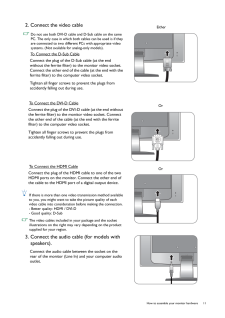
11 .11 How to assemble yo...11 How to assemble your monitor hardware2. Connect the video cable Do not use both DVI-D cable and D-Sub cable on the same PC. The only case in which both cables can be used is if they are connected to two different PCs with appropriate video systems....
-
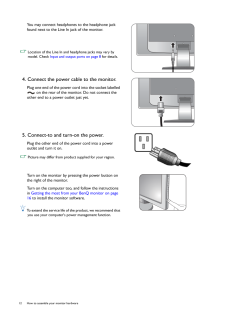
12 .12 How to assemble your ...12 How to assemble your monitor hardware You may connect headphones to the headphone jack found next to the Line In jack of the monitor. Location of the Line In and headphone jacks may vary by model. Check Input and output ports on page 8 for details.4....
-
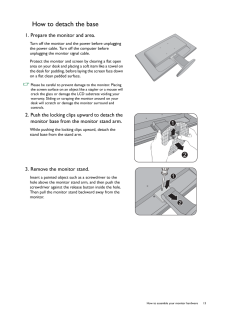
13 .13 How to assemble yo...13 How to assemble your monitor hardwareHow to detach the base1. Prepare the monitor and area.Turn off the monitor and the power before unplugging the power cable. Turn off the computer before unplugging the monitor signal cable.Protect the monitor and...
-
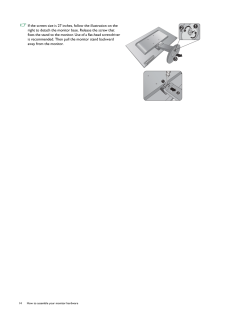
14 .14 How to assemble your ...14 How to assemble your monitor hardware If the screen size is 27 inches , follow the illustration on the right to detach the monitor base. Release the screw that fixes the stand to the monitor. Use of a flat-head screwdriver is recommended. Then pull t...
-
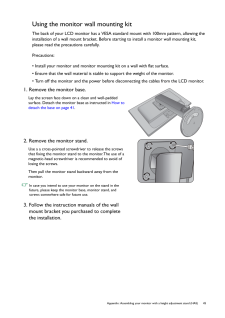
15 .15 How to assemble yo...15 How to assemble your monitor hardwareUsing the monitor wall mounting kitThe back of your LCD monitor has a VESA standard mount with 100mm pattern, allowing the installation of a wall mount bracket. Before starting to install a monitor wall mounting...
-
16 .16 Getting the most from...16 Getting the most from your BenQ monitor Getting the most from your BenQ monitorTo gain the most benefit from your new BenQ LCD monitor, you should install the custom BenQ LCD Monitor driver software as pr ovided on the BenQ LCD Monitor CD-ROM.The cir...
-
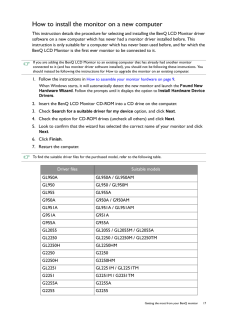
17 .17 Getting the most f...17 Getting the most from your BenQ monitorHow to install the monitor on a new computerThis instruction details the procedure for select ing and installing the BenQ LCD Monitor driver software on a new computer which has never had a monitor dr iver inst...
-
18 .18 Getting the most from...18 Getting the most from your BenQ monitor GL2450 GL2450 / GL2450MGL2450H GL2450HM / GL2450HTG2450 G2450G2450H G2450HMGL2750H GL2750HMG2750 G2750G2750H G2750HMDriver files Suitable models
-
19 .19 Getting the most f...19 Getting the most from your BenQ monitorHow to upgrade the monitor on an existing computerThis instruction details the procedure for ma nually updating the existing monitor driver software on your Microsoft Windows computer. It is currently tested a...
-
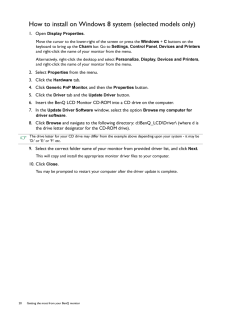
20 .20 Getting the most from...20 Getting the most from your BenQ monitor How to install on Windows 8 system (selected models only)1. Open Display Properties .Move the cursor to the lower-right of the screen or press the Windows + C buttons on the keyboard to bring up the Charm bar...
-
21 .21 Getting the most f...21 Getting the most from your BenQ monitorHow to install on Windows 7 system1. Open Display Properties .Go to Start , Control Panel, Hardware and Sound, Devices and Printers and right-click the name of your monitor from the menu.Alternatively, rig...
-
22 .22 Getting the most from...22 Getting the most from your BenQ monitor How to install on Windows Vista systems1. Open Display Settings .Right-click the desktop and select Personalize from the popup menu.Select Display Settings from the Personalize appearance and sounds window....
-
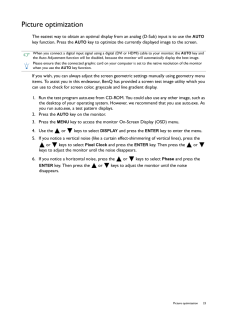
23 .23 Picture optimizati...23 Picture optimizationPicture optimizationThe easiest way to obtain an optimal display from an analog (D-Sub) input is to use the AUTO key function. Press the AUTO key to optimize the currently displayed image to the screen.If you wish, you can al...
-
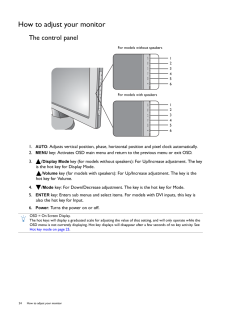
24 .24 How to adjust your mo...24 How to adjust your monitor How to adjust your monitorThe control panel1. AUTO : Adjusts vertical position, phase, horizont al position and pixel clock automatically.2. MENU key: Activates OSD main menu and return to the previous menu or exit OSD.3...
-
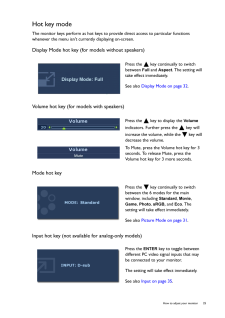
25 .25 How to adjust your...25 How to adjust your monitorHot key modeThe monitor keys perform as hot keys to pr ovide direct access to particular functions whenever the menu isn't currently displaying on-screen.Display Mode hot key (for models without speakers)Volume hot key (for...
-
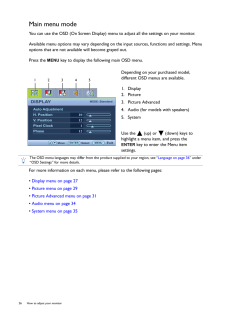
26 .26 How to adjust your mo...26 How to adjust your monitor Main menu modeYou can use the OSD (On Screen Display) menu to adjust all the settings on your monitor. Available menu options may vary depending on the input sources, functions and settings. Menu options that are not avail...
-
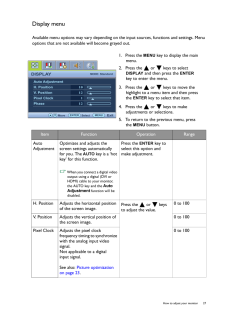
27 .27 How to adjust your...27 How to adjust your monitorDisplay menuAvailable menu options may vary depending on th e input sources, functions and settings. Menu options that are not available will become grayed out.1. Press the MENU key to display the main menu.2. Press the ...
-
28 .28 How to adjust your mo...28 How to adjust your monitor Phase Adjusts the pixel clock phase timing to synchronize with the analog input video signal. Not applicable to a digitalinput signal.See also: Picture optimization on page 23.Press the or keys to adjust the value.0 to 6...
-
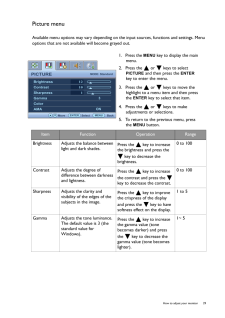
29 .29 How to adjust your...29 How to adjust your monitorPicture menuAvailable menu options may vary depending on th e input sources, functions and settings. Menu options that are not available will become grayed out.1. Press the MENU key to display the main menu.2. Press the ...
-
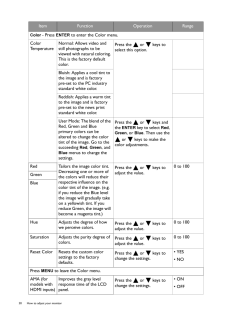
30 .30 How to adjust your mo...30 How to adjust your monitor Color - Press ENTER to enter the Color menu.Color TemperatureNormal: Allows video and still photographs to be viewed with natural coloring. This is the factory default color. Press the or keys to select this option.Bl...
-
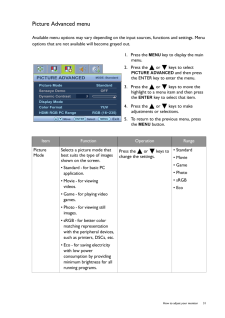
31 .31 How to adjust your...31 How to adjust your monitorPicture Advanced menuAvailable menu options may vary depending on th e input sources, functions and settings. Menu options that are not available will become grayed out.1. Press the MENU key to display the main menu.2. P...
-
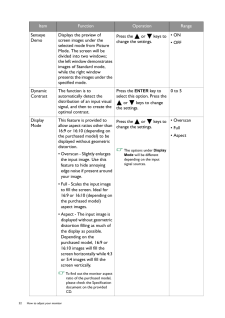
32 .32 How to adjust your mo...32 How to adjust your monitor Senseye DemoDisplays the preview of screen images under the selected mode from Picture Mode. The screen will be divided into two windows; the left window demonstrates images of Standard mode, while the right window presents ...
-
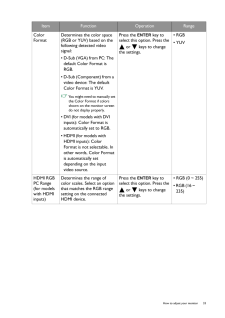
33 .33 How to adjust your...33 How to adjust your monitorColor FormatDetermines the color space (RGB or YUV) based on the following detected video signal:* D-Sub (VGA) from PC: The default Color Format is RGB.* D-Sub (Component) from a video device: The default Color Format is YU...
-
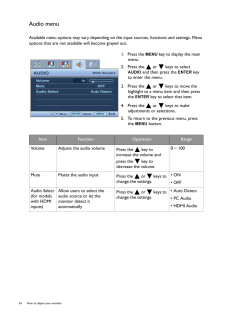
34 .34 How to adjust your mo...34 How to adjust your monitor Audio menuAvailable menu options may vary depending on the input sources, functions and settings. Menu options that are not available will become grayed out.1. Press the MENU key to display the main menu.2. Press the o...
-
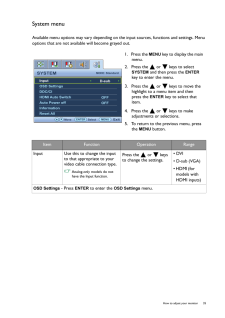
35 .35 How to adjust your...35 How to adjust your monitorSystem menuAvailable menu options may vary depending on th e input sources, functions and settings. Menu options that are not available will become grayed out.1. Press the MENU key to display the main menu.2. Press the ...
-
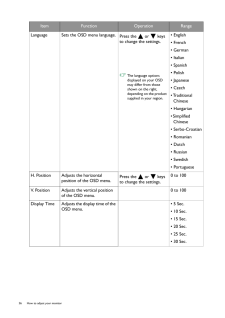
36 .36 How to adjust your mo...36 How to adjust your monitor Language Sets the OSD menu language.Press the or keys to change the settings. The language options displayed on your OSD may differ from those shown on the right, depending on the product supplied in your region.* Engli...
-
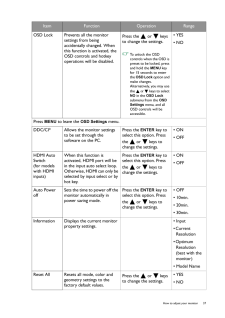
37 .37 How to adjust your...37 How to adjust your monitorOSD Lock Prevents all the monitor settings from being accidentally changed. When this function is activated, the OSD controls and hotkey operations will be disabled.Press the or keys to change the settings. To unlock t...
-
38 .38 How to adjust your mo...38 How to adjust your monitor *DDC/CI, short for Display Data Channel/Command Interface, which was developed by Video Electronics Standards Association (VESA). DDC/CI capability allows moni tor controls to be sent via the software for remote diagnostics.
-
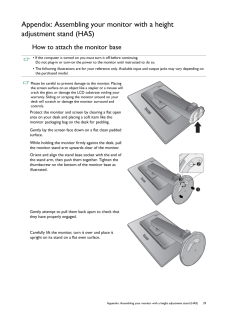
39 .39 Appendix: Assembli...39 Appendix: Assembling your monitor with a height adjustment stand (HAS)Appendix: Assembling your monitor with a height adjustment stand (HAS)How to attach the monitor base* If the computer is turned on you must turn it off before continuing. Do not p...
-
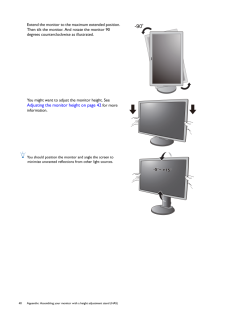
40 .40 Appendix: Assemb ling ...40 Appendix: Assemb ling your monitor with a height adjustment stand (HAS) Extend the monitor to the maximum extended position. Then tilt the monitor. And rotate the monitor 90 degrees counterclockwise as illustrated.You might want to adjust the monitor h...
-
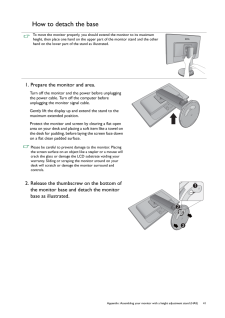
41 .41 Appendix: Assembli...41 Appendix: Assembling your monitor with a height adjustment stand (HAS)How to detach the baseTo move the monitor properly, you should extend the monitor to its maximum height, then place one hand on the upper part of the monitor stand and the other h...
-
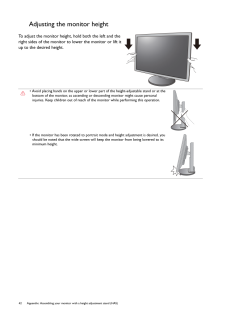
42 .42 Appendix: Assemb ling ...42 Appendix: Assemb ling your monitor with a height adjustment stand (HAS) Adjusting the monitor heightTo adjust the monitor height, hold both the left and the right sides of the monitor to lower the monitor or lift it up to the desired height.* Avoid pla...
-
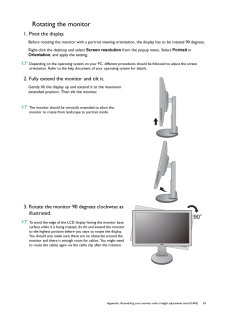
43 .43 Appendix: Assembli...43 Appendix: Assembling your monitor with a height adjustment stand (HAS)Rotating the monitor1. Pivot the display.Before rotating the monitor with a portrait viewing or ientation, the display has to be rotated 90 degrees.Right-click the desktop and sel...
-
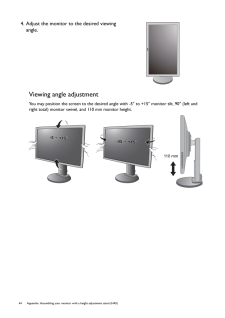
44 .44 Appendix: Assemb ling ...44 Appendix: Assemb ling your monitor with a height adjustment stand (HAS) Viewing angle adjustmentYou may position the screen to the desired angl e with -5 to +15 monitor tilt, 90 (left and right total) monitor swivel, and 110 mm monitor height.4. Adjust...
-
45 .45 Appendix: Assembli...45 Appendix: Assembling your monitor with a height adjustment stand (HAS)Using the monitor wall mounting kitThe back of your LCD monitor has a VESA standard mount with 100mm pattern, allowing the installation of a wall mount bracket. Before starting t...
-
46 .46 Troubleshooting Troub...46 Troubleshooting TroubleshootingFrequently asked questions (FAQ)The image is blurred:Read the instructions on the link "Adjusting the Screen Resolution" on the CD, and then select the correct resolution, refresh rate and make adjustments based on these...
-
47 .47 TroubleshootingNee...47 TroubleshootingNeed more help?If your problems remain after checking this ma nual, please contact your place of purchase or e-mail us at: Support@BenQ.com.Is the prompt on the display illuminated in orange?If the LED is illuminated in orange, the po...