VGP-WKB1の取扱説明書・マニュアル [全132ページ 1.18MB]


7


85 / 132 ページ

85 / 132 ページ


現在のページURL
15 FRsuiteIndicateur Fonctione/E Indicateur(piles)IndicateurNum LockIndicateurCaps LockIndicateurScroll LockLorsque tous les indicateurs sont allumes ou qu'ils clignotentLorsque tous les indicateurs sont allumes, le clavier est en cours dereinitialisation.Lorsque tous les indicateurs clignotent, le clavier n'a pas pu etablir decommunication avec le recepteur.Remarques*Si vous n'utilisez pas le clavier pendant plus de 20 minutes, les indicateurs s'eteignentet la communication entre le clavier et le recepteur risque d'etre deconnectee. Si cela seproduit, appuyez sur la touche Fn, puis verifiez que e ou E s'affiche avantl'utilisation.*Annulation du mode de veilleSur un ordinateur de bureau :Apres avoir appuye sur la touche (veille) pour annuler le mode de veille, assurez-vous que l'indicateur apparait. Si l'indicateur n'apparait pas, appuyez de nouveau sur latouche (veille).Sur un ordinateur portable :Appuyez sur n'importe quelle touche de votre ordinateur portable pour annuler le modede veille.Lorsque la duree de vie des piles du clavier est suffisante, es'affiche.E s'affiche lorsque les piles sont presque epuisees.Lorsque e clignote, la duree de vie des piles est suffisante,mais la communication entre le clavier et le recepteur a etedeconnectee.Lorsque E clignote, la duree de vie des piles n'est passuffisante et la communication entre le clavier et le recepteura ete deconnectee.Lorsque e et E clignotent, le clavier est en train d'etablirune communication avec le recepteur.S'allume lorsque le pave numerique est active.S'allume lorsque le verrouillage des majuscules est active.S'allume lorsque l'arret du defilement est active.
参考になったと評価  17人が参考になったと評価しています。
このマニュアルの目次
-
1 .Printed on 100% recycled ...Printed on 100% recycled paper usingVOC (Volatile Organic Compound)-freevegetable oil based ink.(C) 2004 Sony Corporation / Printed in JapanWireless KeyboardVGP-WKB1http://www.sony.net/2-190-351-01(1)取扱説明書 / Operating Instructions / Mode d'emploi/ Bedienu...
-
2 .2 JP警告表示の意味取扱説明書および製品では、次...2 JP警告表示の意味取扱説明書および製品では、次のような表示をしています。表示の内容をよく理解してから本文をお読みください。この表示の注意事項を守らないと、火災・感電などにより死亡や大けがなどの人身事故につながることがあります。この表示の注意事項を守らないと、感電やその他の事故によりけがをしたり周辺の家財に損害を与えたりすることがあります。行為を禁止する記号行為を指示する記号ソニー製品は安全に十分配慮して設計されています。しかし、電気製品はすべて、まちがった使いかたをすると、火災や感電などにより人身事故に...
-
3 .3 JPJP目次....................3 JPJP目次..................................................................................................4..................................................................................................5お使いになる前に.............................................
-
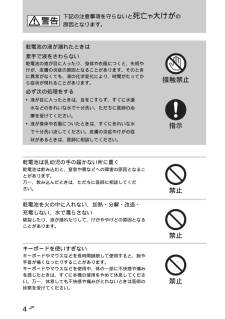
4 .4 JP乾電池の液が漏れたときは素手で液をさわらな...4 JP乾電池の液が漏れたときは素手で液をさわらない乾電池の液が目に入ったり、身体や衣服につくと、失明やけが、皮膚の炎症の原因となることがあります。そのときに異常がなくても、液の化学変化により、時間がたってから症状が現れることがあります。必ず次の処理をする*液が目に入ったときは、目をこすらず、すぐに水道水などのきれいな水で十分洗い、ただちに医師の治療を受けてください。*液が身体や衣服についたときは、すぐにきれいな水で十分洗い流してください。皮膚の炎症やけがの症状があるときは、医師に相談してください。乾電池は...
-
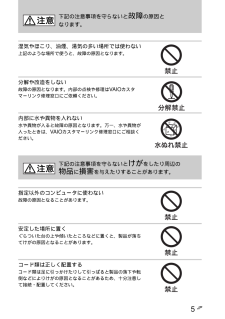
5 .5 JP湿気やほこり、油煙、湯気の多い場所では使わ...5 JP湿気やほこり、油煙、湯気の多い場所では使わない上記のような場所で使うと、故障の原因となります。分解や改造をしない故障の原因となります。内部の点検や修理はVAIOカスタマーリンク修理窓口にご依頼ください。内部に水や異物を入れない水や異物が入ると故障の原因となります。万一、水や異物が入ったときは、VAIOカスタマーリンク修理窓口にご相談ください。下記の注意事項を守らないと 故障 の原因となります。下記の注意事項を守らないと けが をしたり周辺の物品 に損害 を与えたりすることがあります。指定以外のコンピ...
-
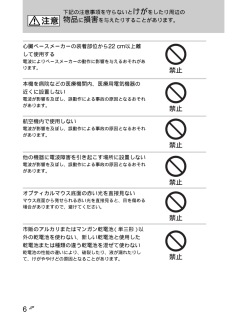
6 .6 JP心臓ペースメーカーの装着部位から22 cm...6 JP心臓ペースメーカーの装着部位から22 cm以上離して使用する電波によりペースメーカーの動作に影響を与えるおそれがあります。本機を病院などの医療機関内、医療用電気機器の近くに設置しない電波が影響を及ぼし、誤動作による事故の原因となるおそれがあります。航空機内で使用しない電波が影響を及ぼし、誤動作による事故の原因となるおそれがあります。他の機器に電波障害を引き起こす場所に設置しない電波が影響を及ぼし、誤動作による事故の原因となるおそれがあります。オプティカルマウス底面の赤い光を直接見ないマウス底面から発...
-
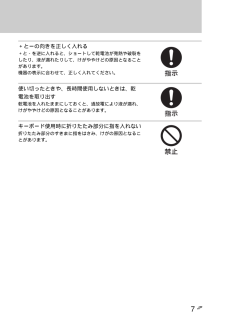
7 .7 JP+とーの向きを正しく入れる+と-を逆に入れ...7 JP+とーの向きを正しく入れる+と-を逆に入れると、ショートして乾電池が発熱や破裂をしたり、液が漏れたりして、けがややけどの原因となることがあります。機器の表示に合わせて、正しく入れてください。使い切ったときや、長時間使用しないときは、乾電池を取り出す乾電池を入れたままにしておくと、過放電により液が漏れ、けがややけどの原因となることがあります。キーボード使用時に折りたたみ部分に指を入れない折りたたみ部分のすきまに指をはさみ、けがの原因となることがあります。
-
8 .8 JP電波障害自主規制についてこの装置は、情報処...8 JP電波障害自主規制についてこの装置は、情報処理装置等電波障害自主規制協議会(VCCI)の基準に基づくクラスB情報技術装置です。この装置は、家庭環境で使用することを目的としていますが、この装置がラジオやテレビジョン受信機に近接して使用されると、受信障害を引き起こすことがあります。取扱説明書に従って正しい取り扱いをして下さい。電波法に基づく認証について本製品は、電波法に基づく小電力データ通信の無線設備として認証を受けています。従って、本製品を使用するときに無線局の免許は必要ありません。認証機器名:VGP-...
-
9 .準 備9 JPお使いになる前に本製品は、ソニー製コ...準 備9 JPお使いになる前に本製品は、ソニー製コンピュータ バイオのうち、Windows XPモデル専用のワイヤレスキーボードです(ただしPCV-LXシリーズを除く)。他のコンピュータではお使いになれません。ご注意ワイヤレスキーボード・マウスのレシーバーが内蔵されているコンピュータで本製品をお使いになる場合は、本製品に付属のレシーバーをコンピュータに接続してお使いください。
-
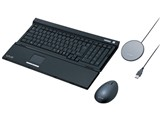
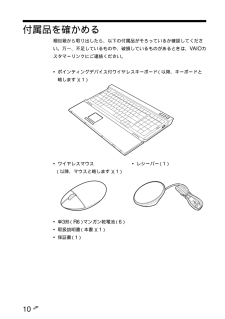
10 .10 JP付属品を確かめる梱包箱から取り出したら、...10 JP付属品を確かめる梱包箱から取り出したら、以下の付属品がそろっているか確認してください。万一、不足しているものや、破損しているものがあるときは、VAIOカスタマーリンクにご連絡ください。*ポインティングデバイス付ワイヤレスキーボード(以降、キーボードと略します)(1)*ワイヤレスマウス*レシーバー(1)(以降、マウスと略します)(1)*単3形(R6)マンガン乾電池(6)*取扱説明書(本書)(1)*保証書(1)
-
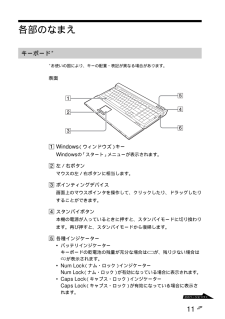
11 .準 備次のページにつづく 11 JP各部のなまえキ...準 備次のページにつづく 11 JP各部のなまえキーボード**お使いの国により、キーの配置・表記が異なる場合があります。表面1235641Windows(ウィンドウズ)キーWindowsの「スタート」メニューが表示されます。2左/右ボタンマウスの左/右ボタンに相当します。3ポインティングデバイス画面上のマウスポインタを操作して、クリックしたり、ドラッグしたりすることができます。4スタンバイボタン本機の電源が入っているときに押すと、スタンバイモードに切り換わります。再び押すと、スタンバイモードから復帰します。...
-
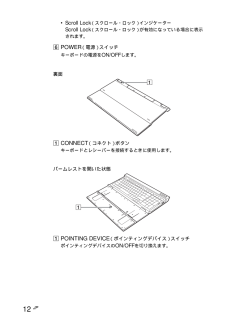
12 .12 JP*Scroll Lock(スクロール・ロ...12 JP*Scroll Lock(スクロール・ロック)インジケーターScroll Lock(スクロール・ロック)が有効になっている場合に表示されます。6POWER(電源)スイッチキーボードの電源をON/OFFします。裏面11CONNECT(コネクト)ボタンキーボードとレシーバーを接続するときに使用します。パームレストを開いた状態11POINTING DEVICE(ポインティングデバイス)スイッチポインティングデバイスのON/OFFを切り換えます。
-
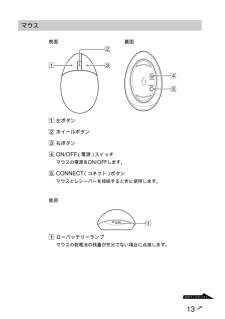
13 .準 備次のページにつづく 13 JPマウス表面 裏...準 備次のページにつづく 13 JPマウス表面 裏面132451左ボタン2ホイールボタン3右ボタン4ON/OFF(電源)スイッチマウスの電源をON/OFFします。5CONNECT(コネクト)ボタンマウスとレシーバーを接続するときに使用します。後部11ローバッテリーランプマウスの乾電池の残量が充分でない場合に点滅します。
-
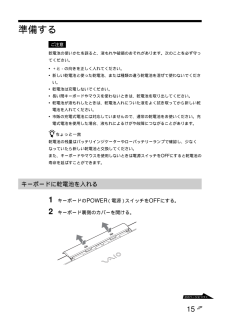
15 .準 備次のページにつづく 15 JP準備するご注意...準 備次のページにつづく 15 JP準備するご注意乾電池の使いかたを誤ると、液もれや破損のおそれがあります。次のことを必ず守ってください。*+と-の向きを正しく入れてください。*新しい乾電池と使った乾電池、または種類の違う乾電池を混ぜて使わないでください。*乾電池は充電しないでください。*長い間キーボードやマウスを使わないときは、乾電池を取り出してください。*乾電池が液もれしたときは、乾電池入れについた液をよく拭き取ってから新しい乾電池を入れてください。*市販の充電式電池には対応していませんので、通常の乾電...
-
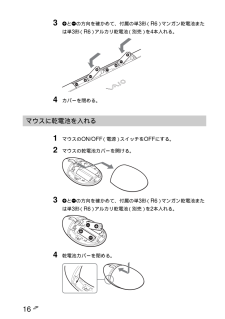
16 .16 JP3 eとEの方向を確かめて、付属の単3形...16 JP3 eとEの方向を確かめて、付属の単3形(R6)マンガン乾電池または単3形(R6)アルカリ乾電池(別売)を4本入れる。4 カバーを閉める。マウスに乾電池を入れる1 マウスのON/OFF(電源)スイッチをOFFにする。2 マウスの乾電池カバーを開ける。3 eとEの方向を確かめて、付属の単3形(R6)マンガン乾電池または単3形(R6)アルカリ乾電池(別売)を2本入れる。4 乾電池カバーを閉める。
-
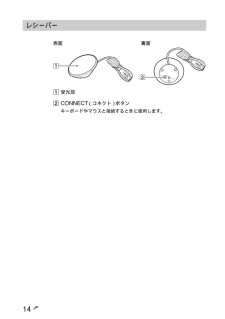
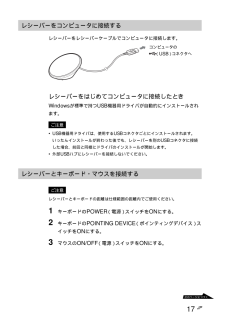
17 .準 備次のページにつづく 17 JPレシーバーをコ...準 備次のページにつづく 17 JPレシーバーをコンピュータに接続するレシーバーをレシーバーケーブルでコンピュータに接続します。レシーバーをはじめてコンピュータに接続したときWindowsが標準で持つUSB機器用ドライバが自動的にインストールされます。ご注意*USB機器用ドライバは、使用するUSBコネクタごとにインストールされます。いったんインストールが終わった後でも、レシーバーを別のUSBコネクタに接続した場合、前回と同様にドライバのインストールが開始します。*外部USBハブにレシーバーを接続しないでくだ...
-
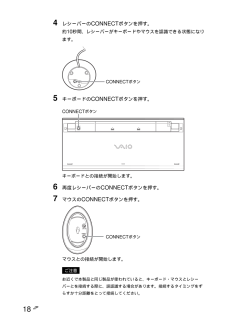
18 .18 JP4 レシーバーのCONNECTボタンを押...18 JP4 レシーバーのCONNECTボタンを押す。約10秒間、レシーバーがキーボードやマウスを認識できる状態になります。5 キーボードのCONNECTボタンを押す。キーボードとの接続が開始します。6 再度レシーバーのCONNECTボタンを押す。7 マウスのCONNECTボタンを押す。マウスとの接続が開始します。ご注意お近くで本製品と同じ製品が使われていると、キーボード・マウスとレシーバーとを接続する際に、誤認識する場合があります。接続するタイミングをずらすか十分距離をとって接続してください。CONNEC...
-
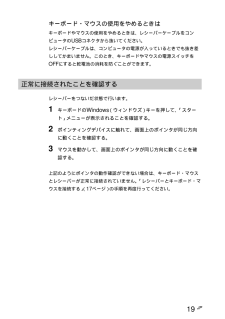
19 .準 備19 JPキーボード・マウスの使用をやめると...準 備19 JPキーボード・マウスの使用をやめるときはキーボードやマウスの使用をやめるときは、レシーバーケーブルをコンピュータのUSBコネクタから抜いてください。レシーバーケーブルは、コンピュータの電源が入っているときでも抜き差ししてかまいません。このとき、キーボードやマウスの電源スイッチをOFFにすると乾電池の消耗を防ぐことができます。正常に接続されたことを確認するレシーバーをつないだ状態で行います。1 キーボードのWindows(ウィンドウズ)キーを押して、「スタート」メニューが表示されることを確認する...
-
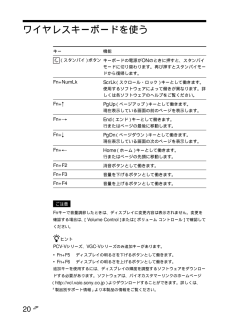
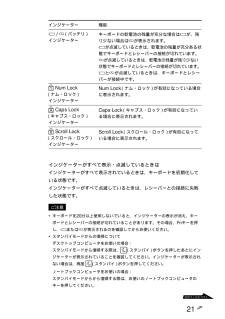
20 .20 JPワイヤレスキーボードを使うキー 機能 (...20 JPワイヤレスキーボードを使うキー 機能 (スタンバイ)ボタンFn+NumLkFn+RFn+tFn+rFn+TFn+F2Fn+F3Fn+F4ご注意Fnキーで音量調節したときは、ディスプレイに変更内容は表示されません。変更を確認する場合は、[Volume Control]または[ボリューム コントロール]で確認してください。z ヒントPCV-Vシリーズ、VGC-Vシリーズのみ追加キーがあります。*Fn+F5ディスプレイの明るさを下げるボタンとして働きます。*Fn+F6ディスプレイの明るさを上げるボタンと...
-
21 .準 備次のページにつづく 21 JPインジケーター...準 備次のページにつづく 21 JPインジケーター 機能e/E(バッテリ)インジケーター Num Lock(ナム・ロック)インジケーター Caps Lock(キャプス・ロック)インジケーター Scroll Lock(スクロール・ロック)インジケーターインジケーターがすべて表示・点滅しているときはインジケーターがすべて表示されているときは、キーボードを初期化している状態です。インジケーターがすべて点滅しているときは、レシーバーとの接続に失敗した状態です。ご注意*キーボードを20分以上使用しないでいると、インジ...
-
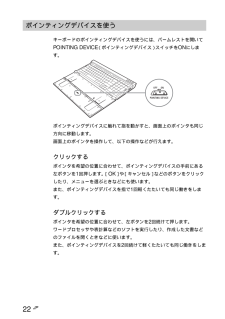
22 .22 JPポインティングデバイスを使うキーボードの...22 JPポインティングデバイスを使うキーボードのポインティングデバイスを使うには、パームレストを開いてPOINTING DEVICE(ポインティングデバイス)スイッチをONにします。ポインティングデバイスに触れて指を動かすと、画面上のポインタも同じ方向に移動します。画面上のポインタを操作して、以下の操作などが行えます。クリックするポインタを希望の位置に合わせて、ポインティングデバイスの手前にある左ボタンを1回押します。[OK]や[キャンセル]などのボタンをクリックしたり、メニューを選ぶときなどにも使います...
-
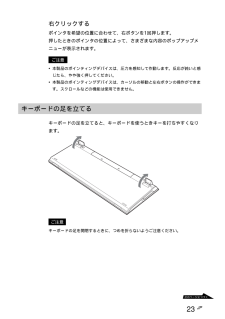
23 .準 備次のページにつづく 23 JP右クリックする...準 備次のページにつづく 23 JP右クリックするポインタを希望の位置に合わせて、右ボタンを1回押します。押したときのポインタの位置によって、さまざまな内容のポップアップメニューが表示されます。ご注意*本製品のポインティングデバイスは、圧力を感知して作動します。反応が鈍いと感じたら、やや強く押してください。*本製品のポインティングデバイスは、カーソルの移動と左右ボタンの操作ができます。スクロールなどの機能は使用できません。キーボードの足を立てるキーボードの足を立てると、キーボードを使うときキーを打ちやすくな...
-
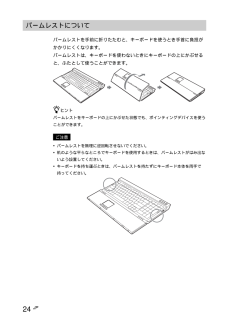
24 .24 JPパームレストについてパームレストを手前に...24 JPパームレストについてパームレストを手前に折りたたむと、キーボードを使うとき手首に負担がかかりにくくなります。パームレストは、キーボードを使わないときにキーボードの上にかぶせると、ふたとして使うことができます。z ヒントパームレストをキーボードの上にかぶせた状態でも、ポインティングデバイスを使うことができます。ご注意*パームレストを無理に逆回転させないでください。*机のような平らなところでキーボードを使用するときは、パームレストがはみ出ないよう設置してください。*キーボードを持ち運ぶときは、パームレ...
-
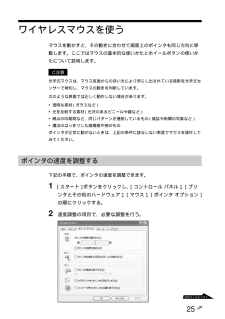
25 .準 備次のページにつづく 25 JPワイヤレスマウ...準 備次のページにつづく 25 JPワイヤレスマウスを使うマウスを動かすと、その動きに合わせて画面上のポインタも同じ方向に移動します。ここではマウスの基本的な使いかたとホイールボタンの使いかたについて説明します。ご注意光学式マウスは、マウス底面からの赤い光により照らし出されている陰影を光学式センサーで検知し、マウスの動きを判断しています。次のような表面では正しく動作しない場合があります。*透明な素材(ガラスなど)*光を反射する素材(光沢のあるビニールや鏡など)*網点の印刷物など、同じパターンが連続しているも...
-
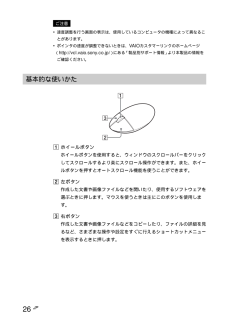
26 .26 JPご注意*速度調整を行う画面の表示は、使用...26 JPご注意*速度調整を行う画面の表示は、使用しているコンピュータの機種によって異なることがあります。*ポインタの速度が調整できないときは、VAIOカスタマーリンクのホームページ(http://vcl.vaio.sony.co.jp/)にある「製品別サポート情報」より本製品の情報をご確認ください。基本的な使いかた1321ホイールボタンホイールボタンを使用すると、ウィンドウのスクロールバーをクリックしてスクロールするより楽にスクロール操作ができます。また、ホイールボタンを押すとオートスクロール機能を使うこ...
-
27 .27 JP使用上のご注意キーボード・マウスの操作距...27 JP使用上のご注意キーボード・マウスの操作距離についてキーボード・マウスの最長接続可能距離は、レシーバーから10 m以内とされています。しかし使用環境によっては、電波の到達距離が極端に短くなり、正常に動作しないことがあります。本製品が正常に動作しないときは、下記の環境で使用するようにしてください。*コンピュータやディスプレイなどの電子機器から20 cm以上離す。*キーボードやマウスにより近い位置にレシーバーを設置する。*マウスパッドを使用する。ポインティングデバイスの操作感についてお使いのコンピュータ...
-
28 .28 JPお手入れ表面のゴミやほこりなどは、乾いた...28 JPお手入れ表面のゴミやほこりなどは、乾いた布で軽く拭き取ってください。ご注意*本機を掃除するときは、必ずコンピュータから取りはずしてください。*濡れたもので本機を拭かないでください。内部に水が入ると故障の原因となります。*アルコールやシンナーなど揮発性のものは、表面の仕上げを傷めますので使わないでください。化学ぞうきんを使うときはその注意書に従ってください。*お手入れするときは、必ず乾電池を取り出してください。保証書とアフターサービス保証書*この製品は保証書が添付されていますので、お買い上げの際、お...
-
29 .次のページにつづく 29 JP修理について当社では...次のページにつづく 29 JP修理について当社では本製品の修理は引取修理を行っています。当社指定業者がお客様宅に修理機器をお引き取りにうかがい、修理完了後にお届けします。詳しくは、VAIOカスタマーリンクへご連絡ください。修理用補修部品についてソニーでは、長期にわたる修理部品のご提供、ならびに環境保護などのため、修理サービスご提供の際に、再生部品を使用することがあります。また原則として交換した部品は、上記の理由によりソニーの所有物として回収させていただいておりますので、あらかじめご了承ください。部品の保有期...
-
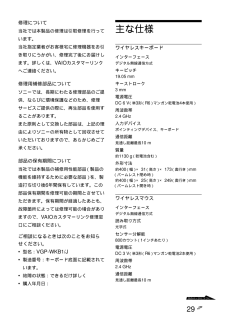
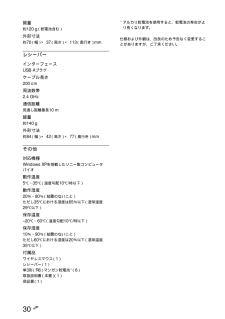
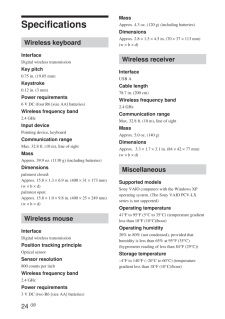
30 .30 JP質量約120 g(乾電池含む)外形寸法約...30 JP質量約120 g(乾電池含む)外形寸法約70(幅) × 37(高さ) × 113(奥行き) mmレシーバーインターフェースUSB Aプラグケーブル長さ200 cm周波数帯2.4 GHz通信距離見通し距離最長10 m質量約140 g外形寸法約84(幅) × 42(高さ) × 77(奥行き) mmその他対応機種Windows XPを搭載したソニー製コンピュータバイオ動作温度5℃~35℃(温度勾配10℃/時以下)動作湿度20%~80%(結露のないこと)ただし35℃における湿度は65%以下(湿球温度29℃...
-
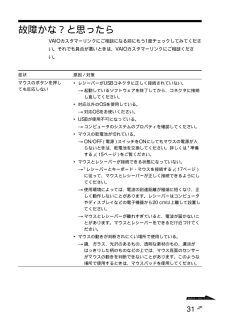
31 .次のページにつづく 31 JP故障かな?と思ったら...次のページにつづく 31 JP故障かな?と思ったらVAIOカスタマーリンクにご相談になる前にもう1度チェックしてみてください。それでも具合が悪いときは、VAIOカスタマーリンクにご相談ください。症状マウスのボタンを押しても反応しない原因/対策*レシーバーがUSBコネクタに正しく接続されていない。t起動しているソフトウェアを終了してから、コネクタに接続し直してください。*対応以外のOSを使用している。t対応OSをお使いください。*USBが使用不可になっている。tコンピュータのシステムのプロパティを確認してくだ...
-
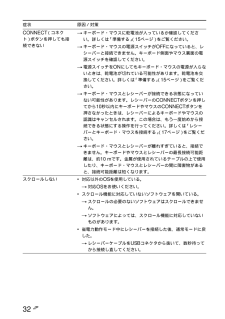
32 .32 JP症状CONNECT(コネクト)ボタンを押...32 JP症状CONNECT(コネクト)ボタンを押しても接続できないスクロールしない原因/対策tキーボード・マウスに乾電池が入っているか確認してください。詳しくは「準備する」(15ページ)をご覧ください。tキーボード・マウスの電源スイッチがOFFになっていると、レシーバーと接続できません。キーボード側面やマウス裏面の電源スイッチを確認してください。t電源スイッチをONにしてもキーボード・マウスの電源が入らないときは、乾電池が切れている可能性があります。乾電池を交換してください。詳しくは「準備する」(15ペー...
-
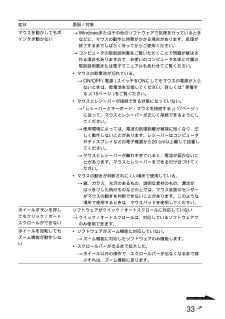
33 .次のページにつづく 33 JP症状マウスを動かして...次のページにつづく 33 JP症状マウスを動かしてもポインタが動かないホイールボタンを押してもクリック/オートスクロールができないホイールを回転してもズーム機能が動作しない原因/対策tWindowsまたはその他のソフトウェアで処理を行っているときなどに、マウスの動作に時間がかかる場合があります。処理が終了するまでしばらく待ってからご使用ください。tコンピュータの取扱説明書をご覧いただくことで問題が解決される場合もありますので、お使いのコンピュータ本体に付属の取扱説明書または電子マニュアルもあわせてご覧くださ...
-
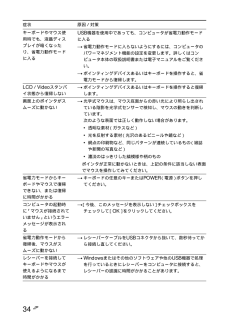
34 .34 JP症状キーボードやマウス使用時でも、液晶デ...34 JP症状キーボードやマウス使用時でも、液晶ディスプレイが暗くなったり、省電力動作モードに入るLCD/Videoスタンバイ状態から復帰しない画面上のポインタがスムーズに動かない省電力モードからキーボードやマウスで復帰できない、または復帰に時間がかかるコンピュータの起動時に「マウスが接続されていません」というエラーメッセージが表示される省電力動作モードから復帰後、マウスがスムーズに動かないレシーバーを接続してキーボードやマウスが使えるようになるまで時間がかかる原因/対策USB機器を使用中であっても、コンピ...
-
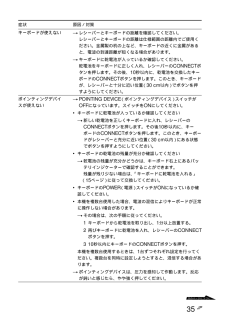
35 .次のページにつづく 35 JP症状キーボードが使え...次のページにつづく 35 JP症状キーボードが使えないポインティングデバイスが使えない原因/対策tレシーバーとキーボードの距離を確認してください。レシーバーとキーボードの距離は仕様範囲の距離内でご使用ください。金属製の机の上など、キーボードの近くに金属があると、電波の到達距離が短くなる場合があります。tキーボードに乾電池が入っているか確認してください。乾電池をキーボードに正しく入れ、レシーバーのCONNECTボタンを押します。その後、10秒以内に、乾電池を交換したキーボードのCONNECTボタンを押します。...
-
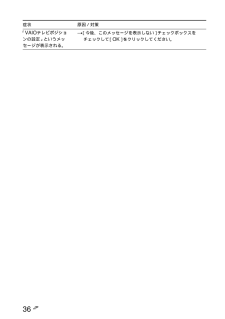
36 .36 JP症状「VAIOテレビポジションの設定」と...36 JP症状「VAIOテレビポジションの設定」というメッセージが表示される。原因/対策t[今後、このメッセージを表示しない]チェックボックスをチェックして[OK]をクリックしてください。
-
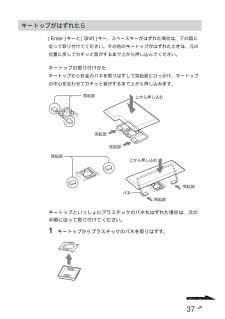
37 .次のページにつづく 37 JPキートップがはずれた...次のページにつづく 37 JPキートップがはずれたら[Enter]キーと[Shift]キー、スペースキーがはずれた場合は、下の図に従って取り付けてください。その他のキートップがはずれたときは、元の位置に戻してカチッと音がするまで上から押し込んでください。キートップの取り付けかたキートップから針金のバネを取りはずして突起部にひっかけ、キートップの中心を合わせてカチッと音がするまで上から押し込みます。キートップといっしょにプラスチックのバネもはずれた場合は、次の手順に従って取り付けてください。1 キートップから...
-
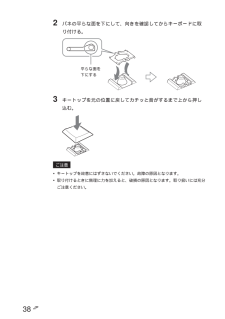
38 .38 JP2 バネの平らな面を下にして、向きを確認...38 JP2 バネの平らな面を下にして、向きを確認してからキーボードに取り付ける。3 キートップを元の位置に戻してカチッと音がするまで上から押し込む。ご注意*キートップを故意にはずさないでください。故障の原因となります。*取り付けるときに無理に力を加えると、破損の原因となります。取り扱いには充分ご注意ください。平らな面を下にする
-
39 .39 JPお問い合わせ先について「故障かな?と思っ...39 JPお問い合わせ先について「故障かな?と思ったら」の項目をチェックしても具合が悪いときは、以下のお問い合わせ先にご相談ください。VAIOカスタマーリンク電話番号(0466)30-3000受付時間平日10時~20時土、日、祝日10時~17時(年末年始は除く)お電話は音声認識を用いた自動音声のアナウンスに従って、ご希望のメニューをお選びください。各メニューの担当オペレーターが対応いたします。お電話の前に以下の内容をご用意ください。1お客様のVAIOカスタマーID(ご登録いただいている場合)2カスタマー登録...
-
40 .2 GBEnglishWARNINGTo prev...2 GBEnglishWARNINGTo prevent fire or shock hazard,do not expose the unit to rain ormoisture.Owner's RecordThe model number and the serial number are locatedon the bottom of the keyboard. Record the serialnumber in the space provided below. Refer to thisnum...
-
41 .3 GBIt also complies with...3 GBIt also complies with the EN 60825-1, beingclassified as a CLASS 1 LED product.Repair and maintenance only by authorized Sonytechnicians. Improper use and repairs can create asafety hazard.This equipment has been tested and found tocomply with the limi...
-
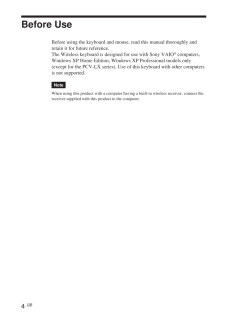
42 .4 GBBefore UseBefore usin...4 GBBefore UseBefore using the keyboard and mouse, read this manual thoroughly andretain it for future reference.The Wireless keyboard is designed for use with Sony VAIO(R) computers,Windows XP Home Edition, Windows XP Professional models only(except for t...
-
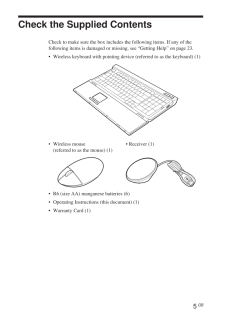
43 .5 GBCheck the Supplied Co...5 GBCheck the Supplied ContentsCheck to make sure the box includes the following items. If any of thefollowing items is damaged or missing, see "Getting Help" on page 23.*Wireless keyboard with pointing device (referred to as the keyboard) (1)*Wireless mou...
-
44 .6 GBNames of PartsKeyboar...6 GBNames of PartsKeyboard**Keyboard layout and special characters may vary depending on your country or region.Top1235641Windows keyThe Windows "Start" menu appears.2Left/right buttonUsed as the left and right mouse buttons.3Pointing deviceControls the on...
-
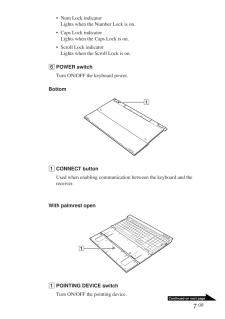
45 .7 GBContinued on next pag...7 GBContinued on next page*Num Lock indicatorLights when the Number Lock is on.*Caps Lock indicatorLights when the Caps Lock is on.*Scroll Lock indicatorLights when the Scroll Lock is on.6POWER switchTurn ON/OFF the keyboard power.Bottom11CONNECT buttonUse...
-
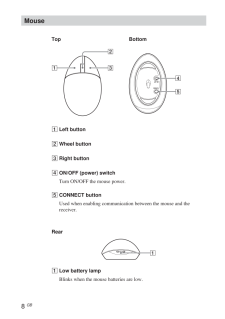
46 .8 GBMouseTop Bottom132451...8 GBMouseTop Bottom132451Left button2Wheel button3Right button4ON/OFF (power) switchTurn ON/OFF the mouse power.5CONNECT buttonUsed when enabling communication between the mouse and thereceiver.Rear11Low battery lampBlinks when the mouse batteries are low.
-
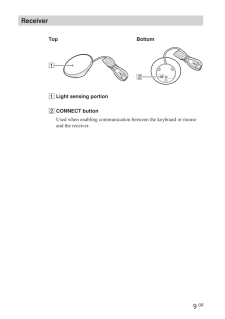
47 .9 GBReceiverTop Bottom121...9 GBReceiverTop Bottom121Light sensing portion2CONNECT buttonUsed when enabling communication between the keyboard or mouseand the receiver.
-
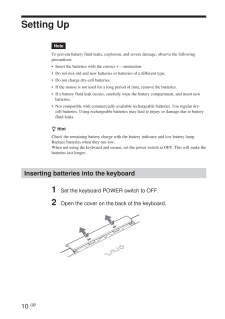
48 .10 GBSetting UpNoteTo pr...10 GBSetting UpNoteTo prevent battery fluid leaks, explosion, and severe damage, observe the followingprecautions.*Insert the batteries with the correct + - orientation.*Do not mix old and new batteries or batteries of a different type.*Do not charge dry-...
-
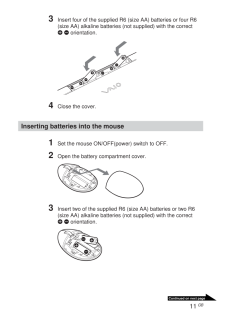
49 .11 GBContinued on next pa...11 GBContinued on next page3 Insert four of the supplied R6 (size AA) batteries or four R6(size AA) alkaline batteries (not supplied) with the correcteE orientation.4 Close the cover.Inserting batteries into the mouse1 Set the mouse ON/OFF(power) switch to...
-
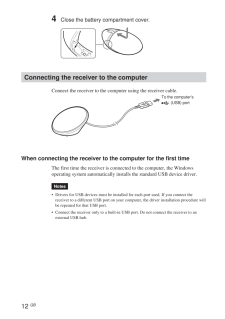
50 .12 GB4 Close the battery...12 GB4 Close the battery compartment cover.Connecting the receiver to the computerConnect the receiver to the computer using the receiver cable.When connecting the receiver to the computer for the first timeThe first time the receiver is connected to the ...
-
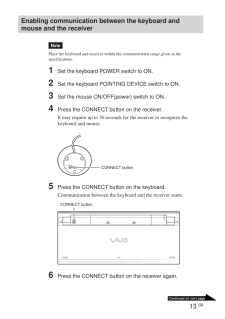
51 .13 GBContinued on next pa...13 GBContinued on next pageEnabling communication between the keyboard andmouse and the receiverNotePlace the keyboard and receiver within the communication range given in thespecifications.1 Set the keyboard POWER switch to ON.2 Set the keyboard POINTING ...
-
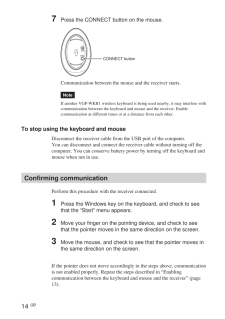
52 .14 GB7 Press the CONNECT...14 GB7 Press the CONNECT button on the mouse.Communication between the mouse and the receiver starts.NoteIf another VGP-WKB1 wireless keyboard is being used nearby, it may interfere withcommunication between the keyboard and mouse and the receiver. Enable...
-
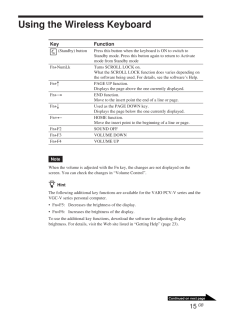
53 .15 GBContinued on next pa...15 GBContinued on next pageUsing the Wireless KeyboardKey Function (Standby) buttonFn+NumLkFn+RFn+tFn+rFn+ TFn+F2Fn+F3Fn+F4NoteWhen the volume is adjusted with the Fn key, the changes are not displayed on thescreen. You can check the changes in "Volume Con...
-
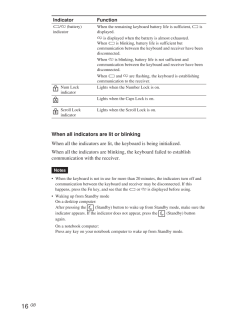
54 .16 GBIndicator Functione...16 GBIndicator Functione/E (battery)indicatorNum LockindicatorScroll LockindicatorWhen all indicators are lit or blinkingWhen all the indicators are lit, the keyboard is being initialized.When all the indicators are blinking, the keyboard failed to establ...
-
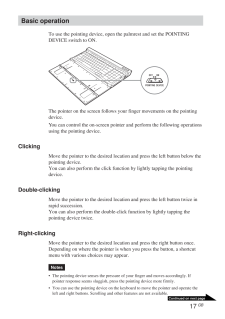
55 .17 GBContinued on next pa...17 GBContinued on next pageBasic operationTo use the pointing device, open the palmrest and set the POINTINGDEVICE switch to ON.The pointer on the screen follows your finger movements on the pointingdevice.You can control the on-screen pointer and perform ...
-
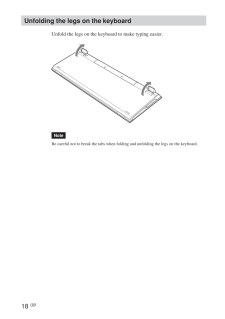
56 .18 GBUnfolding the legs ...18 GBUnfolding the legs on the keyboardUnfold the legs on the keyboard to make typing easier.NoteBe careful not to break the tabs when folding and unfolding the legs on the keyboard.
-
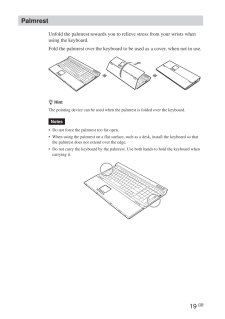
57 .19 GBPalmrestUnfold the p...19 GBPalmrestUnfold the palmrest towards you to relieve stress from your wrists whenusing the keyboard.Fold the palmrest over the keyboard to be used as a cover, when not in use.z HintThe pointing device can be used when the palmrest is folded over the key...
-
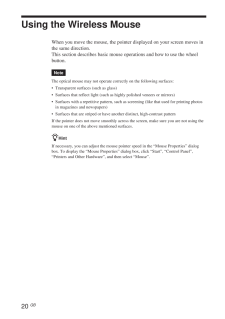
58 .20 GBUsing the Wireless ...20 GBUsing the Wireless MouseWhen you move the mouse, the pointer displayed on your screen moves inthe same direction.This section describes basic mouse operations and how to use the wheelbutton.NoteThe optical mouse may not operate correctly on the follo...
-
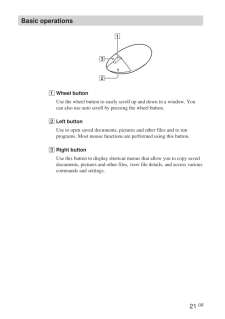
59 .21 GBBasic operations1321...21 GBBasic operations1321Wheel buttonUse the wheel button to easily scroll up and down in a window. Youcan also use auto scroll by pressing the wheel button.2Left buttonUse to open saved documents, pictures and other files and to runprograms. Most mouse fu...
-
60 .22 GBPrecautionsOperatin...22 GBPrecautionsOperating range for thekeyboard and mouseThe maximum communication range forthe keyboard and mouse is 32.81 ft. (10m) from the receiver. Depending on theusage environment, sometimes the usabledistance may be shorter, preventingnormal opera...
-
61 .23 GBGetting HelpThis sec...23 GBGetting HelpThis section provides information on howto get help and support from Sony, andtroubleshooting tips for your keyboard andmouse.Sony support optionsSony provides several support options foryour unit. When you have questions aboutyour keyboar...
-
62 .24 GBMassApprox. 4.3 oz....24 GBMassApprox. 4.3 oz. (120 g) (including batteries)DimensionsApprox. 2.8 × 1.5 × 4.5 in. (70 × 37 × 113 mm)(w × h × d)Wireless receiverInterfaceUSB ACable length78.7 in. (200 cm)Wireless frequency band2.4 GHzCommunication rangeMax. 32.8 ft. (10 m), lin...
-
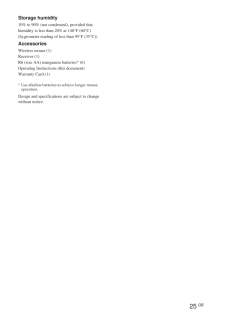
63 .25 GBStorage humidity10% ...25 GBStorage humidity10% to 90% (not condensed), provided thathumidity is less than 20% at 140F (60C)(hygrometer reading of less than 95F (35C))AccessoriesWireless mouse (1)Receiver (1)R6 (size AA) manganese batteries* (6)Operating Instructions (this docum...
-
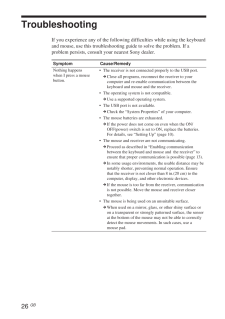
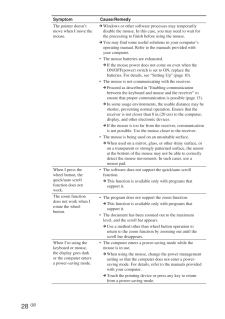
64 .26 GBTroubleshootingIf y...26 GBTroubleshootingIf you experience any of the following difficulties while using the keyboardand mouse, use this troubleshooting guide to solve the problem. If aproblem persists, consult your nearest Sony dealer.Symptom Cause/RemedyNothing happenswhen ...
-
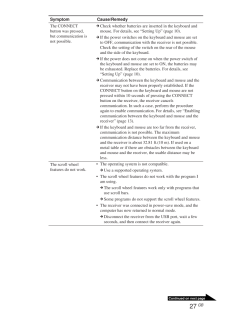
65 .27 GBContinued on next pa...27 GBContinued on next pageSymptom Cause/RemedyThe CONNECTbutton was pressed,but communication isnot possible.The scroll wheelfeatures do not work.cCheck whether batteries are inserted in the keyboard andmouse. For details, see "Setting Up" (page 10).cIf t...
-
66 .28 GBSymptom Cause/Remed...28 GBSymptom Cause/RemedyThe pointer doesn'tmove when I move themouse.When I press thewheel button, thequick/auto scrollfunction does notwork.The zoom functiondoes not work when Irotate the wheelbutton.When I'm using thekeyboard or mouse,the display goes ...
-
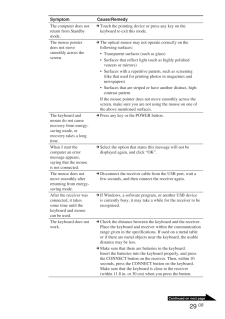
67 .29 GBContinued on next pa...29 GBContinued on next pageSymptom Cause/RemedyThe computer does notreturn from Standbymode.The mouse pointerdoes not movesmoothly across thescreen.The keyboard andmouse do not causerecovery from energy-saving mode, orrecovery takes a longtime.When I start...
-
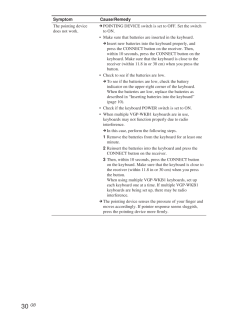
68 .30 GBSymptom Cause/Remed...30 GBSymptom Cause/RemedyThe pointing devicedoes not work.cPOINTING DEVICE switch is set to OFF. Set the switchto ON.*Make sure that batteries are inserted in the keyboard.cInsert new batteries into the keyboard properly, andpress the CONNECT button on th...
-
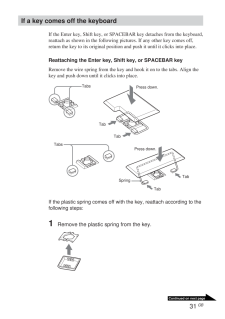
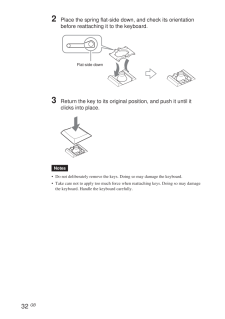
69 .31 GBContinued on next pa...31 GBContinued on next pageIf a key comes off the keyboardIf the Enter key, Shift key, or SPACEBAR key detaches from the keyboard,reattach as shown in the following pictures. If any other key comes off,return the key to its original position and push it un...
-
70 .32 GB2 Place the spring ...32 GB2 Place the spring flat-side down, and check its orientationbefore reattaching it to the keyboard.3 Return the key to its original position, and push it until itclicks into place.Notes*Do not deliberately remove the keys. Doing so may damage the keyb...
-
71 .71 ページ目のマニュアル
-
72 .2 FRFrancaisAVERTISSEMENT...2 FRFrancaisAVERTISSEMENTPour prevenir tout risqued'incendie ou d'electrocution,gardez cet appareil a l'abri de lapluie et de l'humidite.Cet appareil contient les equipements sans filsuivants :clavier (VGP-WKB1/U*), souris (VGP-WMS1) etrecepteur (VGP-WRC1)...
-
73 .3 FRAvant l'utilisationAv...3 FRAvant l'utilisationAvant d'utiliser le clavier et la souris, veuillez lire attentivement ce manuel,a conserver pour reference ulterieure.Le clavier sans fil est concu pour etre utilise avec les ordinateurs VAIO(R) deSony, modeles Windows XP Edition fam...
-
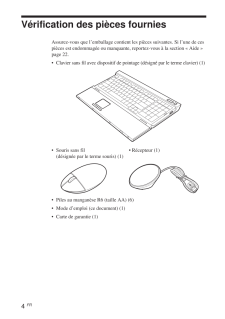
74 .4 FRVerification des piec...4 FRVerification des pieces fourniesAssurez-vous que l'emballage contient les pieces suivantes. Si l'une de cespieces est endommagee ou manquante, reportez-vous a la section << Aide >>page 22.*Clavier sans fil avec dispositif de pointage (designe par le te...
-
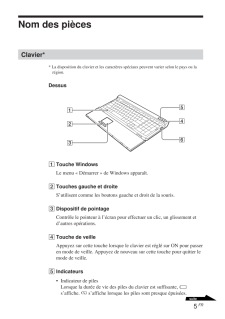
75 .5 FRsuiteNom des piecesCl...5 FRsuiteNom des piecesClavier** La disposition du clavier et les caracteres speciaux peuvent varier selon le pays ou laregion.Dessus1235641Touche WindowsLe menu << Demarrer >> de Windows apparait.2Touches gauche et droiteS'utilisent comme les boutons gauc...
-
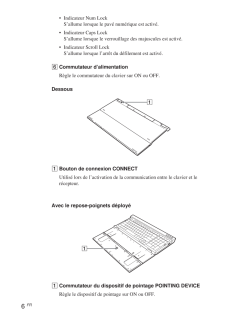
76 .6 FR*Indicateur Num LockS...6 FR*Indicateur Num LockS'allume lorsque le pave numerique est active.*Indicateur Caps LockS'allume lorsque le verrouillage des majuscules est active.*Indicateur Scroll LockS'allume lorsque l'arret du defilement est active.6Commutateur d'alimentationRegle ...
-
77 .7 FRsuiteSourisDessus Des...7 FRsuiteSourisDessus Dessous132451Bouton gauche2Bouton molette3Bouton droit4Commutateur ON/OFFRegle l'alimentation de la souris sur ON ou OFF.5Bouton de connexion CONNECTUtilise lors de l'activation de la communication entre la souris et lerecepteur.Arrie...
-
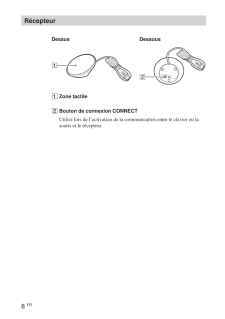
78 .8 FRRecepteurDessus Desso...8 FRRecepteurDessus Dessous121Zone tactile2Bouton de connexion CONNECTUtilise lors de l'activation de la communication entre le clavier ou lasouris et le recepteur.
-
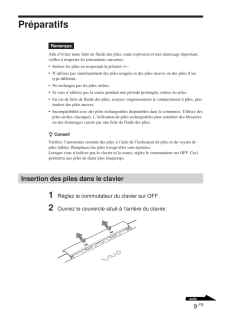
79 .9 FRsuitePreparatifsRemar...9 FRsuitePreparatifsRemarqueAfin d'eviter toute fuite de fluide des piles, toute explosion et tout dommage important,veillez a respecter les precautions suivantes.*Inserez les piles en respectant la polarite +/-.*N'utilisez pas simultanement des piles usag...
-
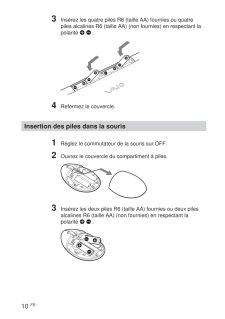
80 .10 FR3 Inserez les quatr...10 FR3 Inserez les quatre piles R6 (taille AA) fournies ou quatrepiles alcalines R6 (taille AA) (non fournies) en respectant lapolarite eE .4 Refermez le couvercle.Insertion des piles dans la souris1 Reglez le commutateur de la souris sur OFF.2 Ouvrez le ...
-
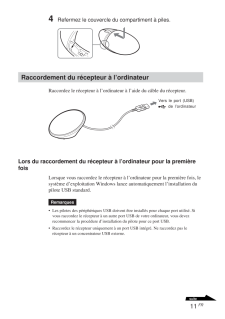
81 .11 FRsuite4 Refermez le c...11 FRsuite4 Refermez le couvercle du compartiment a piles.Raccordement du recepteur a l'ordinateurRaccordez le recepteur a l'ordinateur a l'aide du cable du recepteur.Lors du raccordement du recepteur a l'ordinateur pour la premierefoisLorsque vous raccord...
-
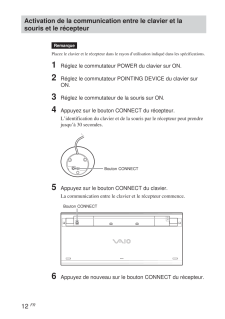
82 .12 FRActivation de la co...12 FRActivation de la communication entre le clavier et lasouris et le recepteurRemarquePlacez le clavier et le recepteur dans le rayon d'utilisation indique dans les specifications.1 Reglez le commutateur POWER du clavier sur ON.2 Reglez le commutateur P...
-
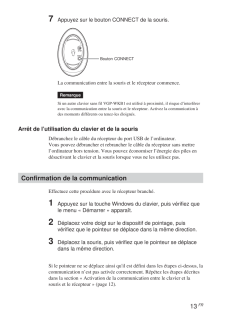
83 .13 FR7 Appuyez sur le bou...13 FR7 Appuyez sur le bouton CONNECT de la souris.La communication entre la souris et le recepteur commence.RemarqueSi un autre clavier sans fil VGP-WKB1 est utilise a proximite, il risque d'interfereravec la communication entre la souris et le recepteur. ...
-
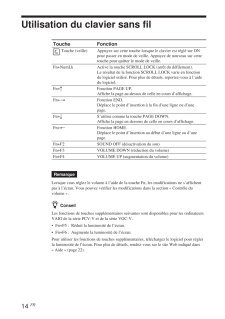
84 .14 FRUtilisation du clav...14 FRUtilisation du clavier sans filTouche Fonction Touche (veille)Fn+NumLkFn+RFn+tFn+rFn+TFn+F2Fn+F3Fn+F4RemarqueLorsque vous reglez le volume a l'aide de la touche Fn, les modifications ne s'affichentpas a l'ecran. Vous pouvez verifier les modifications...
-
85 .15 FRsuiteIndicateur Fonc...15 FRsuiteIndicateur Fonctione/E Indicateur(piles)IndicateurNum LockIndicateurCaps LockIndicateurScroll LockLorsque tous les indicateurs sont allumes ou qu'ils clignotentLorsque tous les indicateurs sont allumes, le clavier est en cours dereinitialisation....
-
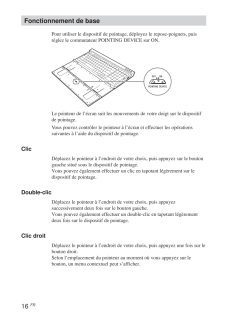
86 .16 FRFonctionnement de b...16 FRFonctionnement de basePour utiliser le dispositif de pointage, deployez le repose-poignets, puisreglez le commutateur POINTING DEVICE sur ON.Le pointeur de l'ecran suit les mouvements de votre doigt sur le dispositifde pointage.Vous pouvez controler ...
-
87 .17 FRsuiteRemarques*Le di...17 FRsuiteRemarques*Le dispositif de pointage detecte la pression de votre doigt et se deplace enconsequence. Si le pointeur est lent, appuyez plus fermement sur le dispositif depointage.*Vous pouvez utiliser le dispositif de pointage du clavier pour depla...
-
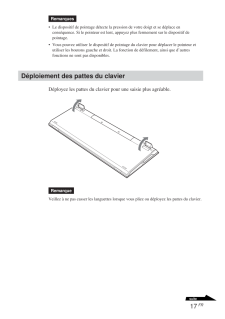
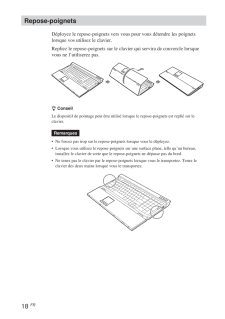
88 .18 FRRepose-poignetsDepl...18 FRRepose-poignetsDeployez le repose-poignets vers vous pour vous detendre les poignetslorsque vos utilisez le clavier.Repliez le repose-poignets sur le clavier qui servira de couvercle lorsquevous ne l'utiliserez pas.z ConseilLe dispositif de pointage ...
-
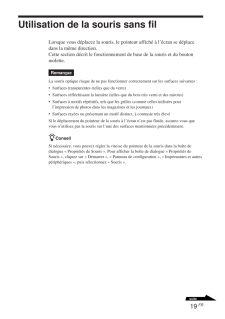
89 .19 FRsuiteUtilisation de ...19 FRsuiteUtilisation de la souris sans filLorsque vous deplacez la souris, le pointeur affiche a l'ecran se deplacedans la meme direction.Cette section decrit le fonctionnement de base de la souris et du boutonmolette.RemarqueLa souris optique risque de n...
-
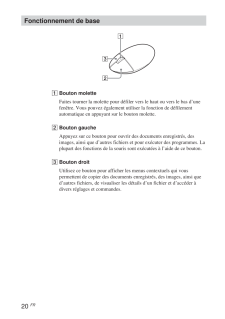
90 .20 FRFonctionnement de b...20 FRFonctionnement de base1321Bouton moletteFaites tourner la molette pour defiler vers le haut ou vers le bas d'unefenetre. Vous pouvez egalement utiliser la fonction de defilementautomatique en appuyant sur le bouton molette.2Bouton gaucheAppuyez sur c...
-
91 .21 FRPrecautionsRayon d'u...21 FRPrecautionsRayon d'utilisation duclavier et de la sourisLe clavier et la souris peuvent etre utilisesdans un rayon de 10 m maximum autourdu recepteur. Selon l'environnementd'utilisation, il se peut que cette distancesoit reduite, empechant ainsi uneut...
-
92 .22 FRAideCette section f...22 FRAideCette section fournit des informations surl'aide et l'assistance technique offertes parSony et vous donne des conseils dedepannage pour votre clavier et votresouris.Options d'assistancetechnique de SonySony offre plusieurs options d'assistancetec...
-
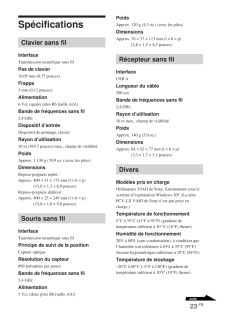
93 .23 FRsuitePoidsApprox. 1223 FRsuitePoidsApprox. 120 g (4,3 oz.) (avec les piles)DimensionsApprox. 70 × 37 × 113 mm (l × h × p)(2,8 × 1,5 × 4,5 pouces)Recepteur sans filInterfaceUSB ALongueur du cable200 cmBande de frequences sans fil2,4 GHzRayon d'utilisation10 m max., champ de vi...
-
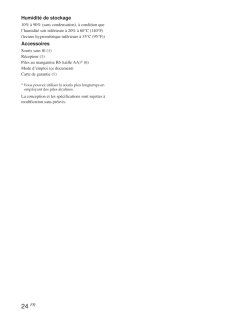
94 .24 FRHumidite de stockag...24 FRHumidite de stockage10% a 90% (sans condensation), a condition quel'humidite soit inferieure a 20% a 60C (140F)(lecture hygrometrique inferieure a 35C (95F))AccessoiresSouris sans fil (1)Recepteur (1)Piles au manganese R6 (taille AA)* (6)Mode d'emplo...
-
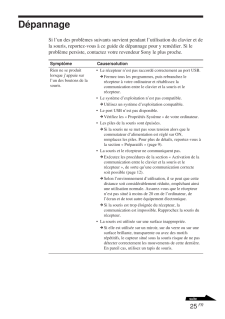
95 .25 FRsuiteDepannageSi l'u...25 FRsuiteDepannageSi l'un des problemes suivants survient pendant l'utilisation du clavier et dela souris, reportez-vous a ce guide de depannage pour y remedier. Si leprobleme persiste, contactez votre revendeur Sony le plus proche.Symptome Cause/solution...
-
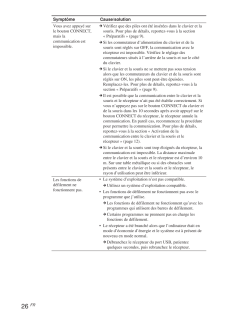
96 .26 FRSymptome Cause/solu...26 FRSymptome Cause/solutionVous avez appuye surle bouton CONNECT,mais lacommunication estimpossible.Les fonctions dedefilement nefonctionnent pas.cVerifiez que des piles ont ete inserees dans le clavier et lasouris. Pour plus de details, reportez-vous a ...
-
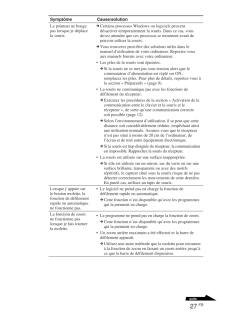
97 .27 FRsuiteSymptome Cause/...27 FRsuiteSymptome Cause/solutionLe pointeur ne bougepas lorsque je deplacela souris.Lorsque j'appuie surle bouton molette, lafonction de defilementrapide ou automatiquene fonctionne pas.La fonction de zoomne fonctionne paslorsque je fais tournerla molette...
-
98 .28 FRSymptome Cause/solu...28 FRSymptome Cause/solutionPendant que j'utilise leclavier ou la souris,l'ecran devient noir oul'ordinateur passe enmode d'economied'energie.L'ordinateur ne quittepas le mode de veille.Le deplacement dupointeur a l'ecrann'est pas fluide.Le clavier et la ...
-
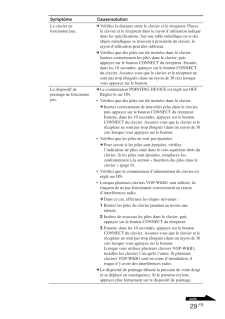
99 .29 FRsuiteSymptome Cause/...29 FRsuiteSymptome Cause/solutionLe clavier nefonctionne pas.Le dispositif depointage ne fonctionnepas.cVerifiez la distance entre le clavier et le recepteur. Placezle clavier et le recepteur dans le rayon d'utilisation indiquedans les specifications. Sur ...
-
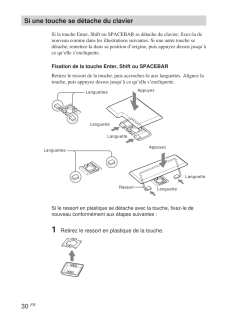
100 .30 FRSi une touche se de...30 FRSi une touche se detache du clavierSi la touche Enter, Shift ou SPACEBAR se detache du clavier, fixez-la denouveau comme dans les illustrations suivantes. Si une autre touche sedetache, remettez-la dans sa position d'origine, puis appuyez dessus jusq...