MINIの取扱説明書・マニュアル [全269ページ 8.83MB]


5


181 / 269 ページ
181 / 269 ページ


現在のページURL
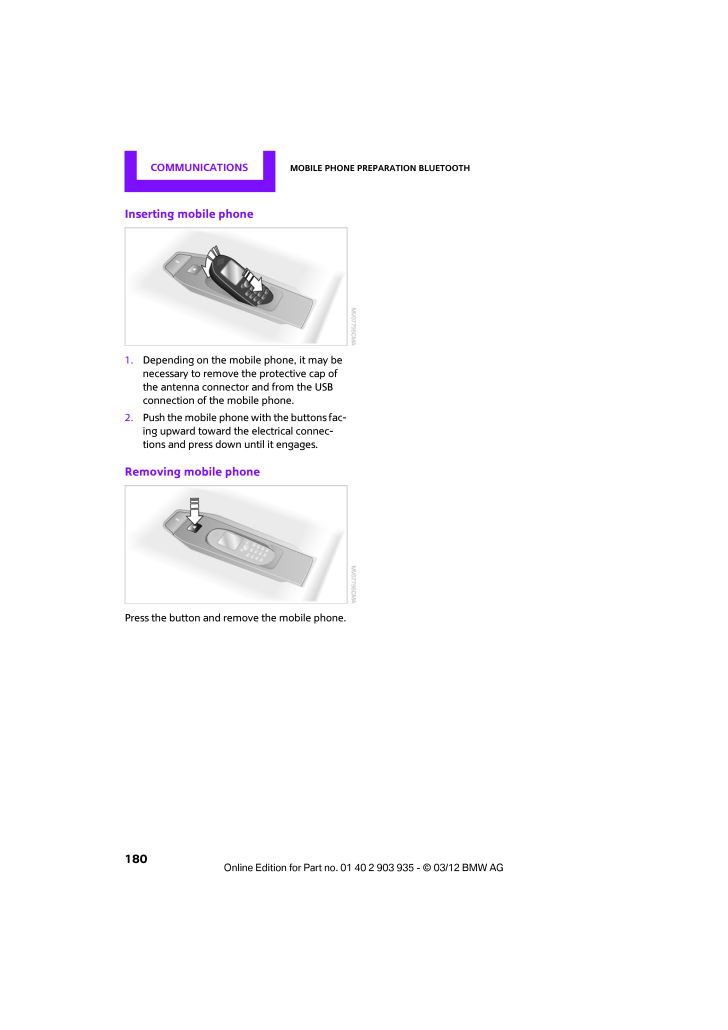
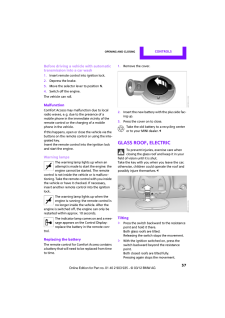
COMMUNICATIONS Mobile phone preparation Bluetooth180Inserting mobile phone1.Depending on the mobile phone, it may be necessary to remove the protective cap of the antenna connector and from the USB connection of the mobile phone.2.Push the mobile phone with the buttons fac-ing upward toward the electrical connec-tions and press down until it engages.Removing mobile phonePress the button and remove the mobile phone.
参考になったと評価  5人が参考になったと評価しています。


このマニュアルの目次
-
2 .CooperCooper SJohn Cooper...CooperCooper SJohn CooperWorksCongratulations on your new MINIThis Owner's Manual should be considered a permanent part of this vehicle. It should stay with the vehicle when sold to provide the next owner with important operating, safety and mainte-nance i...
-
3 .(C) 2012 Bayerische Motor...(C) 2012 Bayerische Motoren WerkeAktiengesellschaftMunich, GermanyReprinting, including excerpts, only with thewritten consent of BMW AG, Munich.US English II/12, 03 12 500Printed on environmentally friendly paper,bleached without chlorine , suitable for r...
-
4 .ContentsThe fastest way t...ContentsThe fastest way to find information on a particu-lar topic or item is by using the index, refer to page254.4Notes6Reporting safety defectsAT A GLANCE 910Cockpit17Onboard computer21Letters and numbers22Voice activation systemCONTROLS 2728Opening and...
-
5 .Notes4NotesUsing this Own...Notes4NotesUsing this Owner's ManualWe have tried to make a ll the information in this Owner's Manual easy to find. The fastest way to find specific topics is to refer to the detailed index at the back of the manual. If you wish to gain an initial overvie...
-
6 .Notes 5For your safetyMai...Notes 5For your safetyMaintenance and repairAdvanced technology, e.g. the use of modern materials an d high-performance electronics, requires specially adapted mainte-nance and repair methods. Therefore, have the necessary work on your MI NI only carried o...
-
7 .Notes6Service and warrant...Notes6Service and warrantyWe recommend that you read this publication thoroughly.Your MINI is covered by the following warran-ties:>New Vehicle Limited Warranty>Rust Perforation Limited Warranty>Federal Emissions Syst em Defect Warranty>Federal Emissions...
-
10 .CONTROLSDRIVING TIPSNAVIG...CONTROLSDRIVING TIPSNAVIGATIONENTERTAINMENTCOMMUNICATIONSMOBILITYREFERENCEAT A GLANCE
-
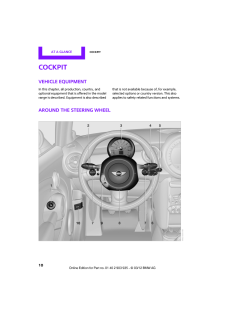
11 .AT A GLANCE Cockpit10Cock...AT A GLANCE Cockpit10CockpitVehicle equipmentIn this chapter, all production, country, and optional equipment that is offered in the model range is described. Equi pment is also described that is not available because of, for example, selected options or c...
-
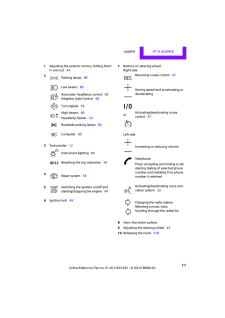
12 .Cockpit AT A GLANCE 111Ad...Cockpit AT A GLANCE 111Adjusting the exterior mirrors, folding them in and out446Ignition lock497Buttons on steering wheel,Right sideLeft side8Horn: the entire surface9Adjusting the steering wheel 4510Releasing the hood 2102Parking lamps83Low beams83Automa...
-
13 .AT A GLANCE Cockpit12Disp...AT A GLANCE Cockpit12Displays1Tachometer59with indicator and warning lamps 132Display for>Current vehicle speed 59>Indicator and warning lamps 133Resetting the trip odometer 594Display for>Position of automatic transmission 51>Computer60>Date of next sched...
-
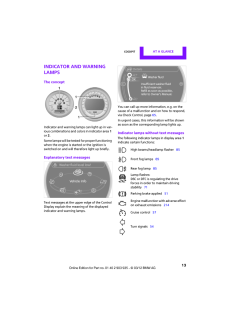
14 .Cockpit AT A GLANCE 13Ind...Cockpit AT A GLANCE 13Indicator and warning lampsThe conceptIndicator and warning lamps can light up in var-ious combinations and co lors in indicator area 1 or2.Some lamps will be tested for proper functioning when the engine is started or the ignition is...
-
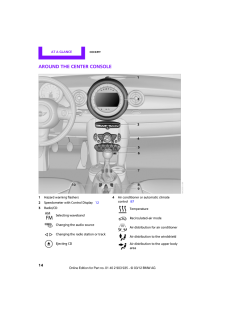
15 .AT A GLANCE Cockpit14Arou...AT A GLANCE Cockpit14Around the center console1Hazard warning flashers2Speedometer with Control Display 123Radio/CD4Air conditioner or automatic climate control87Selecting wavebandChanging the audio sourceChanging the radio station or trackEjecting CDTemp...
-
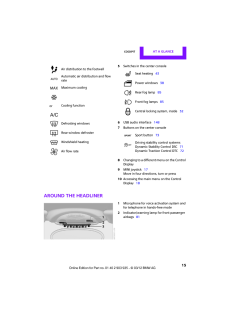
16 .Cockpit AT A GLANCE 155Sw...Cockpit AT A GLANCE 155Switches in the center console6USB audio interface 1487Buttons on the center console8Changing to a differen t menu on the Control Display9MINI joystick17 Move in four directions, turn or press10Accessing the main me nu on the Control...
-
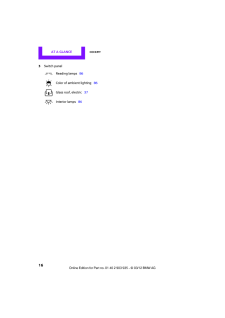
17 .AT A GLANCE Cockpit163Swi...AT A GLANCE Cockpit163Switch panelReading lamps86Color of ambient lighting 86Glass roof, electric 37Interior lamps86
-
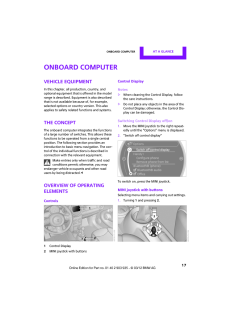
18 .Onboard computer AT A GLA...Onboard computer AT A GLANCE 17Onboard computerVehicle equipmentIn this chapter, all production, country, and optional equipment that is offered in the model range is described. Equipment is also described that is not available be cause of, for example, se...
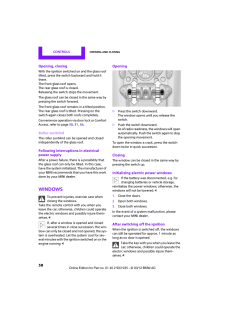
-
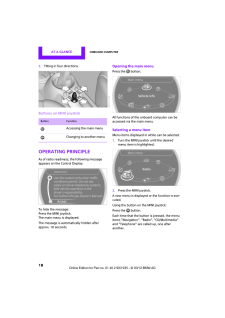
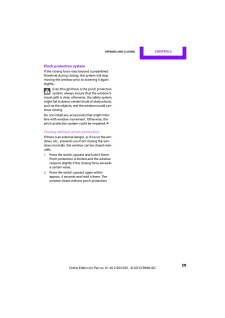
19 .AT A GLANCE Onboard compu...AT A GLANCE Onboard computer182.Tilting in four directions.Buttons on MINI joystickOperating principleAs of radio readiness, the following message appears on the Control Display:To hide the message:Press the MINI joystick.The main menu is displayed.The mes...
-
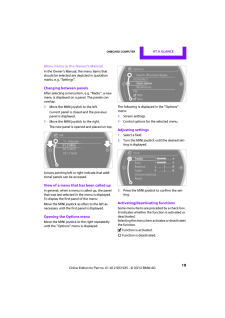
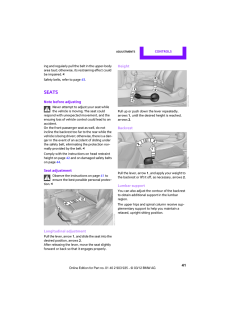
20 .Onboard computer AT A GLA...Onboard computer AT A GLANCE 19Menu items in the Owner's ManualIn the Owner's Manual, the menu items that should be selected are depicted in quotation marks, e.g. "Settings".Changing between panelsAfter selecting a menu item, e.g. "Radio", a new menu is di...
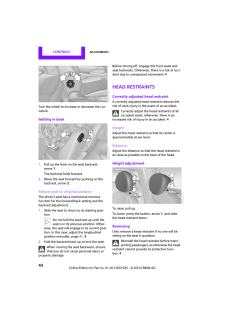
-
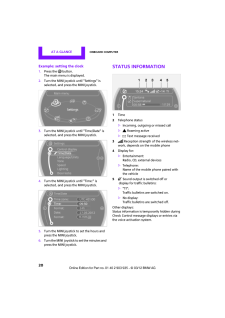
21 .AT A GLANCE Onboard compu...AT A GLANCE Onboard computer20Example: setting the clock1.Press the button.The main menu is displayed.2.Turn the MINI joystick until "Settings" is selected, and press the MINI joystick.3.Turn the MINI joystick until "Time/Date" is selected, and press the ...
-
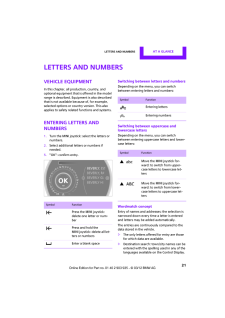
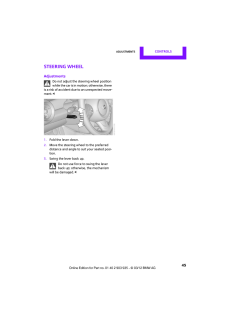
22 .Letters and numbers AT A ...Letters and numbers AT A GLANCE 21Letters and numbersVehicle equipmentIn this chapter, all production, country, and optional equipment that is offered in the model range is described. Equipment is also described that is not available be cause of, for examp...
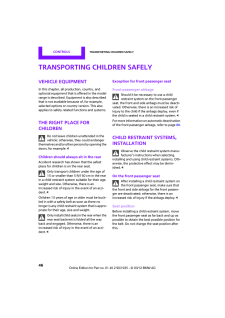
-
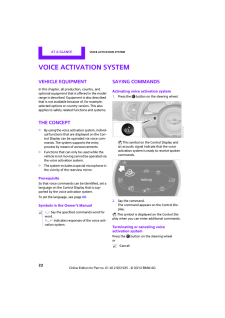
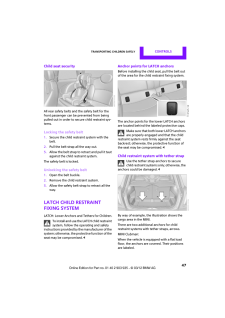
23 .AT A GLANCE Voice activat...AT A GLANCE Voice activation system22Voice activation systemVehicle equipmentIn this chapter, all production, country, and optional equipment that is offered in the model range is described. Equi pment is also described that is not available because of, fo...
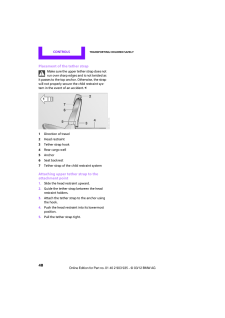
-
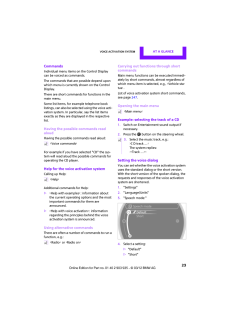
24 .Voice activation system A...Voice activation system AT A GLANCE 23CommandsIndividual menu items on the Control Display can be voiced as commands.The commands that are possible depend upon which menu is currently shown on the Control Display.There are short commands for functions in t...
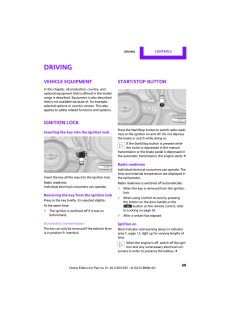
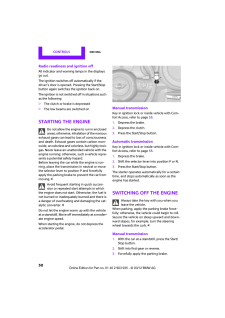
-
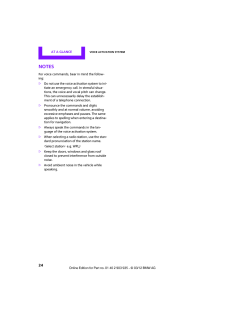
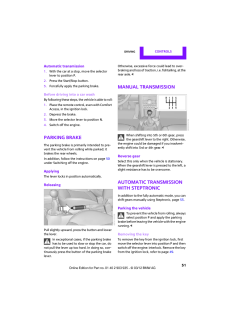
25 .AT A GLANCE Voice activat...AT A GLANCE Voice activation system24NotesFor voice commands, bear in mind the follow-ing:>Do not use the voice activation system to ini-tiate an emergency call. In stressful situa-tions, the voice and vocal pitch can change. This can unnecessarily delay ...
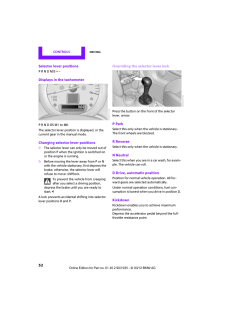
-
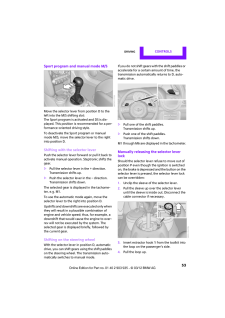
28 .AT A GLANCEDRIVING TIPSNA...AT A GLANCEDRIVING TIPSNAVIGATIONENTERTAINMENTCOMMUNICATIONSMOBILITYREFERENCECONTROLS
-
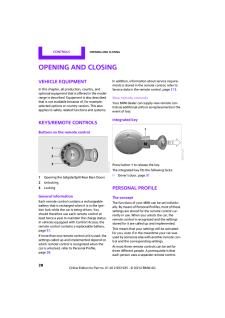
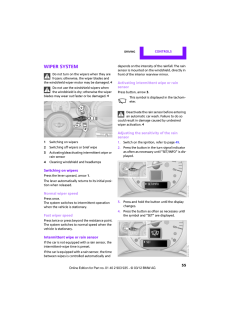
29 .CONTROLS Opening and clos...CONTROLS Opening and closing28Opening and closingVehicle equipmentIn this chapter, all production, country, and optional equipment that is offered in the model range is described. Equi pment is also described that is not available because of, for example, ...
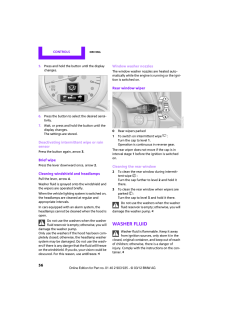
-
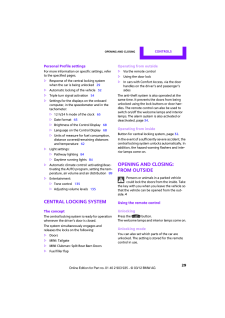
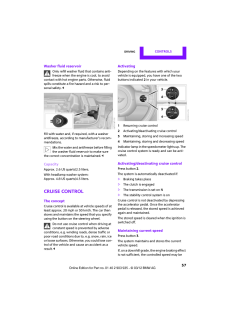
30 .Opening and closing CONTR...Opening and closing CONTROLS 29Personal Profile settingsFor more information on specific settings, refer to the specified pages.>Response of the central locking system when the car is being unlocked 29>Automatic locking of the vehicle 32>Triple turn signa...
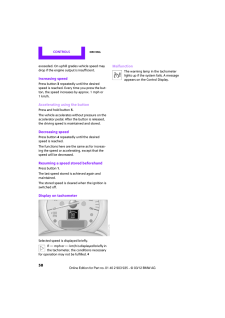
-
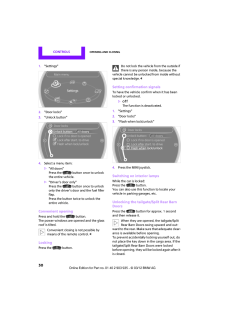
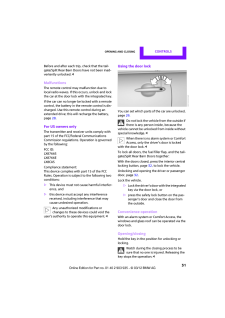
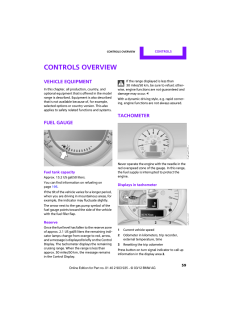
31 .CONTROLS Opening and clos...CONTROLS Opening and closing301."Settings"2."Door locks"3."Unlock button"4.Select a menu item:>"All doors"Press the button once to unlock the entire vehicle.>"Driver's door only"Press the button once to unlock only the driver's door and the fuel filler f...
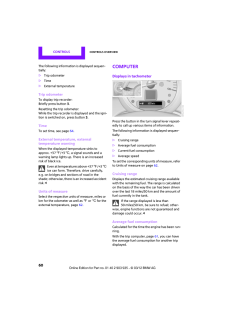
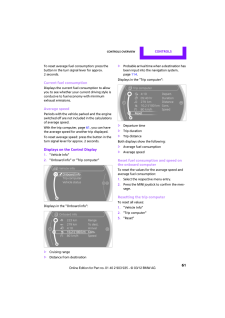
-
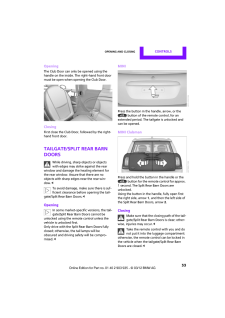
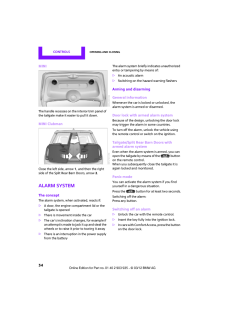
32 .Opening and closing CONTR...Opening and closing CONTROLS 31Before and after each trip, check that the tail-gate/Split Rear Barn Do ors have not been inad-vertently unlocked.33 .CONTROLS Opening and clos...CONTROLS Opening and closing32Manual operationIn the event of an electrical malfunction, the driver's door can be unlocked or locked by turn-ing the integrated key in the door lock to the end positions.Opening and closing: from insideThe switch locks or un...34 .Opening and closing CONTR...Opening and closing CONTROLS 33OpeningThe Club Door can only be opened using the handle on the inside. The right-hand front door must be open when opening the Club Door.ClosingFirst close the Club Door, followed by the right-hand front door.Tailgate/Split ...35 .CONTROLS Opening and clos...CONTROLS Opening and closing34MINIThe handle recesses on the interior trim panel of the tailgate make it easier to pull it down.MINI ClubmanClose the left side, arrow 1, and then the right side of the Split Rear Barn Doors, arrow 2.Alarm systemThe conceptT...36 .Opening and closing CONTR...Opening and closing CONTROLS 35Display on the revolution counterWhen the system is armed, all LEDs pulse. After approx. 16 minutes one LED flashes.>LEDs pulse or LED flashes: system is armed.>One LED flashes at short intervals:Doors, the hood or the tailga...37 .CONTROLS Opening and clos...CONTROLS Opening and closing36>The engine can only be started if the remote control is in the vehicle.>The doors and tailgate/Split Rear Barn Doors must be closed to be able to operate the windows and glass roof.Comparison to standard remote controlsThe in...38 .Opening and closing CONTR...Opening and closing CONTROLS 37Before driving a vehicle with automatic transmission into a car wash1.Insert remote control into ignition lock.2.Depress the brake.3.Move the selector lever to position N.4.Switch off the engine.The vehicle can roll.Malfunct...39 .CONTROLS Opening and clos...CONTROLS Opening and closing38Opening, closingWith the ignition switched on and the glass roof tilted, press the switch backward and hold it there.The front glass roof opens.The rear glass roof is closed.Releasing the switch stops the movement.The glass ro...40 .Opening and closing CONTR...Opening and closing CONTROLS 39Pinch protection systemIf the closing force rises beyond a predefined threshold during closing, the system will stop moving the window prior to lowering it again slightly.Even though there is the pinch protection system, alw...41 .CONTROLS Adjustments40Adj...CONTROLS Adjustments40AdjustmentsVehicle equipmentIn this chapter, all production, country, and optional equipment that is offered in the model range is described. Equi pment is also described that is not available because of, for example, selected options...42 .Adjustments CONTROLS 41in...Adjustments CONTROLS 41ing and regularly pull the belt in the upper-body area taut; otherwise, its restraining effect could be impaired.43 .CONTROLS Adjustments42Tur...CONTROLS Adjustments42Turn the wheel to increase or decrease the cur-vature.Getting in back1.Pull up the lever on the seat backrest, arrow1.The backrest folds forward.2.Move the seat forward by pushing on the backrest, arrow2.Return seat to original positi...44 .Adjustments CONTROLS 43Fr...Adjustments CONTROLS 43Front1.Pull up as far as it will go.2.Fold the backrest forward slightly.3.Press button1 and pull the head restraint out as far as it will go.4.Fold back the backrest.Rear1.Pull up as far as it will go.2.Press button1 and pull the he...45 .CONTROLS Adjustments44Dam...CONTROLS Adjustments44Damage to safety beltsIf the safety belts ar e damaged or stressed in an accident: have th e safety belt system and its seat-belt tensioners replaced and the belt anchors checked. Have this work carried out only by a MINI dealer or b...46 .Adjustments CONTROLS 45St...Adjustments CONTROLS 45Steering wheelAdjustmentsDo not adjust the steering wheel position while the car is in motion; otherwise, there is a risk of accident due to an unexpected move-ment.<1.Fold the lever down.2.Move the steering wheel to the preferred di...47 .CONTROLS Transporting chi...CONTROLS Transporting children safely46Transporting children safelyVehicle equipmentIn this chapter, all production, country, and optional equipment that is offered in the model range is described. Equi pment is also described that is not available because...48 .Transporting children saf...Transporting children safely CONTROLS 47Child seat securityAll rear safety belts and the safety belt for the front passenger can be prevented from being pulled out in order to se cure child restraint sys-tems.Locking the safety belt1.Secure the child restr...49 .CONTROLS Transporting chi...CONTROLS Transporting children safely48Placement of the tether strapMake sure the upper tether strap does not run over sharp edges and is not twisted as it passes to the top anchor. Otherwise, the strap will not properly secure the child restraint sys-tem...50 .Driving CONTROLS 49Drivin...Driving CONTROLS 49DrivingVehicle equipmentIn this chapter, all production, country, and optional equipment that is offered in the model range is described. Equipment is also described that is not available be cause of, for example, selected options or cou...51 .CONTROLS Driving50Radio r...CONTROLS Driving50Radio readiness and ignition offAll indicator and warning lamps in the displays go out.The ignition switches off automatically if the driver's door is opened. Pressing the Start/Stop button again switches the ignition back on.The igniti...52 .Driving CONTROLS 51Automa...Driving CONTROLS 51Automatic transmission1.With the car at a stop, move the selector lever to position P.2.Press the Start/Stop button.3.Forcefully apply the parking brake.Before driving into a car washBy following these steps, the vehicle is able to roll:...53 .CONTROLS Driving52Selecto...CONTROLS Driving52Selector lever positionsP R N D M/S + -Displays in the tachometerP R N D DS M1 to M6The selector lever position is displayed, or the current gear in the manual mode.Changing selector lever positions>The selector lever can only be moved o...54 .Driving CONTROLS 53Sport ...Driving CONTROLS 53Sport program and manual mode M/SMove the selector lever from position D to the left into the M/S shifting slot:The Sport program is activated and DS is dis-played. This position is recommended for a per-formance-oriented driving style.T...55 .CONTROLS Driving545.Move ...CONTROLS Driving545.Move the selector lever into the desired position by pressing the button on the front of the selector lever.Before manually unlo cking the selector lever lock, firmly set the parking brake to prevent the vehicle from rolling away.56 .Driving CONTROLS 55Wiper ...Driving CONTROLS 55Wiper systemDo not turn on the wipers when they are frozen; otherwise, the wiper blades and the windshield wiper motor may be damaged.57 .CONTROLS Driving565.Press...CONTROLS Driving565.Press and hold the button until the display changes.6.Press the button to se lect the desired sensi-tivity.7.Wait, or press and hold the button until the display changes.The settings are stored.Deactivating intermittent wipe or rain sen...58 .Driving CONTROLS 57Washer...Driving CONTROLS 57Washer fluid reservoirOnly refill washer flui d that contains anti-freeze when the engine is cool, to avoid contact with hot engine parts. Otherwise, fluid spills constitute a fire hazard and a risk to per-sonal safety.59 .CONTROLS Driving58exceede...CONTROLS Driving58exceeded. On uphill grades vehicle speed may drop if the engine output is insufficient.Increasing speedPress button3 repeatedly until the desired speed is reached. Every time you press the but-ton, the speed increases by approx. 1 mph or ...60 .Controls overview CONTROL...Controls overview CONTROLS 59Controls overviewVehicle equipmentIn this chapter, all production, country, and optional equipment that is offered in the model range is described. Equipment is also described that is not available be cause of, for example, sel...61 .CONTROLS Controls overvie...CONTROLS Controls overview60The following information is displayed sequen-tially:>Trip odometer>Time>External temperatureTrip odometerTo display trip recorder:Briefly press button 3.Resetting the trip odometer:While the trip recorder is displayed and the i...62 .Controls overview CONTROL...Controls overview CONTROLS 61To reset average fuel consumption: press the button in the turn signal lever for approx. 2 seconds.Current fuel consumptionDisplays the current fuel consumption to allow you to see whether your current driving style is conduciv...63 .CONTROLS Controls overvie...CONTROLS Controls overview62Settings and informationOperating principleCertain settings and information are only avail-able when the ignition is switched on, the vehi-cle is at a standstill and the doors are closed.1Button for:>Selecting display>Setting v...64 .Controls overview CONTROL...Controls overview CONTROLS 631."Settings"2."Language/Units"3.Select the desired menu item.4.Select the desired unit.Service requirementsThe remaining driving dist ance and the date of the next scheduled service are briefly displayed immediately after you s...65 .CONTROLS Controls overvie...CONTROLS Controls overview643."Service required"4." Vehicle inspection"5.Open the deadline entry menu.6."Date:"7.Create the settings.8.Press the MINI joystick to apply the setting. The year is highlighted.9.Turn the MINI joystick to make the adjust-ment.10...66 .Controls overview CONTROL...Controls overview CONTROLS 65Setting the time formatThe settings are stored for the remote control currently in use, refer also to Personal Profile on page28.1."Settings"2."Time/Date"3."Format:"4.Select the desired format and press the MINI joystick.The t...67 .CONTROLS Controls overvie...CONTROLS Controls overview66Text messagesText messages at the uppe r edge of the Control Display explain the mean ing of the displayed indicator and warning lamps.Supplemental text messagesFor most Check Control messages, you can view more information late...68 .Controls overview CONTROL...Controls overview CONTROLS 673.Press the button repeatedly until the corre-sponding symbol and "CHECK INFO" appear in the display.4.Press and hold the button.If there are no Check Control messages, then "CHECK OK" is displayed.If a Check Control messa ge h...69 .CONTROLS Controls overvie...CONTROLS Controls overview68Activating/deactivating the limit1."Settings"2."Speed"3."Warning"4.Press the MINI joystick.Altering settingsLanguage on the Control DisplayYou can set the language on the Control Display.1."Settings"2."Language/Units"3."Language...70 .Controls overview CONTROL...Controls overview CONTROLS 694.Turn the MINI joystick until the desired set-ting is reached.5.Press the MINI joystick.The setting is stored for the remote control cur-rently in use. In bright conditions, for example, the brightness control may not be clea...71 .CONTROLS Technology for d...CONTROLS Technology for driving comfort and safety70Technology for driving comfort and safetyVehicle equipmentIn this chapter, all production, country, and optional equipment that is offered in the model range is described. Equi pment is also described tha...72 .Technology for driving co...Technology for driving comfort and safety CONTROLS 71enter the sensors' blind spots before or after a continuous audible signal is given. Higher, pro-truding objects, such as wall ledges, may not be detectable. Therefore, always drive cautiously; otherwis...73 .CONTROLS Technology for d...CONTROLS Technology for driving comfort and safety72To increase vehicle stabil ity, activate DSC again as soon as possible.Activating DSCPress the button again: the DSC indicator lamps in the display elements go out.For better controlThe indicator lamp on ...74 .Technology for driving co...Technology for driving comfort and safety CONTROLS 73Deactivating both DTC and DSCPress the button for at least 3 seconds; the indi-cator lamp DSC OFF on the speedometer comes on and DSC OFF is displayed on the tachometer.The Dynamic Traction Co ntrol DTC ...75 .CONTROLS Technology for d...CONTROLS Technology for driving comfort and safety74In the event of a pressure loss, the diameter and therefore the rotational speed of the corre-sponding wheel change. This is detected and reported as a flat tire.Functional requirementThe system must have...76 .Technology for driving co...Technology for driving comfort and safety CONTROLS 75Indication of a flat tireThe warning lamps come on in yellow and red. A message appears on the Control Display. An acoustic signal also sounds. There is a flat tire or a major loss in tire inflation pres...77 .CONTROLS Technology for d...CONTROLS Technology for driving comfort and safety76result in an accident. Do not continue driving and contact your MINI dealer.78 .Technology for driving co...Technology for driving comfort and safety CONTROLS 77Gray wheelsThe system cannot detect a puncture.Reasons for this may be:>TPM is being reset.>Interference from systems or devices with the same transmission frequency.>Malfunction.Resetting the systemRese...79 .CONTROLS Technology for d...CONTROLS Technology for driving comfort and safety78Run-flat tiresYou can continue driving with a damaged tire at speeds up to 50 mph/80 km/h.If the vehicle is not equipped with run-flat tires, do not continue driving; continuing to drive can result in ser...80 .Technology for driving co...Technology for driving comfort and safety CONTROLS 79vide a reliable warning about the current infla-tion pressure.Check the tire inflation pressure and reset the system, page77.Declaration according to NHTSA/FMVSS 138 Tire Pressure Monitoring SystemsEach ...81 .CONTROLS Technology for d...CONTROLS Technology for driving comfort and safety80AirbagsThe following airbags are located under the marked covers:1Front airbags2Side airbags in backrests3Head airbags at the front and rearProtective actionObserve the instructions on page 40 to ensure t...82 .Technology for driving co...Technology for driving comfort and safety CONTROLS 81bags for the front passenger are activated or deactivated by the system accordingly.The indicator lamp above the interior rear-view mirror shows th e current status of the front passenger airbags, deacti...83 .CONTROLS Technology for d...CONTROLS Technology for driving comfort and safety82Airbag system malfunction>The warning lamp does not come on when radio readiness is switched on.>The warning lamp stays lit continuously.In the event of a fault in the airbag system, have it checked witho...84 .Lamps CONTROLS 83LampsVeh...Lamps CONTROLS 83LampsVehicle equipmentIn this chapter, all production, country, and optional equipment that is offered in the model range is described. Equipment is also described that is not available be cause of, for example, selected options or count r...85 .CONTROLS Lamps84Welcome l...CONTROLS Lamps84Welcome lampsIf you leave the light switch in the low beam or automatic headlamp control position when you switch off the ignition, the parking lamps and interior lamps come on fo r a certain time as soon as the vehicle is unlocked.Pathway ...86 .Lamps CONTROLS 85Malfunct...Lamps CONTROLS 85MalfunctionA message is displayed.The Adaptive Light Control is malfunctioning or failed. Have the system checked as soon as pos-sible.High beams/roadside parking lamps1Turn signals/roadside parking lamps2Switching on high beams3Switching...87 .CONTROLS Lamps86Adjusting...CONTROLS Lamps86Adjusting brightness>Briefly press button: br ightness changes in stages.>Press and hold the button. Brightness changes in a continuous manner.Interior lampsThe interior lighting, the footwell lamps and the luggage compartment lighting are ...88 .Climate CONTROLS 87Climat...Climate CONTROLS 87ClimateVehicle equipmentIn this chapter, all production, country, and optional equipment that is offered in the model range is described. Equipment is also described that is not available because of, for example, selected options or coun...89 .CONTROLS Climate88Air con...CONTROLS Climate88Air conditioner1Air flow rate2Cooling function3Recirculated-air mode4Temperature5Rear window defroster6Air distribution7Windshield heatingAir flow rateAdjust the air flow rate. The higher the rate, the more effective the heating or coolin...90 .Climate CONTROLS 89Temper...Climate CONTROLS 89TemperatureTurn upward, red, to increase the temper-ature.Turn downward, blue, to decrease the temperature.Rear window defrosterThe defroster is switched off auto-matically after a certain time.The rear window he ating is lowered or swi...91 .CONTROLS Climate90Comfort...CONTROLS Climate90Comfortable interior climateAUTO program2 offers the ideal air distribution and air flow rate for almo st all conditions, refer to AUTO program below. All you need to do is select an interior temperature which is comfort-able for you.The ...92 .Climate CONTROLS 91Rear w...Climate CONTROLS 91Rear window defrosterThe defroster is switched off auto-matically after a certain time.Defrosting windows and removing condensationQuickly removes ice and condensa-tion from the windshield and front side windows. For this purpose, also s...93 .CONTROLS Practical interi...CONTROLS Practical interior accessories92Practical interior accessoriesVehicle equipmentIn this chapter, all production, country, and optional equipment that is offered in the model range is described. Equi pment is also described that is not available bec...94 .Practical interior access...Practical interior accessories CONTROLS 935.As soon as the LED flashes rapidly, release both buttons. The quick flashing indicates that the button on the rearview mirror has been programmed.If the LED does not flash rapidly after approx. 60 seconds, alter ...95 .CONTROLS Practical interi...CONTROLS Practical interior accessories94OperationBefore using the integrated universal remote control, alwa ys inspect the imme-diate area to make certain that no people, ani-mals or objects are within the travel range of the device.Comply also with the s...96 .Practical interior access...Practical interior accessories CONTROLS 95To set the compass zones, press the setting but-ton for approx. 3-4 seconds. The number of the compass zones that have been set are shown on the display.To change the zone se tting, quickly press the setting butto...97 .CONTROLS Practical interi...CONTROLS Practical interior accessories96Glove compartmentOpeningPress the button to open the cover. The light in the glove compartment comes on.ClosingFold cover up.To prevent injury in the event of an acci-dent, close the glove compartment after use whil...98 .Practical interior access...Practical interior accessories CONTROLS 97Center armrestThe center armrest between the front seats con-tains either a compartment or the cover for the snap-in adapter, see page 168.OpeningThe cover slides along guide rails and can be opened fully by pushin...99 .CONTROLS Practical interi...CONTROLS Practical interior accessories98>Storage compartment in the Split Rear Barn Doors>Net on the rear cargo well for smaller objects; for attachin g to the lashing eyesCupholders and ashtrayCupholdersTwo cupholders are located in the front of the cent...100 .Practical interior access...Practical interior accessories CONTROLS 99Connecting electrical appliancesIn your MINI, when the engine is running or if the ignition is switched on, you can use electrical devices such as flashlight s, car vacuum cleaners, etc., up to approx. 140 watts at...ログイン


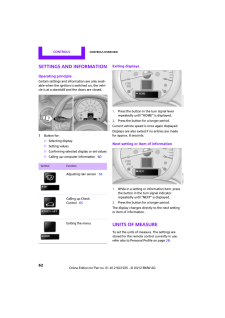
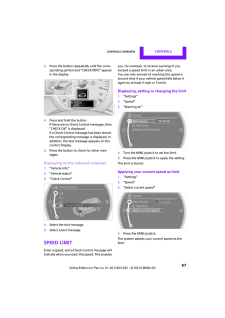
ファイルをアップロードしています。
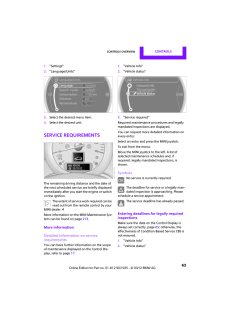
しばらくお待ちください。
しばらくお待ちください。