X3の取扱説明書・マニュアル [全126ページ 4.65MB]


5


11 / 126 ページ

11 / 126 ページ


現在のページURL
Cockpit10Cockpit Controls 1Parking lamps/low beams 532>Turn signals38>Roadside parking lamps 54>High beams54>Headlamp flasher 38>Computer* 443Fog lamps* 544Horn5Washer/wiper system/rain sensor* 386Hazard warning flashers7Central locking system 168Unlocking the hood 88
参考になったと評価  5人が参考になったと評価しています。


このマニュアルの目次
-
2 .X3 2.5iX3 3.0iOwner's Man...X3 2.5iX3 3.0iOwner's Manual for VehicleWe are very glad that you have decided to purchase a BMW.The more familiar you are with it, the more secure you will be on the roads. This is why we ask you:Please read the information we have gathered for you in thi...
-
3 .(C) 2004 Bayerische Motor...(C) 2004 Bayerische Motoren WerkeAktiengesellschaft Munich, GermanyReprinting, including excerpts,only with the written consent ofBMW AG, Munich.Order No. 01 41 0 158 448US English VIII/04Printed in GermanyPrinted on environmentally friendly paper,bleached...
-
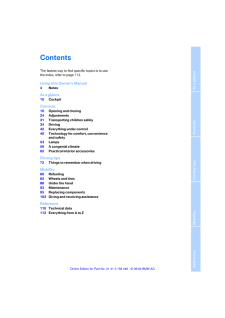
4 .ReferenceAt a glanceContr...ReferenceAt a glanceControlsDriving tipsMobilityContentsThe fastest way to find specific topics is to use the index, refer to page 113.Using this Owner's Manual4NotesAt a glance10Cockpit Controls16Opening and closing24Adjustments31Transporting children saf...
-
5 .Notes4NotesUsing this Own...Notes4NotesUsing this Owner's ManualWe have made every effort to ensure that you are able to find what you need in this Owner's Manual as quickly as possible. The fastest way to find certain topics is by using the detailed index at the end. For a brief ini...
-
6 .ReferenceAt a glanceContr...ReferenceAt a glanceControlsDriving tipsMobility 5The individual vehicleOn purchasing your BMW, you have decided in favor of a model with individualized equipment and features. This Owner's Manual describes all models and equipment that BMW offers within t...
-
7 .Notes6For your own safety...Notes6For your own safety Maintenance and repair Advanced technology, e.g. the use of modern materials and high-performance electronics, requires specially adapted mainte-nance and repair methods. Therefore, only have corresponding work on your BMW carried...
-
8 .ReferenceAt a glanceContr...ReferenceAt a glanceControlsDriving tipsMobility 7Service and warranty We recommend that you read this publication thoroughly.Your BMW is covered by the following warran-ties:>New Vehicle Limited Warranty>Rust Perforation Limited Warranty>Federal Emissions...
-
9 .9 ページ目のマニュアル
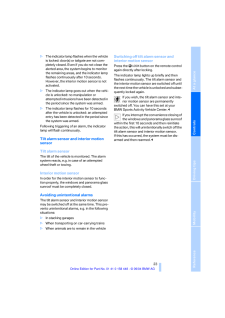
-
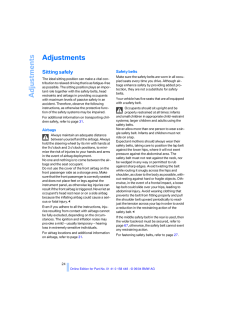
10 .At a glanceThis overview ...At a glanceThis overview of buttons, switches and displaysis intended to familiarize you with yourvehicle's operating environment.The section will also assist you in becomingacquainted with the control conceptsand options available for operatingthe various...
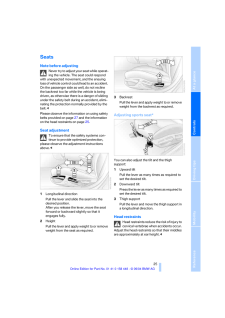
-
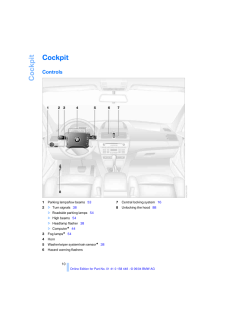
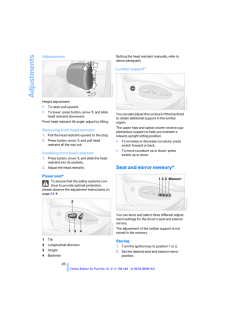
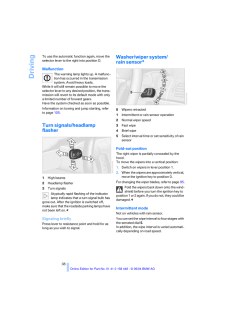
11 .Cockpit10Cockpit Controls...Cockpit10Cockpit Controls 1Parking lamps/low beams 532>Turn signals38>Roadside parking lamps 54>High beams54>Headlamp flasher 38>Computer* 443Fog lamps* 544Horn5Washer/wiper system/rain sensor* 386Hazard warning flashers7Central locking system 168Unlocking...
-
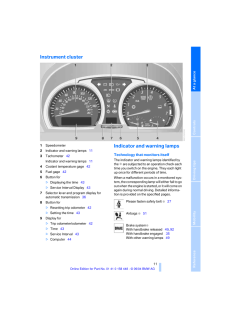
12 .At a glanceControlsDrivin...At a glanceControlsDriving tipsMobility Reference 11Instrument cluster 1Speedometer 2Indicator and warning lamps 11 3Tachometer42Indicator and warning lamps 114Coolant temperature gage 425Fuel gage426Button for>Displaying the time 43>Service Interval Displ...
-
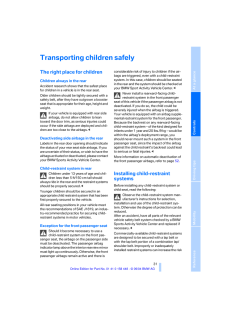
13 .Cockpit12ColorsThe indica...Cockpit12ColorsThe indicator and warning lamps can light up in different colors and combinations.The following section explains the significance of the individual colors as well as how you should respond when they appear.>red:Stop the vehicle immediatelyor...
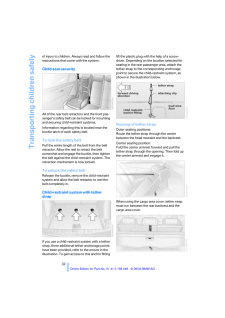
-
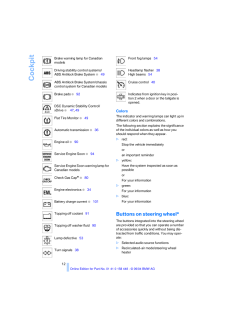
14 .At a glanceControlsDrivin...At a glanceControlsDriving tipsMobility Reference 13>Cruise control >Selected telephone functions>Voice command systemIn order to operate a system, the corre-sponding system must be switched on. < Telephone*/voice command system*Press briefly:Accept incomi...
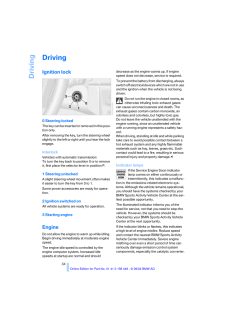
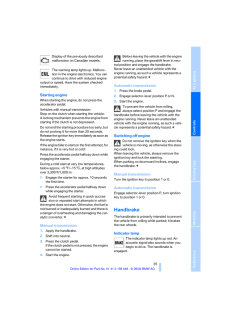
-
15 .15 ページ目のマニュアル
-
16 .ControlsThis chapter is i...ControlsThis chapter is intended to provide you withinformation for complete control of your vehicle.Its extensive array of features and accessories,both for driving and for your own safety,comfort and convenience, are described here.Controls
-
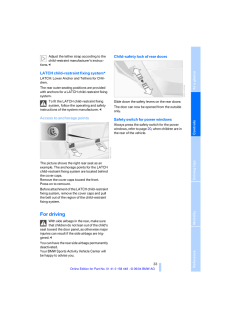
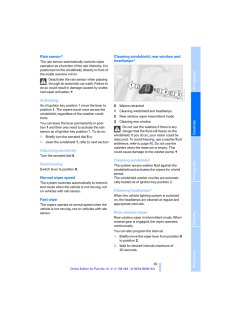
17 .Opening and closing16Open...Opening and closing16Opening and closingKey set 1Master keys with remote controlEvery master key with remote control con-tains an extended-life battery as a power supply, which is charged automatically in the ignition lock as you drive. You should use each...
-
18 .ReferenceAt a glanceContr...ReferenceAt a glanceControlsDriving tipsMobility 17Protect the remote control against unau-thorized use by handing over only the spare key, for example when using hotel valet parking.19 .Opening and closing18LX8F...Opening and closing18LX8FZVECompliance statement: This device complies with part 15 of the FCC Rules. Operation is subject to the following two conditions:>This device may not cause harmful interfer-ence.and>This device must accept any interference receive...20 .ReferenceAt a glanceContr...ReferenceAt a glanceControlsDriving tipsMobility 19Unlocking and opening doors1.Press button for central locking system.2.Pull the respective door handle above the armrest.orindividually pull on the door handle of each door twice to unlock and open.Engagin...21 .Opening and closing20Wind...Opening and closing20Windows Opening and closing windows As of ignition key position 1: >Press the switch up to the resistance point:The window continues to move as long as you continue to press the switch. >Briefly press the switch beyond the resis-tance ...22 .ReferenceAt a glanceContr...ReferenceAt a glanceControlsDriving tipsMobility 21Panorama glass sunroof* When leaving the vehicle, always remove the key and close the doors, as otherwise children could operate the sunroof and injure themselves.< The panorama glass sunroof is operation...23 .Opening and closing22Manu...Opening and closing22Manual operation In the event of an electrical malfunction, you can operate the panorama glass sunroof manually.1.Pull off the cover firmly downward.2.Insert the Allen wrench from the compart-ment beneath the cargo area floor, refer to...24 .ReferenceAt a glanceContr...ReferenceAt a glanceControlsDriving tipsMobility 23>The indicator lamp flashes when the vehicle is locked: door(s) or tailgate are not com-pletely closed. Even if you do not close the alerted area, the system begins to monitor the remaining areas, and the ...25 .Adjustments24AdjustmentsS...Adjustments24AdjustmentsSitting safely The ideal sitting position can make a vital con-tribution to relaxed driving that is as fatigue-free as possible. The sitting position plays an impor-tant role together with the safety belts, head restraints and airba...26 .ReferenceAt a glanceContr...ReferenceAt a glanceControlsDriving tipsMobility 25SeatsNote before adjusting Never try to adjust your seat while operat-ing the vehicle. The seat could respond with unexpected movement, and the ensuing loss of vehicle control co uld lead to an accident. O...27 .Adjustments26AdjustmentsH...Adjustments26AdjustmentsHeight adjustment: >To raise: pull upward.>To lower: press button, arrow 1, and slide head restraint downward.Front head restraint tilt angle: adjust by tilting.Removing front head restraint 1.Pull the head restraint upward to the ...28 .ReferenceAt a glanceContr...ReferenceAt a glanceControlsDriving tipsMobility 273.Press the M EMORY button: The indicator lamp in the button lights up.4.Press the desired memory button 1, 2 or3: The indicator lamp goes out. Requesting a stored settingDo not request a position from t...29 .Adjustments283.Guide the ...Adjustments283.Guide the belt back into its reel.The upper shoulder strap's anchorage point will be in the correct position for seat occupants of every build if the seat is correctly adjusted, refer to page24.The two rear safety belt buckles integrated int...30 .ReferenceAt a glanceContr...ReferenceAt a glanceControlsDriving tipsMobility 29distance to following traffic should not be regarded as precise. < 1Adjustments 2Switching over to the other mirror or to the automatic parking function*Storing the mirror positions, refer to Seat and mirr...31 .Adjustments30Vehicle Memo...Adjustments30Vehicle Memory, Key Memory How the system functions You have probably frequently wished that you could configure individual functions of your vehicle to reflect your own personal require-ments. In developing your vehicle, BMW has incorporated ...32 .ReferenceAt a glanceContr...ReferenceAt a glanceControlsDriving tipsMobility 31Transporting children safely The right place for childrenChildren always in the rearAccident research shows that the safest place for children in a vehicle is in the rear seat.Older children should be tigh...33 .Transporting children saf...Transporting children safely32of injury to children. Always read and follow the instructions that come with the system. Child seat securityAll of the rear belt retractors and the front pas-senger's safety belt can be locked for mounting and securing child-...34 .ReferenceAt a glanceContr...ReferenceAt a glanceControlsDriving tipsMobility 33Adjust the tether strap according to the child-restraint manufacturer's instruc-tions.35 .Driving34DrivingIgnition ...Driving34DrivingIgnition lock 0 Steering locked The key can be inserted or removed in this posi-tion only.After removing the key, turn the steering wheel slightly to the left or right until you hear the lock engage.Interlock Vehicles with automatic transmi...36 .ReferenceAt a glanceContr...ReferenceAt a glanceControlsDriving tipsMobility 35Display of the previously described malfunction on Canadian models.The warning lamp lights up. Malfunc-tion in the engine electronics. You can continue to drive with reduced engine output or speed. Have th...37 .Driving36Indicator lamp f...Driving36Indicator lamp for Canadian models.EngagingThe lever engages automatically and the indica-tor lamp in the instrument cluster lights up from ignition key position 1.ReleasingPull up slightly on the lever, press the button and lower the lever. If ex...38 .ReferenceAt a glanceContr...ReferenceAt a glanceControlsDriving tipsMobility 37Possible displays P R N D SD M1 M2 M3 M4 M5The selector lever position is indicated, and in the manual mode the gear currently engaged.Range selection An interlock prevents inadvertent gearshifts into sele...39 .Driving38To use the autom...Driving38To use the automatic function again, move the selector lever to the right into position D.Malfunction The warning lamp lights up. A malfunc-tion has occurred in the transmission system. Avoid heavy loads.While it will still remain possible to move...40 .ReferenceAt a glanceContr...ReferenceAt a glanceControlsDriving tipsMobility 39Rain sensor*The rain sensor automatically controls wiper operation as a function of the rain intensity. It is positioned on the windshield, directly in front of the inside rearview mirror.Deactivate the ra...41 .Driving403.Move the wiper...Driving403.Move the wiper lever from position 0 to position 2 againTo change the wiper blades, refer to page 95.Cruise control* The vehicle maintains and stores the speed that you set as of a speed of approx. 20 mph/30 km/h. You can use cruise control whe...42 .ReferenceAt a glanceContr...ReferenceAt a glanceControlsDriving tipsMobility 41In addition, the system is automatically inter-rupted in response to the following conditions: >When you apply pressure to the brake pedal >When you apply pressure to the clutch pedal or when you move the ...43 .Everything under control4...Everything under control42Everything under controlOdometer 1Odometer2Trip odometerOdometer You can activate the displays shown in the illus-tration in ignition key position 0 or with the igni-tion key removed by pressing the button in the instrument cluste...44 .ReferenceAt a glanceContr...ReferenceAt a glanceControlsDriving tipsMobility 43Between blue and red fieldsNormal operating range. It is permissible for the dial to drift up to the red field. RedComes on while driving: The engine is overheated. Switch off the engine immediately and al...45 .Everything under control4...Everything under control44Computer* Mode selection As of ignition key position 1, you can call up information from the computer using the com-puter button in the turn signal lever. A new function appears each time you briefly press the computer button.The ...46 .ReferenceAt a glanceContr...ReferenceAt a glanceControlsDriving tipsMobility 45Cruising range Displays the estimated cruising range available with the remaining fuel. The fuel level is mea-sured and the range is calculated taking into account the driving style over the last 20 miles/...47 .Technology for comfort, c...Technology for comfort, convenience and safety46Technology for comfort, convenience and safetyPDC Park Distance Control*The concept PDC provides extra safety and convenience during parking maneuvers. Signal tones indi-cate the current distance to an object...48 .ReferenceAt a glanceContr...ReferenceAt a glanceControlsDriving tipsMobility 47MalfunctionThe indicator lamp in the button flashes and a short continuous tone sounds. PDC is malfunc-tioning. Switch off PDC. Have the system checked. To prevent this problem, keep the sensors clean and ...49 .Technology for comfort, c...Technology for comfort, convenience and safety48Switching off DSC Press the button; the indicator lamp in the instrument cluster lights up continuously. DSC is now deactivated.Stabilizing interventions of the chassis control system DSC are no longer availa...50 .ReferenceAt a glanceContr...ReferenceAt a glanceControlsDriving tipsMobility 49Activating systemPress the button; the indicator lamp comes on. The indicator lamp flashes when the brakes are applied automatically. Deactivating systemPress the button again; the indicator lamp goes out....51 .Technology for comfort, c...Technology for comfort, convenience and safety50The check of the tire inflation pressure is based on monitoring the relative speeds of the wheels. A flat tire is detected and reported on the basis of a deviation in certain speed ratios.Functional requireme...52 .ReferenceAt a glanceContr...ReferenceAt a glanceControlsDriving tipsMobility 51The display consists of two stages: >Normal braking: The brake lamps 1 and the center brake lamp light up.>Heavy braking and braking with ABS:The brake lamps 1 and 2 light up together with the center brake...53 .Technology for comfort, c...Technology for comfort, convenience and safety52Automatic deactivation of front passenger airbags Your BMW has a seat occupation detection system. By evaluating the weight on the front passenger's seat, the system detects whether or not the seat is occupie...54 .ReferenceAt a glanceContr...ReferenceAt a glanceControlsDriving tipsMobility 53LampsParking lamps/low beams Parking lamps The front, rear and side vehicle lighting is switched on. You can use the parking lamps for parking. For lighting on one side for parking as an additional feature...55 .Lamps54Activating Adaptiv...Lamps54Activating Adaptive Head LightIn ignition key position 2, turn the light switch to the position Automatic head-lamp control, refer to page 53.To avoid blinding oncoming traffic, the Adaptive Head Light>is not active when driving in reverse>is only a...56 .ReferenceAt a glanceContr...ReferenceAt a glanceControlsDriving tipsMobility 55Interior lamps The interior lamps operate automatically.If you desire, the interior lamps are switched on after mechanical unlocking of the vehicle. You may have this function acti-vated/deactivated if you...57 .A congenial climate56A co...A congenial climate56A congenial climateAir conditioner 1Airflow directed toward the windshield and side windows 2Airflow for the upper body 573Front footwell ventilation 574Air supply/blower 575Outside air/recirculated-air mode 576Temperature577Air distri...58 .ReferenceAt a glanceContr...ReferenceAt a glanceControlsDriving tipsMobility 57Air supply/blower You can select blower speeds 1 to 4. The heating and ventilation become more and more effective as the air supply settings are increased. In position 0, the blower and heater are switched...59 .A congenial climate58Vent...A congenial climate58Ventilation for coolingAdjust the vents to direct the flow of cool air in your direction, for instance, if the interior has become too warm.Draft-free ventilation Set the vent outlets so that the air flows past you and is not directed ...60 .ReferenceAt a glanceContr...ReferenceAt a glanceControlsDriving tipsMobility 59Automatic climate control* 1Airflow directed toward the windshield and side windows2Airflow for the upper body 613Air to footwell614Individual air distribution 605Temperature606Temperature display 60 Air s...61 .A congenial climate60A co...A congenial climate60A congenial climateFor almost all conditions, the AUTO pro-gram 12 offers the optimal air distribution and air volume. Select an interior temperature you find pleasant.The following section co ntains more detailedinformation on the ava...62 .ReferenceAt a glanceContr...ReferenceAt a glanceControlsDriving tipsMobility 61culates the air currently within the vehicle. During AUC operation, a sensor detects pollut-ants in the outside air and controls the shut-off automatically. Press the button repeatedly to run through the ...63 .Practical interi or acces...Practical interi or accessories62Practical interior accessoriesIntegrated universal remote control* The concept The integrated universal remote control replaces up to three different hand-held trans-mitters for various items of radio-controlled equipment s...64 .ReferenceAt a glanceContr...ReferenceAt a glanceControlsDriving tipsMobility 63The corresponding memory button 1 is now programmed with the signal of the original hand-held transmitter.You can use the system when the engine is run-ning or when the ignition is switched on.If the syste...65 .Practical interi or acces...Practical interi or accessories64RearA cup holder is located in the center armrest at the rear: Press the button to open.Do not place glass containers in the cup holders, as otherwise there is a danger of injury in an accident. < Glove compartment OpeningP...66 .ReferenceAt a glanceContr...ReferenceAt a glanceControlsDriving tipsMobility 65Storage compartment in the instrument panel*OpeningPress the button in the direction of the arrow.ClosingFold the cover down.Storage package* Your convenience is enhanced by:>Armrest, front>Sliding lashing...67 .Practical interi or acces...Practical interi or accessories66Car phone preparation* Hands-free system In vehicles with car phone preparation *, the hands-free microphone is located on the head-liner near the interior lamp.For more information on the car phone, refer to the Owner's Ma...68 .ReferenceAt a glanceContr...ReferenceAt a glanceControlsDriving tipsMobility 67Inserting ski bagThe ski bag is located in the cargo area under the floor cover.1.Fold down the center armrest and pull off the cover.2.Remove the tray behind the cover with a screwdriver by applying it at...69 .Practical interi or acces...Practical interi or accessories68Do not place heavy and hard objects on the cover. If you do so, they could endan-ger occupants during braking maneuvers. Do not allow the cover to snap back into place, as otherwise it could be damaged.70 .ReferenceAt a glanceContr...ReferenceAt a glanceControlsDriving tipsMobility 69Floor cover OpeningFor access to the jack etc.To open, raise the cover by the handle, refer to arrow. If required, you can remove or raise the floor cover.RaisingSwing up the floor cover and hook it onto t...71 .71 ページ目のマニュアル72 .Driving tipsThis section ...Driving tipsThis section is designed to provide you withextra support by supplying informationuseful in dealing with specific drivingand operating conditions.Driving tips73 .Things to remember when d...Things to remember when driving72Things to remember when drivingBreaking-in Moving parts should be allowed to adjust to one another. To ensure that your vehicle provides maximum economy throughout a long service life, we request that you observe the follow...74 .ReferenceAt a glanceContr...ReferenceAt a glanceControlsDriving tipsMobility 73Hot exhaust system As in all vehicles equipped with a catalytic converter, extremely high temperatures are generated in this vehicle. Do not remove the heat shields installed adjacent to various sec-tions ...75 .Things to remember when d...Things to remember when driving74Pulsation at the brake pedal combined with sounds from the hydraulic circuits indicates to the driver that ABS is in its active mode. Wet roads While driving in wet conditions and in heavy rain, it is a good idea to apply ...76 .ReferenceAt a glanceContr...ReferenceAt a glanceControlsDriving tipsMobility 753.Subtract the combined weight of the driver and passengers from XXX lbs. or YYY kg.4.The resulting figure equals the available amount of cargo and luggage load capacity. For example, if the XXX amount equ...77 .Things to remember when d...Things to remember when driving76>Read and comply with the information enclosed with the heavy-duty cargo straps. Always position and secure the load as described above. If you do not, it can even endanger the passengers during braking or evasive maneuver...78 .ReferenceAt a glanceContr...ReferenceAt a glanceControlsDriving tipsMobility 77to dry the brakes, thus preventing a reduc-tion in braking performance caused by the moisture. For cleaning the handbrake, apply the lever slightly at approx. 25 mph/40 km/h and con-tinue to drive for appr...79 .79 ページ目のマニュアル80 .MobilityThis section help...MobilityThis section helps you maintain your mobilityby supplying important information onvital topics including fuels and lubricants,wheels and tires, service, maintenanceand breakdown assistance.Mobility81 .Refueling80Refueling Fuel...Refueling80Refueling Fuel filler door Always switch off the engine before refu-eling, as it is not possible to add fuel with the engine running, and attempts to do so may also trigger the Service Engine Soon lamp. < To open and close: press the rear edge o...82 .ReferenceAt a glanceContr...ReferenceAt a glanceControlsDriving tipsMobility 81Never attempt to continue driving until the tank is completely empty, as engine functions could be affected, and the vehicle could sustain damage as a result.83 .Wheels and tires82Wheels ...Wheels and tires82Wheels and tiresTire inflation pressure Information for your safetyIt is not merely the tire's service life, but also driving comfort and - to a great extent - driving safety that depend on the condition of the tires and the maintenance o...84 .ReferenceAt a glanceContr...ReferenceAt a glanceControlsDriving tipsMobility 83X3 2.5i/3.0i Tire size Pressure specifications in psi/kPaAll pressure specifications in the table are indicated in psi/kilopascal with cold tires, cold = ambient temperature235/55 R 17 99 H M+S235/55 R 17 ...85 .Wheels and tires84Tire id...Wheels and tires84Tire identification marksKnowledge of the labeling on the side of the tire makes it easier to identify and choose the right tires.Tire sizeSpeed code letterQ = up to 105 mph/160 km/hT = up to 118 mph/190 km/hH = up to 131 mph/210 km/hV...86 .ReferenceAt a glanceContr...ReferenceAt a glanceControlsDriving tipsMobility 85Temperature The temperature grades are A, the highest, B and C, representing the tire's resistance to the generation of heat and its ability to dissipate heat when tested under controlled conditions on a s...87 .Wheels and tires86New whe...Wheels and tires86New wheels and tires Have new wheels and tires installed only by your BMW Sports Activity Vehicle Center or tire shop that works according to BMW repair procedures with correspondingly trained personnel. If this work is not carried out pr...88 .ReferenceAt a glanceContr...ReferenceAt a glanceControlsDriving tipsMobility 87Snow chains* Only certain snow chains have been tested by BMW and classified and approved as safe. You can obtain a list of these from your BMW Sports Activity Vehicle Center. BMW recommends the use of app...89 .Under the hood88Under the...Under the hood88Under the hoodNever attempt to perform any service or repair operations on your vehicle without the required professional technical training. If you are not familiar with the regulations to be observed, have work on your vehicle carried out...90 .ReferenceAt a glanceContr...ReferenceAt a glanceControlsDriving tipsMobility 89Engine compartment 1Reservoir for windshield and headlamp washer system90 2Body ground: negative terminal1043Auxiliary terminal for jump starting 104 4Engine oil filler neck 91 5Brake fluid reservoir 926Di...91 .Under the hood90Washer fl...Under the hood90Washer fluid Headlamp* and windshield washer system The antifreeze for the washer systems is flammable. For this reason, keep it away from sources of flame and store it only in its original containers. Store it so that it is inacces-sible t...92 .ReferenceAt a glanceContr...ReferenceAt a glanceControlsDriving tipsMobility 91Do not fill beyond the upper mark on the dipstick. Excess oil can damage the engine.< Adding engine oil Do not add oil until the oil level has dropped to just above the lower marking on the dipstick, refer...93 .Under the hood92sure to e...Under the hood92sure to escape, then continue turning to open.3.The coolant level is correct if the upper end of the red float bar is at least at the same height as the top edge of the filler neck, refer to arrow. The bar end may only pro-trude by a maximu...94 .ReferenceAt a glanceContr...ReferenceAt a glanceControlsDriving tipsMobility 93Maintenance The BMW maintenance system The BMW maintenance system supports the preservation of the traffic and operating safety of your BMW. Regular maintenance is not only required for the safety of the v...95 .Maintenance94the bottom o...Maintenance94the bottom of the instrument cluster and under a cover. The cover has the letters OBD on it. The most important components for the com-position of the emissions can be checked by a device via this interface. If the Service Engine Soon indicato...96 .ReferenceAt a glanceContr...ReferenceAt a glanceControlsDriving tipsMobility 95Replacing componentsOnboard tool kit The onboard tool kit is located in a compart-ment on the left in the cargo area. Replacing wiper blades Front1.Move the wiper into the fold-out position, refer to page3...97 .Replacing components96Hal...Replacing components96Halogen low beams H7 bulb, 55 watts Always wear gloves and eye protection - the atmosphere within the bulb is pres-surized. Failure to observe this precaution can lead to personal injury should the bulb be dam-aged.< Driver's side1.Po...98 .ReferenceAt a glanceContr...ReferenceAt a glanceControlsDriving tipsMobility 974.Place the lamp base with the lower edge against the bracket and press it in until the lamp base locks in place.Make sure that the cover does not fall into the engine compartment, as otherwise the vehicle...99 .Replacing components98lea...Replacing components98lead to personal injury should the bulb be dam-aged.< 1.Pull the cover in front of the fog lamp for-ward. 2.Loosen the screws, refer to arrow, and pull out the headlamp. 3.Turn the lamp base at the back of the head-lamp to the left an...100 .ReferenceAt a glanceContr...ReferenceAt a glanceControlsDriving tipsMobility 99Do not remove the covers, and never stare into the unfiltered light for several hours, as irritation of the retina could result.
ログイン


ファイルをアップロードしています。
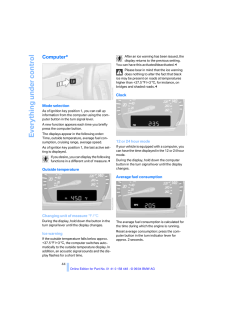
しばらくお待ちください。
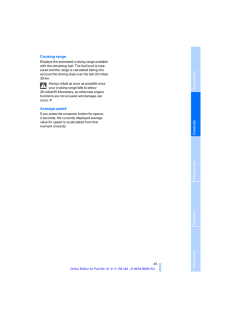
しばらくお待ちください。