
W2243T-PFの取扱説明書・マニュアル [全28ページ 1.53MB]


8


17 / 28 ページ


現在のページURL
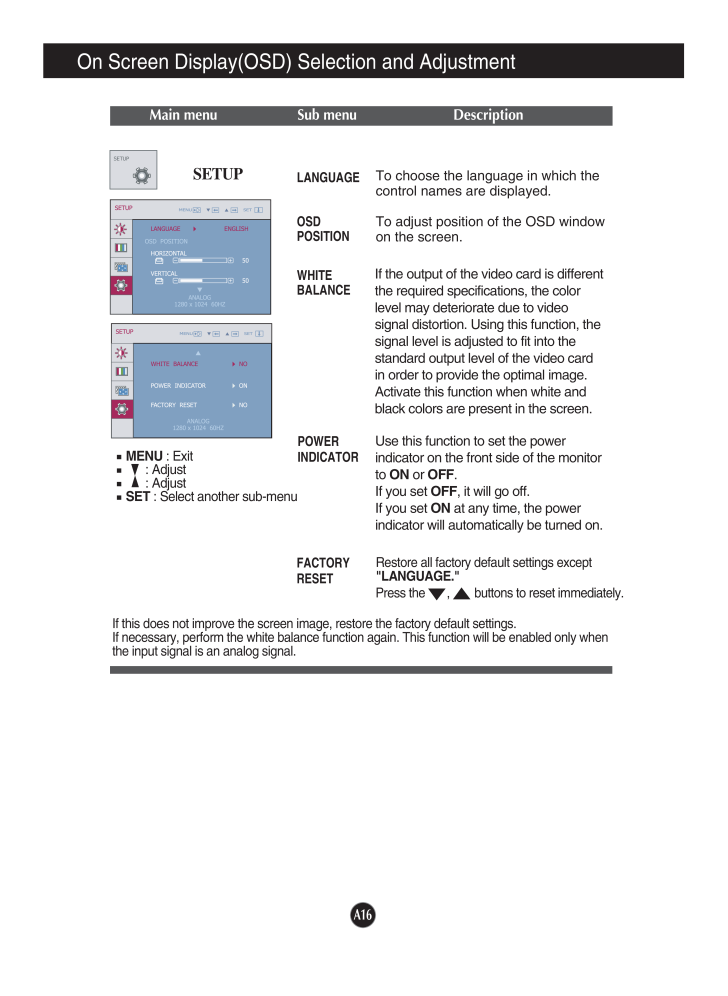
A16Restore all factory default settings except"LANGUAGE." Press the , buttons to reset immediately.On Screen Display(OSD) Selection and Adjustment Main menu Sub menu DescriptionIf this does not improve the screen image, restore the factory default settings. If necessary, perform the white balance function again. This function will be enabled only whenthe input signal is an analog signal. SETUPTo choose the language in which thecontrol names are displayed.To adjust position of the OSD windowon the screen.LANGUAGEOSDPOSITIONWHITEBALANCEFACTORYRESETIf the output of the video card is differentthe required specifications, the colorlevel may deteriorate due to videosignal distortion. Using this function, thesignal level is adjusted to fit into thestandard output level of the video cardin order to provide the optimal image.Activate this function when white andblack colors are present in the screen. POWERINDICATORUse this function to set the powerindicator on the front side of the monitorto ONor OFF.If you set OFF, it will go off. If you set ONat any time, the powerindicator will automatically be turned on.SETUPMENU: Exit: AdjustSET: Select another sub-menu
参考になったと評価  11人が参考になったと評価しています。
このマニュアルの目次
-
1 .M ake sure to read the Im...M ake sure to read the Important Precautionsbefore using the product. Keep the User's Guide(CD) in an accessible place for future reference.See the label attached on the product and give the information to yourdealer when you ask for service.W2043TW2243TW2...
-
2 .A1This unit has been engi...A1This unit has been engineered and manufactured to ensure your personal safety,however improper use may result in potential electrical shock or fire hazards. Inorder to allow the proper operation of all safeguards incorporated in this display,observe the...
-
3 .A2Important PrecautionsOn...A2Important PrecautionsOn InstallationDo not allow anything to rest upon or roll over the power cord, and do not placethe display where the power cord is subject to damage.Do not use this display near water such as near a bathtub, washbowl, kitchensink, la...
-
4 .A3Important PrecautionsOn...A3Important PrecautionsOn CleaningUnplug the display before cleaning the face of the display screen.Use a slightly damp (not wet) cloth. Do not use an aerosol directly on the displayscreen because over-spraying may cause electrical shock.When cleaning the ...
-
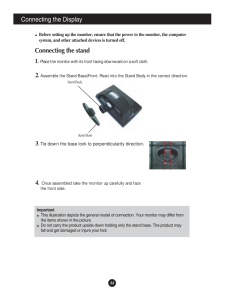
5 .A4Connecting the DisplayI...A4Connecting the DisplayImportantThis illustration depicts the general model of connection. Your monitor may differ fromthe items shown in the picture.Do not carry the product upside down holding only the stand base. The product mayfall and get damaged or ...
-
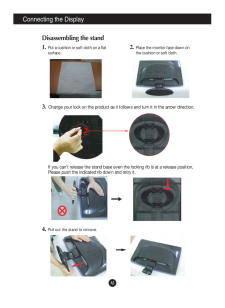
6 .A5Connecting the DisplayD...A5Connecting the DisplayDisassembling the stand1. Put a cushion or soft cloth on a flatsurface.3. Change your lock on the product as it follows and turn it in the arrow direction.2. Place the monitor face down onthe cushion or soft cloth.If you can't relea...
-
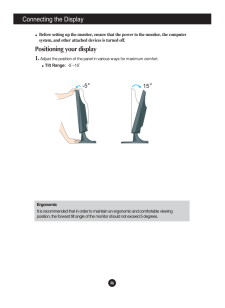
7 .A6Connecting the DisplayB...A6Connecting the DisplayBefore setting up the monitor, ensure that the power to the monitor, the computersystem, and other attached devices is turned off. Positioning your display1. Adjust the position of the panel in various ways for maximum comfort.Tilt ...
-
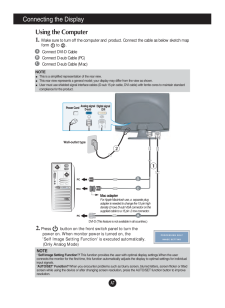
8 .A7Connecting the DisplayW...A7Connecting the DisplayWall-outlet typePower CordAnalog signalD-subDigital signalDVIDVI-D (This feature is not available in all countries.)Mac adapterFor Apple Macintosh use, a separate plugadapter is needed to change the 15 pin highdensity (3 row) D-sub...
-
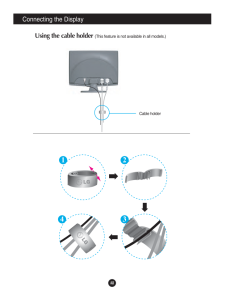
9 .A8Connecting the DisplayN...A8Connecting the DisplayNEPOOPEN1 23EPON4Using the cable holder (This feature is not available in all models.)Cable holder
-
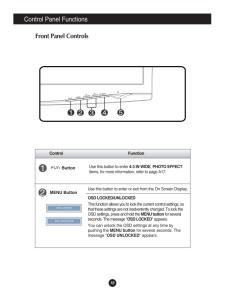
10 .A9Control Panel Functions...A9Control Panel FunctionsFront Panel ControlsControl FunctionMENU ButtonUse this button to enter or exit from the On Screen Display.Use this button to enter 4:3 IN WIDE, PHOTO EFFECTitems, for more information, refer to page A17.OSD LOCKED/UNLOCKEDThis fu...
-
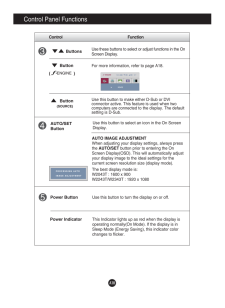
11 .A10Control Panel Function...A10Control Panel FunctionsThis Indicator lights up as red when the display isoperating normally(On Mode). If the display is inSleep Mode (Energy Saving), this indicator colorchanges to flicker.Use this button to turn the display on or off.Power ButtonPower...
-
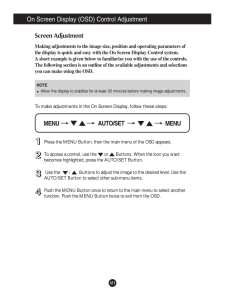
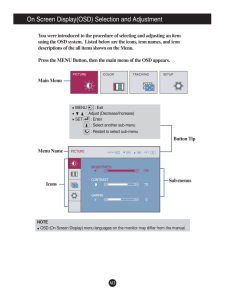
12 .A11On Screen Display (OSD...A11On Screen Display (OSD) Control AdjustmentScreen AdjustmentMaking adjustments to the image size, position and operating parameters ofthe display is quick and easy with the On Screen Display Control system. A short example is given below to familiarize y...
-
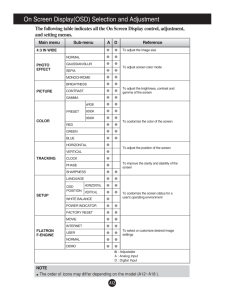
13 .A12NOTEThe order of icons...A12NOTEThe order of icons may differ depending on the model (A12~A18 ).On Screen Display(OSD) Selection and Adjustment The following table indicates all the On Screen Display control, adjustment,and setting menus.Main menu Sub-menu ...
-
14 .A13Sub-menusOn Screen Dis...A13Sub-menusOn Screen Display(OSD) Selection and Adjustment NOTEOSD (On Screen Display) menu languages on the monitor may differ from the manual.You were introduced to the procedure of selecting and adjusting an itemusing the OSD system. Listed below are ...
-
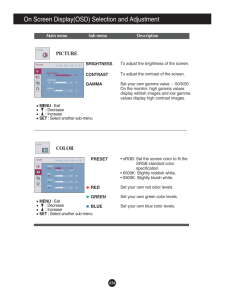
15 .A14On Screen Display(OSD)...A14On Screen Display(OSD) Selection and Adjustment Main menu Sub menu DescriptionBRIGHTNESSCONTRAST GAMMATo adjust the brightness of the screen. To adjust the contrast of the screen.Set your own gamma value. : -50/0/50On the monitor, high gamma valuesdispl...
-
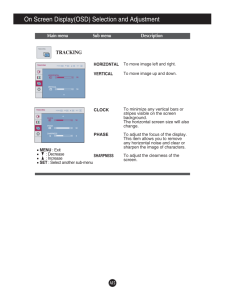
16 .A15On Screen Display(OSD)...A15On Screen Display(OSD) Selection and Adjustment Main menu Sub menu DescriptionCLOCKPHASESHARPNESSTo minimize any vertical bars orstripes visible on the screenbackground.The horizontal screen size will alsochange.To adjust the focus of the display. any h...
-
17 .A16Restore all factory de...A16Restore all factory default settings except"LANGUAGE." Press the , buttons to reset immediately.On Screen Display(OSD) Selection and Adjustment Main menu Sub menu DescriptionIf this does not improve the screen image, restore the factory def...
-
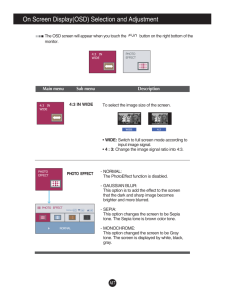
18 .A17On Screen Display(OSD)...A17On Screen Display(OSD) Selection and Adjustment Main menu Sub menu DescriptionThe OSD screen will appear when you touch the button on the right bottom of themonitor.4:3 IN WIDETo select the image size of the screen.* WIDE:Switch to full screen mode acc...
-
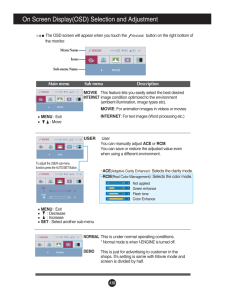
19 .A18On Screen Display(OSD)...A18On Screen Display(OSD) Selection and Adjustment IconsMenu NameSub-menu NameMain menu Sub menu DescriptionMOVIEINTERNETNORMALDEMOUSERThe OSD screen will appear when you touch the button on the right bottom ofthe monitor.INTERNET : For t...
-
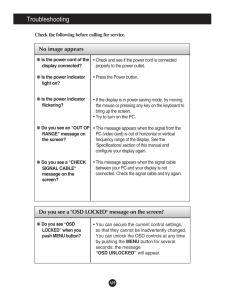
20 .A19TroubleshootingNo imag...A19TroubleshootingNo image appearsCheck the following before calling for service.No image appearsDo you see a "OSD LOCKED" message on the screen?Is the power cord of thedisplay connected?Is the power indicatorlight on?Is the power indicatorflickering?Do yo...
-
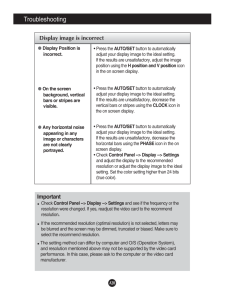
21 .A20TroubleshootingDisplay...A20TroubleshootingDisplay image is incorrectDisplay Position isincorrect.On the screenbackground, verticalbars or stripes arevisible.Any horizontal noiseappearing in anyimage or charactersare not clearlyportrayed.* Press the AUTO/SETbutton to automatically...
-
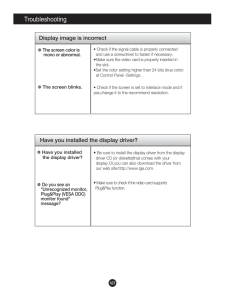
22 .A21Display image is incor...A21Display image is incorrect❁ The screen color ismono or abnormal.❁ The screen blinks.• Check if the signal cable is properly connectedand use a screwdriver to fasten if necessary.•Make sure the video card is properly inserted in the slot.•Set the color...
-
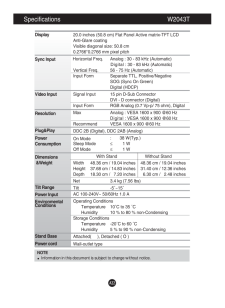
23 .A22Specifications W2043TN...A22Specifications W2043TNOTEInformation in this document is subject to change without notice.DisplaySync InputVideo InputResolutionPlug&PlayPowerConsumptionDimensions&WeightTilt RangePower InputEnvironmentalConditionsStand BasePower cord 20.0 inches (50.8 ...
-
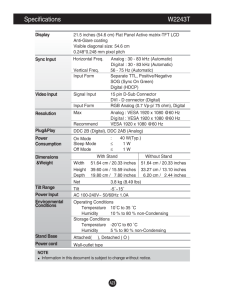
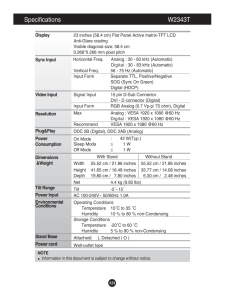
24 .A23Specifications W2243TN...A23Specifications W2243TNOTEInformation in this document is subject to change without notice.DisplaySync InputVideo InputResolutionPlug&PlayPowerConsumptionDimensions&WeightTilt RangePower InputEnvironmentalConditionsStand BasePower cord 21.5 inches (54.6 ...
-
25 .A24Specifications W2343TN...A24Specifications W2343TNOTEInformation in this document is subject to change without notice.DisplaySync InputVideo InputResolutionPlug&PlayPowerConsumptionDimensions&WeightTilt RangePower InputEnvironmentalConditionsStand BasePower cord 23 inches (58.4 cm...
-
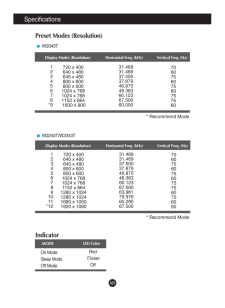
26 .A25SpecificationsIndicato...A25SpecificationsIndicatorOn ModeSleep ModeOff ModeRedFlickerOffLED ColorMODEPreset Modes (Resolution)Display Modes (Resolution) Horizontal Freq. (kHz) Vertical Freq. (Hz)12345678*9720 x 400640 x 480640 x 480800 x 600800 x 6001024 x 7681024 x 7681152 x 864...
-
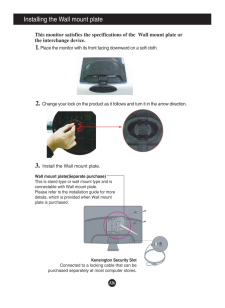
27 .A26Installing the Wall mo...A26Installing the Wall mount plateThis monitor satisfies the specifications of the Wall mount plate orthe interchange device.1. Place the monitor with its front facing downward on a soft cloth.3.Install the Wall mount plate.Wall mount plate(Separate purch...
