
FP71Vの取扱説明書・マニュアル [全40ページ 1.30MB]


1


11 / 40 ページ

11 / 40 ページ


現在のページURL
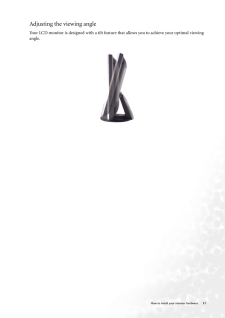
11 How to install your monitor hardwareAdjusting the viewing angleYour LCD monitor is designed with a tilt feature that allows you to achieve your optimal viewing angle.
参考になったと評価  4人が参考になったと評価しています。
このマニュアルの目次
-
1 .FP71V/FP71V+LCD Color Mon...FP71V/FP71V+LCD Color Monitor17.0" LCD Panel SizeUser's ManualWelcome
-
2 .2 CopyrightCopyright (C...2 CopyrightCopyright (C) 2005 by BenQ Corporation. All rights reserved. No part of this publication may be reproduced, transmitted, transcribed, stored in a retrieval system or translated into any language or computer language, in any form or by any me a...
-
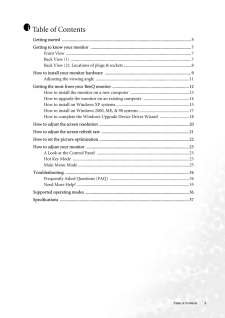
3 .Table of Contents 3Table ...Table of Contents 3Table of ContentsGetting started ......................................................................................................................5Getting to know your monitor .. ........................................................
-
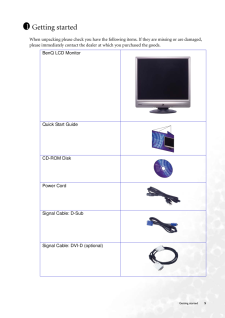
5 .5 Getting startedGett...5 Getting startedGetting startedWhen unpacking please check you have the following items. If they are missing or are damaged, please immediately contact the dealer at which you purchased the goods. 1BenQ LCD MonitorQuick Start Guide CD-ROM DiskPower C...
-
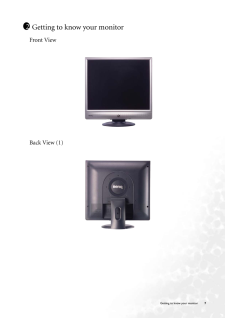
7 .7 Getting to know you...7 Getting to know your monitorGetting to know your monitorFront ViewBack View (1)2
-
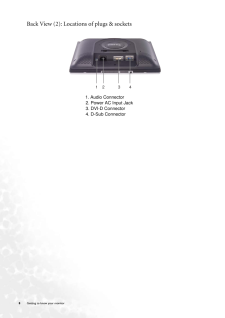
8 .8 Getting to know your mo...8 Getting to know your monitor Back View (2): Locations of plugs & sockets1. Audio Connector2. Power AC Input Jack3. DVI-D Connector4. D-Sub Connector 1 2 3 4
-
9 .9 How to install your...9 How to install your monitor hardwareHow to install your monitor hardwareIf the computer is turned on you must turn it off before continuing. Do not plug-in or turn-on the power to the monitor until instructed to do so. 1. Unpack the monitor and plac...
-
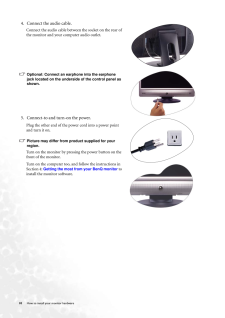
10 .10 How to install your mo...10 How to install your monitor hardware 4. Connect the audio cable.Connect the audio cable between the socket on the rear of the monitor and your computer audio outlet.Optional: Connect an earphone into the earphone jack located on the underside of the c...
-
11 .11 How to install you...11 How to install your monitor hardwareAdjusting the viewing angleYour LCD monitor is designed with a tilt feature that allows you to achieve your optimal viewing angle.
-
12 .12 Getting the most from ...12 Getting the most from your BenQ monitor Getting the most from your BenQ monitorHow do I gain the most benefit from my new monitor?To gain the most benefit from your new BenQ color LCD flat screen monitor, you should install the custom BenQ LCD Monitor...
-
13 .13 Getting the most f...13 Getting the most from your BenQ monitorHow to install the monitor on a new computerThis instruction details the procedure for select ing and installing the BenQ LCD Monitor driver software on a new computer which has never had a monitor driver inst...
-
14 .14 Getting the most from ...14 Getting the most from your BenQ monitor How to upgrade the monitor on an existing computerThis instruction details the procedure for manual ly updating the existing monitor driver software on your Microsoft Windows computer. It is curr rently tested a...
-
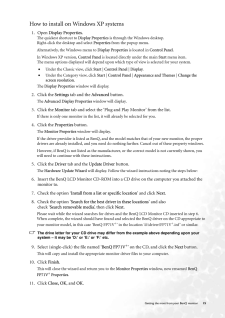
15 .15 Getting the most f...15 Getting the most from your BenQ monitorHow to install on Windows XP systems1. Open Display Properties.The quickest shortcut to Display Properties is through the Windows desktop. Right-click the desktop and select Properties from the popup menu.Alte...
-
16 .16 Getting the most from ...16 Getting the most from your BenQ monitor This will close the Display Properties windows. You do not need to restart Windows XP, as the BenQ LCD monitor drivers will operate immediately with no further action required by you.
-
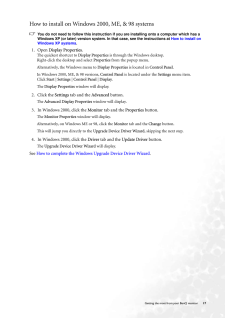
17 .17 Getting the most f...17 Getting the most from your BenQ monitorHow to install on Windows 2000, ME, & 98 systemsYou do not need to follow this instruction if you are installing onto a computer which has a Windows XP (or later) version system. In that case, see the instructi...
-
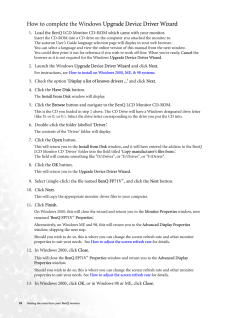
18 .18 Getting the most from ...18 Getting the most from your BenQ monitor How to complete the Windows Upgrade Device Driver Wizard1. Load the BenQ LCD Monitor CD-ROM which came with your monitor.Insert the CD-ROM into a CD drive on the computer you attached the monitor to.The autorun ...
-
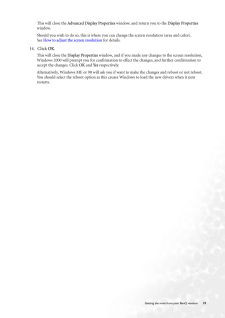
19 .19 Getting the most f...19 Getting the most from your BenQ monitorThis will close the Advanced Display Properties window, and return you to the Display Properties window. Should you wish to do so, this is where you can change the screen resolution (area and color). See How...
-
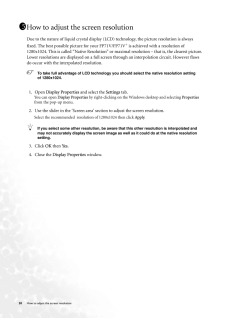
20 .20 How to adjust the scre...20 How to adjust the screen resolution How to adjust the screen resolutionDue to the nature of liquid crystal display (LCD) technology, the picture resolution is always fixed. The best possible picture for your FP71V/FP71V+ is achieved with a resolution ...
-
21 .21 How to adjust the ...21 How to adjust the screen refresh rateHow to adjust the screen refresh rate You don't have to choose the highest possible refresh rate on an LCD display, because it is not technically possible for an LCD display to flicker. The best results are obt...
-
22 .22 How to set the picture...22 How to set the picture optimization How to set the picture optimization The easiest way to obtain an optimal display is to use the i key function. Press the i key to optimize and adjust the screen sett ings automatically for you. Refer to How to in...
-
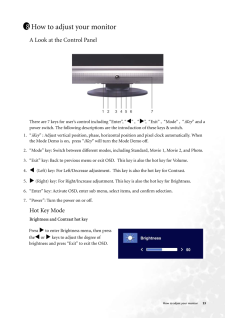
23 .23 How to adjust your...23 How to adjust your monitorHow to adjust your monitorA Look at the Control PanelThere are 7 keys for user's control including "Enter", " v " , " w ", "Exit" , "Mode" , " iKey " and a power switch. The following descriptions are the introduction o...
-
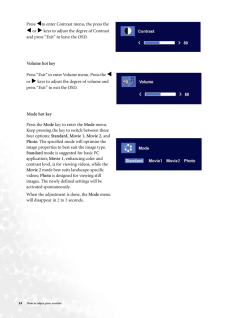
24 .24 How to adjust your mon...24 How to adjust your monitor Volume hot keyMode hot keyPress v to enter Contrast menu, the press the v or w keys to adjust the degree of Contrast and press "Exit" to leave the OSD. Press "Exit" to enter Volume menu. Press the v or w keys to adjust...
-
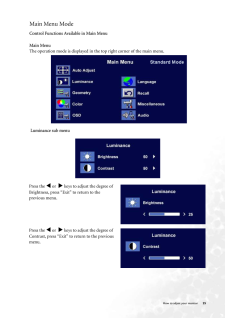
25 .25 How to adjust your...25 How to adjust your monitorMain Menu ModeControl Functions Available in Main Menu Luminance sub menuMain MenuThe operation mode is displayed in the top right corner of the main menu.Press the v or w keys to adjust the degree of Brightness,...
-
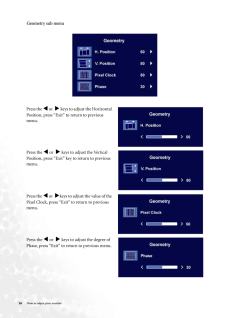
26 .26 How to adjust your mon...26 How to adjust your monitor Geometry sub menu Press the v or w keys to adjust the Horizontal Position, press "Exit" to return to previous menu.Press the v or w keys to adjust the Vertical Position, press "Exit" key to return to previous menu.P...
-
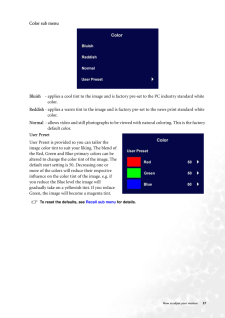
27 .27 How to adjust your...27 How to adjust your monitorColor sub menuBluish - applies a cool tint to the image and is factory pre-set to the PC industry standard white color.Reddish - applies a warm tint to the image and is factory pre-set to the news print standard white ...
-
28 .28 How to adjust your mon...28 How to adjust your monitor OSD sub menuPress the v or w keys to adjust the Horizontal Position of the OSD, press "Exit" to return to previous menu.Press the v or w keys to adjust the Vertical Position of the OSD, press "Exit" to return to p...
-
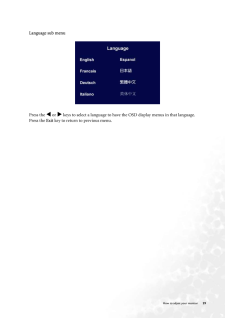
29 .29 How to adjust your...29 How to adjust your monitor Language sub menuPress the v or w keys to select a language to have the OSD display menus in that language.Press the Exit key to return to previous menu.
-
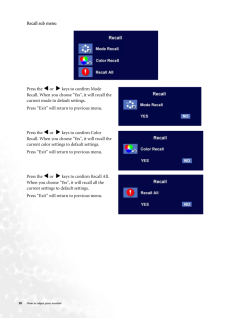
30 .30 How to adjust your mon...30 How to adjust your monitor Recall sub menu Press the v or w keys to confirm Mode Recall. When you choose "Yes", it will recall the current mode to default settings. Press "Exit" will return to previous menu.Press the v or w keys to confirm Co...
-
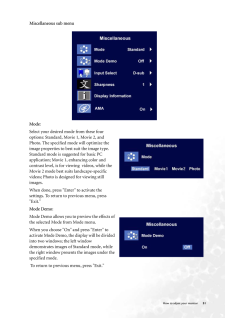
31 .31 How to adjust your...31 How to adjust your monitorMiscellaneous sub menuMode: Select your desired mode from these four options: Standard, Movie 1, Movie 2, and Photo. The specified mode will optimize the image properties to best suit the image type. Standard mode is sugges...
-
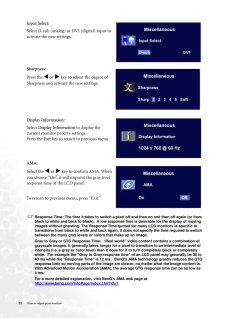
32 .32 How to adjust your mon...32 How to adjust your monitor Input Select: Select D-sub (analog) or DVI (digital) input to activate the new settings.Sharpness:Press the v or w key to adjust the degree of Sharpness and activate the new settings. Display Information:Select Display In...
-
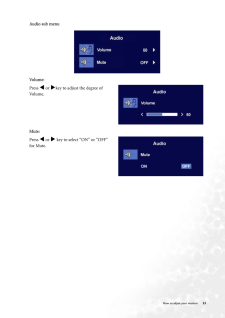
33 .33 How to adjust your...33 How to adjust your monitorAudio sub menu Volume:Press v or w key to adjust the degree of Volume. Mute:Press v or w key to select "ON" or "OFF" for Mute.
-
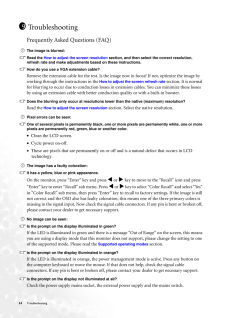
34 .34 Troubleshooting Troub...34 Troubleshooting TroubleshootingFrequently Asked Questions (FAQ)The image is blurred:Read the How to adjust the screen resolution section, and then select the correct resolution, refresh rate and make adjustments based on these instructions.How do you ...
-
35 .35 TroubleshootingThe...35 TroubleshootingThe image is distorted, flashes or flickers:Read the How to adjust the screen resolution section and then select the correct resolution, refresh rate and make adjustments based on these instructions.The image is displaced in one dire...
-
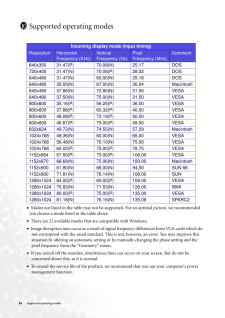
36 .36 Supported operating mo...36 Supported operating modes Supported operating modes• Modes not listed in the table may not be su pported. For an optimal picture, we recommended you choose a mode listed in the table above.• There are 22 available modes that are compatible with Wind...
-
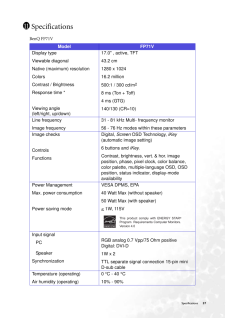
37 .37 SpecificationsSpeci...37 SpecificationsSpecificationsBenQ FP71V11Model FP71VDisplay type Viewable diagonal Native (maximum) resolutionColorsContrast / BrightnessResponse time *Viewing angle (left/right, up/down) 17.0" , active, TFT43.2 cm1280 x 102416.2 million500:1 / 300 cd...
-
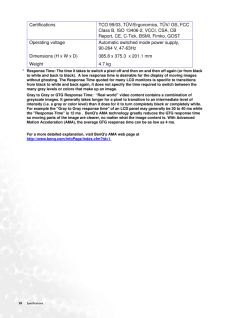
38 .38 Specifications * Re...38 Specifications * Response Time: The time it takes to switch a pixel off and then on and then off again (or from black to white and back to black). A low response time is desirable for the display of moving images without ghosting. The Response Time ...
-
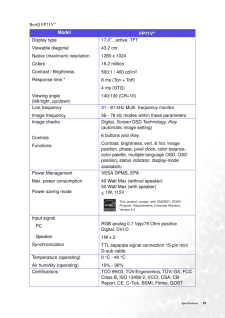
39 .39 SpecificationsBenQ ...39 SpecificationsBenQ FP71V+ModelFP71V+Display type Viewable diagonal Native (maximum) resolutionColorsContrast / BrightnessResponse time *Viewing angle (left/right, up/down) 17.0" , active, TFT43.2 cm1280 x 102416.2 million500:1 / 400 cd/m28 ms (Ton + ...
-
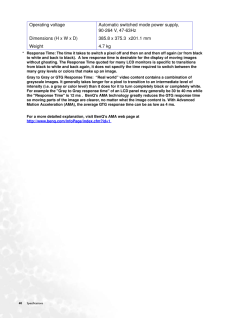
40 .40 Specifications * Re...40 Specifications * Response Time: The time it takes to switch a pixel off and then on and then off again (or from black to white and back to black). A low response time is desirable for the display of moving images without ghosting. The Response Time ...
