

Q&A
取扱説明書・マニュアル (文書検索対応分のみ)
"SteelSeries"13 件の検索結果
"SteelSeries"7 件の検索結果
全般
質問者が納得おそらくマウスとUSB間のコードが断線してるのでは?
BF3など頻繁にマウスを動かすので接触不良でパソコンから一時的に抜いた状態とつながった状態が繰り返される(接続する音と切断したときの音が何回も出)のが原因だと思います。
ほかのマウスが問題ないならおそらく断線しかかってるか断線してるんでしょう。
4524日前view643
全般
質問者が納得KANAもビルドインメモリを搭載しているはずです。
SteelSeriesはドライバレスのマウスなので家で設定して会場に持っていけばいいと思いますよ
4627日前view262
全般
質問者が納得まずポーリングレートとは何なのか理解できてますか?
ポーリングレートとは簡単に言えば1秒間にマウスがPCに情報を送信する回数です。
値が高いほどマウスの動作やボタン操作の情報をより素早く正確にコンピュータに伝える事ができます。
ただ、むやみにレートを上げるとCPUがUSBポートの監視を行う頻度が増大しスペックに余裕のないPCを使用している場合、CPU負荷率が増加しプレイに悪影響を及ぼす可能性があるのです。
サドンアタックやスペシャルフォースなどでポーリングレート150Hz以上だとマウスポイントが波打つの...
4798日前view184
全般
質問者が納得マウスソールはご存知ですか。
http://hdd-check.com/pc_23.html
この黒い3つのやつはマウススケート。摩擦などで磨り減るマウスソールに塗ることでマウスパッドとマウススケートの間の摩擦を軽減、マウスの寿命も延ばします。
4839日前view159
全般
質問者が納得気になったので....
カテ違いますが....
フェラーリの質問されてましたね??
探しても見つからなかったっての...
あれはフェラーリ612GTOです。
回答になってなくて申し訳ございません。
4829日前view423
全般
質問者が納得この様なレビューを見つけました。
一般的にサイドボタンが2つに対して、反対側にも二つあります。
これが私の持ち方では握る瞬間などに暴発しがちになります。
ゲームにおいては何も割り当てていないので関係ないのですが、MMOなど大量のボタンをマウスに割り当てる人は、持ち方などいろいろと吟味する必要があるかもしれません。
補足
レビューの筆者もゲームにおいては何も割り当てていないので」と記載されていますが暴発を指摘されています。
4829日前view207
全般
質問者が納得色々でてますよ。
左右対称なのは右利きでも左利きでも使えるようにしているため。
調べればものすごいへんな形の物もでてます。
人間工学自体もどんどん変わって行ってるのに何を基準に人間工学に基づいたマウスが出ていないといっているのかが分からない。
人間工学に基づいたと謳っているマウスは使いやすい使いにくいは置いておいて腐るほど出ている。
学会で発表されたばかりの論文に基づいて設計とかするには、当然の人から許諾を得ないといけないだろうし開発期間だって掛かる。
そもそもマウス自体ものすごい古いデバイスである事は明...
4977日前view135
全般
質問者が納得plofile setting propatty のマクロスイッチにチェックを入れれば可能です。
4981日前view276
全般
質問者が納得どちらかというとRazer Imperator 2012でしょうか?
どちらもFPSにはいいメーカーなので、量販店などで持った感じを確かめることをおすすめします
性能がよくても手の大きさ等で相性があるとおもいますので
個人的にはFPS用でLogicoolのマウスばかり使っています、性能もありますが大きさと重量をかなり重視して選んでおります
5008日前view109

2INTRODUCTION Thank you for choosing the SteelSeries Sensei! This mouse has been developed by SteelSeries, a dedicated manufacturer of innovative professional gaming gear including headsets, keyboards, mousepads, and other accessories.This user guide is designed to familiarize you with all aspects of our product, its setup, and its usage. We hope that it will be of use to you. If there are any questions that are not answered or clarii ed in this user guide, please refer to our website:http://www.steelseries...
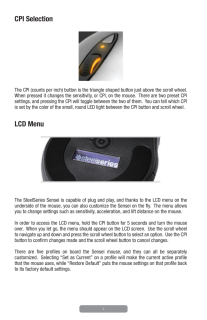
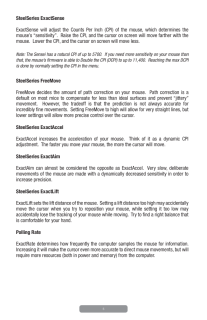
4CPI SelectionThe CPI (counts per inch) button is the triangle shaped button just above the scroll wheel. When pressed it changes the sensitivity, or CPI, on the mouse. There are two preset CPI settings, and pressing the CPI will toggle between the two of them. You can tell which CPI is set by the color of the small, round LED light between the CPI button and scroll wheel.LCD MenuThe SteelSeries Sensei is capable of plug and play, and thanks to the LCD menu on the underside of the mouse, you can also cus...
5SteelSeries ExactSenseExactSense will adjust the Counts Per Inch (CPI) of the mouse, which determines the mouse’s “sensitivity”. Raise the CPI, and the cursor on screen will move farther with the mouse. Lower the CPI, and the cursor on screen will move less.Note: The Sensei has a natural CPI of up to 5700. If you need more sensitivity on your mouse than that, the mouse’s irmware is able to Double the CPI (DCPI) to up to 11,400. Reaching the max DCPI is done by normally setting the CPI in the menu.Steel...
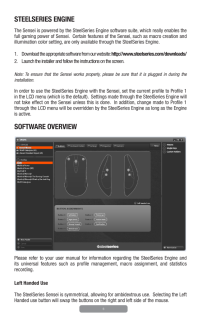
6STEELSERIES ENGINEThe Sensei is powered by the SteelSeries Engine software suite, which really enables the full gaming power of Sensei. Certain features of the Sensei, such as macro creation and illumination color setting, are only available through the SteelSeries Engine.1. Download the appropriate software from our website: http://www.steelseries.com/downloads/2. Launch the installer and follow the instructions on the screen.Note: To ensure that the Sensei works properly, please be sure that it is pl...
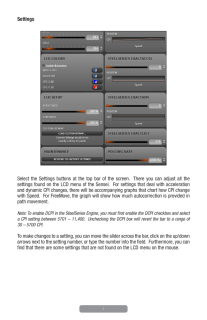
7SettingsSelect the Settings buttons at the top bar of the screen. There you can adjust all the settings found on the LCD menu of the Sensei. For settings that deal with acceleration and dynamic CPI changes, there will be accompanying graphs that chart how CPI change with Speed. For FreeMove, the graph will show how much autocorrection is provided in path movement.Note: To enable DCPI in the SteelSeries Engine, you must irst enable the DCPI checkbox and select a CPI setting between 5701 – 11,400. Unchec...
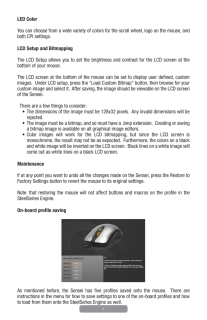
8LED ColorYou can choose from a wide variety of colors for the scroll wheel, logo on the mouse, and both CPI settings.LCD Setup and BitmappingThe LCD Setup allows you to set the brightness and contrast for the LCD screen at the bottom of your mouse.The LCD screen at the bottom of the mouse can be set to display user deined, custom images. Under LCD setup, press the “Load Custom Bitmap” button, then browse for your custom image and select it. After saving, the image should be viewable on the LCD screen of ...

9CONCLUSIONThis concludes the SteelSeries Sensei user manual. We hope this manual answered any questions you may have had. If you have any further questions – please refer to our website: http://www.steelseries.comGood luck, and Have Fun.
- 1
- 2
- 1

