

Q&A
取扱説明書・マニュアル (文書検索対応分のみ)
42 件の検索結果
60 - 70 件目を表示
全般
質問者が納得性能的には、GTX760 > GTX660 > GTX750 で間違いありません。
ついでにRadeonも入れると、RadeonR9 280X>GTX760 >R9 270X> GTX660 > GTX750 になります。
あとは予算的にどの辺まで可能可によりますね。
個人的には270X以上をお薦めします。
気になる所としてはKT-S650-12Aでしょうか。
間違ってもゲーミングPCに使う電源ではないので気がかりです。
実際の出力もカタログより大きく下回るとのこと。
...
4226日前view36
全般
質問者が納得はい対応できないPCですね
背面に付いている「ミニD-sub 15pin」はマニュアルP31に記載あり「外部ディスプレイIN(入力用)」通常のOUT(出力用)ではない
http://www.jp.onkyo.com/pc/desktop/e413/interface.htm
二画面にするにはUSBタイプのVGAアダプターが必要です
http://www.google.co.jp/search?sourceid=ie7&q=++USB%E3%82%BF%E3%82%A4%E3%83%97%E3%81...
4757日前view138
全般
質問者が納得お使いの機種のHDMI端子は入力専用です。
出力には対応していません。
USBからHDMI D-sub DVIのいずれかに変換できるものが販売されていますので、そういったものが必要です。
下記のサイトで対応バススロットをUSB2.0にして検索してください。
http://kakaku.com/specsearch/0550/
5007日前view107
全般
質問者が納得普通は利用可能だと思いますが・・・
http://www.junban.com/display.html
とりあえず,設定方法.
追記
Windows7なら、Windowsキー+Pを押しても無理ですか?
〉アイコンやメニューバーの無 い画面を出すことができます。
つまり、表示されてはいるということですか?
同じ画面を出したいのですか?
もしかして、マルチ設定になっているだけでは?クローンにしてみては?
あと、音は基本一方からしか出ないかと…おそらく一番に設定しているほうからのみだと思います。
5018日前view66
全般
質問者が納得あ・・・・・
そりゃ、液晶パネルの固定部分の、
シールパッキングじゃないですか?
何年、使われたか存じませんが、
多分、バックライトの発熱で、
接着が弱かったところが、引っ張られて
内側にはみ出て来たものだと思います。
保証期間内なら、交換もののトラブルです。
手先の器用な人なら、裏ブタを外して
修正するのは、難しいことではないと思います。
すでに、長く使ったものならば・・・・・
下を傷つけないように注意して、カッターナイフで
除去しても、問題ないと思いますね。
こいつは、「運」としか、言えませ...
5077日前view132
全般
質問者が納得推奨スペックが変更になっています。
OS:Windows 7 64bit
CPU:Qyad Core 以上
メモリ:4GB 以上
HDD:20GB 以上
VGA:(DirectX 11に対応)Radion HD6950以上、GeForce GTX560以上
VGA メモリ:1,024MB 以上
構成の見直しをされてはいかがでしょうか?
電源は750W以上の方が良いでしょう。
--補足--
マザボに関して…GIGABYTEも良い物ですよ。ASUSしか使った事のない自分が言うのも何なんですがw
「850w...
5120日前view27
全般
質問者が納得当たり前
あなたがやっているのはTB倍率を変更しているだけ
本来のOCである基礎倍率の変更は2500K/2600Kでしかできません
5136日前view55
全般
質問者が納得正常に映っているいるんでしょ?
モニターのドライバっていうのは、PCにモニターの機種名を正しく認識させるのと、対応していない解像度をPC側で選べない様にするだけのもので、ドライバがない(公開されていない)機種が多いです。
それにしても24インチのモニターを貰えるなんて、気前の良いお友達ですね、羨ましい。
5267日前view128
全般
質問者が納得POSTの段階ではビデオがBIOSの支配下にあり
Windowsの環境下に無いので
コンパネで画面の設定をしても何ら影響が無いでしょう。
BIOSセットアップで
ビデオに割り当てるメモリ・サイズを大きく設定してください。
これで改善されませんか?
5732日前view84
全般
質問者が納得TV用とPC用のコネクタは
物理的にも電気的にも互換性はありません
ただ最近はHDMIとかDisplay端子とか
コネクタもアスペクト比も統一の動き出てますが
ゲーム機をPCモニタで遊びたい場合いくつか方法があります
1、アップスキャンコンバータを使う、映像方式を変換する機器です
ただし安くても6000円~くらい、ちょっと場所取る
2、上に出たHDMI端子を使う、PS3ならばこれが手っ取り早い
3、ビデオキャプチャボードを使いキャプチャソフトで外部出力させる
中古のボード買えば2000円程度で済みますが...
5774日前view44
LCD MonitorUser ManualE900HD/E900HDA E2200HD/E2200HDAM2200HD M2400HD/E2400HD
Table of ContentsCopyright ..................................................................................................................... ...2Disclaimer .................................................................................................................... ...2Getting started ............................................................................................................... .4Getting to know your monitor ...........................................................................
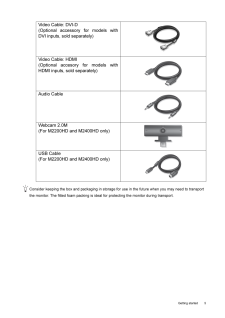
5 Getting startedConsider keeping the box and packaging in storage for use in the future when you may need to transport the monitor. The fitted foam packing is ideal for protecting the monitor during transport.Video Cable: DVI-D (Optional accessory for models withDVI inputs, sold separately)Video Cable: HDMI(Optional accesory for models withHDMI inputs, sold separately)Audio CableWebcam 2.0M(For M2200HD and M2400HD only)USB Cable(For M2200HD and M2400HD only)
2 CopyrightCopyright (C) 2008 by BenQ Corporat ion. All rights reserved. No part of this publication may be reproduced, transmitted, transcribed, stored in a re trieval system or translated into any language or computer language, in any form or by any m eans, electronic, mechanical, magnetic, optical, chemical, manual or otherwise, without the prior written permission of BenQ Corporation.DisclaimerBenQ Corporation makes no representations or wa rranties, either expressed or implied, with respect to the ...
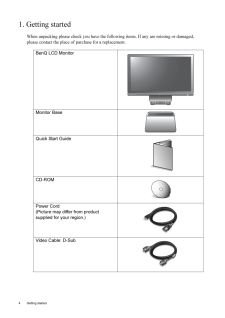
4 Getting started 1. Getting startedWhen unpacking please check you have the foll owing items. If any are missing or damaged, please contact the place of purchase for a replacement. BenQ LCD MonitorMonitor BaseQuick Start Guide CD-ROM Power Cord(Picture may differ from product supplied for your region.)Video Cable: D-Sub AUTO MENU ENTER

7 How to assemble your monitor hardware3. How to assemble your monitor hardwareIf the computer is turned on you must turn it off before continuing. Do not plug-in or turn-on the power to the monitor until instructed to do so. 1. Attach the monitor base.Please be careful to prevent damage to the monitor. Placing the screen surface on an object like a stapler or a mouse will crack the glass or damage the LCD substrate voiding your warranty. Sliding or scraping the monitor around on your desk will scratch...
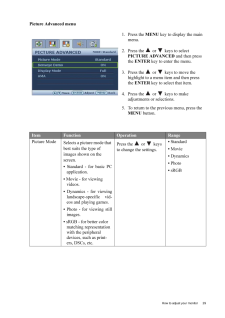
29 How to adjust your monitorPicture Advanced menu1. Press the MENU key to display the main menu.2. Press the or keys to select PICTURE ADVANCED and then press the ENTER key to enter the menu.3. Press the or keys to move the highlight to a menu item and then press the ENTER key to select that item.4. Press the or keys to make adjustments or selections.5. To return to the previous menu, press the MENU button.Item Function Operation RangePicture ModeSelects a picture mode that best suits the t...
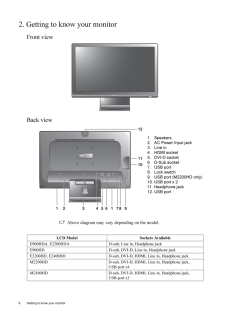
6 Getting to know your monitor 2. Getting to know your monitorFront viewBack view Above diagram may vary depending on the model.LCD Model Sockets AvailableE900HDA, E2200HDA D-sub, Line in, Headphone jackE900HD D-sub, DVI-D, Line in, Headphone jackE2200HD, E2400HD D-sub, DVI-D, HDMI, Line in, Headphone jackM2200HD D-sub, DVI-D, HDMI, Line in, Headphone jack,USB port x4M2400HD D-sub, DVI-D, HDMI, Line in, Headphone jack,USB port x3AUTO MENU ENTER3 4 5 81211101 1 6 2 7 91. Speakers2. AC Power Input jack3...

30 How to adjust your monitor Senseye Demo Displays the preview of screen images under the selected mode from Picture Mode. The screen will be divided into two windows; the left window demonstrates images of Standard mode, while the right window presents the images under the specified mode.Press the or keys to change the settings. * ON* OFFDisplay Mode This feature is provided to allow aspect ratio's other than 16:9 to be displayed without geometric distortion.* Overscan -Slightly enlarges the input i...
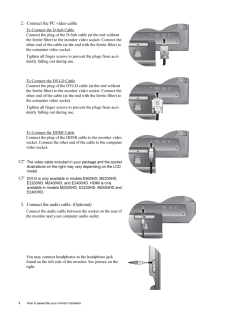
8 How to assemble your monitor hardware 2. Connect the PC video cable To Connect the D-Sub CableConnect the plug of the D-S ub cable (at the end without the ferrite filter) to the mon itor video socket. Connect the other end of the cable (at the end with the ferrite filter) to the computer video socket.Tighten all finger screws to prevent the plugs from acci-dently falling out during use.To Connect the DVI-D CableConnect the plug of the DVI-D cable (at the end without the ferrite filter) to the mon itor...

