

Q&A
取扱説明書・マニュアル (文書検索対応分のみ)
9 件の検索結果
40 - 50 件目を表示
全般
質問者が納得私も似たような症状にかかったことがあります。
結果として原因はモニタの故障でした。モニタを買い替えたら完全に治ったので。
買い替える前は何度か再起動を繰り返したり、プラグを差し直したら治ることはありましたが、
悪化する一方でした。
私の場合もともとモニタの調子が悪かったので、参考までに。
5260日前view127
全般
質問者が納得その接続はD-subがビデオ入力と共用になってる三菱製ディスプレイの接続の仕方ですね
残念ながらBenQのG2400WDではアップスキャンコンバータかトランスコーダを挟まないと表示できません
画質や表示遅延を気にしないならアップスキャンコンバータ
気にするならトランスコーダの方がメリットがあるようです
http://trasco.s53.xrea.com/index.php?TrascoList
Wii用のトランスコーダで有名なのはVD-W2とWii/PS3 VGA Cableですかね
どちらも海外製品でデ...
5690日前view94
全般
質問者が納得>D1/D2端子⇒D-Sub
提案しているケーブルで可能です。
>D1/D2端子or RGB ⇒DVI-D
下記商品で可能です。
プラス、HDMI---DVI-D変換ケーブルが必要。
http://store.shopping.yahoo.co.jp/akiba-garage/ad000002586780.html
5994日前view93
全般
質問者が納得こうなると、
別のモニタがあれば、そいつを接続してみる
PCの付属品にDVI-I→D-Sub変換アダプタがあれば、それを使ってD-Sub15Pで接続してみる
新しく購入したモニタを質問を書くのに使ったPCに接続してみる
付属品のケーブルの不良を疑って、ケーブルを交換してみる
これでも駄目なら初期不良の可能性も考えられるので、購入した店に相談するしかない。
6089日前view508
全般
全般
質問者が納得問題ないんじゃないでしょうか。
電源はSS-600HMあたりをお勧めしますが、EA-650でも悪くはないでしょう。
どうでもいいですがやっとTwoが出てたんですね、Nine hundred。
6166日前view47
全般
質問者が納得この中からですと私は
BenQのE2200HD
が良いと思いますよ◎
私はE2400HDを使っているのですが、21.5インチと24インチは画面の大きさが結構違ってくるので、ご予算が許せばE2400HDをお買いになったほうがより迫力が増すと思います
ですが…ご予算は2万円なのですよね?勝手ながら過去のご質問も拝見させていただきました(>_<)
E2200HDはだいたい27000円くらいなのでやはりこちらかな…
G2400HDは24インチですが、上下に黒い帯がでますので、お気になさるならば...
6187日前view85
全般
質問者が納得dynabook Qosmio E10シリーズ <仕様>
http://www.tlt.co.jp/pc/catalog/qosmio/040722e1/spec.htm
BenQ Japan - パソコン周辺機器
http://www.benq.co.jp/products/LCD/?product=1323&page=specifications
PC側はD-sub 15pinの出力に、モニタ側はD-sub 15pinの入力に対応しているようですので、「映すこと」自体は可能だと思います。
...
6262日前view63
全般
質問者が納得いいと思いますが、ThreeHundredはフロントファンがないので自分で追加したほうがいいでしょう。また電源もKRPW-V560Wのほうがいいと思います。560のほうが500より作りが丁寧ですし。この構成なら450Wあれば十分ですか。
なおUMAXメモリーとASUSのP45シリーズはP35シリーズより相性問題が若干発生しやすいので、心配なら12000円程度で買えるP5K PROにしましょう。P35シリーズのほうが発売して日数がたっているので、情報も多いです。
なおCore2Duoは新ステッピングのE0が登...
6308日前view52


2 CopyrightCopyright (C) 2008 by BenQ Corporation. All rights reserved. No part of this publication may be reproduced, transmitted, transcribed, stored in a retrieval system or translated into any language or computer language, in any form or by any me ans, electronic, mechanical, magnetic, optical, chemical, manual or otherwise, without the pr ior written permission of BenQ Corporation.DisclaimerBenQ Corporation makes no representations or warranties, either expressed or implied, with respect to the con...

Table of Contents 3Table of ContentsGetting started ......................................................................................................................4Getting to know your monitor .. ..........................................................................................6Front view .................................................................................................................... 6Back view .................................................................................
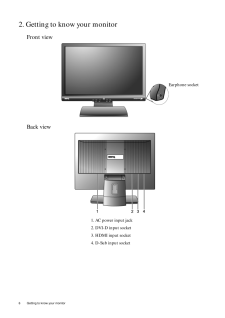
6 Getting to know your monitor 2. Getting to know your monitorFront viewBack view 1. AC power input jack2. DVI-D input socket 3. HDMI input socket4. D-Sub input socketEarphone socket

5 Getting startedConsider keeping the box and packaging in storage for use in the future when you may need to transport the monitor. The fitted foam packing is ideal for protecting the monitor during transport.Signal Cable: DVI-D (optional)
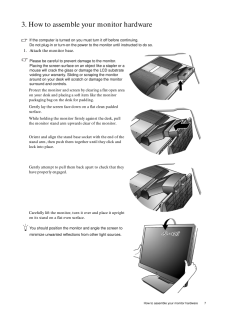
7 How to assemble your monitor hardware3. How to assemble your monitor hardwareIf the computer is turned on you must turn it off before continuing. Do not plug-in or turn-on the power to the monitor until instructed to do so. 1. Attach the monitor base.Please be careful to prevent damage to the monitor. Placing the screen surface on an object like a stapler or a mouse will crack the glass or damage the LCD substrate voiding your warranty. Sliding or scraping the monitor around on your desk will scratch...
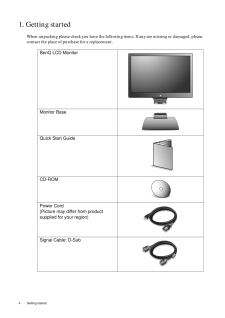
4 Getting started 1. Getting startedWhen unpacking please check you have the follow ing items. If any are missing or damaged, please contact the place of purchase for a replacement. BenQ LCD MonitorMonitor BaseQuick Start Guide CD-ROM Power Cord(Picture may differ from product supplied for your region)Signal Cable: D-Sub
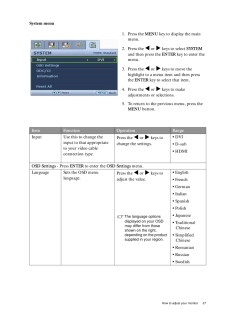
27 How to adjust your monitorSystem menu1. Press the MENU key to display the main menu.2. Press the v or w keys to select SYSTEM and then press the ENTER key to enter the menu.3. Press the v or w keys to move the highlight to a menu item and then press the ENTER key to select that item.4. Press the v or w keys to make adjustments or selections.5. To return to the previous menu, press the MENU button.Item Function Operation RangeInput Use this to change the input to that appropriate to your vide...
16 Picture optimization 5. Picture optimization The easiest way to obtain an optimal display from an analog (D-Sub) input is to use the AUTO key function. Press the AUTO key to optimize the currently displayed image to the screen. When you connect a digital video output using a digital (DVI) cable to your monitor, the AUTO key and the Auto Adjustment function will be disabled, because the monito r will automatically disp lay the best image. Please ensure that the connected graphic card on your computer...
9 How to assemble your monitor hardware4. Route the cables via the cable clip.Release the cable retaining clip by squeezing the clip inwards as illustrated. Positi on the cables together and reinsert the clip over them to retain the cables neatly in place behind the monitor stand.5. Connect-to and turn-on the power.Plug the other end of the power cord into a power outlet and turn it on.Picture may differ from product supplied for your region.Turn on the monitor by pressing the power button on the front ...
- 1

