

Q&A
取扱説明書・マニュアル (文書検索対応分のみ)
43 件の検索結果
10 - 20 件目を表示
全般
質問者が納得HDMIケーブル繋いだ瞬間自動で切り替わる可能性はありますが、
コントロールパネルのサウンドデバイスの管理から変更出来ますよ。
大型音声出力無しの液晶ディスプレイの方が最近高額だったりします、、、。
4950日前view62
全般
質問者が納得詳細に観察され、記述していますので、ご質問内容は理解できます。
私も似たような経験をしました。そのときは、グラフィックボードを装着のし直しで直りました。私の推測では、グラフィックボードとマザーボード間のコネクタ部の接触不良と思いました。ちょうど今の時季で、気温が高くなるときでした。
「モニターの電源を入れると、最初にBenQのマークが映り」とありますので、モニターの故障ではないような気もします。
「デスクトップが一瞬だけ映る」とありますので、もしかしたらモニタ側に不具合があるのかもしれません。
あまり自信...
5245日前view116
全般
質問者が納得最新のMac miniには、写真の HDMI−DVIアダプタが付属しているので、背面のHDMIポートで接続可能です。ただしHDMIポートですと最大解像度1,920×1,200ピクセル表示となります。
それ以上の解像度が必要な場合は別売りのApple Mini DisplayPort − DVI アダプタ(3400円)が必要です。Apple Mini DisplayPort − DVI アダプタを使うと最大2,560×1,600ピクセル表示となります。
※Apple Mini DisplayPort − DV...
5510日前view71
全般
質問者が納得漠然としているので非常に返答に困る質問です。
一応、定義をハイビジョンの中ではコスト安に見ると仮定します。
G2411HDにはスピーカーが無いのでただ接続しただけでは音が出ないのが問題になります。
そこでチューナーには音声出力が備わっている必要があります。
http://kakaku.com/item/K0000079869/spec/
他DVDレコーダーでもOKですが、やはりスピーカーが別途必要です。
端子に対応するPCスピーカーを選んでください。
http://kakaku.com/pc/pc-spea...
5730日前view83
全般
質問者が納得これですね。8000円で買えます。VGA端子なので画質はそれなりです。
VGAKTV-DIGIBOX http://joshinweb.jp/av/digibox.html?ACK=REP
【補足に対する回答】
私だったらモニタをPS3専用にして、今あるテレビでぎりぎりまでアナログ放送を見ます。
屋上の共同アンテナがUHF(矢印みたいなアンテナ)であれば特に工事は必要ありません。
5766日前view42
全般
質問者が納得メーカー物ならメーカーの名前、型番をはっきり書きましょう。
グラフィックカードの追加している場合はそれも。
RGB入力もあるので多分何でも使えます。
最大解像度はディスプレイとグラフィックカード間で通信をして
決めますから大丈夫なはずです。
だめなら手動設定も出来ますし。
補足:モニターの型番はわかっているからPC本体の情報が
必要だったんだが・・・普通わからん?
ハイビジョン動画にはハイビジョン対応の再生補助機能が
いるしグラフィック機能が足らないとのたうつように遅く表示さ
れたりする、昔のチップ...
5783日前view57
全般
質問者が納得kimu_kimu_huurinnkazannさん :大雑把な機種名しか書かれていませんが、お使いのPCのグラフィック性能に関してご自身で詳しく仕様を確認すべきです。
というのは、ワイド液晶を買ってもその解像度にパソコン側で設定できなければ無意味だからです。
私はその姉妹機のHP Compaq Business Desktop dc5000/CTを持っていますが、やはりオンボードの映像出力ではワイド画面に対応していないので、従来の形状の液晶を買いました。たしかBenQでしたね。
5781日前view27
全般
質問者が納得スキャンコンバーターがあれば、コンポーネント(YCbCr)をD-Sub(RGB)へ変換して接続は可能です。
5792日前view75
全般
質問者が納得液晶の取り付け用の部品(シール?)がずれてしまったのかもしれません。
購入直後なら、販売店に申し出ましょう。
交換が無理でも、無償修理対象のはずです。
5810日前view68
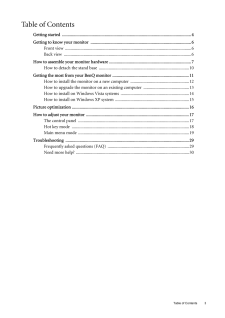
Table of Contents 3Table of ContentsGetting started ......................................................................................................................4Getting to know your monitor ............................................................................................6Front view .................................................................................................................... 6Back view ..................................................................................

2 CopyrightCopyright (C) 2009 by BenQ Corporation. All rights reserved. No part of this publication may be reproduced, transmitted, transcribed, stored in a retrieval system or translated into any language or computer language, in any form or by any me ans, electronic, mechanical, magnetic, optical, chemical, manual or otherwise, without the pr ior written permission of BenQ Corporation.DisclaimerBenQ Corporation makes no representations or warranties, either expressed or implied, with respect to the con...
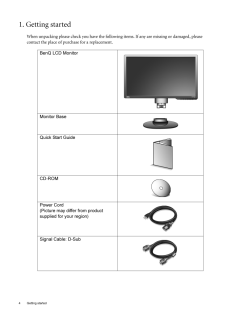
4 Getting started 1. Getting startedWhen unpacking please check you have the follow ing items. If any are missing or damaged, please contact the place of purchase for a replacement. BenQ LCD MonitorMonitor BaseQuick Start Guide CD-ROM Power Cord(Picture may differ from product supplied for your region)Signal Cable: D-Sub

6 Getting to know your monitor 2. Getting to know your monitorFront viewBack view 1. AC power input jack2. HDMI input socket 3. DVI-D input socket 4. D-Sub input socketEarphone socket
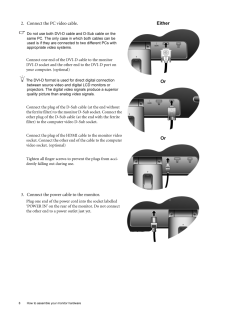
8 How to assemble your monitor hardware 2. Connect the PC video cable.Do not use both DVI-D cable and D-Sub cable on the same PC. The only case in which both cables can be used is if they are connec ted to two different PCs with appropriate video systems. Connect one end of the DVI-D cable to the monitor DVI-D socket and the other end to the DVI-D port on your computer. (optional)The DVI-D format is used for direct digital connection between source video and digital LCD monitors or projectors. The digital...

7 How to assemble your monitor hardware3. How to assemble your monitor hardwareIf the computer is turned on you must turn it off before continuing. Do not plug-in or turn-on the power to the monitor until instructed to do so. 1. Attach the monitor base.Please be careful to prevent damage to the monitor. Placing the screen surface on an object like a stapler or a mouse will crack the glass or damage the LCD substrate voiding your warranty. Sliding or scraping the monitor around on your desk will scratch ...
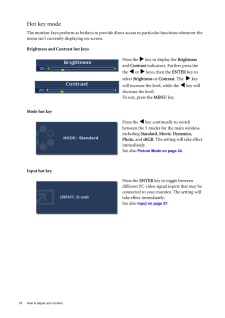
18 How to adjust your monitor Hot key modeThe monitor keys perform as hotkeys to provide di rect access to particular functions whenever the menu isn't currently displaying on-screen.Brightness and Contrast hot keysMode hot keyInput hot keyPress the w key to display the Brightness and Contrast indicators. Further press the the v or w keys, then the ENTER key to select Brightness or Contrast. The w key will increase the level, while the v key will decrease the level.To exit, press the MENU key.Press...
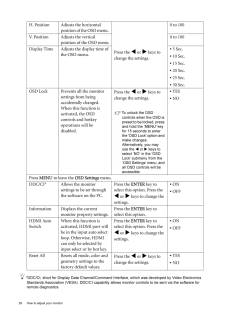
28 How to adjust your monitor *DDC/CI, short for Display Data Channel/Command Interface, which was developed by Video Electronics Standards Association (VESA). DDC/CI capability allows monitor controls to be sent via the software for remote diagnostics.H. Position Adjusts the horizontal position of the OSD menu. Press the v or w keys to change the settings. 0 to 100V. Position Adjusts the vertical position of the OSD menu.0 to 100Display Time Adjusts the display time of the OSD menu.* 5 Sec.* 10 Sec.* ...

29 Troubleshooting7. TroubleshootingFrequently asked questions (FAQ)The image is blurred:Read the instructions on the link "Adjusting the Screen Resolution" on the CD, and then select the correct resolution, refresh rate and make adjustments based on these instructions.How do you use a VGA extension cable?Remove the extension cable for the test. Is the imag e now in focus? If not, optimize the image by working through the instructions in the "Adjusting the refresh rate" section on the link "Adjusting t...

