

Q&A
取扱説明書・マニュアル (文書検索対応分のみ)
12 件の検索結果
220 - 230 件目を表示
全般
質問者が納得30fpsで良いのであれば760でも行けるでしょう。
ただしどうしても不利になりますので、設定を落としてでもフレームレートを稼いだほうが良いような気がしますが・・・。
>>4GBモデルと比較した際に大きく動作が異なるのでしょうか?
VRAMについては以下を参考にしてください。
http://note.chiebukuro.yahoo.co.jp/detail/n220138
結論としては2GBで問題無いと思います。
>>GTX760とどちらをおすすめしますか?
今後Nvidiaが...
4394日前view32
全般
質問者が納得>グラボをほかのパソコンに付けて起動したのですが問題なく画面は映り起動しました。
>ほかのグラボを差し込んで電源を入れても起動しませんでした。
グラボが故障している可能性は限りなく0に近いと思うんだけど、なぜわざわざグラボを何度も抜き差しするのか?
故障箇所は質問文だけでは分からないけど、マザーボードか電源の可能性が高そう。
マザー交換はほぼ全てのパーツをばらす必要があり、1台丸ごと自作に近いレベルの知識が必要になる。CPUクーラーも載せ替えるのでグリスも用意。
自信がないならパソコン専門店に持ちこんで簡...
4439日前view25
全般
質問者が納得補足にコメント:
それだとあまり思いつきませんが…もしかしたら、RealTekのサイトへ行ってドライバをダウンロードしないとダメとかって可能性はないですか? Windows標準のドライバだからタブがないとかって可能性はない? あとはマザーボードのCDにある奴はどうなのかとか。
元々どうなってて、再インストールで同じに戻るべきものなのかが判らないので。マザーボードからしてショップのBTOとかだったりするのを自分で入れなおしたとかだと、ドライバの構成が違う可能性も考えられます。
--
現在有効なオーディオ...
4480日前view22
全般
質問者が納得CPUかマザーのどちらかが逝ってしまった可能性がありますね。OCやっていたなら仕方がないですが。
対処もすべてやった感はするので、ここはアクティブにHaswellで組まれてはどうでしょうか。
4523日前view26
全般
質問者が納得ゲームとして動作させるのは問題ないでしょうね。
高画質設定でもまぁまぁ動くんじゃないですか?
電源は変えた方がいいと思うけど予算しだいだな。
っていうか最初からDSFRにしたら?わざわざ下げるなら意味ないし?
5060日前view6
全般
質問者が納得???自作ですか?
BIOSの設定がいるかどうかはPCによりますが、通常は不要です。
必要な場合は、「BIOS上でオンボードのディスプレイを無効にしている場合」ですね。
何のデバイスが停止しているのかも書いてませんね。
と、いうわけで何が問題なのかもわかりません。
画面が見れているようですし、ATIのグラフィックボードははずしているようですからオンボードのグラフィックで問題なく動いているのでは?
補足へのご回答
よくわからないんですけど、オンボードのグラフィックチップがNVIDIA geforce ...
5234日前view1
全般
質問者が納得鮮やかでくっきりというのはもともとの製品の素性を超えることはできません
PC用等のモニタは動画やゲーム向けではないのでこういう用途に使うには調整の余地があるものもあります
調整の余地がある部分は色合いでカラーバランスが崩れているのを修正したり好みの色合いに調整したりします
(この製品についてどうかは知りません)
この場合は輝度やコントラストではなくRed/Blue/Greenを調整します
それからAMAはどうやら本来ありえない表示がでることもあるようなのでAMAのON/OFFなども試してみると良いかもしれま...
5805日前view103
全般
質問者が納得1 問題ないと思います。
2 プロデザインナーじゃなければ、十分足りるし、きれいに表示させると思います。
5944日前view87
全般
質問者が納得モニター側面のヘッドフォン端子から、一番大きいスピーカー(ウーファー)の使用していないメス端子×2に赤と白のオス端子を差し込めばOKです。下記のような形のケーブルを買ってください。
ヘッドフォン端子⇒ステレオ音声端子
http://www.amazon.co.jp/audio-technica-GOLDLINK-%E3%83%94%E3%83%B3%C3%972-%E3%82%B9%E3%83%86%E3%83%AC%E3%82%AA%E3%83%9F%E3%83%8B3-0m-AT561A-3-0/dp...
6010日前view77
LCD MonitorUser ManualE900HD/E900HDA E2200HD/E2200HDAM2200HD M2400HD/E2400HD

2 CopyrightCopyright (C) 2008 by BenQ Corporat ion. All rights reserved. No part of this publication may be reproduced, transmitted, transcribed, stored in a re trieval system or translated into any language or computer language, in any form or by any m eans, electronic, mechanical, magnetic, optical, chemical, manual or otherwise, without the prior written permission of BenQ Corporation.DisclaimerBenQ Corporation makes no representations or wa rranties, either expressed or implied, with respect to the ...
Table of ContentsCopyright ..................................................................................................................... ...2Disclaimer .................................................................................................................... ...2Getting started ............................................................................................................... .4Getting to know your monitor ...........................................................................

16 Getting the most from your BenQ monitor How to install on Windows XP system1. Open Display Properties.The quickest shortcut to Display Properties is through the Windows desktop. Right-click the desktop and select Properties from the popup menu.Alternatively, the Windows menu to Display Properties is located in Control Panel. In Windows XP version, Control Panel is located directly under the main Start menu item. The menu options displayed will depend upon which type of view is selected for your syst...
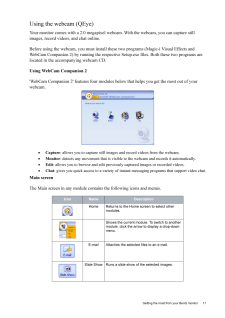
17 Getting the most from your BenQ monitorUsing the webcam (QEye)Your monitor comes with a 2.0 megapixel web cam. With the webcam, you can capture still images, record videos, and chat online.Before using the webcam, you must install thes e two programs (Magic-i Visual Effects and WebCam Companion 2) by running the respective Se tup.exe files. Both these two programs are located in the accompanying webcam CD.Using WebCam Companion 2'WebCam Companion 2' features four modules below that helps you get the...
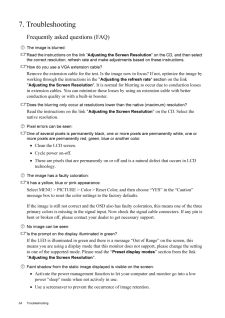
34 Troubleshooting 7. TroubleshootingFrequently asked questions (FAQ)The image is blurred:Read the instructions on the link " Adjusting the Screen Resolution " on the CD, and then select the correct resolution, refresh rate and make adjustments based on these instructions.How do you use a VGA extension cable?Remove the extension cable for the test. Is the image now in focus? If not, optimize the image by working through the instructions in the "Adjusting the refresh rate " section on the link "Adjusting ...

18 Getting the most from your BenQ monitor Capturing still images or recording videos12. Launch 'WebCam Companion 2' by clicking Start, All Programs, the ArcSoft WebCam Companion 2 folder, and then click WebCam Companion 2.13. Click to select the Capture module from the Home screen.14. On the Capture preview screen, you can do the following tasks.•Capture: captures still images from the webcam.•Burst: captures multiple images in quick succession. The number of images to be captured in each burst can be...
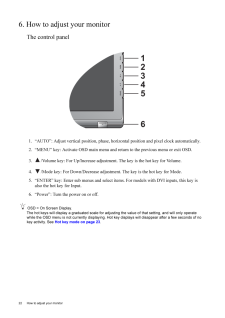
22 How to adjust your monitor 6. How to adjust your monitorThe control panel1. "AUTO": Adjust vertical pos ition, phase, horizontal position and pixel clock automatically.2. "MENU" key: Activate OSD main menu and return to the previous menu or exit OSD.3. /Volume key: For Up/Increase adjustme nt. The key is the hot key for Volume.4. /Mode key: For Down/Decrease adjustme nt. The key is the hot key for Mode. 5. "ENTER" key: Enter sub menus and select item s. For models with DVI inputs, this key is also th...
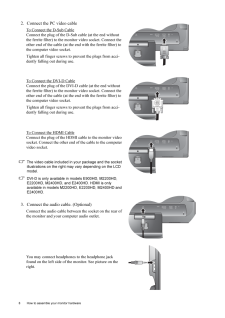
8 How to assemble your monitor hardware 2. Connect the PC video cable To Connect the D-Sub CableConnect the plug of the D-S ub cable (at the end without the ferrite filter) to the mon itor video socket. Connect the other end of the cable (at the end with the ferrite filter) to the computer video socket.Tighten all finger screws to prevent the plugs from acci-dently falling out during use.To Connect the DVI-D CableConnect the plug of the DVI-D cable (at the end without the ferrite filter) to the mon itor...

5 Getting startedConsider keeping the box and packaging in storage for use in the future when you may need to transport the monitor. The fitted foam packing is ideal for protecting the monitor during transport.Video Cable: DVI-D (Optional accessory for models withDVI inputs, sold separately)Video Cable: HDMI(Optional accesory for models withHDMI inputs, sold separately)Audio CableWebcam 2.0M(For M2200HD and M2400HD only)USB Cable(For M2200HD and M2400HD only)
- 1
- 2

