

Q&A
取扱説明書・マニュアル (文書検索対応分のみ)
48 件の検索結果
20 - 30 件目を表示
全般
質問者が納得コンピューターを右クリック
管理
ディスクの管理
と進み一覧に見えているか。
見えているなら
パーテーションの作成
初期化
ドライブ番号の割り当て
で使えるようになります。
3627日前view72
全般
質問者が納得AFTに関してはOS側の問題なのでこれは問題無いかと。
BIOSも出荷時設定のままであれば問題は出ないと思いますが
念の為出荷時状態にリセットしてみてください。
現状でできるとすれば、大事なデータのバックアップを作成して
HDDを初期化後にクリーンインストールを行うしかないのかなと思いますが……。
3634日前view77
全般
質問者が納得マニュアルのP71付近に書いてあります。切り替えはどうもWindows上でやるみたいですね。
マニュアル
tp://ftp.dell.com/Manuals/all-products/esuprt_laptop/esuprt_inspiron_laptop/inspiron-1526_owner%27s%20manual_ja-jp.pdf
上記アドレス先頭にfをつけてコピー、貼り付けでして下さい。yahoo内からftp://のリンクは出来ないようなので。
3982日前view102
全般
質問者が納得まず、電源をつながずにバッテリーのみで正常に起動し、動作するか
確かめてください。
それでバッテリーの残量が問題なく減っていくようでしたら問題ない
のかと思います。
ACアダプターに問題があるとも思えませんので、本体とACアダプター
の接触が悪いとか、バッテリーと本体の接触が悪いなどの問題がある
かもしれませんので、バッテリーを一度外し、しっかりと再度付けて
みてください。
ACアダプターと本体の接続もゆるくなっていないか、など接続不良が
発生していないことを確かめてみてください。
4108日前view220
全般
質問者が納得まさか・・・ 充電しながら、PC起動させてませんよね?
+
充電させるときは充電だけ(PC起動しない)、
PC使うときはバッテリーを外す (コレで起動しない機種は仕方ないからバッテリー付ける)
で、いきましょう。
バッテリーは熱で劣化するので、なるべくはPC起動中は外しておきたいですね
4108日前view174
全般
質問者が納得それはDVDの再生でPCに負荷が掛かっているので冷却ファンが高速で回転している音だと思います。
CPUに負荷が掛かって発熱量が高くなると、それを緩和する為に、少しでもCPU風を送る為にファンがかなり高速で回ります。
DVDやブルーレイの再生には結構マシンパワーを食います。(それらを再生する専用デッキではないので)
なので、別に問題はありません。
どうしても音が気になるのでしたら、ファンの音を抑える設定(CPUの最高スピードを抑える)がコントロールパネルの省電力の中から調整できると思いますが、そうするとC...
4392日前view27
全般
質問者が納得いつもお世話になっております。デル株式会社ソーシャルメディアチームです!
FnキーとF8を押すことでディスプレイの信号出力を切り替えることが可能ですので、PCとテレビを繋いだ状態でFnキーとF8キーを入力し信号の切り替えをお試し下さい。
改善が見られない場合は、弊社テクニカルサポートにて詳細を確認させて頂いた上で、改善策を提案させていただきたいと思います。
【DELLテクニカルサポートへの問い合わせ】
http://supportapj.dell.com/support/topics/topic.aspx...
4409日前view63
全般
質問者が納得ずっと、キャッシュからの表示になっているのでしょうね。
IE9の
メニューバー から ツール → インターネットオプション を開きます
#メニューバーが無い場合は Altキー押してください
全般タブ で、 閲覧の履歴の項目の所の 設定 をクリック
インターネット一時ファイル という項目に
おそらく、 自動的に確認する にチェックが入っていると思います。
ここを、 InternetExplorerを起動するたびに確認する(S) にチェック
OK で閉じてください。
これで、IEでとあるサイトを見に行っ...
4415日前view60
全般
質問者が納得初心者と自負するなら、お知り合いの詳しい人か訪問サービスで直接設定してもらった方が早いです。
ここでひとつひとつ説明しても、躓き⇒質問⇒躓き⇒質問・・・・・・いつになっても設定できません。
まずはPCのマニュアルをよく読んで設定してみてください。
マニュアルが無いなどと言う理由は通用しません。メーカーホームページでマニュアルはダウンロードできます。
無線LANルータの設定も然り。
4433日前view71
Dell™ Inspiron™ 1525/1526 Service Manual Before You BeginSubscriber Identity Module (Optional)ExpressCardsUsing the Memory Card ReaderOptical DriveHard DriveCenter Control CoverInternal Card With Bluetooth® Wireless TechnologyKeyboardButton BoardMemoryDisplaySpeaker AssemblyPalm RestExpressCard CageProcessor Thermal-Cooling AssemblyProcessor ModuleWireless Mini-CardsSystem Board AssemblyCoin-Cell BatteryBattery Latch AssemblyFlashing the BIOSPin Assignments for I/O Connectors Notes, Notices, and CautionsNOT...
Back to Contents Page Before You BeginDell™ Inspiron™ 1525/1526 Service Manual Recommended Tools Before Working Inside Your ComputerThis document provides procedures for removing and installing the components in your computer. Unless otherwise noted, each procedure assumes that:l You have performed the steps in Before Working Inside Your Computer.l You have read the safety information in your Dell Product Information Guide.l When replacing a component, you have already removed the original, if installed...
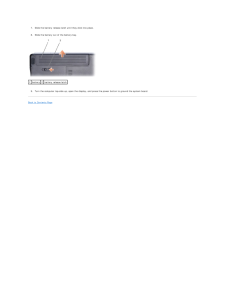
7.Slide the battery release latch until they click into place.8. Slide the battery out of the battery bay.1 battery 2 battery release latch9. Turn the computer top-side up, open the display, and press the power button to ground the system board.Back to Contents Page
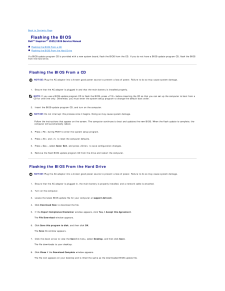
Back to Contents Page Flashing the BIOSDell™ Inspiron™ 1525/1526 Service Manual Flashing the BIOS From a CD Flashing the BIOS From the Hard DriveIf a BIOS-update program CD is provided with a new system board, flash the BIOS from the CD. If you do not have a BIOS-update program CD, flash the BIOSfrom the hard drive. Flashing the BIOS From a CDNOTICE: Plug the AC adapter into a known good power source to prevent a loss of power. Failure to do so may cause system damage.1. Ensure that the AC adapter is pl...

9.Double-click the file icon on the desktop and follow the instructions on the screen.Back to Contents Page
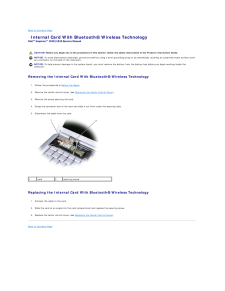
Back to Contents Page Internal Card With Bluetooth® Wireless TechnologyDell™ Inspiron™ 1525/1526 Service Manual CAUTION: Before you begin any of the procedures in this section, follow the safety instructions in the Product Information Guide.NOTICE: To avoid electrostatic discharge, ground yourself by using a wrist grounding strap or by periodically touching an unpainted metal surface (suchas a connector on the back of the computer).NOTICE: To help prevent damage to the system board, you must remove the ba...
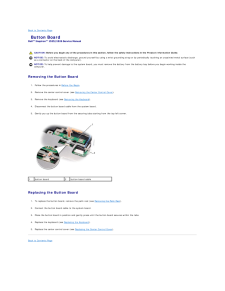
Back to Contents Page Button BoardDell™ Inspiron™ 1525/1526 Service Manual CAUTION: Before you begin any of the procedures in this section, follow the safety instructions in the Product Information Guide.NOTICE: To avoid electrostatic discharge, ground yourself by using a wrist grounding strap or by periodically touching an unpainted metal surface (suchas a connector on the back of the computer).NOTICE: To help prevent damage to the system board, you must remove the battery from the battery bay before you...
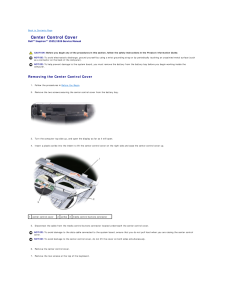
Back to Contents Page Center Control CoverDell™ Inspiron™ 1525/1526 Service Manual CAUTION: Before you begin any of the procedures in this section, follow the safety instructions in the Product Information Guide.NOTICE: To avoid electrostatic discharge, ground yourself by using a wrist grounding strap or by periodically touching an unpainted metal surface (suchas a connector on the back of the computer).NOTICE: To help prevent damage to the system board, you must remove the battery from the battery bay be...
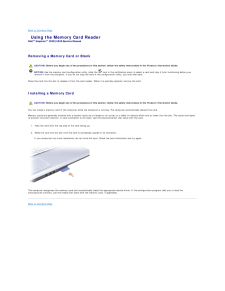
Back to Contents Page Using the Memory Card ReaderDell™ Inspiron™ 1525/1526 Service Manual Removing a Memory Card or Blank CAUTION: Before you begin any of the procedures in this section, follow the safety instructions in the Product Information Guide.NOTICE: Use the memory card configuration utility (click theicon in the notification area) to select a card and stop it from functioning before youremove it from the computer. If you do not stop the card in the configuration utility, you may lose data.Press ...
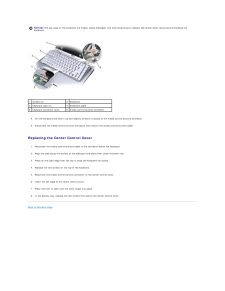
NOTICE: The key caps on the keyboard are fragile, easily dislodged, and time-consuming to replace. Be careful when removing and handling thekeyboard.1screws (2)2keyboard3keyboard tabs (5)4keyboard cable5keyboard connector latch6media control buttons connector8. Lift the keyboard and hold it up and slightly forward to access to the media control buttons connector.9. Disconnect the media control buttons connector and remove the media control buttons cable. Replacing the Center Control Cover1. Reconnect the me...

