
ISの取扱説明書・マニュアル [全70ページ 2.33MB]


3


48 / 70 ページ

48 / 70 ページ


現在のページURL
4384-3. Do-it-yourself maintenanceRemoving the front controller (engine compartment: type B fuse box)Lift the lid off while pushing thetabs on either side.Type DNormal fuseBlown fuseContact your Lexus dealer.
参考になったと評価  3人が参考になったと評価しています。


このマニュアルの目次
-
1 .3914Maintenance and care4...3914Maintenance and care4-3. Do-it-yourself maintenanceDo-it-yourself service precautionsIf you perform maintenance yourself, be sure to follow the correct proce-dure given in these sections.Items Parts and toolsBattery condition (→ P. 408 )*Warm water*Bak...
-
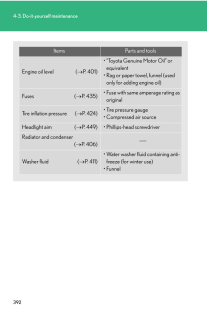
2 .3924-3. Do-it-yourself ma...3924-3. Do-it-yourself maintenanceItems Parts and toolsEngine oil level (→P. 401)*"Toyota Genuine Motor Oil" or equivalent*Rag or paper towel, funnel (used only for adding engine oil)Fuses (→P. 435)*Fuse with same amperage rating as originalTire inflation ...
-
3 .3934-3. Do-it-yourself ma...3934-3. Do-it-yourself maintenance4Maintenance and careCAUTIONThe engine compartment contains many mechanisms and fluids that may move sud-denly, become hot, or become electrically energized. To avoid death or serious injury,observe the following precauti...
-
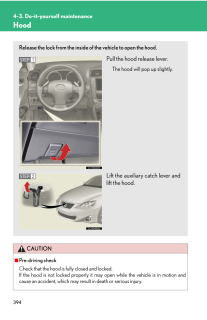
4 .3944-3. Do-it-yourself ma...3944-3. Do-it-yourself maintenanceHoodCAUTION■Pre-driving checkCheck that the hood is fully closed and locked. If the hood is not locked properly it may open while the vehicle is in motion andcause an accident, which may result in death or serious injury.R...
-
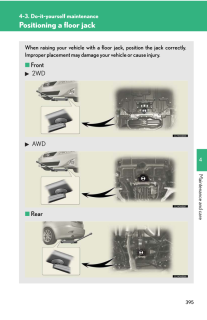
5 .3954-3. Do-it-yourself ma...3954-3. Do-it-yourself maintenance4Maintenance and carePositioning a floor jackWhen raising your vehicle with a floor jack, position the jack correctly.Improper placement may damage your vehicle or cause injury.■Front 2WD AWD■Rear
-
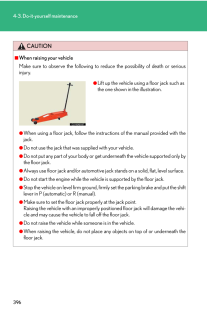
6 .3964-3. Do-it-yourself ma...3964-3. Do-it-yourself maintenanceCAUTION■When raising your vehicleMake sure to observe the following to reduce the possibility of death or seriousinjury.●When using a floor jack, follow the instructions of the manual provided with thejack.●Do not use the ...
-
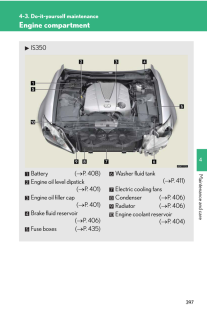
7 .3974-3. Do-it-yourself ma...3974-3. Do-it-yourself maintenance4Maintenance and careEngine compartmentIS350Battery (→P. 408)Engine oil level dipstick(→P. 401)Engine oil filler cap(→P. 401)Brake fluid reservoir(→P. 406)Fuse boxes (→P. 435)Washer fluid tank(→P. 411)Electric cooling fans...
-
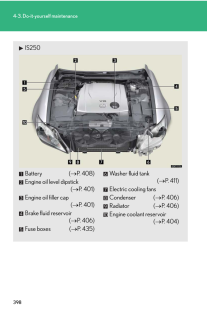
8 .3984-3. Do-it-yourself ma...3984-3. Do-it-yourself maintenanceIS250Battery (→P. 408)Engine oil level dipstick(→P. 401)Engine oil filler cap(→P. 401)Brake fluid reservoir(→P. 406)Fuse boxes (→P. 435)Washer fluid tank(→P. 411)Electric cooling fansCondenser (→P. 406)Radiator (→P. 406)En...
-
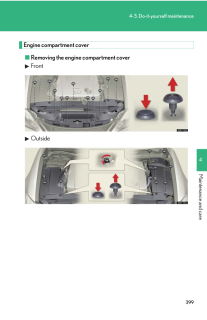
9 .3994-3. Do-it-yourself ma...3994-3. Do-it-yourself maintenance4Maintenance and careEngine compartment cover■Removing the engine compartment coverFrontOutside
-
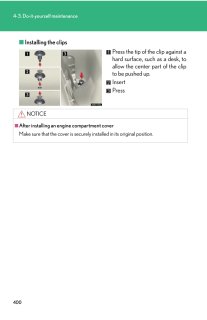
10 .4004-3. Do-it-yourself ma...4004-3. Do-it-yourself maintenance■Installing the clipsPress the tip of the clip against ahard surface, such as a desk, toallow the center part of the clipto be pushed up.InsertPressNOTICE■After installing an engine compartment coverMake sure that the cove...
-
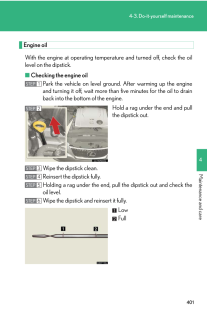
11 .4014-3. Do-it-yourself ma...4014-3. Do-it-yourself maintenance4Maintenance and careEngine oilWith the engine at operating temperat ure and turned off, check the oillevel on the dipstick.■Checking the engine oilPark the vehicle on level ground. After warming up the engineand turning i...
-
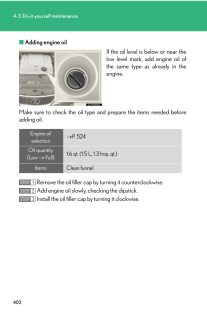
12 .4024-3. Do-it-yourself ma...4024-3. Do-it-yourself maintenance■Adding engine oilIf the oil level is below or near thelow level mark, add engine oil ofthe same type as already in theengine.Make sure to check the oil type and prepare the items needed beforeadding oil.Remove the oil fil...
-
13 .4034-3. Do-it-yourself ma...4034-3. Do-it-yourself maintenance4Maintenance and care■Engine oil consumption●The amount of engine oil consumed depe nds on the oil viscosity, the quality ofthe oil and the way the vehicle is driven.●More oil is consumed under driving conditions such as h...
-
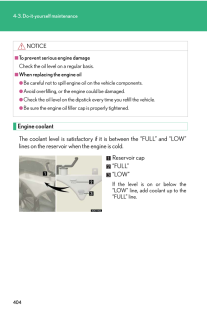
14 .4044-3. Do-it-yourself ma...4044-3. Do-it-yourself maintenanceEngine coolantThe coolant level is satisfactory if it is between the "FULL" and "LOW"lines on the reservoir when the engine is cold.Reservoir cap"FULL""LOW"If the level is on or below the"LOW" line, add coolant up to the"...
-
15 .4054-3. Do-it-yourself ma...4054-3. Do-it-yourself maintenance4Maintenance and care■If the coolant level drops within a short time after replenishingVisually check the radiator, hoses, engine coolant filler cap, radiator cap, drain cockand water pump. If you cannot find a leak, hav...
-
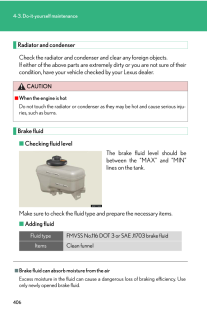
16 .4064-3. Do-it-yourself ma...4064-3. Do-it-yourself maintenanceRadiator and condenserCheck the radiator and condenser and clear any foreign objects. If either of the above parts are extremely dirty or you are not sure of theircondition, have your vehicle checked by your Lexus dealer....
-
17 .4074-3. Do-it-yourself ma...4074-3. Do-it-yourself maintenance4Maintenance and careCAUTION■When filling the reservoirTake care because brake fluid can harm your hands or eyes and damage paintedsurfaces.If fluid gets in your eyes, flush your eyes with clean water immediately.If you st...
-
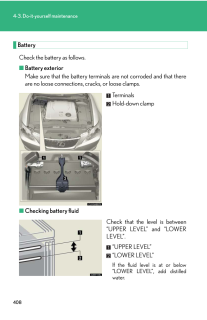
18 .4084-3. Do-it-yourself ma...4084-3. Do-it-yourself maintenanceBatteryCheck the battery as follows.■Battery exteriorMake sure that the battery terminals are not corroded and that thereare no loose connections, cracks, or loose clamps.TerminalsHold-down clamp■Checking battery fluidChe...
-
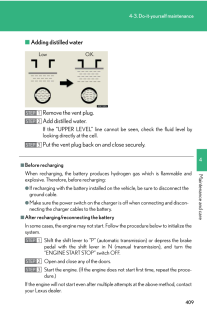
19 .4094-3. Do-it-yourself ma...4094-3. Do-it-yourself maintenance4Maintenance and care■Adding distilled waterRemove the vent plug.Add distilled water.If the "UPPER LEVEL" line cannot be seen, check the fluid level bylooking directly at the cell.Put the vent plug back on and close secure...
-
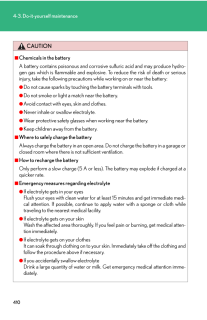
20 .4104-3. Do-it-yourself ma...4104-3. Do-it-yourself maintenanceCAUTION■Chemicals in the batteryA battery contains poisonous and corrosive sulfuric acid and may produce hydro-gen gas which is flammable and explosive. To reduce the risk of death or seriousinjury, take the following prec...
-
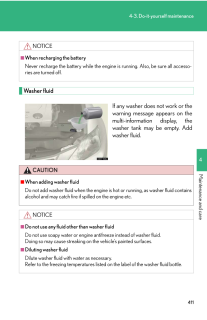
21 .4114-3. Do-it-yourself ma...4114-3. Do-it-yourself maintenance4Maintenance and careWasher fluidIf any washer does not work or thewarning message appears on themulti-information display, thewasher tank may be empty. Addwasher fluid.NOTICE■When recharging the batteryNever recharge the ...
-
22 .4124-3. Do-it-yourself ma...4124-3. Do-it-yourself maintenanceTiresReplace or rotate tires in accordan ce with maintenance schedules andtreadwear.■Checking tiresNew treadTreadwear indicatorWorn treadThe location of treadwear indi-cators is shown by the "TWI" or"∆" marks, etc., molded...
-
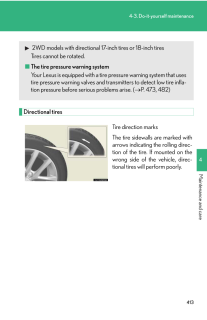
23 .4134-3. Do-it-yourself ma...4134-3. Do-it-yourself maintenance4Maintenance and careDirectional tiresTire direction marksThe tire sidewalls are marked witharrows indicating the rolling direc-tion of the tire. If mounted on thewrong side of the vehicle, direc-tional tires will perform ...
-
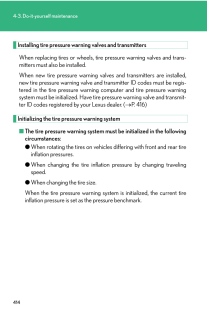
24 .4144-3. Do-it-yourself ma...4144-3. Do-it-yourself maintenanceInstalling tire pressure warning valves and transmittersWhen replacing tires or wheels, tire pressure warning valves and trans-mitters must also be installed. When new tire pressure warning va lves and transmitters are ins...
-
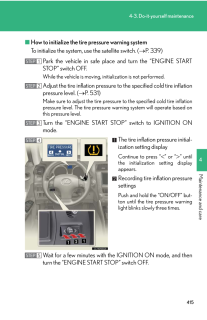
25 .4154-3. Do-it-yourself ma...4154-3. Do-it-yourself maintenance4Maintenance and care■How to initialize the tire pressure warning systemTo initialize the system, use the satellite switch. ( →P. 339)Park the vehicle in safe place and turn the "ENGINE STARTSTOP" switch OFF.While the vehi...
-
26 .4164-3. Do-it-yourself ma...4164-3. Do-it-yourself maintenanceRegistering and selecting ID codesTo select tire pressure warning valve and transmitter ID codes, use thesatellite switch. (→P. 339)■Registering ID codes2 sets of tire pressure warning valve and transmitter ID codes can b...
-
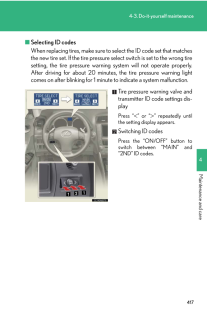
27 .4174-3. Do-it-yourself ma...4174-3. Do-it-yourself maintenance4Maintenance and care■Selecting ID codesWhen replacing tires, make sure to select the ID code set that matchesthe new tire set. If the tire pressure select switch is set to the wrong tiresetting, the tire pressure warnin...
-
28 .4184-3. Do-it-yourself ma...4184-3. Do-it-yourself maintenance■When to replace your vehicle's tiresTires should be replaced if:●You have tire damage such as cuts, splits, cracks deep enough to expose thefabric or bulges indicating internal damage●A tire goes flat repeatedly or cannot...
-
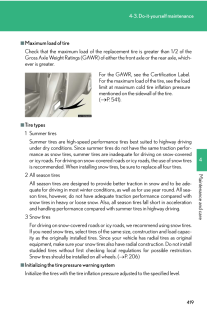
29 .4194-3. Do-it-yourself ma...4194-3. Do-it-yourself maintenance4Maintenance and care■Maximum load of tireCheck that the maximum load of the replac ement tire is greater than 1/2 of theGross Axle Weight Ratings (GAWR) of either the front axle or the rear axle, which-ever is greater.■Ti...
-
30 .4204-3. Do-it-yourself ma...4204-3. Do-it-yourself maintenance■When the initialization of the tire pressure warning system has failedInitialization can be completed in a few minutes. However, in the following cases,the settings have not been recorded and the system will not operate ...
-
31 .4214-3. Do-it-yourself ma...4214-3. Do-it-yourself maintenance4Maintenance and care■Tire pressure warning system certificationMODEL/FCC IDs:Transmitter: PAXPMV107JReceiver: HYQ13BCEFor vehicles sold in the U.S.A.NOTE:This device complies with Part 15 of the FCC Rules. Operation is su...
-
32 .4224-3. Do-it-yourself ma...4224-3. Do-it-yourself maintenanceCAUTION■Tire pressure warning system operationThe tire pressure warning system may not provide warning immediately if a tirebursts or if sudden air leakage occurs.■When inspecting or replacing tiresObserve the following pr...
-
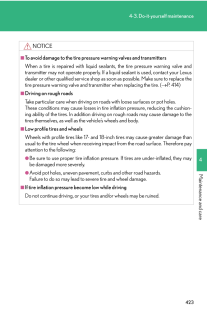
33 .4234-3. Do-it-yourself ma...4234-3. Do-it-yourself maintenance4Maintenance and careNOTICE■To avoid damage to the tire pressure warning valves and transmittersWhen a tire is repaired with liquid seal ants, the tire pressure warning valve andtransmitter may not operate properly. If a l...
-
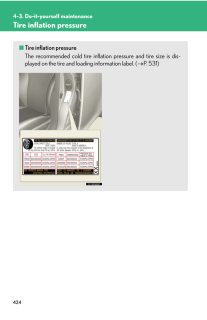
34 .4244-3. Do-it-yourself ma...4244-3. Do-it-yourself maintenanceTire inflation pressure■Tire inflation pressureThe recommended cold tire inflation pressure and tire size is dis-played on the tire and loading information label. ( →P. 531)
-
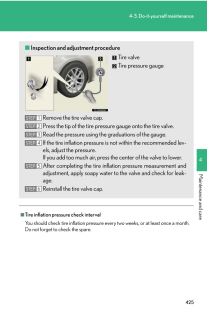
35 .4254-3. Do-it-yourself ma...4254-3. Do-it-yourself maintenance4Maintenance and care■Tire inflation pressure check intervalYou should check tire inflation pressure every two weeks, or at least once a month.Do not forget to check the spare.■Inspection and adjustment procedureTire valve...
-
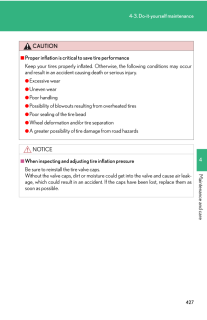
36 .4264-3. Do-it-yourself ma...4264-3. Do-it-yourself maintenance■Effects of incorrect tire inflation pressureDriving with incorrect tire inflation pressure may result in the following:●Reduced fuel efficiency●Reduced driving comfort and tire life●Reduced safety●Damage to the drive trai...
-
37 .4274-3. Do-it-yourself ma...4274-3. Do-it-yourself maintenance4Maintenance and careCAUTION■Proper inflation is critical to save tire performanceKeep your tires properly inflated. Otherw ise, the following conditions may occurand result in an accident cau sing death or serious injury....
-
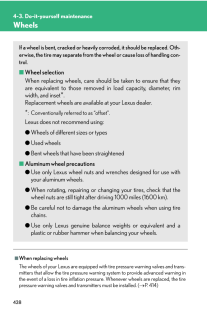
38 .4284-3. Do-it-yourself ma...4284-3. Do-it-yourself maintenanceWheels■When replacing wheelsThe wheels of your Lexus are equipped with tire pressure warning valves and trans-mitters that allow the tire pressure warning system to provide advanced warning inthe event of a loss in tire in...
-
39 .4294-3. Do-it-yourself ma...4294-3. Do-it-yourself maintenance4Maintenance and careCAUTION■When replacing wheels●Do not use wheels that are a different size from those recommended in theOwner's Manual, as this may result in loss of handling control.●Never use an inner tube in a leak...
-
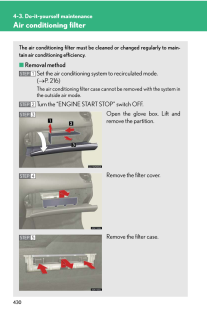
40 .4304-3. Do-it-yourself ma...4304-3. Do-it-yourself maintenanceAir conditioning filterThe air conditioning filter must be cleaned or changed regularly to main-tain air conditioning efficiency.■Removal methodSet the air conditioning system to recirculated mode. (→P. 216)The air condit...
-
41 .4314-3. Do-it-yourself ma...4314-3. Do-it-yourself maintenance4Maintenance and care■Checking intervalInspect and replace the air conditioning filter according to the maintenance sched-ule. In dusty areas or areas with heavy traffic flow, early replacement may berequired. (For schedul...
-
42 .4324-3. Do-it-yourself ma...4324-3. Do-it-yourself maintenanceNOTICE■To prevent damage to the system●When using the air conditioning system, make sure that a filter is always installed.●When cleaning the filter, do not clean the filter with water.
-
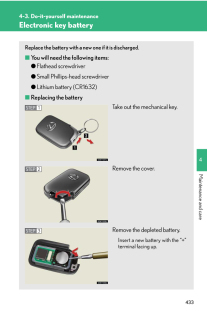
43 .4334-3. Do-it-yourself ma...4334-3. Do-it-yourself maintenance4Maintenance and careElectronic key batteryReplace the battery with a new one if it is discharged.■You will need the following items:●Flathead screwdriver●Small Phillips-head screwdriver●Lithium battery (CR1632)■Replacing ...
-
44 .4344-3. Do-it-yourself ma...4344-3. Do-it-yourself maintenance■If the electronic key battery is dischargedThe following symptoms may occur.●The smart access system with push-button start and wireless remote control willnot function properly.●The operational range is reduced.■Use a CR...
-
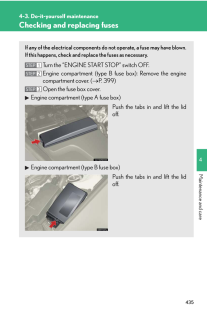
45 .4354-3. Do-it-yourself ma...4354-3. Do-it-yourself maintenance4Maintenance and careChecking and replacing fusesIf any of the electrical components do not operate, a fuse may have blown.If this happens, check and re place the fuses as necessary.Turn the "ENGINE START STOP" switch OFF....
-
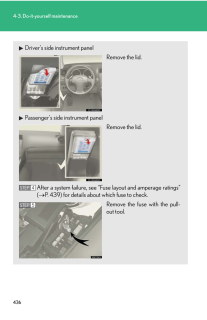
46 .4364-3. Do-it-yourself ma...4364-3. Do-it-yourself maintenanceDriver's side instrument panelRemove the lid.Passenger's side instrument panelRemove the lid.After a system failure, see "Fuse layout and amperage ratings"(→P. 439) for details about which fuse to check.Remove the fuse wit...
-
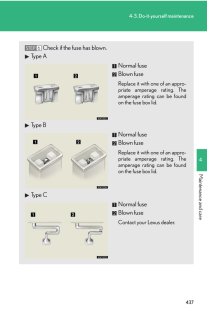
47 .4374-3. Do-it-yourself ma...4374-3. Do-it-yourself maintenance4Maintenance and careCheck if the fuse has blown.Type ANormal fuseBlown fuseReplace it with one of an appro-priate amperage rating. Theamperage rating can be foundon the fuse box lid.Type BNormal fuseBlown fuseReplace it w...
-
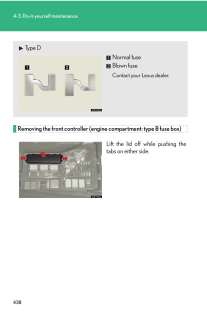
48 .4384-3. Do-it-yourself ma...4384-3. Do-it-yourself maintenanceRemoving the front controller (engine compartment: type B fuse box)Lift the lid off while pushing thetabs on either side.Type DNormal fuseBlown fuseContact your Lexus dealer.
-
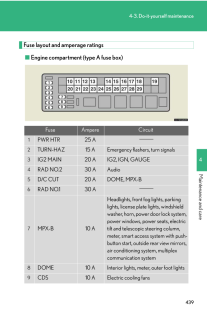
49 .4394-3. Do-it-yourself ma...4394-3. Do-it-yourself maintenance4Maintenance and careFuse layout and amperage ratings■Engine compartment (type A fuse box)Fuse Ampere Circuit1PWR HTR 25 A2TURN-HAZ 15 A Emergency flashers, turn signals3IG2 MAIN 20 A IG2, IGN, GAUGE4RAD NO.2 30 A Audio5D/...
-
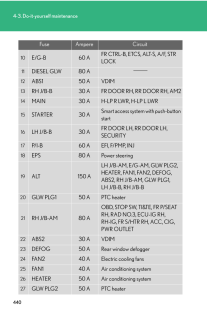
50 .4404-3. Do-it-yourself ma...4404-3. Do-it-yourself maintenance10E/G-B 60 AFR CTRL-B, ETCS, ALT-S, A/F, STR LOCK11DIESEL GLW 80 A12ABS1 50 A VDIM13RH J/B-B 30 A FR DOOR RH, RR DOOR RH, AM214MAIN 30 A H-LP R LWR, H-LP L LWR15STARTER 30 ASmart access system with push-button start16LH J/...
-
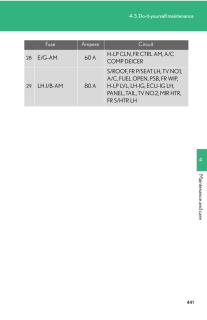
51 .4414-3. Do-it-yourself ma...4414-3. Do-it-yourself maintenance4Maintenance and care28E/G-AM 60 AH-LP CLN, FR CTRL AM, A/C COMP DEICER29LH J/B-AM 80 AS/ROOF, FR P/SEAT LH, TV NO.1, A/C, FUEL OPEN, PSB, FR WIP, H-LP LVL, LH-IG, ECU-IG LH, PANEL, TAIL, TV NO.2, MIR HTR, FR S/HTR LHFuse ...
-
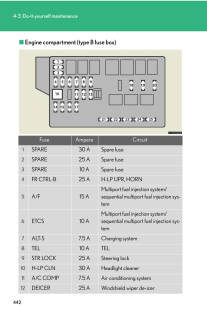
52 .4424-3. Do-it-yourself ma...4424-3. Do-it-yourself maintenance■Engine compartment (type B fuse box)Fuse Ampere Circuit1SPARE 30 A Spare fuse2SPARE 25 A Spare fuse3SPARE 10 A Spare fuse4FR CTRL-B 25 A H-LP UPR, HORN5A/F 15 AMultiport fuel injection system/sequential multiport fuel inj...
-
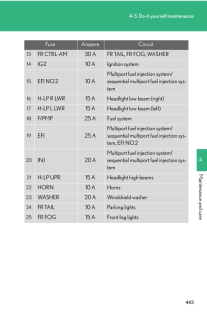
53 .4434-3. Do-it-yourself ma...4434-3. Do-it-yourself maintenance4Maintenance and care13FR CTRL-AM 30 A FR TAIL, FR FOG, WASHER14IG2 10 A Ignition system15EFI NO.2 10 AMultiport fuel injection system/sequential multiport fuel injection sys-tem16H-LP R LWR 15 A Headlight low beam (right)...
-
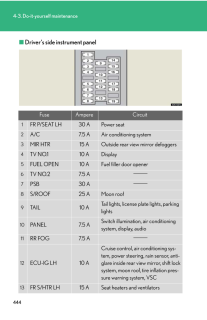
54 .4444-3. Do-it-yourself ma...4444-3. Do-it-yourself maintenance■Driver's side instrument panelFuse Ampere Circuit1FR P/SEAT LH 30 A Power seat2A/C 7.5 A Air conditioning system3MIR HTR 15 A Outside rear view mirror defoggers4TV NO.1 10 A Display5FUEL OPEN 10 A Fuel filler door opener6...
-
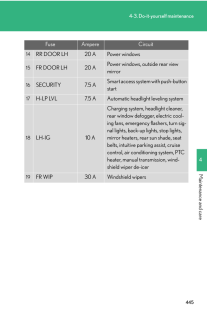
55 .4454-3. Do-it-yourself ma...4454-3. Do-it-yourself maintenance4Maintenance and care14RR DOOR LH 20 A Power windows15FR DOOR LH 20 APower windows, outside rear view mirror16SECURITY 7.5 ASmart access system with push-button start17H-LP LVL 7.5 A Automatic headlight leveling system18LH...
-
56 .4464-3. Do-it-yourself ma...4464-3. Do-it-yourself maintenance■Passenger's side instrument panelFuse Ampere Circuit1FR P/SEAT RH 30 A Power seat2DOOR DL 15 A3OBD 7.5 A On-board diagnosis system4STOP SW 7.5 AStop lights, multiport fuel injection sys-tem/sequential multiport fuel injec...
-
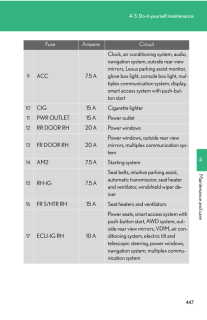
57 .4474-3. Do-it-yourself ma...4474-3. Do-it-yourself maintenance4Maintenance and care9ACC 7.5 AClock, air conditioning system, audio, navigation system, outside rear view mirrors, Lexus parking assist monitor, glove box light, console box light, mul-tiplex communication system, display...
-
58 .4484-3. Do-it-yourself ma...4484-3. Do-it-yourself maintenance■After a fuse is replaced●If the lights do not turn on even afte r the fuse has been replaced, a bulb mayneed replacement. (→P. 451)●If the replaced fuse blows again, have the vehicle inspected by your Lexusdealer.■If ther...
-
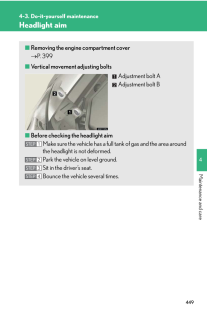
59 .4494-3. Do-it-yourself ma...4494-3. Do-it-yourself maintenance4Maintenance and careHeadlight aim■Removing the engine compartment cover→P. 399■Vertical movement adjusting boltsAdjustment bolt AAdjustment bolt B■Before checking the headlight aimMake sure the vehicle has a full tank of ...
-
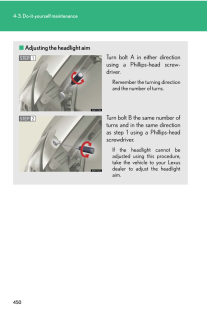
60 .4504-3. Do-it-yourself ma...4504-3. Do-it-yourself maintenance■Adjusting the headlight aimTurn bolt A in either directionusing a Phillips-head screw-driver.Remember the turning directionand the number of turns.Turn bolt B the same number ofturns and in the same directionas step 1 usi...
-
61 .4514-3. Do-it-yourself ma...4514-3. Do-it-yourself maintenance4Maintenance and careLight bulbsYou may replace the following bulbs yourself. For more information aboutreplacing other light bulbs, contact your Lexus dealer.■Preparing a replacement light bulbCheck the wattage of the lig...
-
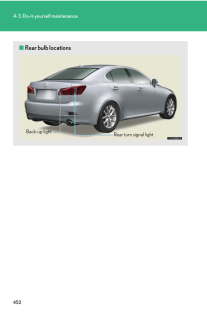
62 .4524-3. Do-it-yourself ma...4524-3. Do-it-yourself maintenance■Rear bulb locationsRear turn signal lightBack-up light
-
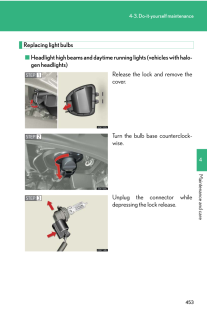
63 .4534-3. Do-it-yourself ma...4534-3. Do-it-yourself maintenance4Maintenance and careReplacing light bulbs■Headlight high beams and daytime r unning lights (vehicles with halo-gen headlights)Release the lock and remove thecover.Turn the bulb base counterclock-wise.Unplug the connector ...
-
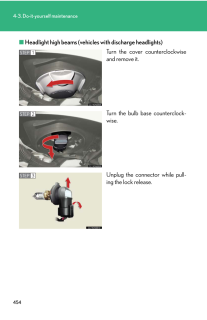
64 .4544-3. Do-it-yourself ma...4544-3. Do-it-yourself maintenance■Headlight high beams (vehicles with discharge headlights)Turn the cover counterclockwiseand remove it.Turn the bulb base counterclock-wise.Unplug the connector while pull-ing the lock release.STEP 1STEP 2STEP 3
-
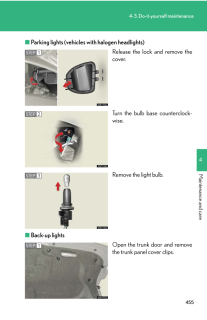
65 .4554-3. Do-it-yourself ma...4554-3. Do-it-yourself maintenance4Maintenance and care■Parking lights (vehicles with halogen headlights)Release the lock and remove thecover.Turn the bulb base counterclock-wise.Remove the light bulb.■Back-up lightsOpen the trunk door and removethe trunk ...
-
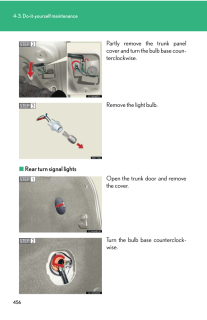
66 .4564-3. Do-it-yourself ma...4564-3. Do-it-yourself maintenancePartly remove the trunk panelcover and turn the bulb base coun-terclockwise.Remove the light bulb.■Rear turn signal lightsOpen the trunk door and removethe cover.Turn the bulb base counterclock-wise.STEP 2STEP 3STEP 1STEP ...
-
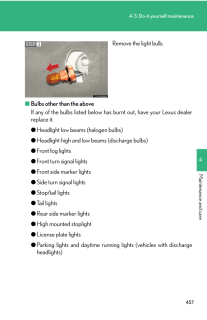
67 .4574-3. Do-it-yourself ma...4574-3. Do-it-yourself maintenance4Maintenance and careRemove the light bulb.■Bulbs other than the aboveIf any of the bulbs listed below has burnt out, have your Lexus dealerreplace it.●Headlight low beams (halogen bulbs)●Headlight high and low beams (disc...
-
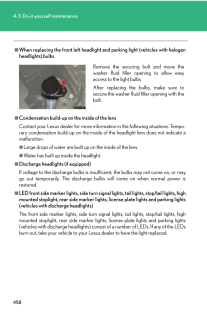
68 .4584-3. Do-it-yourself ma...4584-3. Do-it-yourself maintenance■When replacing the front left headlight and parking light (vehicles with halogenheadlights) bulbs■Condensation build-up on the inside of the lensContact your Lexus dealer for more inform ation in the following situations...
-
69 .4594-3. Do-it-yourself ma...4594-3. Do-it-yourself maintenance4Maintenance and careCAUTION■Replacing light bulbs●Turn off the headlights. Do not attempt to replace the bulb immediately after turn-ing off the headlights. The bulbs become very hot and may cause burns.●Do not touch the...
