MINIの取扱説明書・マニュアル [全165ページ 2.67MB]


6


48 / 165 ページ
48 / 165 ページ


現在のページURL
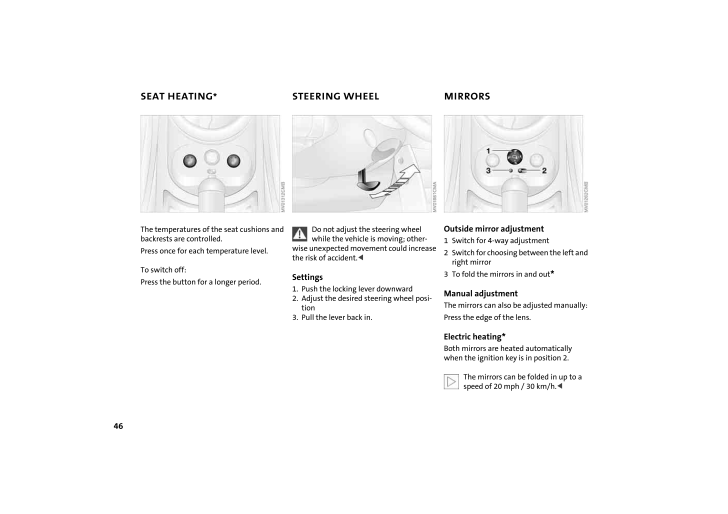
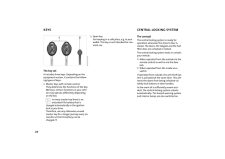
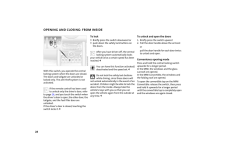
46SEAT HEATING* STEERING WHEEL MIRRORSThe temperatures of the seat cushions and backrests are controlled. Press once for each temperature level. To switch off: Press the button for a longer period.Do not adjust the steering wheel while the vehicle is moving; other-wise unexpected movement could increase the risk of accident. <Settings 1. Push the locking lever downward 2. Adjust the desired steering wheel posi-tion3. Pull the lever back in.Outside mirror adjustment 1 Switch for 4-way adjustment 2 Switch for choosing between the left and right mirror 3 To fold the mirrors in and out* Manual adjustment The mirrors can also be adjusted manually: Press the edge of the lens. Electric heating * Both mirrors are heated automatically when the ignition key is in position 2.The mirrors can be folded in up to a speed of 20 mph / 30 km/h. <
参考になったと評価  8人が参考になったと評価しています。


このマニュアルの目次
-
2 .2 ページ目のマニュアル
-
3 .CONGRATULATIONS ON YOUR N...CONGRATULATIONS ON YOUR NEW MINI This Owner's Manual should be considered a permanen t part of this vehicle. It should stay with the vehicle when sold to provide the next owner with important operating, safety and maintenance information.We wish you an en...
-
4 .CONTENTS2(C) 2004 Bayeris...CONTENTS2(C) 2004 Bayerische Motoren Werke Aktiengesellschaft Munich, Germany Reprinting, including excerpts, only with the written consent of BMW AG, Munich. Order No. 01 41 0 158 427 US English VI/04 Printed in Germany Printed on envi...
-
5 .3OVERVIEW REPAIRS OPERATI...3OVERVIEW REPAIRS OPERATION CONTROLS DATA INDEXDriving: Ignition lock 51Starting the engine 51Switching off the engine 52Parking brake 53Manual transmission 53Continuously Variable automatic Transmission (CVT) 54Parking lamps/Low beams 57signal/Head...
-
6 .CONTENTS4In the engine co...CONTENTS4In the engine compartment: Bonnet 105Engine compartment: MINI COOPER and MINI COOPER CONVERTIBLE 106 MINI COOPER S and MINI COOPER S CONVERTIBLE 107Washer fluid 108Engine oil 108Coolant 110Brake fluid 111Maintenance and care: MINI Maintena...
-
7 .5OVERVIEW REPAIRS OPERATI...5OVERVIEW REPAIRS OPERATION CONTROLS DATA INDEXINDEX Everything from A to Z 148
-
8 .6About this Owner's Manua...6About this Owner's Manual In compiling this Owner's Manual we have made every effort to furnish you with a convenient reference source affording quick access to all the essentials. The fast-est way to find detailed information on any specific subject is t...
-
9 .7OVERVIEW REPAIRS OPERATI...7OVERVIEW REPAIRS OPERATION CONTROLS DATA INDEXEditorial notice The manufacturer pursues a policy of con-tinuous, ongoing development that is con-ceived to ensure that MINI vehicles con-tinue to embody the highest quality and safety standards combined with...
-
10 .8NOTES Parts and accessor...8NOTES Parts and accessories:For your own safety, use genuine parts and accessories approved by the manufacturer of the MINI. When you purchase accessories tested and approved by the manufacturer of the MINI and Original MINI Parts, you simulta-neously a...
-
11 .9OVERVIEW REPAIRS OPERATI...9OVERVIEW REPAIRS OPERATION CONTROLS DATA INDEXReporting safety defects The following only applies to vehicles owned and operated in the US.If you believe that your vehicle has a defect which could cause a crash or could cause injury or death, yo u should ...
-
12 .12 ページ目のマニュアル
-
13 .OVERVIEWCONTROLSOPERATION...OVERVIEWCONTROLSOPERATION, CARE , MAINTENANCEOWNER SERVICE PROCEDURESINDEXTECHNICAL DATA11OVERVIEW REPAIRS OPERATION CONTROLS DATA INDEX
-
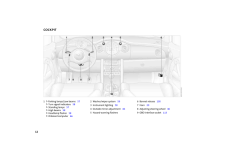
14 .121 >Parking lamps/Low be...121 >Parking lamps/Low beams 57> Turn signal indicators 58> Standing lamps 57> High beams 58> Headlamp flasher 58> Onboard computer 662Washer/wiper system 593 Instrument lighting 584 Outside mirror adjustment 465 Hazard warning flashers6 Bonnet re...
-
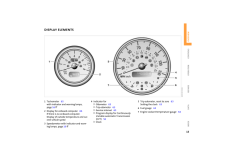
15 .13OVERVIEW REPAIRS OPERAT...13OVERVIEW REPAIRS OPERATION CONTROLS DATA INDEX1 Tachometer 65 with indicator and warning lamps, page 16 ff2 Display for onboard computer 66 If there is no onboard computer: Display of outside temperature and cur-rent vehicle speed3 Speedometer with ...
-
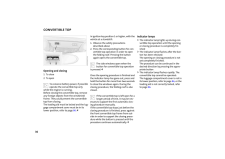
16 .141Tachometer 65 with in...141Tachometer 65 with indicator and warning lamps, page 16 ff2 Display for onboard computer 3 Speedometer with indicator and warning lamps, page 16 ff4 Trip odometer, reset to zero 63 Setting the clock 635 Indicator for> Odometer 63> Trip odometer 63...
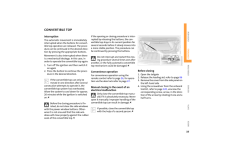
-
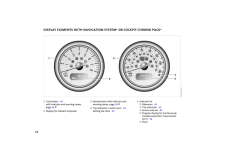
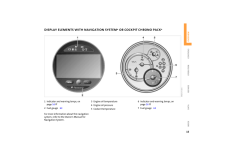
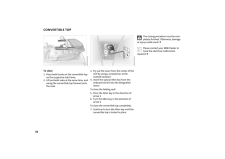
17 .15OVERVIEW REPAIRS OPERAT...15OVERVIEW REPAIRS OPERATION CONTROLS DATA INDEXDISPLAY ELEMENTS WITH NAVIGATION SYSTEM* OR COCKPIT CHRONO PACK* 1 Indicator and warning lamps, on page 16 ff 2 Fuel gauge 63For more information about the navigation system, refer to the Owner's Manual for...
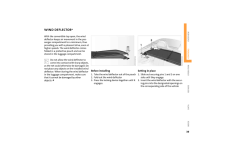
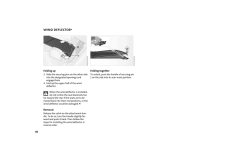
-
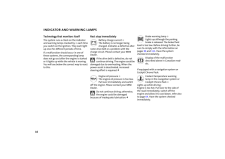
18 .16INDICATOR AND WARNING L...16INDICATOR AND WARNING LAMPS Technology that monitors itself The system runs a check on the indicator and warning lamps marked by + each time you switch on the ignition. They each light up once for different periods of time.If a malfunction should occur ...
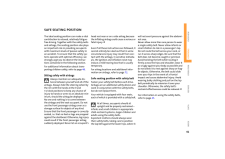
-
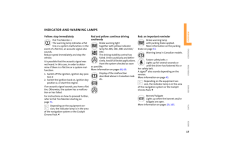
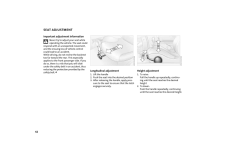
19 .17OVERVIEW REPAIRS OPERAT...17OVERVIEW REPAIRS OPERATION CONTROLS DATA INDEXINDICATOR AND WARNING LAMPS Yellow: stop immediatelyFlat Tire Monitor + The warning lamp indicates a flat tire or a system malfunction. In the event of a flat tire, an acoustic signal also sounds. Reduce spee...
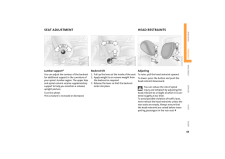
-
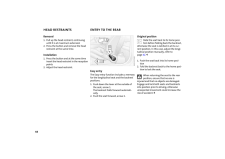
20 .18INDICATOR AND WARNING L...18INDICATOR AND WARNING LAMPS Red: check as soon as possibleAirbags + There is a malfunction in the airbag system. Have the system checked as soon as possible. More information on page 73.Depending on the equipment ver-sion, the indicator lamp is in the a...
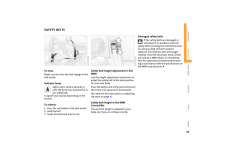
-
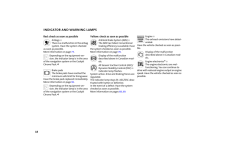
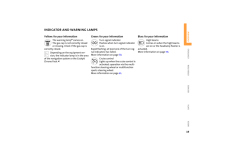
21 .19OVERVIEW REPAIRS OPERAT...19OVERVIEW REPAIRS OPERATION CONTROLS DATA INDEXINDICATOR AND WARNING LAMPS Yellow: for your informationThe warning lamp* comes on. The gas cap is not correctly closed or missing. Check if the gas cap is correctly closed.Depending on the equipment ver-sion...
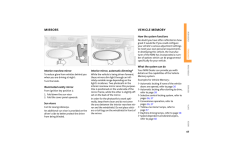
-
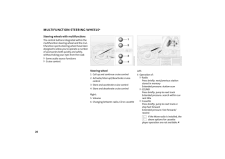
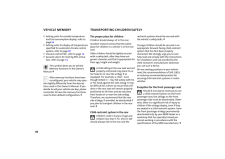
22 .20MULTIFUNCTION STEERING ...20MULTIFUNCTION STEERING WHEELS* Steering wheels with multifunctions The control buttons in tegrated within the multifunction steering wheel and the mul-tifunction sports steering wheel have been designed to allow yo u to operate a number of accessories bo...
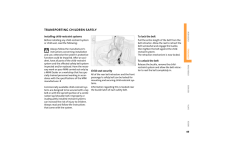
-
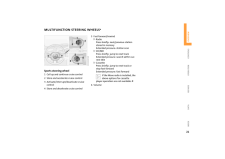
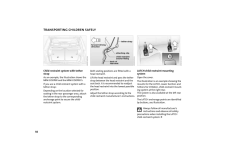
23 .21OVERVIEW REPAIRS OPERAT...21OVERVIEW REPAIRS OPERATION CONTROLS DATA INDEXMULTIFUNCTION STEERING WHEELS* Sports steering wheel 1 Call up and continue cruise control 2 Store and accelerate cruise control 3 Activate/interrupt/deactivate cruise control4 Store and decelerate cruise co...
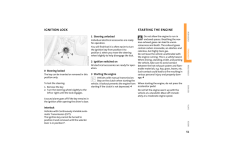
-
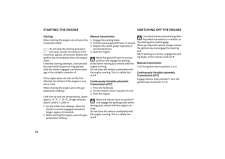
24 .24 ページ目のマニュアル
-
25 .OVERVIEWCONTROLSOPERATION...OVERVIEWCONTROLSOPERATION, CARE , MAINTENANCEOWNER SERVICE PROCEDURESINDEXTECHNICAL DATA23OVERVIEW REPAIRS OPERATION CONTROLS DATA INDEXControls
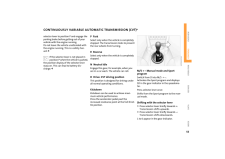
-
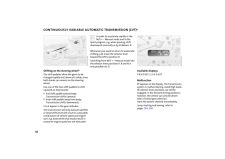
26 .24KEYSCENTRAL LOCKING SYS...24KEYSCENTRAL LOCKING SYSTEMThe key set It includes three keys. Depending on the equipment version, it contains the follow-ing types of keys: 1 Master keys with remote control. They determine the functions of the Key Memory. Certain functions in your ve...
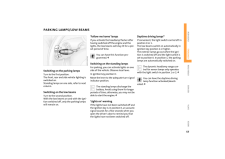
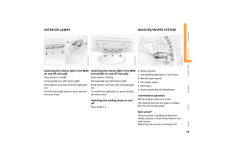
-
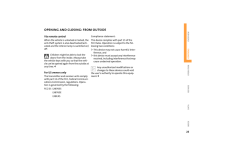
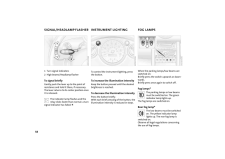
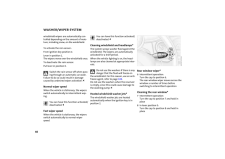
27 .25OVERVIEW REPAIRS OPERAT...25OVERVIEW REPAIRS OPERATION CONTROLS DATA INDEXOPENING AND CLOSING: FROM OUTSIDE Via remote control When the vehicle is unlocked or locked, the anti-theft system is also deactivated/acti-vated and the interior lamp is switched on/off.Children might be ab ...
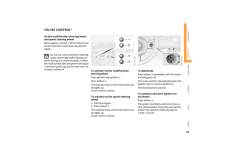
-
28 .26OPENING AND CLOSIN G: F...26OPENING AND CLOSIN G: FROM OUTSIDE 1Unlocking and convenience opening2 Locking and securing 3 Unlocking the tailgate To unlock 1. Press the button once. The driver's door is unlocked. The interior lamps are switched on and the hazard warning flashers...
-
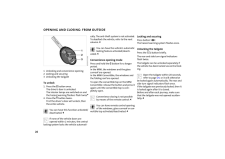
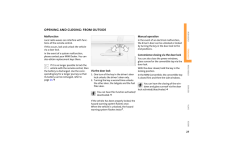
29 .27OVERVIEW REPAIRS OPERAT...27OVERVIEW REPAIRS OPERATION CONTROLS DATA INDEXOPENING AND CLOSING: FROM OUTSIDE Malfunction Local radio waves can interfere with func-tions of the remote control. If this occurs, lock and unlock the vehicle via a door lock.In the event of a system malfun...
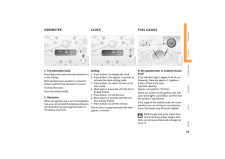
-
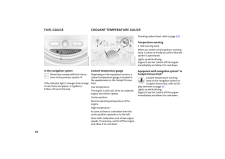
30 .28OPENING AND CLOSIN G: F...28OPENING AND CLOSIN G: FROM INSIDE With this switch, you operate the central locking system when the doors are closed. The doors and tailgate are unlocked or locked only. The anti-theft system is not activated.If the remote control has been used to unlo...
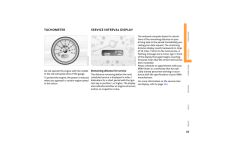
-
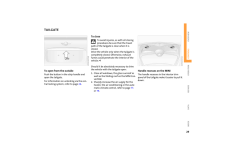
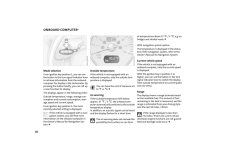
31 .29OVERVIEW REPAIRS OPERAT...29OVERVIEW REPAIRS OPERATION CONTROLS DATA INDEXTAILGATE To open from the outside Push the button in the strip handle and open the tailgate.For information on unlocking via the cen-tral locking system, refer to page 26.To closeTo avoid injuries, as with ...
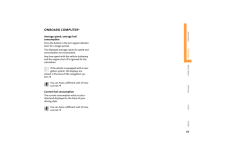
-
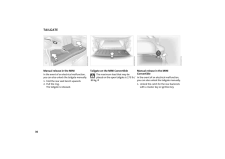
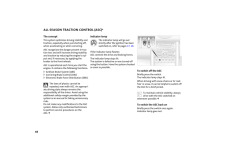
32 .30TAILGATE Manual release...30TAILGATE Manual release in the MINI In the event of an electrical malfunction, you can also unlock the tailgate manually. 1. Fold the rear seat bench upwards 2. Pull the ring. The tailgate is released.Tailgate on the MINI Convertible The maximum load th...
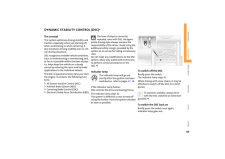
-
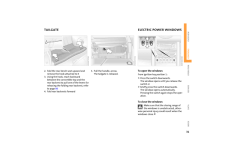
33 .31OVERVIEW REPAIRS OPERAT...31OVERVIEW REPAIRS OPERATION CONTROLS DATA INDEXTAILGATEELECTRIC POWER WINDOWS2.Fold the rear bench seat upward and remove the hook attached to it3. Using the hook, reach backward between the convertible top and the rear backrest to pull one of the levers...
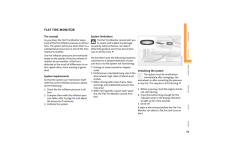
-
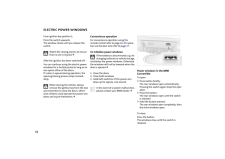
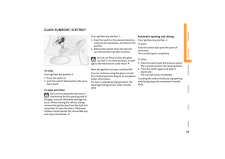
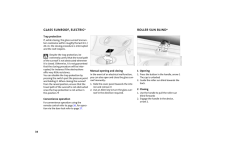
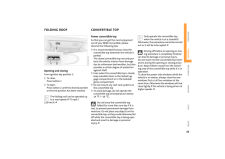
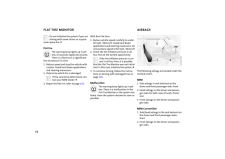
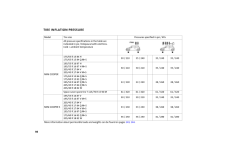
34 .32ELECTRIC POWER WINDOWS ...32ELECTRIC POWER WINDOWS From ignition key position 1:Press the switch upwards. The window closes until you release the switch.Watch the closing process to ensure that no one is injured.35 .33OVERVIEW REPAIRS OPERAT...33OVERVIEW REPAIRS OPERATION CONTROLS DATA INDEXGLASS SUNROOF, ELECTRIC* To raise From ignition key position 1:> Press the switch or > push the switch backwards to the resis-tance point.To open and closeBe sure that adequate clearance is maintained for th...36 .34GLASS SUNROOF, ELECTRIC...34GLASS SUNROOF, ELECTRIC*ROLLER SUN BLIND* Trap protection If, while closing, the glass sunroof encoun-ters resistance within roughly the last 8 in / 20 cm, the closing procedure is interrupted and the roof reopens.Despite the trap protection, be extrem...37 .35OVERVIEW REPAIRS OPERAT...35OVERVIEW REPAIRS OPERATION CONTROLS DATA INDEXFOLDING ROOF CONVERTIBLE TOP Opening and closing From ignition key position 1:1To close: Press button 12To open: Press button 2 until the desired position or the end position has been reached.The folding ro...38 .36CONVERTIBLE TOP Opening...36CONVERTIBLE TOP Opening and closing 1To close 2To openTo conserve battery power, if possible operate the convertible top only while the engine is running. Before closing the convertible top, remove any foreign objects from the windshield frame. They cou...39 .37OVERVIEW REPAIRS OPERAT...37OVERVIEW REPAIRS OPERATION CONTROLS DATA INDEXCONVERTIBLE TOP Interruption The automatic movement is immediately interrupted when the buttons for convert-ible top operation are released. The proce-dure can be continued in the desired direc-tion by pressi...40 .38CONVERTIBLE TOP To clos...38CONVERTIBLE TOP To close 1. Place both hands on the convertible top on the respective side frame2. Lift out both sides at the same time, and swing the convertible top forward onto the cowl3.Pry out the cover from the center of the roof by using a screw...41 .39OVERVIEW REPAIRS OPERAT...39OVERVIEW REPAIRS OPERATION CONTROLS DATA INDEXWIND DEFLECTOR* With the convertible top open, the wind deflector keeps air movement in the pas-senger compartment to a minimum, thus providing you with a pleasant drive, even at higher speeds. The wind defle...42 .40WIND DEFLECTOR*Folding ...40WIND DEFLECTOR*Folding up 3. Slide the securing pins on the other side into the designated openings and engage them4. Fold up the upper half of the wind deflector.When the wind deflector is installed, do not incline the seat backrests too far toward the...43 .41OVERVIEW REPAIRS OPERAT...41OVERVIEW REPAIRS OPERATION CONTROLS DATA INDEXSAFE SEATING POSITION The ideal seating position can make a vital contribution to relaxed, relatively fatigue-free driving. Together with the safety belts and airbags, the seating position also plays an impor...44 .42SEAT ADJUSTMENT Importa...42SEAT ADJUSTMENT Important adjustment informationNever try to adjust your seat while operating the vehicle. The seat could respond with an unexpected movement, and the ensuing loss of vehicle control could lead to an accident. While driving, do not recli...45 .43OVERVIEW REPAIRS OPERAT...43OVERVIEW REPAIRS OPERATION CONTROLS DATA INDEXSEAT ADJUSTMENTHEAD RESTRAINTS Lumbar support * You can adjust the contour of the backrest for additional support in the curvature of your spine's lumbar region. The upper hips and spinal column receive sup...46 .44HEAD RESTRAINTSENTRY TO...44HEAD RESTRAINTSENTRY TO THE REARRemoval 1. Pull up the head restraint, continuing until it is at maximum extension2. Press the button and remove the head restraint at the same time.Installation 1. Press the button and at the same time insert the head res...47 .45OVERVIEW REPAIRS OPERAT...45OVERVIEW REPAIRS OPERATION CONTROLS DATA INDEXSAFETY BELTS To close Make sure you hear the lock engage in the belt buckle.Indicator lampLights up for several seconds or until the driver has fastened his or her safety belt. A signal* also sounds depend...48 .46SEAT HEATING* STEERING ...46SEAT HEATING* STEERING WHEEL MIRRORSThe temperatures of the seat cushions and backrests are controlled. Press once for each temperature level. To switch off: Press the button for a longer period.Do not adjust the steering wheel while the vehicle is mo...49 .47OVERVIEW REPAIRS OPERAT...47OVERVIEW REPAIRS OPERATION CONTROLS DATA INDEXMIRRORSVEHICLE MEMORY Interior rearview mirror To reduce glare from vehicles behind you when you are driving at night:Turn the knob. Illuminated vanity mirror From ignition key position 1:1. Fold down the s...50 .48VEHICLE MEMORYTRANSPORT...48VEHICLE MEMORYTRANSPORTING CHILDREN SAFELY > Setting units for outside temperature and fuel consumption display, refer to page 66> Setting units for display of temperatures specified for automa tic climate control system, refer to page 80> Volume control...51 .49OVERVIEW REPAIRS OPERAT...49OVERVIEW REPAIRS OPERATION CONTROLS DATA INDEXTRANSPORTING CHILDREN SAFELY Installing child-restraint systems Before installing any child-restraint system or child seat, read the following: Always follow the manufacturer's instructions concerning instal...52 .50TRANSPORTING CHILDREN S...50TRANSPORTING CHILDREN SAFELY Child-restraint system with tether strap As an example, the illustration shows the MINI COOPER and the MINI COOPER S.If you use a child-restr aint system with a tether strap:Depending on the location selected for seating in ...53 .51OVERVIEW REPAIRS OPERAT...51OVERVIEW REPAIRS OPERATION CONTROLS DATA INDEXIGNITION LOCKSTARTING THE ENGINE0 Steering locked The key can be inserted or removed in this position only.To lock the steering: 1. Remove the key 2. Turn the steering wheel slightly to the left or right unti...54 .52STARTING THE ENGINESWIT...52STARTING THE ENGINESWITCHING OFF THE ENGINE Starting When starting the engine, do not press the accelerator pedal.Do not stop the starting procedure too early, and do not continue it for more than approx. 20 seconds. Release the ignition key immediately...55 .53OVERVIEW REPAIRS OPERAT...53OVERVIEW REPAIRS OPERATION CONTROLS DATA INDEXPARKING BRAKE MANUAL TRANSMISSION The parking brake is designed primarily to prevent the vehicle from rolling when it is parked. It operates against the rear wheels.To engage Lever automatically locks in pos...56 .54MANUAL TRANSMISSIONCONT...54MANUAL TRANSMISSIONCONTINUOUSLY VARIABLE AUTOMATIC TRANSMISSION (CVT)* Reverse gear Before selecting reverse gear, ensure the vehicle is stationary; then, fully depress the clutch pedal and pause briefly before mov-ing the gearshift lever into position. ...57 .55OVERVIEW REPAIRS OPERAT...55OVERVIEW REPAIRS OPERATION CONTROLS DATA INDEXCONTINUOUSLY VARIABLE AUTOMATIC TRANSMISSION (CVT)*selector lever to position P and engage the parking brake before getting out of your vehicle with the engine running. Do not leave the vehicle unattended wit...58 .56CONTINUOUSLY VARIABLE A...56CONTINUOUSLY VARIABLE AUTOMATIC TRANSMISSION (CVT)*Shifting on the steering wheel * The shift paddles allow the gears to be changed rapidly and, above all, safely, since both hands can remain on the steering wheel.Use one of the two shift paddles to sh...59 .57OVERVIEW REPAIRS OPERAT...57OVERVIEW REPAIRS OPERATION CONTROLS DATA INDEXPARKING LAMPS/LOW BEAMS Switching on the parking lamps Turn to the first position. The front, rear and side vehicle lighting is switched on. Standing lamps on one side, refer to next column.Switching on t...60 .58SIGNAL/HEADLAMP FLASHER...58SIGNAL/HEADLAMP FLASHER INSTRUMENT LIGHTING FOG LAMPS1Turn signal indicators 2 High beams/Headlamp flasher To signal briefly Gently push the lever up to the point of resistance and hold it there, if necessary. The lever returns to its center position on...61 .59OVERVIEW REPAIRS OPERAT...59OVERVIEW REPAIRS OPERATION CONTROLS DATA INDEXINTERIOR LAMPSWASHER/WIPER SYSTEM Switching the interior light in the MINI on and off manually Press button 1 briefly. Permanently turn off interior light: Keep button 1 pressed until the light goes out.To s...62 .60WASHER/WIPER SYSTEM win...60WASHER/WIPER SYSTEM windshield wipers are automatically con-trolled depending on the amount of mois-ture, including snow, on the windshield. To activate the rain sensor: From ignition key position 1:Lever in position 1. The wipers move over the windshi...63 .61OVERVIEW REPAIRS OPERAT...61OVERVIEW REPAIRS OPERATION CONTROLS DATA INDEXCRUISE CONTROL* On the multifunction steering wheel and sports steering wheelAbove approx. 20 mph / 30 km/h the cruise control maintains and stores any desired speed. Do not use cruise control on twisting r...64 .62CRUISE CONTROL*Press an...62CRUISE CONTROL*Press and hold button 3.The vehicle accelerates without pressure on the accelerator pedal. When you release the button, the system maintains and stores the current speed.If, on a downhill gradient, the engine braking effect is not suffici...65 .63OVERVIEW REPAIRS OPERAT...63OVERVIEW REPAIRS OPERATION CONTROLS DATA INDEXODOMETERCLOCKFUEL GAUGE 1 Trip odometer/clock Resetting to zero when the trip odometer is in the display:With ignition key in position 1, press the button until the trip odometer is at zero.To show the clock:...66 .64FUEL GAUGE COOLANT TEMP...64FUEL GAUGE COOLANT TEMPERATURE GAUGE In the navigation system Please also comply with the instruc-tions in the previous section.67 .65OVERVIEW REPAIRS OPERAT...65OVERVIEW REPAIRS OPERATION CONTROLS DATA INDEXTACHOMETERSERVICE INTERVAL DISPLAYDo not operate the engine with the needle in the red overspeed zone of the gauge. To protect the engine, the power is reduced when you approach a certain engine speed in thi...68 .66ONBOARD COMPUTER* Mode ...66ONBOARD COMPUTER* Mode selection From ignition key position 1, you can use the button in the turn signal indicator lever to retrieve information from the onboard computer for display in the tachometer. By pressing the button briefly, you can call up a ne...69 .67OVERVIEW REPAIRS OPERAT...67OVERVIEW REPAIRS OPERATION CONTROLS DATA INDEXONBOARD COMPUTER*Average speed, average fuel consumption Press the button in the turn signal indicator lever for a longer period.The displayed average values for speed and consumption are recalculated.Any tim...70 .68ALL SEASON TRACTION CON...68ALL SEASON TRACTION CONTROL (ASC)* The concept This system optimizes driving stability and traction, especially when just starting off, when accelerating or when cornering. ASC recognizes the danger present in trac-tion loss and will increase driving sta...71 .69OVERVIEW REPAIRS OPERAT...69OVERVIEW REPAIRS OPERATION CONTROLS DATA INDEXDYNAMIC STABILITY CONTROL (DSC)* The concept This system optimizes driving stability and traction, especially when just starting off, when accelerating or when cornering. It also maintains driving stability e...72 .70ANTILOCK BRAKE SYSTEM (...70ANTILOCK BRAKE SYSTEM (ABS) The concept The ABS keeps the wheels from locking while braking, thereby enhancing active driving safety. ABS also includes Electronic Brake Force Distribution (EBD).Safe braking Your vehicle is equipped with ABS as a stan-d...73 .71OVERVIEW REPAIRS OPERAT...71OVERVIEW REPAIRS OPERATION CONTROLS DATA INDEXFLAT TIRE MONITOR The concept As you drive, the Flat Tire Monitor keeps track of the tire inflation pressure in all four tires. The system alerts you when there is a substantial pressure loss in one of the t...74 .72FLAT TIRE MONITORAIRBAG...72FLAT TIRE MONITORAIRBAGSDo not initialize the system if you are driving with snow chains or a space-saver spare tire.75 .73OVERVIEW REPAIRS OPERAT...73OVERVIEW REPAIRS OPERATION CONTROLS DATA INDEXAIRBAGS Protective effect The front airbags supplement the safety belts by providing additional protection for the driver and front passenger in the event of a frontal collision in which the protec-tion affor...76 .74PARK DISTANCE CONTROL (...74PARK DISTANCE CONTROL (PDC)* The concept The PDC assists you when you back into a parking space. A signal tone tells you the current distance to an object behind your vehicle. To do this, four ultrasonic sensors in the rear bumper measure the distance to...77 .75OVERVIEW REPAIRS OPERAT...75OVERVIEW REPAIRS OPERATION CONTROLS DATA INDEXAIR CONDITIONING SYSTEM* 1Air onto the windsh ield and onto the side windows 2 Air for the upper body area 773 Air for the front and rear footwells4 Temperature 765 Windshield heating* 766 Air volume/Blowe...78 .76AIR CONDITIONING SYSTEM...76AIR CONDITIONING SYSTEM*Air volume/Blower You can select blower speeds from 1 to 4. Position 0: fan is turned off. The button for recir-culated air mode fully blocks the supply of air from outside.The heating, ventilation and air condition-ing operate i...79 .77OVERVIEW REPAIRS OPERAT...77OVERVIEW REPAIRS OPERATION CONTROLS DATA INDEXAIR CONDITIONING SYSTEM* Draft-free ventilation Air supply for the upper body area: Button 1: air outlets can be opened and closed by turning. The points indicate the position in each case.Nozzle 2: change ...80 .781 Air onto the windshie...781 Air onto the windshield and onto the side windows2 Air for the upper body area 803 Air for the front and rear footwells 4 Rear window defroster and windshield heating* 795 Interior temperature sensor, please keep clear and unobstructed6 Recirculated ...81 .79OVERVIEW REPAIRS OPERAT...79OVERVIEW REPAIRS OPERATION CONTROLS DATA INDEXAUTOMATIC CLIMATE CONTROL*Automatic air distribution and volume Automatic program (AUTO): Indicator lamp lights up. Automatic adjustment of the air distribu-tion and volume, and adaptation of the specified t...82 .80AUTOMATIC CLIMATE CONTR...80AUTOMATIC CLIMATE CONTROL* Permanent heating with maximum power output at temperature selec-tion HI. Permanent cooling at LO. With the setting at HI, the recirculated air mode can-not be switched on. < Defrosting and demisting windows Press the button. ...83 .81OVERVIEW REPAIRS OPERAT...81OVERVIEW REPAIRS OPERATION CONTROLS DATA INDEXGLOVE COMPARTMENT ASHTRAY, DRINKS HOLDERSTo open: Pull the handle. The light goes on. To close: Fold the door up.To prevent injury in the event of an accident, close the glove compart-ment immediately after...84 .82CIGARETTE LIGHTER, 12 V...82CIGARETTE LIGHTER, 12 V POWER SUPPLY From ignition key position 1:Press the cigarette lighter in. Remove as soon as the lighter jumps back out.Hold or touch the hot cigarette lighter by the knob only. Holding or touching it in other areas could result ...85 .83OVERVIEW REPAIRS OPERAT...83OVERVIEW REPAIRS OPERATION CONTROLS DATA INDEXINTEGRATED UNIVERSAL REMOTE CONTROL* The concept The integrated universal remote control takes the place of up to three different con-trol devices for different radio-remote-con-trolled systems such as gate o...86 .84INTEGRATED UNIVERSAL RE...84INTEGRATED UNIVERSAL REMOTE CONTROL*4. Simultaneously press the command but-ton of the original control device and the desired memory button 1 on the inte-grated universal remote control. The indicator lamp 2 begins to flash slowly. Release both buttons ...87 .85OVERVIEW REPAIRS OPERAT...85OVERVIEW REPAIRS OPERATION CONTROLS DATA INDEXLUGGAGE COMPARTMENT IN THE MINI Luggage compartment cover When the tailgate is opened, the luggage compartment cover is also raised.Never place any heavy or hard objects on the luggage compartment cover; ot...88 .86LUGGAGE COMPARTMENT IN ...86LUGGAGE COMPARTMENT IN THE MINI CONVERTIBLE LOADING CARGO Loading aid When the convertible top is closed, you can load the vehicle more easily by releasing the convertible top and folding it up.1. Release the convertible top using the handles, arrows 12....89 .87OVERVIEW REPAIRS OPERAT...87OVERVIEW REPAIRS OPERATION CONTROLS DATA INDEXLOADING CARGOAvoid overloading the vehicle so that the permitted load on the tires is not exceeded. Overloading can lead to over-heating and damage inside the tires. Depending on the circumstances, this can ...90 .88LOADING CARGO Stowing c...88LOADING CARGO Stowing cargo > Place heavy cargo as far forward as possi-ble, directly behind the backrests, and as low as possible> Cover sharp edges and corners > Do not pile objects higher than the top edges of the backrests.For very heavy cargo when ...91 .89OVERVIEW REPAIRS OPERAT...89OVERVIEW REPAIRS OPERATION CONTROLS DATA INDEXROOF-MOUNTED LUGGAGE RACK* Always position and secure the load as described above. If you do not, it can pose a danger to the passengers during braking and evasive maneuvers, for exam-ple. Do not exceed the ...92 .92 ページ目のマニュアル93 .OVERVIEWCONTROLSOPERATION...OVERVIEWCONTROLSOPERATION, CARE, MAINTENANCEOWNER SERVICE PROCEDURESINDEXTECHNICAL DATA91OVERVIEW REPAIRS OPERATION CONTROLS DATA INDEXOperation94 .92BREAK-IN PROCEDURES To...92BREAK-IN PROCEDURES To ensure that your vehicle provides maxi-mum economy throughout a long service life, we request that you comply with the following information: Engine Up to 1,250 miles / 2,000 km:Drive at varying engine and road speeds, but do not ...95 .93OVERVIEW REPAIRS OPERAT...93OVERVIEW REPAIRS OPERATION CONTROLS DATA INDEXGENERAL DRIVING NOTES Parking the vehicle Condensation forms in the air conditioner system during operation, and then exits under the vehicle. Traces of condensed water on the ground are therefore normal.Saf...96 .94REFUELING Always switch...94REFUELING Always switch off the engine before refueling. If you do not, fuel cannot be filled into the tank and the SERVICE ENGINE SOON lamp may come on. <1. Open the fuel filler door 2. Turn the gas cap counterclockwise 3. Put the gas cap in the bracke...97 .95OVERVIEW REPAIRS OPERAT...95OVERVIEW REPAIRS OPERATION CONTROLS DATA INDEXREFUELINGDo not use leaded gasoline, as other-wise the lambda probe and catalytic converter will be permanently damaged.98 .96BRAKE SYSTEM Brake flui...96BRAKE SYSTEM Brake fluid level If the brake fluid level is too low and brake pedal travel has become longer, there may be a defect in one of the brake system's hydraulic circuits.Proceed to the nearest MINI Dealer. Higher brake application pressure may ...99 .97OVERVIEW REPAIRS OPERAT...97OVERVIEW REPAIRS OPERATION CONTROLS DATA INDEXTIRE INFLATION PRESSURE Information for your safety It is not merely the tire's service life, but also driving safety and driving comfort that depend on the condition of the tires and the maintenance of the ...100 .98TIRE INFLATION PRESSURE...98TIRE INFLATION PRESSUREModelTire sizePressures specified in psi / kPaAll pressure specifications in the table are indicated in psi / kilopascal with cold tires.Cold = ambient temperatureMINI COOPER175/65 R 15 84 H 175/65 R 15 84 Q M+S30 / 21035 / 24035 /...
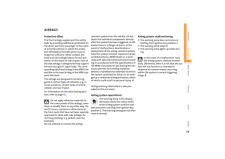
ログイン


ファイルをアップロードしています。
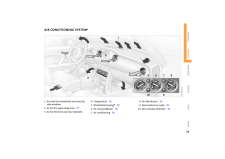
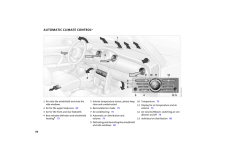
しばらくお待ちください。
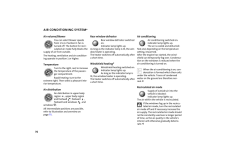
しばらくお待ちください。