MINIの取扱説明書・マニュアル [全275ページ 2.97MB]


5


3 / 275 ページ

3 / 275 ページ


現在のページURL
(C) 2012 Bayerische Motoren WerkeAktiengesellschaftMunich, GermanyReprinting, including excerpts, only with the written consent of BMW AG, Munich.US English X/12, 11 12 500Printed on environmentally friendly paper,bleached without chlorine , suitable for recycling.
参考になったと評価  5人が参考になったと評価しています。


このマニュアルの目次
-
2 .CooperCooper SCooper S AL...CooperCooper SCooper S ALL4John CooperWorksCongratulations on your new MINIThis Owner's Manual should be considered a permanent part of this vehicle. It should stay with the vehicle when sold to provide the next owner with important operating, safety and m...
-
3 .(C) 2012 Bayerische Motor...(C) 2012 Bayerische Motoren WerkeAktiengesellschaftMunich, GermanyReprinting, including excerpts, only with the written consent of BMW AG, Munich.US English X/12, 11 12 500Printed on environmentally friendly paper,bleached without chlorine , suitable for r...
-
4 .ContentsThe fastest way t...ContentsThe fastest way to find information on a particu-lar topic or item is by using the index, refer to page260.4Notes7Reporting safety defectsAT A GLANCE 910Cockpit16Onboard computer20Letters and numbers21Voice activation systemCONTROLS 2526Opening and...
-
5 .Notes4NotesUsing this Own...Notes4NotesUsing this Owner's ManualWe have tried to make a ll the information in this Owner's Manual easy to find. The fastest way to find specific topics is to refer to the detailed index at the back of the manual. If you wish to gain an initial overvie...
-
6 .Notes 5nance and repair m...Notes 5nance and repair methods. Therefore, have the necessary work on your MI NI only carried out by a MINI dealer or a work shop that has specially trained personnel workin g in accordance with the specifications of the MINI manufacturer. If this work is...
-
7 .Notes6>Federal Emissions ...Notes6>Federal Emissions Performance Warranty>California Emission Control System Limited WarrantyDetailed information about these warranties is listed in the Service and Warranty Information Booklet for US models or in the Warranty and Service Guide Bookle...
-
8 .Notes 7Event data recorde...Notes 7Event data recorder EDRThis vehicle is equipped with an event data recorder EDR. The main purpose of an EDR is to record, in certain crash or crash-like situations such as an air bag deploy ment or collision with a road obstacle, data that will assi...
-
10 .CONTROLSDRIVING TIPSNAVIG...CONTROLSDRIVING TIPSNAVIGATIONEntertainmentCOMMUNICATIONSMOBILITYREFERENCEAT A GLANCE
-
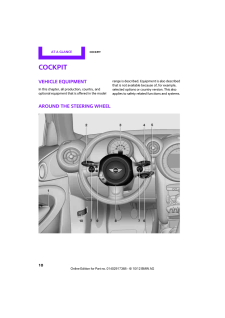
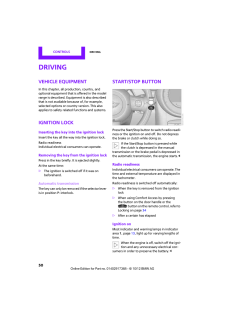
11 .AT A GLANCE Cockpit10Cock...AT A GLANCE Cockpit10CockpitVehicle equipmentIn this chapter, all production, country, and optional equipment that is offered in the model range is described. Equi pment is also described that is not available because of, for example, selected options or c...
-
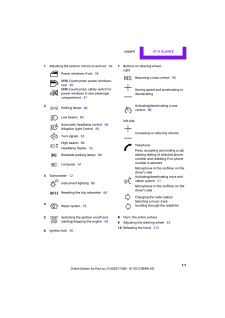
12 .Cockpit AT A GLANCE 111Ad...Cockpit AT A GLANCE 111Adjusting the exterior mirrors in and out 446Ignition lock507Buttons on steering wheel, rightleft side8Horn: the entire surface9Adjusting the steering wheel 4510Releasing the hood 215Power windows, front 36MINI Countryman: power win...
-
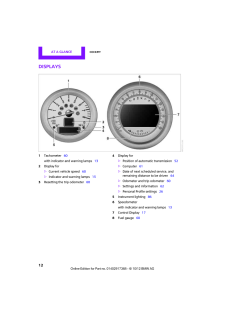
13 .AT A GLANCE Cockpit12Disp...AT A GLANCE Cockpit12Displays1Tachometer60with indicator and warning lamps 132Display for>Current vehicle speed 60>Indicator and warning lamps 133Resetting the trip odometer 604Display for>Position of automatic transmission 52>Computer61>Date of next sched...
-
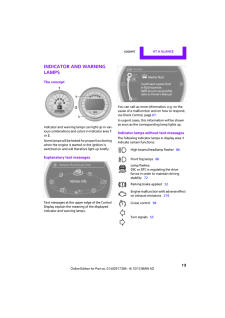
14 .Cockpit AT A GLANCE 13Ind...Cockpit AT A GLANCE 13Indicator and warning lampsThe conceptIndicator and warning lamps can light up in var-ious combinations and co lors in indicator area 1 or2.Some lamps will be tested for proper functioning when the engine is started or the ignition is...
-
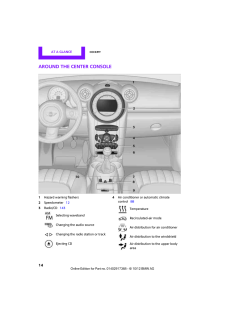
15 .AT A GLANCE Cockpit14Arou...AT A GLANCE Cockpit14Around the center console1Hazard warning flashers2Speedometer123Radio/CD1434Air conditioner or automatic climate control88Selecting wavebandChanging the audio sourceChanging the radio station or trackEjecting CDTemperatureRecirculated...
-
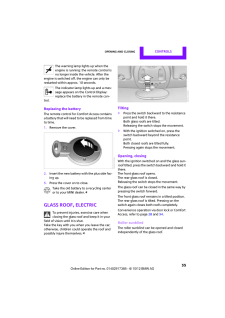
16 .Cockpit AT A GLANCE 155Sw...Cockpit AT A GLANCE 155Switches in the center console6Storage compartment7Changing to a differen t menu on the Control Display188MINI joystick16 Move in four directions, turn or press9USB audio interface 15410Accessing the main me nu on the Control Display...
-
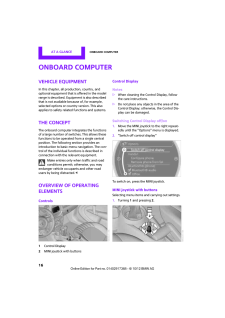
17 .AT A GLANCE Onboard compu...AT A GLANCE Onboard computer16Onboard computerVehicle equipmentIn this chapter, all production, country, and optional equipment that is offered in the model range is described. Equi pment is also described that is not available because of, for example, sel...
-
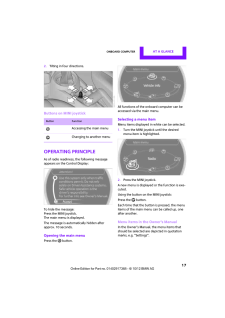
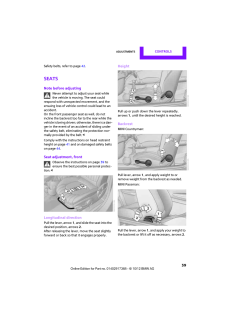
18 .Onboard computer AT A GLA...Onboard computer AT A GLANCE 172.Tilting in four directions.Buttons on MINI joystickOperating principleAs of radio readiness, the following message appears on the Control Display:To hide the message:Press the MINI joystick.The main menu is displayed.The me...
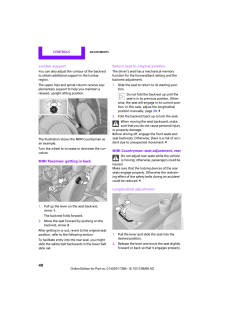
-
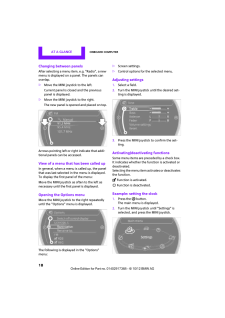
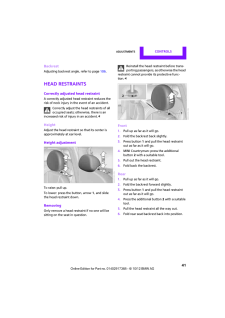
19 .AT A GLANCE Onboard compu...AT A GLANCE Onboard computer18Changing between panelsAfter selecting a menu item, e.g. "Radio", a new menu is displayed on a panel. The panels can overlap.>Move the MINI joystick to the left.Current panel is closed and the previous panel is displayed.>Move...
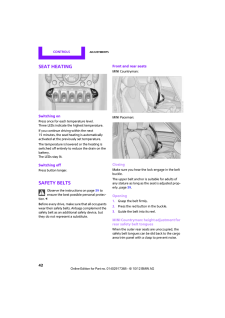
-
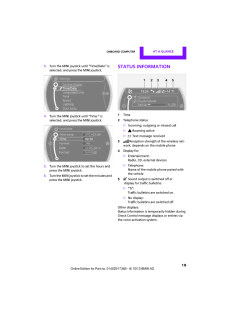
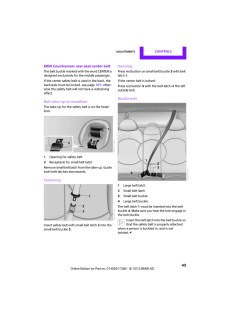
20 .Onboard computer AT A GLA...Onboard computer AT A GLANCE 193.Turn the MINI joystick until "Time/Date" is selected, and press the MINI joystick.4.Turn the MINI joystick until "Time:" is selected, and press the MINI joystick.5.Turn the MINI joystick to set the hours and press the MINI...
-
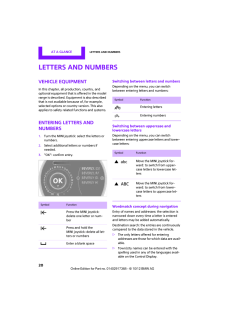
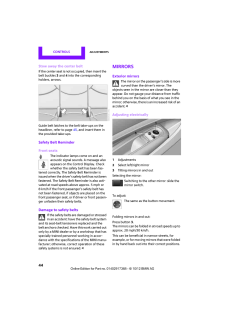
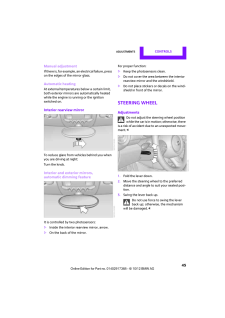
21 .AT A GLANCE Letters and n...AT A GLANCE Letters and numbers20Letters and numbersVehicle equipmentIn this chapter, all production, country, and optional equipment that is offered in the model range is described. Equi pment is also described that is not available because of, for exampl...
-
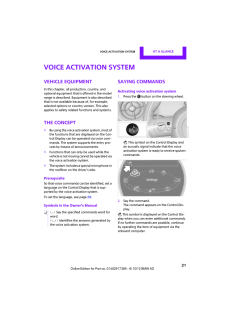
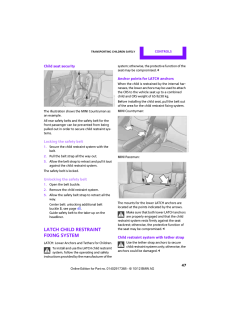
22 .Voice activation system A...Voice activation system AT A GLANCE 21Voice activation systemVehicle equipmentIn this chapter, all production, country, and optional equipment that is offered in the model range is described. Equipment is also described that is not available be cause of, f...
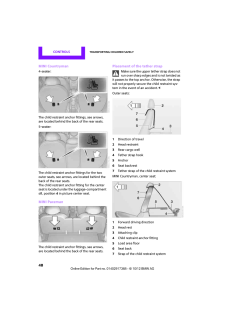
-
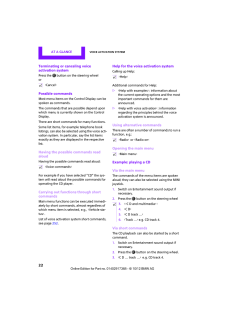
23 .AT A GLANCE Voice activat...AT A GLANCE Voice activation system22Terminating or canceling voice activation systemPress the button on the steering wheelorPossible commandsMost menu items on the Control Display can be spoken as commands.The commands that are possible depend upon which...
-
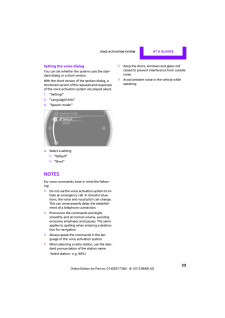
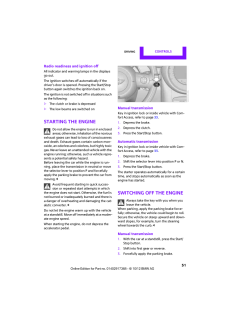
24 .Voice activation system A...Voice activation system AT A GLANCE 23Setting the voice dialogYou can set whether the system uses the stan-dard dialog or a short version.With the short version of the spoken dialog, a shortened version of the requests and responses of the voice activatio...
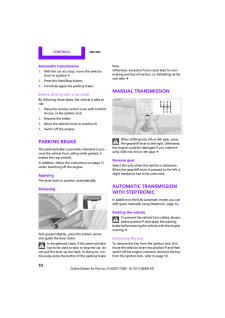
-
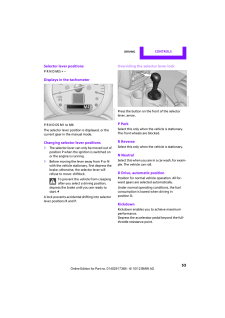
26 .AT A GLANCEDRIVING TIPSNA...AT A GLANCEDRIVING TIPSNAVIGATIONEntertainmentCOMMUNICATIONSMOBILITYREFERENCECONTROLS
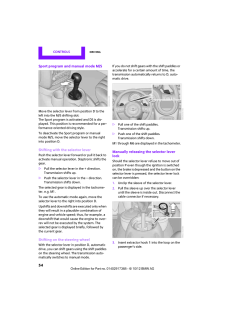
-
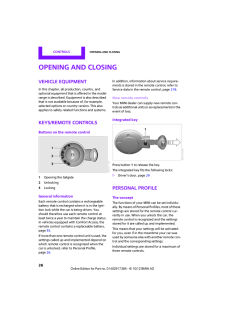
27 .CONTROLS Opening and clos...CONTROLS Opening and closing26Opening and closingVehicle equipmentIn this chapter, all production, country, and optional equipment that is offered in the model range is described. Equi pment is also described that is not available because of, for example, ...
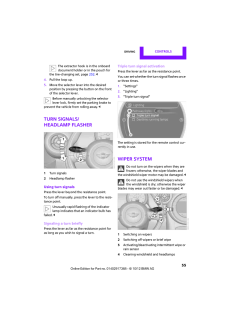
-
28 .Opening and closing CONTR...Opening and closing CONTROLS 27Personal Profile settingsFor more information on specific settings, refer to the specified pages.>Response of the central locking system when the car is being unlocked 27>Automatic locking of the vehicle 30>Triple turn signa...
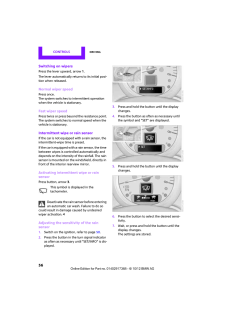
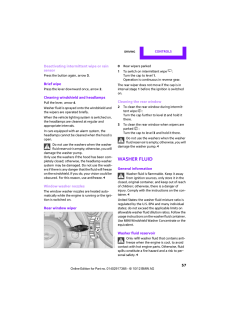
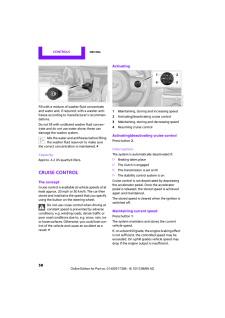
-
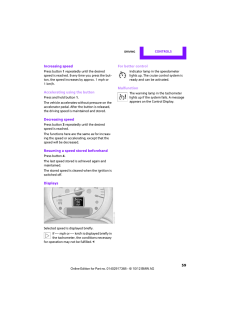
29 .CONTROLS Opening and clos...CONTROLS Opening and closing281."Settings"2."Door locks"3."Unlock button"4.Select a menu item:>"All doors"Press the button once to unlock the entire vehicle.>"Driver's door only"Press the button once to unlock only the driver's door and the fuel filler fl...
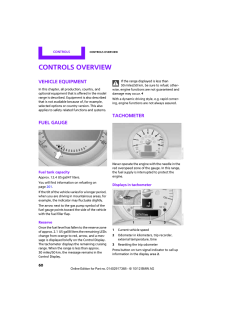
-
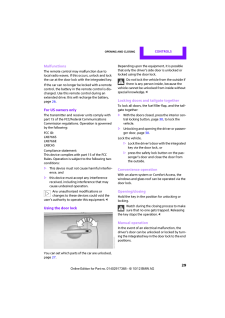
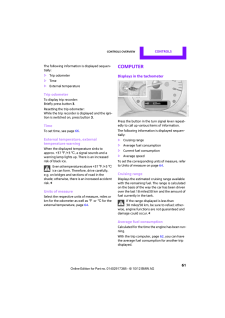
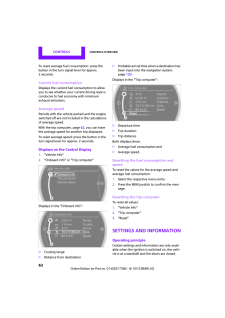
30 .Opening and closing CONTR...Opening and closing CONTROLS 29MalfunctionsThe remote control may malfunction due to local radio waves. If this occurs, unlock and lock the car at the door lock with the integrated key.If the car can no longer be locked with a remote control, the battery i...
-
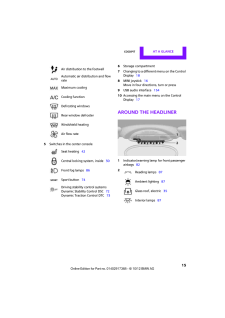
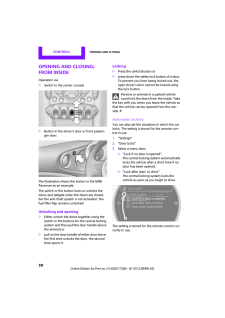
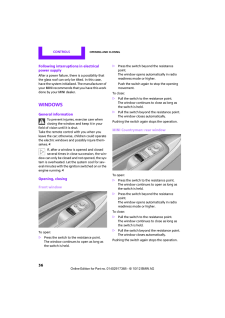
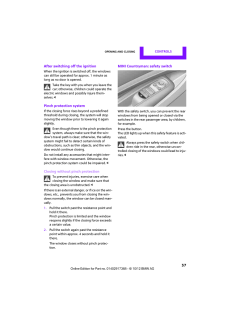
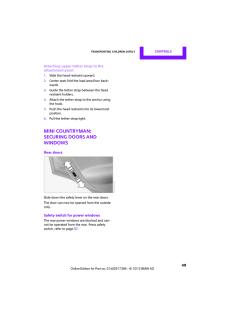
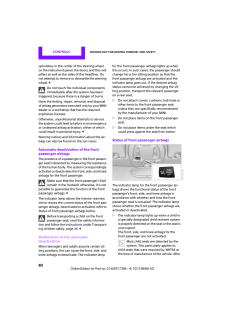
31 .CONTROLS Opening and clos...CONTROLS Opening and closing30Opening and closing: from insideOperation via>Switch in the center console>Button in the driver's door or front passen-ger door:The illustration shows the button in the MINI Paceman as an example.The switch or the button lock...
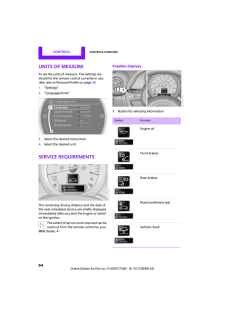
-
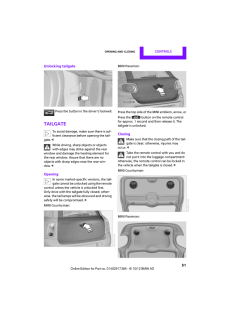
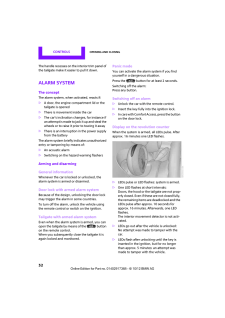
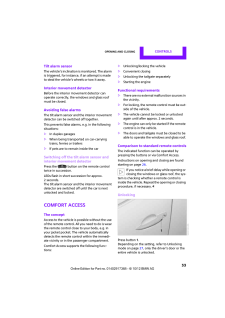
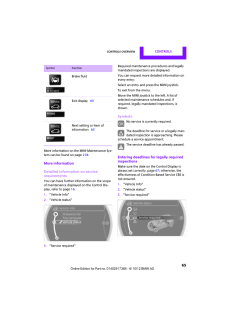
32 .Opening and closing CONTR...Opening and closing CONTROLS 31Unlocking tailgatePress the button in the driver's footwell.TailgateTo avoid damage, make sure there is suf-ficient clearance before opening the tail-gate.33 .CONTROLS Opening and clos...CONTROLS Opening and closing32The handle recesses on the interior trim panel of the tailgate make it easier to pull it down.Alarm systemThe conceptThe alarm system, when activated, reacts if:>A door, the engine compartment lid or the tailgate is opened>The...34 .Opening and closing CONTR...Opening and closing CONTROLS 33Tilt alarm sensorThe vehicle's inclination is monitored. The alarm is triggered, for instance, if an attempt is made to steal the vehicle's wheels or tow it away.Interior movement detectorBefore the interior mo vement detecto...35 .CONTROLS Opening and clos...CONTROLS Opening and closing34Press the button again to lock the vehicle again.36 .Opening and closing CONTR...Opening and closing CONTROLS 35The warning lamp lights up when the engine is running: th e remote control is no longer inside the vehicle. After the engine is switched off, the engine can only be restarted within approx. 10 seconds.The indicator lamp light...37 .CONTROLS Opening and clos...CONTROLS Opening and closing36Following interruptions in electrical power supplyAfter a power failure, there is a possibility that the glass roof can only be tilted. In this case, have the system initializ ed. The manufacturer of your MINI recommends that ...38 .Opening and closing CONTR...Opening and closing CONTROLS 37After switching off the ignitionWhen the ignition is sw itched off, the windows can still be operated for approx. 1 minute as long as no door is opened.Take the key with you when you leave the car; otherwise, children could o...39 .CONTROLS Adjustments38Adj...CONTROLS Adjustments38AdjustmentsVehicle equipmentIn this chapter, all production, country, and optional equipment that is offered in the model range is described. Equi pment is also described that is not available because of, for example, selected options...40 .Adjustments CONTROLS 39Sa...Adjustments CONTROLS 39Safety belts, refer to page 42.SeatsNote before adjustingNever attempt to adjust your seat while the vehicle is moving. The seat could respond with unexpected movement, and the ensuing loss of vehicle control could lead to an acciden...41 .CONTROLS Adjustments40Lum...CONTROLS Adjustments40Lumbar supportYou can also adjust the contour of the backrest to obtain additional support in the lumbar region.The upper hips and spin al column receive sup-plementary support to help you maintain a relaxed, upright sitting position...42 .Adjustments CONTROLS 41Ba...Adjustments CONTROLS 41BackrestAdjusting backrest angle, refer to page 106.Head restraintsCorrectly adjusted head restraintA correctly adjusted head restraint reduces the risk of neck injury in the event of an accident.Correctly adjust the he ad restraints...43 .CONTROLS Adjustments42Sea...CONTROLS Adjustments42Seat heatingSwitching onPress once for each temperature level. Three LEDs indicate the highest temperature.If you continue driving within the next 15 minutes, the seat heat ing is automatically activated at the previously set temperat...44 .Adjustments CONTROLS 43MI...Adjustments CONTROLS 43MINI Countryman: rear seat center beltThe belt buckle marked with the word CENTER is designed exclusively for the middle passenger.If the center safety belt is used in the back, the backrests must be locked, see page 107; other-wise ...45 .CONTROLS Adjustments44Sto...CONTROLS Adjustments44Stow away the center beltIf the center seat is not occupied, then insert the belt buckles3 and 4 into the corresponding holders, arrows.Guide belt latches to the belt take-ups on the headliner, refer to page 43, and insert them in the...46 .Adjustments CONTROLS 45Ma...Adjustments CONTROLS 45Manual adjustmentIf there is, for example, an electrical failure, press on the edges of the mirror glass.Automatic heatingAt external temperatures below a certain limit, both exterior mirrors are automatically heated while the engin...47 .CONTROLS Transporting chi...CONTROLS Transporting children safely46Transporting children safelyVehicle equipmentIn this chapter, all production, country, and optional equipment that is offered in the model range is described. Equi pment is also described that is not available because...48 .Transporting children saf...Transporting children safely CONTROLS 47Child seat securityThe illustration shows the MINI Countryman as an example.All rear safety belts and the safety belt for the front passenger can be prevented from being pulled out in order to se cure child restraint...49 .CONTROLS Transporting chi...CONTROLS Transporting children safely48MINI Countryman4-seater:The child restraint anchor fittings, see arrows, are located behind the back of the rear seats.5-seater:The child restraint anchor fittings for the two outer seats, see arrows, are located behi...50 .Transporting children saf...Transporting children safely CONTROLS 49Attaching upper tether strap to the attachment point1.Slide the head restraint upward.2.Center seat: fold the load area floor back-wards3.Guide the tether strap between the head restraint holders.4.Attach the tether ...51 .CONTROLS Driving50Driving...CONTROLS Driving50DrivingVehicle equipmentIn this chapter, all production, country, and optional equipment that is offered in the model range is described. Equi pment is also described that is not available because of, for example, selected options or coun...52 .Driving CONTROLS 51Radio ...Driving CONTROLS 51Radio readiness and ignition offAll indicator and warning lamps in the displays go out.The ignition switches off automatically if the driver's door is opened. Pressing the Start/Stop button again switches the ignition back on.The ignitio...53 .CONTROLS Driving52Automat...CONTROLS Driving52Automatic transmission1.With the car at a stop, move the selector lever to position P.2.Press the Start/Stop button.3.Forcefully apply the parking brake.Before driving into a car washBy following these steps, the vehicle is able to roll:1...54 .Driving CONTROLS 53Select...Driving CONTROLS 53Selector lever positionsP R N D M/S + -Displays in the tachometerP R N D DS M1 to M6The selector lever position is displayed, or the current gear in the manual mode.Changing selector lever positions>The selector lever can only be moved ...55 .CONTROLS Driving54Sport p...CONTROLS Driving54Sport program and manual mode M/SMove the selector lever from position D to the left into the M/S shifting slot:The Sport program is activated and DS is dis-played. This position is recommended for a per-formance-oriented driving style.To...56 .Driving CONTROLS 55The ex...Driving CONTROLS 55The extractor hook is in the onboard document holder or in the pouch for the tire-changing set, page 232.<4.Pull the loop up.5.Move the selector le ver into the desired position by pressing the button on the front of the selector lever.B...57 .CONTROLS Driving56Switchi...CONTROLS Driving56Switching on wipersPress the lever upward, arrow 1.The lever automatically returns to its initial posi-tion when released.Normal wiper speedPress once.The system switches to intermittent operation when the vehicle is stationary.Fast wiper...58 .Driving CONTROLS 57Deacti...Driving CONTROLS 57Deactivating intermittent wipe or rain sensorPress the button again, arrow 3.Brief wipePress the lever downward once, arrow 2.Cleaning windshield and headlampsPull the lever, arrow 4.Washer fluid is sprayed onto the windshield and the w...59 .CONTROLS Driving58Fill wi...CONTROLS Driving58Fill with a mixture of washer fluid concentrate and water and, if required, with a washer anti-freeze according to ma nufacturer's recommen-dations.Do not fill with undiluted washer fluid concen-trate and do not use wa ter alone; these ca...60 .Driving CONTROLS 59Increa...Driving CONTROLS 59Increasing speedPress button1 repeatedly until the desired speed is reached. Every time you press the but-ton, the speed increases by approx. 1 mph or 1km/h.Accelerating using the buttonPress and hold button 1.The vehicle accelerates wi ...61 .CONTROLS Controls overvie...CONTROLS Controls overview60Controls overviewVehicle equipmentIn this chapter, all production, country, and optional equipment that is offered in the model range is described. Equi pment is also described that is not available because of, for example, sele...62 .Controls overview CONTROL...Controls overview CONTROLS 61The following informatio n is displayed sequen-tially:>Trip odometer>Time>External temperatureTrip odometerTo display trip recorder:Briefly press button 3.Resetting the trip odometer:While the trip recorder is displayed and the...63 .CONTROLS Controls overvie...CONTROLS Controls overview62To reset average fuel consumption: press the button in the turn signal lever for approx. 2seconds.Current fuel consumptionDisplays the current fuel consumption to allow you to see whether your current driving style is conducive ...64 .Controls overview CONTROL...Controls overview CONTROLS 631Button for:>Selecting display>Setting values>Confirming selected display or set values>Calling up computer information 61Exiting displays1.Press the button in the turn signal lever repeatedly until "HOME" is displayed.2.Press ...65 .CONTROLS Controls overvie...CONTROLS Controls overview64Units of measureTo set the units of measure. The settings are stored for the remote co ntrol currently in use, refer also to Personal Profile on page 26.1."Settings"2."Language/Units"3.Select the desired menu item.4.Select the d...66 .Controls overview CONTROL...Controls overview CONTROLS 65More information on th e MINI Maintenance Sys-tem can be found on page 218.More informationDetailed information on service requirementsYou can have further information on the scope of maintenance displayed on the Control Dis-pl...67 .CONTROLS Controls overvie...CONTROLS Controls overview664." Vehicle inspection"5.Open the deadline entry menu.6."Date:"7.Create the settings.8.Press the MINI joystick to apply the setting. The year is highlighted.9.Turn the MINI joystick to make the adjust-ment.10.Press the MINI joys...68 .Controls overview CONTROL...Controls overview CONTROLS 674.Turn MINI joystick until the desired time zone is set and press the MINI joystick.The time zone is stored.DateSetting date1."Settings"2."Time/Date"3."Date:"4.Turn MINI joystick until the desired day is displayed and press the...69 .CONTROLS Controls overvie...CONTROLS Controls overview68Hiding Check Control messagesPress the button in th e turn signal lever.>Some Check Control me ssages are displayed until the malfunctions have been rectified. They cannot be hidden. If several malfunc-tions occur at the same ti...70 .Controls overview CONTROL...Controls overview CONTROLS 69Speed limitEnter a speed, and a Check Control message will indicate when you reach this speed. This enables you, for example, to re ceive warnings if you exceed a speed limit in an urban area. You are only warned of reaching t...71 .CONTROLS Controls overvie...CONTROLS Controls overview703."Language:"4.Select the desired language.The setting is stored fo r the remote control cur-rently in use.Setting the voice dialogSwitch between a standa rd dialog and a short dialog.1."Settings"2."Language/Units"3."Speech mode...72 .Technology for driving co...Technology for driving comfort and safety CONTROLS 71Technology for driving comfort and safetyVehicle equipmentIn this chapter, all production, country, and optional equipment that is offered in the model range is described. Equipment is also described tha...73 .CONTROLS Technology for d...CONTROLS Technology for driving comfort and safety72enter the sensors' blind spots before or after a continuous audible signal is given. Higher, pro-truding objects, such as wall ledges, may not be detectable. Therefore, always drive cautiously; otherwise...74 .Technology for driving co...Technology for driving comfort and safety CONTROLS 73Activating DSCPress the switch again: the DSC indicator lamps in the display elements go out.For better controlThe indicator lamp on the tachometer is flashing: DSC controls the dr iving and braking for...75 .CONTROLS Technology for d...CONTROLS Technology for driving comfort and safety74Deactivating both DTC and DSCPress the switch for at least 3 seconds; the indi-cator lamp DSC OFF on the speedometer comes on and DSC OFF is displayed on the tachometer.The Dynamic Traction Control DTC an...76 .Technology for driving co...Technology for driving comfort and safety CONTROLS 75Flat Tire Monitor FTMThe conceptThe system does not measure the actual infla-tion pressure in the tires.The system detects a pre ssure loss in a tire by comparing the rotational speeds of the individ-ual...77 .CONTROLS Technology for d...CONTROLS Technology for driving comfort and safety76Indication of a flat tireThe warning lamps come on in yellow and red. A message appears on the Control Display. An acoustic signal also sounds.There is a flat tire or a major loss in tire inflation pressu...78 .Technology for driving co...Technology for driving comfort and safety CONTROLS 77Vibrations or loud noises while driving can indicate final failure of the tire. Reduce your speed and bring the vehicle to a stop; oth-erwise, pieces of tire may come off, which could result in an accide...79 .CONTROLS Technology for d...CONTROLS Technology for driving comfort and safety78Gray wheelsThe system cannot detect a puncture.Reasons for this may be:>TPM is being reset.>Interference from systems or devices with the same transmission frequency.>Malfunction.Resetting systemReset the...80 .Technology for driving co...Technology for driving comfort and safety CONTROLS 79Run-flat tiresYou can continue driving with a damaged tire at speeds up to 50 mph/80 km/h.If the vehicle is not equipped with run-flat tires, do not continue driving; continuing to drive can result in s...81 .CONTROLS Technology for d...CONTROLS Technology for driving comfort and safety80Message for unsuccessful system resetYellow warning lamp comes on. A mes-sage appears on the onboard com-puter.The system has detected a wheel change, but has not yet been reset. It is not possible to pr...82 .Technology for driving co...Technology for driving comfort and safety CONTROLS 81AirbagsMINI Countryman:MINI Paceman:The following airbags are located under the marked covers:1Front airbags2Knee airbag3Side airbags in backrests4Head airbags at the front and rearProtective actionObser...83 .CONTROLS Technology for d...CONTROLS Technology for driving comfort and safety82upholstery in the center of the steering wheel, on the instrument panel, the doors, and the roof pillars as well as the sides of the headliner. Do not attempt to remove or dismantle the steering wheel.84 .Technology for driving co...Technology for driving comfort and safety CONTROLS 83installing a child seat, check that the indica-tor lamp for the front passenger airbags lights up. It indicates that the child seat has been detected and that the front passenger airbags are deactivated....85 .CONTROLS Lamps84LampsVehi...CONTROLS Lamps84LampsVehicle equipmentIn this chapter, all production, country, and optional equipment that is offered in the model range is described. Equi pment is also described that is not available because of, for example, selected options or coun try...86 .Lamps CONTROLS 85Welcome ...Lamps CONTROLS 85Welcome lampsIf you leave the light switch in the low beam or automatic headlamp control position when you switch off the ignition, the parking lamps and interior lamps come on fo r a certain time as soon as the vehicle is unlocked.Pathway...87 .CONTROLS Lamps86In revers...CONTROLS Lamps86In reverse, the Adaptive Light Control is not acti-vated.MalfunctionA message is displayed.The Adaptive Light Control is malfunctioning or failed. Have the system checked as soon as pos-sible.High beams/roadside parking lamps1Turn signals/...88 .Lamps CONTROLS 87Adjustin...Lamps CONTROLS 87Adjusting brightness>Briefly press button: brightness changes in stages.>Press and hold the button. Brightness changes in a continuous manner.Interior lampsThe interior lamps, the footwell lamps, the entry lamps, and the cargo area lamp ar...89 .CONTROLS Climate88Climate...CONTROLS Climate88ClimateVehicle equipmentIn this chapter, all production, country, and optional equipment that is offered in the model range is described. Equi pment is also described that is not available because of, for example, selected options or coun...90 .Climate CONTROLS 89Recirc...Climate CONTROLS 89Recirculated-air modeIf the air outside the car has an unpleasant odor or contains pollut-ants, shut off the supply to the inte-rior of the car temporarily. The system then recirculates the air curre ntly within the vehicle.If the window...91 .CONTROLS Climate90Automat...CONTROLS Climate90Automatic climate control1Air flow rate, manual2AUTO program3Recirculated-air mode4Maximum cooling5Air distribution, manual6Temperature7Defrosting windows and removing conden-sation8Cooling function9Rear window defroster10Windshield heati...92 .Climate CONTROLS 91If con...Climate CONTROLS 91If condensation starts to form on the inside win-dow surfaces, press the AUTO button or switch off the recirculated-air mode and, if necessary, increase the air flow ra te. Ensure that air can flow onto the windshield.The recirculated-a...93 .CONTROLS Climate92outside...CONTROLS Climate92outside air. Your MINI dealer replaces this com-bined filter as a standard part of your scheduled maintenance. You can call up further in formation in the service requirements display, page 64.Ventilation1Knob for continuous opening and ...94 .Practical interior access...Practical interior accessories CONTROLS 93Practical interior accessoriesVehicle equipmentIn this chapter, all production, country, and optional equipment that is offered in the model range is described. Equipment is also described that is not available be ...95 .CONTROLS Practical interi...CONTROLS Practical interior accessories945.As soon as the LED flashes rapidly, release both buttons. The quick flashing indicates that the button on the rearview mirror has been programmed.If the LED does not flash rapidly after approx. 60 seconds, alter t...96 .Practical interior access...Practical interior accessories CONTROLS 95press the button on the hand-held transmit-ter for 2 seconds and release several times.OperationBefore using the integrated universal remote control, alwa ys inspect the imme-diate area to make certain that no peop...97 .CONTROLS Practical interi...CONTROLS Practical interior accessories96Calibrating the digital compassThe digital compass must be calibrated in the following situations:>The incorrect cardinal direction is displayed.>The direction that is displayed does not change even though the driv...98 .Practical interior access...Practical interior accessories CONTROLS 97Glove compartmentOpeningPull the handle to open the cover. The light in the glove compartment comes on.ClosingFold cover up.To prevent injury in the event of an acci-dent, close the glove compartment after use whil...99 .CONTROLS Practical interi...CONTROLS Practical interior accessories98Center armrest frontOpeningPress the button, arrow, and lift the cover.Center armrest rearRemovingThe center armrest in the rear can be removed to increase the amount of storage room.1.Turn handwheel counterclockwis...100 .Practical interior access...Practical interior accessories CONTROLS 99Center RailVarious accessory parts ca n be attached to the Center Rail and installe d in different positions.Do not use accessory parts near the hand brake; otherwise these could be damaged when the hand brake leve...
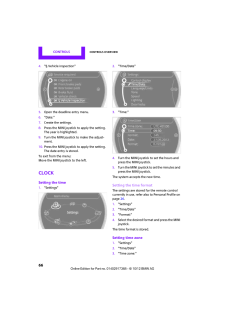
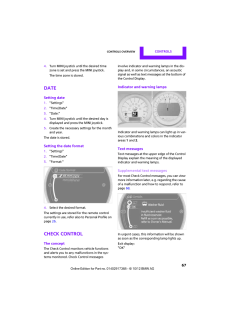
ログイン


ファイルをアップロードしています。
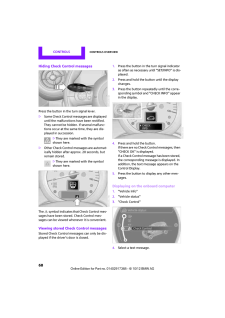
しばらくお待ちください。
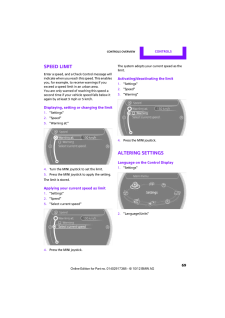
しばらくお待ちください。