Z4の取扱説明書・マニュアル [全120ページ 3.44MB]


4


67 / 120 ページ

67 / 120 ページ


現在のページURL
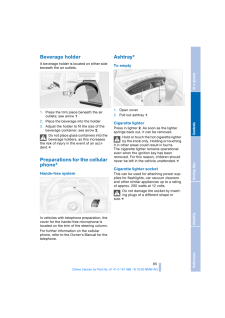
ReferenceAt a glanceControlsDriving tipsMobility 65Beverage holder A beverage holder is located on either side beneath the air outlets.1.Press the trim piece beneath the air outlets; see arrow 12.Place the beverage into the holder3.Adjust the holder to fit the size of the beverage container; see arrow 2.Do not place glass containers into the beverage holders, as this increases the risk of injury in the event of an acci-dent.<Preparations for the cellular phone* Hands-free systemIn vehicles with telephone preparation, the cover for the hands-free microphone is located on the trim of the steering column.For further information on the cellular phone, refer to the Owner's Manual for the telephone.Ashtray* To empty1.Open cover2.Pull out ashtray 1.Cigarette lighterPress in lighter 2. As soon as the lighter springs back out, it can be removed.Hold or touch the hot cigarette lighter by the knob only. Holding or touching it in other areas could result in burns.The cigarette lighter remains operational even when the ignition key has been removed. For this reason, children should never be left in the vehicle unattended. <Cigarette lighter socketThis can be used for attaching power sup-plies for flashlights, car vacuum cleaners and other similar appliances up to a rating of approx. 200 watts at 12 volts.Do not damage the socket by insert-ing plugs of a different shape or size.<
参考になったと評価  18人が参考になったと評価しています。


このマニュアルの目次
-
2 .2 ページ目のマニュアル
-
3 .Z4 2.5iZ4 3.0i Congratul...Z4 2.5iZ4 3.0i Congratulations, and thank you for choosing a BMW.Thorough familiarity with your vehicle will provide you with enhanced control and security when you drive it. There-fore, we have one request:Please take the time to read this Owner's Manual...
-
4 .(C) 2003 Bayerische Moto...(C) 2003 Bayerische Motoren WerkeAktiengesellschaftMunich, GermanyReprinting, including excerpts, only with the written consent of BMW AG, Munich. Order No. 01 41 0 157 498US English IX/03Printed in GermanyPrinted on environmentally friendly paper, bleach...
-
5 .ReferenceAt a glanceCont...ReferenceAt a glanceControlsDriving tipsMobility Contents The fastest way to find information on spe-cial topics is by using the index, refer to page 104. Using this Owner's Manual 4Notes7Reporting safety defects At a glance 10Cockpit Controls 16Opening a...
-
6 .Notes 4 Notes About this...Notes 4 Notes About this Owner's Manual We have made every effort to ensure that you are able to find what you need in this Owner's Manual as quickly as possible. The fastest way to find certain topics is by using the detailed index at the end. If you wi...
-
7 .ReferenceAt a glanceCont...ReferenceAt a glanceControlsDriving tipsMobility 5 Your individual vehicle On buying your BMW, you have decided in favor of a model with individualized equip-ment and features. This Owner's Manual describes all models and equipment that BMW offers within...
-
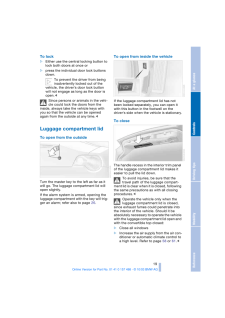
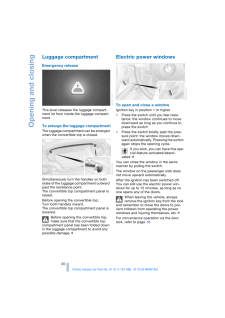
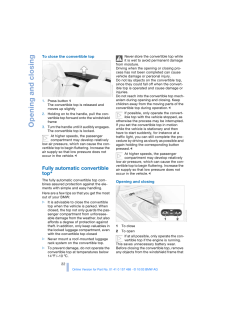
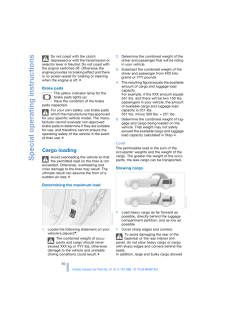
8 .Notes 6 Parts and access...Notes 6 Parts and accessories For your own safety, use parts and accessories approved by BMW. When you purchase accessories tested and approved by BMW and Original BMW Parts, you simultaneously acquire the assurance that they have been thoroughly tested b...
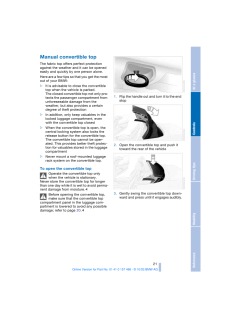
-
9 .ReferenceAt a glanceCont...ReferenceAt a glanceControlsDriving tipsMobility 7 Reporting safety defects The following only applies to vehicles owned and operated in the US.If you believe that your vehicle has a defect which could cause a crash or could cause injury or death, you sh...
-
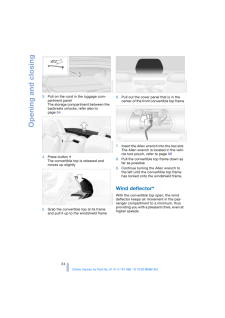
10 .10 ページ目のマニュアル
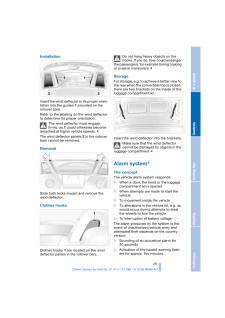
-
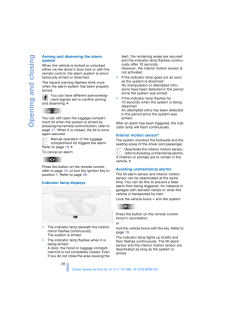
11 .At a glance The overview...At a glance The overviews of buttons, switches anddisplays presented in this chapter will helpyou find your way around your vehicle.You will also be familiarized with the con-cepts behind the operation of the featuresavailable to you.
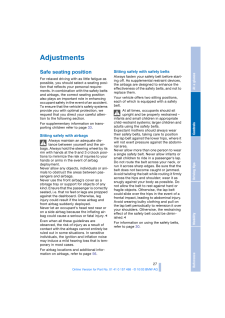
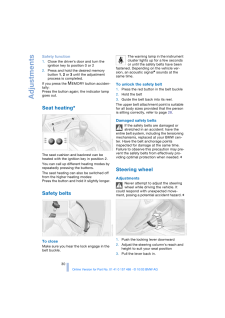
-
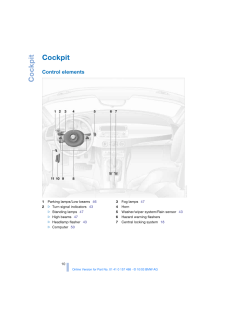
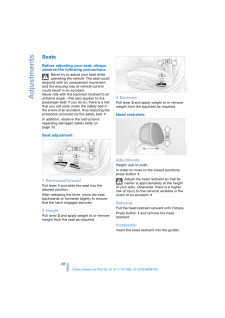
12 .Cockpit 10 Cockpit Contr...Cockpit 10 Cockpit Control elements 1 Parking lamps/Low beams 46 2 > Turn signal indicators 43 > Standing lamps47 > High beams47 > Headlamp flasher 43 > Computer50 3 Fog lamps47 4 Horn 5 Washer/wiper system/Rain sensor 43 6 Hazard warning flashers 7 Cent...
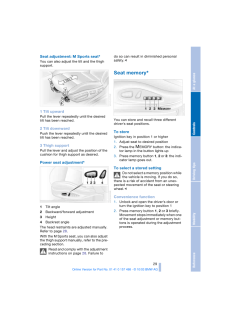
-
13 .At a glanceControlsDrivi...At a glanceControlsDriving tipsMobility Reference 11 8 Buttons in steering wheel * VolumePress briefly:Accept incoming call, start dialing, termi-nate callExtended pressure:Activate and deactivate voice entrySwitch between telephone and radio or CDFast f...
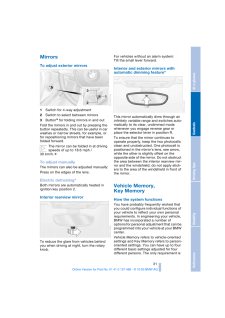
-
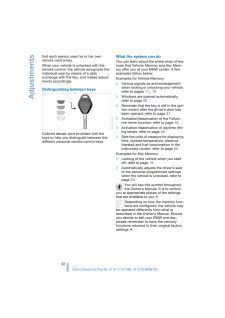
14 .Cockpit 12 Instrument cl...Cockpit 12 Instrument cluster 1 Speedometer 2 Indicator and warning lamps 12 3 Tachometer48with indicator and warning lamps 12 4 Engine coolant temperature gauge 48 5 Fuel gauge48 6 Button for > Time49>Service interval display 49 7Display field for selec...
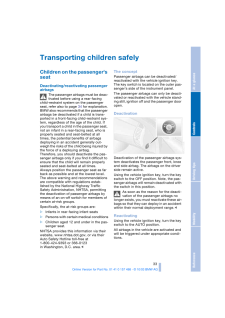
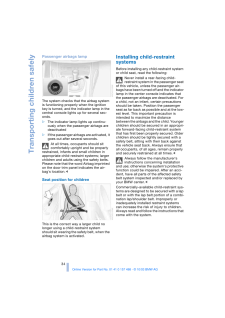
-
15 .At a glanceControlsDrivin...At a glanceControlsDriving tipsMobility Reference 13ColorsThe indicator and warning lamps can light up in various colors and combinations.The following section explains the signifi-cance of the individual colors as well as how you should respond.>Red: Stop...
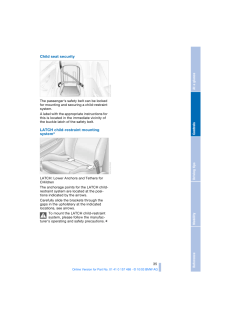
-
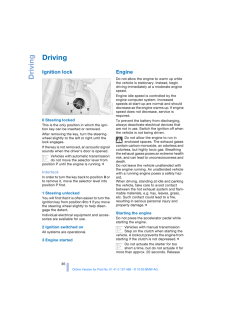
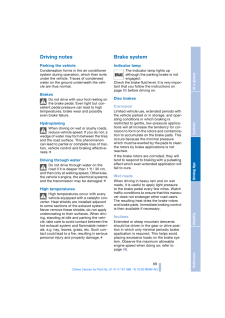
16 .16 ページ目のマニュアル
-
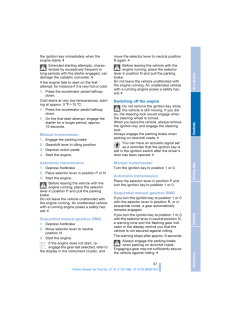
17 .ControlsThis chapter prov...ControlsThis chapter provides you with the informa-tion you need for complete control overyour vehicle. It describes all features usedfor driving and for ensuring your safety andcomfort.
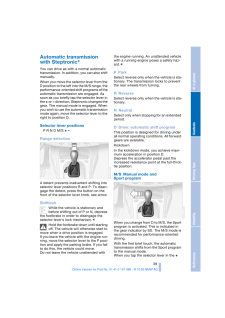
-
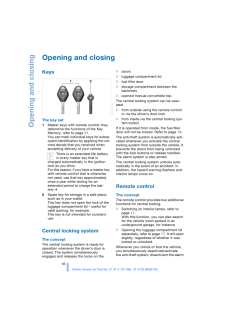
18 .Opening and closing16Open...Opening and closing16Opening and closingKeys The key set1Master keys with remote control: they determine the functions of the Key Memory, refer to page 31.You can mark individual keys for subse-quent identification by applying the col-ored decals that you...
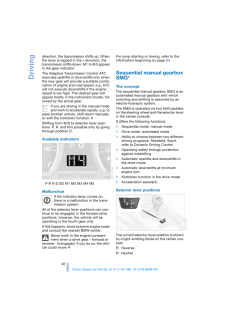
-
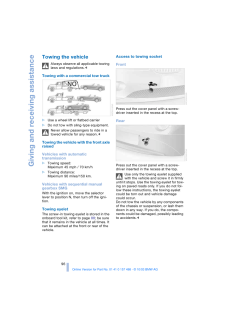
19 .ReferenceAt a glanceContr...ReferenceAt a glanceControlsDriving tipsMobility 17system and switch the interior lamps on/off.You can have a signal set to confirm that the vehicle's locks have engaged securely.20 .Opening and closing18FCC ...Opening and closing18FCC ID: LX8EWSLX8FZVSLX8FZVECompliance statement: This device complies with part 15 of the FCC Rules. Operation is subject to the fol-lowing two conditions:>This device may not cause harmful interference, and>this device must accept an...21 .ReferenceAt a glanceContr...ReferenceAt a glanceControlsDriving tipsMobility 19To lock >Either use the central locking button to lock both doors at once or >press the individual door lock buttons down. To prevent the driver from being inadvertently locked out of the vehicle, the driv...22 .Opening and closing20Lugg...Opening and closing20Luggage compartment Emergency release This lever releases the luggage compart-ment lid from inside the luggage compart-ment.To enlarge the luggage compartmentThe luggage compartment can be enlarged when the convertible top is closed. S...23 .ReferenceAt a glanceContr...ReferenceAt a glanceControlsDriving tipsMobility 21Manual convertible top The fabric top offers perfect protection against the weather and it can be opened easily and quickly by one person alone.Here are a few tips so that you get the most out of your BMW:...24 .Opening and closing22To c...Opening and closing22To close the convertible top1.Press button 1 The convertible top is released and moves up slightly2.Holding on to the handle, pull the con-vertible top forward onto the windshield frame3.Turn the handle until it audibly engages. The co...25 .ReferenceAt a glanceContr...ReferenceAt a glanceControlsDriving tipsMobility 23could keep the convertible top from closing properly.26 .Opening and closing243.Pu...Opening and closing243.Pull on the cord in the luggage com-partment panelThe storage compartment between the backrests unlocks, refer also to page 644.Press button 1 The convertible top is released and moves up slightly5.Grab the convertible top at its fra...27 .ReferenceAt a glanceContr...ReferenceAt a glanceControlsDriving tipsMobility 25InstallationInsert the wind deflector in its proper orien-tation into the guides 1 provided on the rollover bars.Refer to the labeling on the wind deflector to determine its proper orientation.The wind de...28 .Opening and closing26Armi...Opening and closing26Arming and disarming the alarm systemWhen the vehicle is locked or unlocked either via the driver's door lock or with the remote control, the alarm system is simul-taneously armed or disarmed.The hazard warning flashers blink once when...29 .ReferenceAt a glanceContr...ReferenceAt a glanceControlsDriving tipsMobility 27AdjustmentsSafe seating positionFor relaxed driving with as little fatigue as possible, you should select a seating posi-tion that reflects your personal require-ments. In combination with the safety belts...30 .Adjustments28Seats Before...Adjustments28Seats Before adjusting your seat, always observe the following precautionsNever try to adjust your seat while operating the vehicle. The seat could respond with an unexpected movement, and the ensuing loss of vehicle control could result in an...31 .ReferenceAt a glanceContr...ReferenceAt a glanceControlsDriving tipsMobility 29Seat adjustment: M Sports seat * You can also adjust the tilt and the thigh support.1 Tilt upwardPull the lever repeatedly until the desired tilt has been reached.2 Tilt downwardPush the lever repeatedly u...32 .Adjustments30Safety funct...Adjustments30Safety function1.Close the driver's door and turn the ignition key to position 0 or 22.Press and hold the desired memory button 1, 2 or 3 until the adjustment process is completed.If you press the M EMORY button acciden-tally: Press the button...33 .ReferenceAt a glanceContr...ReferenceAt a glanceControlsDriving tipsMobility 31Mirrors To adjust exterior mirrors 1Switch for 4-way adjustment2Switch to select between mirrors3Button* for folding mirrors in and outFold the mirrors in and out by pressing the button repeatedly. This ca...34 .Adjustments32that each pe...Adjustments32that each person uses his or her own remote control key. When your vehicle is unlocked with the remote control, the vehicle recognizes the individual user by means of a data exchange with the key, and makes adjust-ments accordingly.Distinguish...35 .ReferenceAt a glanceContr...ReferenceAt a glanceControlsDriving tipsMobility 33Transporting children safely Children on the passenger's seat Deactivating/reactivating passenger airbagsThe passenger airbags must be deac-tivated before using a rear-facing child-restraint system on the ...36 .Transporting children saf...Transporting children safely34Passenger airbags lampThe system checks that the airbag system is functioning properly when the ignition key is turned, and the indicator lamp in the central console lights up for several sec-onds.>The indicator lamp lights up...37 .ReferenceAt a glanceContr...ReferenceAt a glanceControlsDriving tipsMobility 35Child seat securityThe passenger's safety belt can be locked for mounting and securing a child-restraint system.A label with the appropriate instructions for this is located in the immediate vicinity of th...38 .Driving36DrivingIgnition ...Driving36DrivingIgnition lock 0 Steering locked This is the only position in which the igni-tion key can be inserted or removed.After removing the key, turn the steering wheel slightly to the left or right until the lock engages.If the key is not removed, ...39 .ReferenceAt a glanceContr...ReferenceAt a glanceControlsDriving tipsMobility 37the ignition key immediately when the engine starts.40 .Driving38Parking brake Th...Driving38Parking brake The parking brake is designed primarily to prevent the vehicle from rolling when parked. It operates against the rear wheels.Indicator lampThe indicator lamp lights up when the parking brake is engaged; if you start driving, an acous...41 .ReferenceAt a glanceContr...ReferenceAt a glanceControlsDriving tipsMobility 39Automatic transmission with Steptronic* You can drive as with a normal automatic transmission. In addition, you can also shift manually.When you move the selector lever from the D position to the left into...42 .Driving40direction, the t...Driving40direction, the transmission shifts up. When the lever is tapped in the - direction, the transmission shifts down. M1 to M5 appear in the gear indicator.The Adaptive Transmission Control ATC executes upshifts or downshifts only when the new gear w...43 .ReferenceAt a glanceContr...ReferenceAt a glanceControlsDriving tipsMobility 41Forward position with one-touch functions:Sequential mode+:manual upshifting-:manual downshiftingD: drive mode.The SMG is ready for operation in ignition key positions 2 and 3. The gearbox is automatically...44 .Driving42You accelerate f...Driving42You accelerate from higher gears, e.g. dur-ing passing, by downshifting manually.In the following situations, the SMG in the sequential mode assists you:>The transmission will only execute upshifts and downshifts that will result in an appropriate...45 .ReferenceAt a glanceContr...ReferenceAt a glanceControlsDriving tipsMobility 43Deactivating the Sport programPress the SPORT button again.The LED in the button goes out.Acceleration assistant with SMGThe acceleration assistant permits opti-mum racing-style acceleration on skid-resist...46 .Driving445Rotary dial for...Driving445Rotary dial for control of the wipe inter-val or the sensitivity of the rain sensorIntermittent operationNot on vehicles with rain sensor.You can set the wipe interval over four stages with rotary dial 5.In addition, the wipe interval is varied ...47 .ReferenceAt a glanceContr...ReferenceAt a glanceControlsDriving tipsMobility 45Cruise control* 1To maintain and store speed/to accelerate2To decelerate3To recall the stored setting4To deactivate the systemDo not use cruise control on twisting roads, when high traffic density pre-vent...48 .Lamps46LampsParking lamps...Lamps46LampsParking lamps/Low beams Parking lamps The front, rear and side vehicle lighting is switched on. You can use the parking lamps to signal the position of the vehicle when it is parked. For information on lighting on one side of the vehicle for pa...49 .ReferenceAt a glanceContr...ReferenceAt a glanceControlsDriving tipsMobility 47High beams/Standing lamps 1High beams: blue indicator lamp2Headlamp flasher: blue indicator lamp3Standing lampsLeft or right standing lamps *As an additional feature, you can illuminate your vehicle on eit...50 .Everything under control4...Everything under control48Everything under controlOdometer 1Odometer2Trip odometerOdometer With the ignition key in position 0, you can activate the displays shown in the illustra-tion by pressing the button - see arrow - in the instrument cluster.Trip odo...51 .ReferenceAt a glanceContr...ReferenceAt a glanceControlsDriving tipsMobility 49Between the blue and red zonesNormal operating range. The needle may rise as far as the edge of the red sector dur-ing normal operation.RedWhen you switch on the ignition, warning lamp 1 comes on briefly t...52 .Everything under control5Everything under control504.Press button 1 repeatedly until the required minutes are set5.Press button 2 to confirm the settings.The set time of day is transferred to the car radio display or appears in the instrument cluster display.Display modeIn ignitio...53 .ReferenceAt a glanceContr...ReferenceAt a glanceControlsDriving tipsMobility 51Average fuel consumption If you continue to press the button on the turn signal lever, the average fuel con-sumption last displayed is recalculated from that point in time.Any time spent when the vehicle i...54 .Technology for safety and...Technology for safety and driving convenience52Technology for safety and driving convenienceDynamic Stability Control DSCThe conceptThis system optimizes driving stability and traction, especially when just starting off, when accelerating or when cornering...55 .ReferenceAt a glanceContr...ReferenceAt a glanceControlsDriving tipsMobility 53If the brake warning lamp comes on together with the yellow indicator lamps for the Antilock Brake Sys-tem ABS and the Dynamic Stability Control DSC:The entire ABS and DSC control system has failed. Contin...56 .Technology for safety and...Technology for safety and driving convenience54The display has two levels:>Normal braking:Brake lamp 1 lights up on both sides of the vehicle together with the center brake lamp>Forceful braking and braking with ABS:Brake lamps 1 and 2 light up on both veh...57 .ReferenceAt a glanceContr...ReferenceAt a glanceControlsDriving tipsMobility 55place in all four tires over an extended period of time.58 .Technology for safety and...Technology for safety and driving convenience56Airbags The following airbags are located under the marked covers:1Front airbags for driver and passenger2Side airbags for driver and passenger3Knee airbags for driver and passengerProtective effectThe front a...59 .ReferenceAt a glanceContr...ReferenceAt a glanceControlsDriving tipsMobility 57them to be deactivated, the airbags have to be deactivated with the vehicle ignition key and the key switch on the outer passen-ger's side of the instrument panel. Apart from passengers, do not place any a...60 .Controlling the climate f...Controlling the climate for pleasant driving58Controlling the climate for pleasant drivingAir conditioning 1Air onto the windshield and the side windows2Air for the upper body area 593Air for the footwell4Air distribution595Air conditioning 596Outside-air/...61 .ReferenceAt a glanceContr...ReferenceAt a glanceControlsDriving tipsMobility 59Air distribution You can direct airflow onto the windows , toward the upper body and into the footwell . All intermediate settings are pos-sible. Air supply/blower You can set the blower to 8 differ-en...62 .Controlling the climate f...Controlling the climate for pleasant driving60To defrost windows and remove condensation1Turn the rotary control to 2Turn the rotary blower control for the air supply completely to the right3Turn the rotary temperature control completely to the right4To de...63 .ReferenceAt a glanceContr...ReferenceAt a glanceControlsDriving tipsMobility 61Automatic climate control * 1Air onto the windshield and the side windows2Air for the upper body area 633Air for the footwell4Individual air distribution 625To defrost windows and remove condensation626Aut...64 .Controlling the climate f...Controlling the climate for pleasant driving62Tips for pleasant drivingUse the automatic system - switch on with AUTO button 6. Select the desired interior temperature.Detailed setting options are described for you below.Automatic air distribution and supp...65 .ReferenceAt a glanceContr...ReferenceAt a glanceControlsDriving tipsMobility 63Outside air/Automatic recirculated air control AUC/recirculated air mode You can respond to unpleasant external odors or pollutants by temporarily stopping the flow of outside air. The system then recircul...66 .Interior conveniences64In...Interior conveniences64Interior conveniencesGlove compartment To openPress the two push buttons together.To closeSwing the door up.To prevent injury in the event of an accident, close the glove compart-ment immediately after use.67 .ReferenceAt a glanceContr...ReferenceAt a glanceControlsDriving tipsMobility 65Beverage holder A beverage holder is located on either side beneath the air outlets.1.Press the trim piece beneath the air outlets; see arrow 12.Place the beverage into the holder3.Adjust the holder to fi...68 .68 ページ目のマニュアル69 .Driving tipsDriving tips ...Driving tipsDriving tips provides you with informationyou will need in certain driving situationsand when using special operating modes.70 .Special operating instruc...Special operating instructions68Special operating instructionsBreak-in procedures To ensure that your vehicle provides maxi-mum economy throughout a long service life, we request that you observe the fol-lowing: Engine and differentialUp to 1,200 miles / 2...71 .ReferenceAt a glanceContr...ReferenceAt a glanceControlsDriving tipsMobility 69Driving notes Parking the vehicleCondensation forms in the air conditioner system during operation, which then exits under the vehicle. Traces of condensed water on the ground underneath the vehi-cle are t...72 .Special operating instruc...Special operating instructions70Do not coast with the clutch depressed or with the transmission or selector lever in Neutral. Do not coast with the engine switched off. Otherwise the engine provides no braking effect and there is no power-assist for brakin...73 .ReferenceAt a glanceContr...ReferenceAt a glanceControlsDriving tipsMobility 71behind the seats may prevent the backrest from engaging properly. Ensure that the backrest is securely locked by moving the seat forward if necessary. Refer to page 28.74 .74 ページ目のマニュアル75 .MobilityTo ensure that yo...MobilityTo ensure that you stay mobile,the following chapter provides you withimportant information on fuels and fluids,tires and wheels, maintenance proceduresand steps to take in the event of a break-down.76 .Refueling74RefuelingFuel ...Refueling74RefuelingFuel filler door 1.Open fuel filler door 2.Turn the gas cap in a counter-clockwise direction3.Place the gas cap in the bracket on the filler door.Releasing manuallyIf an electrical malfunction occurs, you can unlock the fuel filler door...77 .ReferenceAt a glanceContr...ReferenceAt a glanceControlsDriving tipsMobility 75Wheels and tiresTire inflation pressure Information for your safetyIt is not merely the tire's service life, but also driving comfort and driving safety that largely depend on the condition of the tires an...78 .Wheels and tires76Z4 2.5i...Wheels and tires76Z4 2.5i Z4 3.0i Tires Pressure specifications in psi/kPaTiresAll pressure specifications in the table are indicated in psi/kilopascal with cold tires, cold = ambient temperature225/50 R 16 92 V225/45 R 17 91 W30/210 33/230225/40 R 18 88 ...79 .ReferenceAt a glanceContr...ReferenceAt a glanceControlsDriving tipsMobility 77Tire codingUnderstanding the lettering on the tire sidewall makes it easier to identify and choose the correct tires.Tire size e.g. 225/50 R 16 92 VNominal width in mm Cross-sectionalratio in % Radial belt...80 .Wheels and tires78Tempera...Wheels and tires78TemperatureThe temperature grades are A, the highest, B and C, representing the tire's resistance to the generation of heat and its ability to dissipate heat when tested under con-trolled conditions on a specified indoor lab-oratory test ...81 .ReferenceAt a glanceContr...ReferenceAt a glanceControlsDriving tipsMobility 79Wheel and tire replacement Unprofessional attempts by laymen to service tires can lead to damage and accidents. Have this work performed by skilled pro-fessionals only. Any BMW center has the required tech...82 .Wheels and tires80Run Fla...Wheels and tires80Run Flat tires Run Flat tires are labeled on the sidewall with a circular symbol containing the letters RSC. Run Flat tires consist of self-support-ing tires and special rims. The tire rein-forcement ensures that driving remains possible ...83 .ReferenceAt a glanceContr...ReferenceAt a glanceControlsDriving tipsMobility 81In the engine compartmentHood To release the hood Pull the lever located under the left-hand side of the instrument panel.Do not work on your vehicle without the appropriate skills to do so. Failure to wor...84 .In the engine compartment...In the engine compartment82Engine compartment 1Reservoir for the headlamp and wind-shield washer system 832Engine oil filler neck 843Auxiliary terminal for jump-starting 944Reservoir for brake fluid 855Chassis ground, negative terminal6Engine oil dipstick...85 .ReferenceAt a glanceContr...ReferenceAt a glanceControlsDriving tipsMobility 83Washer fluids for washer systems Headlamp* and windshield washer systemCapacity of windshield washer system: approx. 3.2 quarts/3 liters.Capacity when equipped with headlamp washer system: approx. 5.3 quar...86 .In the engine compartment...In the engine compartment84The oil volume between the two marks on the dipstick corresponds to approx. 1.1 quarts/1 liter. Do not fill beyond the upper mark on the dipstick. Excess oil will damage the engine.Adding engine oil While you should wait until th...87 .ReferenceAt a glanceContr...ReferenceAt a glanceControlsDriving tipsMobility 85allow accumulated pressure to escape, then open completely2.The coolant level is correct when the upper end of the red float is at least even with the upper edge of the filler neck but no more than 3/4 in/...88 .Maintenance86Maintenance ...Maintenance86Maintenance The BMW Maintenance System The BMW Maintenance System has been designed as a reliable means of providing maximum driving and operating safety, and as cost-effectively for you as possible.Please keep in mind that regular mainte-nanc...89 .ReferenceAt a glanceContr...ReferenceAt a glanceControlsDriving tipsMobility 87Laws and regulationsCalifornia Proposition 65 warningCalifornia laws require us to state the fol-lowing warning:Engine exhaust and a wide variety of automobile components and parts, including components fo...90 .Replacement procedures88R...Replacement procedures88Replacement proceduresOnboard tool kitThe onboard tool kit is stored in a tool pouch. It is located in the luggage compart-ment beneath the floor panel.Windshield wiper blades 1.Fold the wiper arm completely out from the windshield ...91 .ReferenceAt a glanceContr...ReferenceAt a glanceControlsDriving tipsMobility 891.Open the caps with a suitable object, e.g. a coin or screwdriver2.Fold up the protective cover in the wheel well.Headlamp cover1.Pull the wire clamp out straight2.Pull the wire clamp past the catches, se...92 .Replacement procedures90F...Replacement procedures90Front turn signal indicators21 watt bulb1.Insert a Phillips-head screwdriver from the onboard toolkit into the appropriate opening, arrows 12.Turn the screwdriver to the left, arrows 23.Use the Phillips-head screwdriver to pull out ...93 .ReferenceAt a glanceContr...ReferenceAt a glanceControlsDriving tipsMobility 91Please contact a BMW center in case of a malfunction.License plate lamps 5 watt bulb1.Push out the lamp with a suitable object and remove it2.Replace the bulb.Snap the lamp back into place.Changing a wheel...94 .Replacement procedures92C...Replacement procedures92Charging the batteryCharge the battery in the vehicle only when the engine is not running. For information on connections, refer to Jump-starting on page 94. Battery disposalReturn used batteries to a recycling point or to your BMW ...95 .ReferenceAt a glanceContr...ReferenceAt a glanceControlsDriving tipsMobility 93Giving and receiving assistance Receiving assistanceThe BMW Group's Mobile Service offers you 24-hour assistance in the event of a breakdown, even on weekends and holi-days.The telephone numbers of the Mob...96 .Giving and receiving assi...Giving and receiving assistance94Warning triangle* The warning triangle is stored in the rear luggage compartment panel.Pull the ends of the rubber bands upward and out of the fasteners.Always observe all legal regulations requiring a warning triangle to b...97 .ReferenceAt a glanceContr...ReferenceAt a glanceControlsDriving tipsMobility 95Connecting jumper cablesAlways adhere to this sequence when connecting jumper cables; failure to observe this procedure can lead to sparks at the battery terminals and pose an injury hazard.98 .Giving and receiving assi...Giving and receiving assistance96Towing the vehicle Always observe all applicable towing laws and regulations.
Use a wheel lift or flatbed carrier>Do not tow with sling-type equipment.Never allow passengers to ride in a... 100 .100 ページ目のマニュアルログイン
 ファイルをアップロードしています。
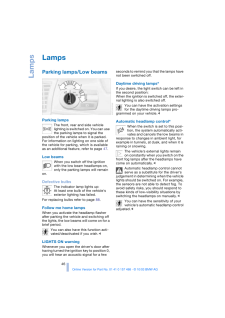
しばらくお待ちください。