
MENTOR MENUETの取扱説明書・マニュアル [全34ページ 2.24MB]


2


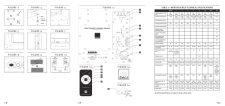


15UKDEDK9.1 Adjustment of the sub wooferWhen you have decided upon which method of connection you want and positioned the subwoofer, you can commence the exciting process of tuning the system. Please note that positioning the subwoofer will have a big inluence on its contribution to the overall sound, e.g. if the DALI MENtOR SuB is positioned in a corner the bass will be much heavier than if it is positioned midway between two corners. the following tuning method is recommended to achieve the best results: use a piece of music you know well, preferably one including rhythmic bass such as kettle drums, bass guitar etc. Start adjusting the subwoofer by setting the ON/OFF switch to ON. Set the AutO/MANuAL switch to AutO. Adjust the subwoofer using the remote or the buttons on the rear panel of the subwoofer. Note: When adjusting, the logo / LED display on the front of the subwoofer will show your setting.Note: We recommend that you take advantage of the remote control option and adjust the settings of the sub woofer from the listening position. 9.2 Overloading the subwooferIf DALI MENtOR SuB is overloaded, the built-in safety circuit will cut the power off. If this occurs let it cool down before turning it back on. the built-in safety circuit is not a guarantee against damage as a result of overloading.9.3 Powerthe POWER button is the main ON/OFF switch. We recommend switching OFF the system when it is not to be used for long periods. When changing connections, always disconnect the mains voltage to the subwoofer .We recommend that you ALWAYS turn off the DALI MENtOR SuB with the Remote control BEFORE turning off the mains switch.10. THE LISTENING ROOMEvery room has its own distinctive acoustics, which inluence the way we experience sound from a speaker. the sound you hear consists of direct sound from the speakers and relected sound from the loor, ceiling and walls. the latter will affect how you experience the sound. As a basic rule, try to avoid large, hard and relective areas in the immediate vicinity of your loudspeakers as it will typically cause strong relections, which might disturb the precision and spatial effect of the sound reproduction. Relection might be suppressed by positioning e.g. a plant between the speaker and the relecting surface. Soft items such as carpets, curtains etc. might help if the sound is too bright. Both the amount and quality of the deep bass depend on the size and shape of the room, and the position of the speakers. Positioning the speakers near a side or back wall will accentuate the bass.A corner location will accentuate it even more, but will also increase the relections.11. TECHNICAL SPECIFICATIONSIn table 2 you will ind the most common speciications for our speakers. Please have in mind that there are countless methods for measuring speakers. However, none of them tell you anything useful about how a speaker really sounds. Only your ears can decide whether one speaker sounds better than another. Like all our speakers, DALI MENtOR series is designed to reproduce music as honestly as possible.Enjoy your new DALI MENtOR!

