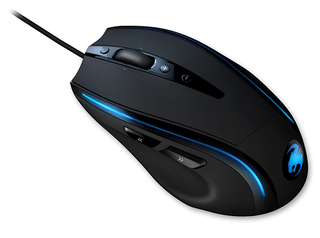
ROCCAT Kone
x
Gizport

ROCCAT Koneの取扱説明書・マニュアル [全19ページ 4.65MB]

6
ROCCAT-Kone-Manual-22-02-2010-EN.pdf
gizport - 2013-08-14
http://www.roccat.org/.../ROCCAT-Kone-Manual-22-02-2010-EN.pdf - 4.65MB - キャッシュ
8517view
19page / 4.65MB
Share (facebook)
10 / 19 ページ
 
10 / 19 ページ
ファイルを開く
現在のページURL
0Creating a Macro (Basic Editor) Step : Click the upper line in the left-hand window. In the following dropdown menu you can add a macro set (Add Macro Set) or delete one (Delete Macro Set). Click ‘Add Macro Set’. Step : Give your macro set a name. To make things clearer, use a general name for the events in the game you’re playing. For example, you can name the set ‘Magic buffs’ or ‘Weapons arsenal’ or just give it the name of the game. Step 3: If you click ‘New’ under the left-hand window, you can assign a name to the individual macro like ‘Arcane rotation’ or ‘Sniper rile’. Conirm the name by hitting the return key.Step 4: Now you can enter a macro. To do that, click the ‘Start Record’ button in the right-hand window. Enter the key combination which you need for a special action in the game. The option ‘Record delays between key commands’ is located under the record button. This option allows you to determine how long a certain key should be pressed for. As a result it’s possible to create a macro that instructs a igure in the game to only perform a speciic action after a pre-determined period.Step 5: Click ‘Stop Record’ once you’re done entering your key combination via the keyboard. You can now either record an additional macro in the macro set you’ve created or create a new macro set. Click ‘OK’ when you’re done. The macro can now be assigned to any one of the eight programmable buttons. You can assign the macro to a button by clicking onto the arrow next to the box of the button you want the macro to be assigned to. In the following dropdown menu choose ‘Assign Menu’. All available macro sets are now displayed. Select the one containing your macro of choice and then click on the respective macro.Note: You’ll need to assign the macro to the desired mouse button again even if you’ve edited a macro that is already assigned to a particular button. Step 6:Assign the function to the mouse by clicking the ‘Apply’ button without exiting the ROCCAT menu. It may take a few seconds until the information is transferred to the mouse. You can now store and save these settings under one of the ive proiles that can be stored on the mouse. Proiles will be easier to manage if you name them after the game, gamer or program. Note: A running macro can be ended at any time by clicking on the button again.MACRO MAnAGER

参考になったと評価
  7人が参考になったと評価しています。

このマニュアルの目次

  • 1 .
    DRIVER ManualIMPORTANTDO...
    DRIVER ManualIMPORTANTDOCUMENT
  • 2 .
    TABLE OF COnTEnTS Safety...
    TABLE OF COnTEnTS Safety Instructions Introduction Installation Main Control • Sensitivity Options • DPI Switcher • Mousewheel Scroll Speed • Double Click • Button Assignment Macro Manager • Creating a Macro • Integrate Mouseklicks ...
  • 3 .
    3LaserThis mouse uses a C...
    3LaserThis mouse uses a Class 1 laser sensor (830nm). The light from this sensor is invisible to human eyes and is therefore classiied as being harmless. Despite this, under certain circumstances pointing the laser directly at the eyes may cause blindness....
  • 4 .
    4Welcome to the ROCCAT™ K...
    4Welcome to the ROCCAT™ Kone Congratulations. You have purchased our irst gaming mouse which is stuffed with technology and design innovations. It is the only tool to unleash your hidden skills and develop your existing ones to the max. The ROCCAT™ Kon...
  • 5 .
    5Windows® XP/Vista Step ...
    5Windows® XP/Vista Step : the mouse into any free USB port on your computer. Step : Windows® will automatically detect the ROCCAT™ Kone. Step 3: the latest driver from www.roccat.org/support. Step 4: a folder in which to install the...
  • 6 .
    6About the Main Control ...
    6About the Main Control Millisecond-precise attack, buff or cast sequences with complex character strings and pauses can be stored on just a single mouse button. 128kB of internal memory allows 5 Game Proiles to be stored on the mouse itself for separate...
  • 7 .
    7Button Assignment Sensit...
    7Button Assignment Sensitivity OptionsSet the sensitivity of the mouse pointer here. You can select a sensitivity level down to a hundredth of a point on the scale of 1.00 to 10.00. 10 equates to the highest level of sensitivity. Note: We urge you to ke...
  • 8 .
    8Button Assignment Click:...
    8Button Assignment Click: mouse button.Menu: mouse button. The context menu will open when you point to a document or folder using the mouse.Universal scrolling: Mousewheel function to scroll by moving the mouse.Double-click: Lef...
  • 9 .
    9To access the Macro Mang...
    9To access the Macro Manger, choose the index ‘Main Control’. Then click onto the arrow next to any of the boxes under ‘Button assignment’ to open a dropdown menu and select ‘ assign Macro’. Choose ‘Create new Macro’ on the following dropdown menu. This ...
  • 10 .
    0Creating a Macro (Basic...
    0Creating a Macro (Basic Editor) Step : Click the upper line in the left-hand window. In the following dropdown menu you can add a macro set (Add Macro Set) or delete one (Delete Macro Set). Click ‘Add Macro Set’. Step : Give your macro set a name...
  • 11 .
    Integrate Mouse Clicksa...
    Integrate Mouse Clicksanother special feature of the ROCC aT driver is that it allows you to integrate mouse clicks into a macro along with keyboard commands. You can program a mouse event to be executed after, before or in-between a key sequence. To do ...
  • 12 .
    Switch to advanced edit...
    Switch to advanced editorIn the center window it’s possible to manually change the time intervals between the individual key presses of a particular macro. Individual blue bars show the length of time the respective button has been pressed for. Along wit...
  • 13 .
    3Create/Save ProileCreat...
    3Create/Save ProileCreate one of ive proiles. For instance, you can save all button assignments, macros, color settings or sensitivity settings to a proile here. As each different mouse assignment is best suited to different programs you can assign each p...
  • 14 .
    4Choose a light to adjus...
    4Choose a light to adjustFive LEDs can be assigned 38 different colors. Under ‘Change Color’ click one of the LEDs to assign it a color of your choice. Change ColorClick a color box to select the color you want. Light On/OffHere you can switch off the LED...
  • 15 .
    5Adjust the light effect...
    5Adjust the light effectMultiple options are listed here which allow you to control the use of the color you’ve selected on the ROCCAT™ Kone. In the irst section you can use the selected color or allow a random single color or random multiple colors to be...
  • 16 .
    6Advanced Sensitivity (X...
    6Advanced Sensitivity (X-Y)It can be a great help to independently conigure the sensitivity of the horizontal and vertical (x-axis and y-axis respectively) movements of the mouse pointer, not only when it comes to graphics applications, with many games bu...
  • 17 .
    7TCU – Tracking Control ...
    7TCU – Tracking Control UnitThe Tracking Control unit (TCu) is an additional sensor that scans the surface of the mousepad and then automatically adjusts the performance of the sensor to match the surface. This adjustment results in optimized tracking....
  • 18 .
    8Polling RateThe term ‘p...
    8Polling RateThe term ‘polling rate’ describes the number of times the computer prompts the mouse for information. A high polling rate in conjunction with a high dpi setting ensures smooth pointer movement. We recommend that you start off with a resolutio...
  • 19 .
    9Update your ROCCAT™ Kon...
    9Update your ROCCAT™ Kone Gaming Mouse at any time. You can check here whether new software is available for the mouse. Note: All mouse settings will be reset as soon as you install new irmware on your computer. Macros saved on the mouse will not be affec...