

Q&A
取扱説明書・マニュアル (文書検索対応分のみ)
13 件の検索結果
30 - 40 件目を表示
全般
質問者が納得VIERAは光沢液晶ではないですか? しかも倍速だし。
BenQは非光沢液晶なので、鮮やかさ等を期待するモニターではなく、モニターへの映り込みの軽減や、目の疲れにくさを期待するものです。
4683日前view238
全般
質問者が納得パソコン工房のね・・・79,980 円 本当にタワーだけね・・
http://www.pc-koubou.jp/pc/php/bto_confirm.php?pc_id=84868c3bbfbbc5b9d8afc52a15c2d728&divFlg=1
4690日前view285
全般
質問者が納得›たびたび突然モニターがバックライトオフ(?)になり、映らなくなってしまいます
LEDバックライト回路の故障でしょう!
LEDの寿命は3万時間前後です。
BenQ の液晶パネル及びバックライトは1年保証なので保証期間中なら修理依頼してください。
http://www.benq.co.jp/support/warrantyjp
保証期間外なら買い換えた方が安いでしょうね。
BenQ GL2250HM
http://kakaku.com/item/K0000295086/
補足
3万時間なので1日8時...
4715日前view637
全般
質問者が納得特に問題ありません
GL2250HMを購入したら、RGBケーブルが付属するので、それをモニタ出力端子に接続して、WINDOWSキー+Pを押して、拡張モードまたは複製モードを選択してください。
デジタル接続したい場合は、市販のHDMI-DVIケーブルを購入して、それで接続してください。ただまあ、映りは変わりませんよ。やってみれば分かります。
4803日前view155
全般
質問者が納得自分なら
LGエレクトロニクス
FLATRON E2251VR-BN [21.5インチ]
を選びますね。
スペック上は、どちらも変わりなく同じ性能ですからデザインやメーカーで選びました^^
ただしモニターのスピーカーは、おもちゃ以下なので使わないように
4879日前view204
全般
質問者が納得Q.このモニターでXBOX360はプレイできますか?
A.できます(HDMI接続推奨)。
Q.スピーカーは手持ちの物を使いたい。ヘッドホンジャックに繋げばいい?
A.はい(ただしHDMI接続の場合のみ)。
Q.遅延って何?
A.コントローラーのボタンを押してゲーム画面に反映されるまでかかる時間のことです(厳密には違う)。リズムゲームや格闘ゲームなど入力がシビアなゲームで問題になってきます。5ms以下の最近の液晶モニタなら気にしなくてもいいんではないでしょうか?
4977日前view422
全般
質問者が納得FPSは21~24型くらいのサイズが一番やり易いのでURLのモニターで充分だと思います。
お店によっては特価でモニター販売しているところもあるので覗いてみるのも良いかも知れませんね♪
4998日前view261
全般
質問者が納得来月の予定なら、グラボはHD7770の方がいいです。
HD7770はHD5850/6850相当の性能でありながら、
TDP80Wと省エネです。
HD5770リネームのHD6770とは大違いです。
5010日前view113
全般
質問者が納得デスクトップ解像度とモニターの解像度は一致していますか?
接続がHDMIの場合グラフィックの種類によっては小さくなります。
補)
デスクトップの解像度が1920×1080かご確認を。
Windowsなら
デスクトップの何も無い所で右クリック
プロパティー
設定と進み
画面の解像度をチェックしましょう。
5041日前view530
全般
質問者が納得三菱電機
Diamondcrysta WIDE RDT233WX-S(BK) [23インチ ブラック]¥30,980
http://kakaku.com/item/K0000254151/
参考に成れば
5063日前view133

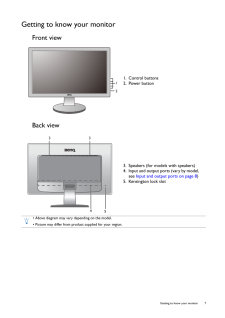
7 Getting to know your monitorGetting to know your monitorFront viewBack view1. Control buttons2. Power button123. Speakers (for models with speakers)4. Input and output ports (vary by model, see Input and output ports on page 8 )5. Kensington lock slot3354* Above diagram may vary depending on the model.* Picture may differ from product supplied for your region.
2 CopyrightCopyright 2013 by BenQ Corporatio n. All rights reserved. No part of this publication may be reproduced, transmitted, transcribed, stored in a retrieval system or translated into any language or computer language, in any form or by any means, el ectronic, mechanical, magnetic, optical, chemical, manual or otherwise, wi thout the prior written permission of BenQ Corporation.DisclaimerBenQ Corporation makes no repres entations or warranties, either expressed or implied, with respect to the cont...
4 Table of ContentsCopyright ......................................................................................................................................2Getting started .............................................................................................................................5Getting to know your monitor ................................................................................................7Front view .....................................................................
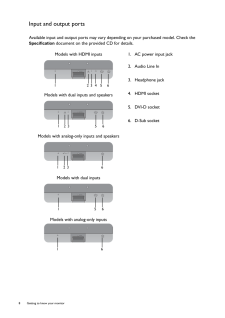
8 Getting to know your monitor Input and output portsAvailable input and output po rts may vary depending on your purchased model. Check the Specification document on the provided CD for details. Models with HDMI inputs 1. AC power input jack2. Audio Line In3. Headphone jack4. HDMI socket5. DVI-D socket6. D-Sub socketModels with dual inputs and speakersModels with analog-only inputs and speakersModels with dual inputsModels with analog-only inputs123456123 5 6123 615616
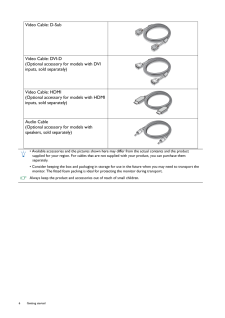
6 Getting started Video Cable: D-Sub Video Cable: DVI-D(Optional accessory for models with DVI inputs, sold separately)Video Cable: HDMI(Optional accessory for models with HDMI inputs, sold separately)Audio Cable(Optional accessory for models with speakers, sold separately)* Available accessories and the pictures shown here may differ from the actual contents and the product supplied for your region. For cables that are not supplied with your product, you can purchase them separately.* Consider keeping th...
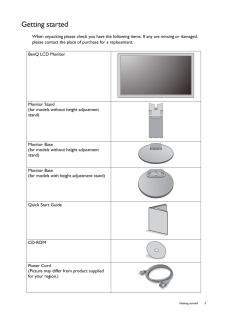
5 Getting startedGetting startedWhen unpacking please check you have the foll owing items. If any are missing or damaged, please contact the place of purchase for a replacement. BenQ LCD MonitorMonitor Stand(for models without height adjustment stand)Monitor Base(for models without height adjustment stand)Monitor Base(for models with height adjustment stand)Quick Start Guide CD-ROM Power Cord(Picture may differ from product supplied for your region.)

16 Getting the most from your BenQ monitor Getting the most from your BenQ monitorTo gain the most benefit from your new BenQ LCD monitor, you should install the custom BenQ LCD Monitor driver software as pr ovided on the BenQ LCD Monitor CD-ROM.The circumstances under which you connect and install your BenQ LCD Monitor will determine which process you need to follow to successfully install the BenQ LCD Monitor driver software. These circumst ances relate to which version of Microsoft Windows you are u...

3ServicingDo not attempt to service this product yourself, as opening or removing covers may expose you to dangerous voltages or other risks. If any of the above mentioned misuse or other accident such as dropping or mishandling occurs, contact qualified service personnel for servicing.BenQ ecoFACTSBenQ has been dedicated to th e design and development of gr eener product as part of its aspiration to realize the ideal of the "Bringing Enjoyment 'N Qu ality to Life" corporate vision with the ultimate ...
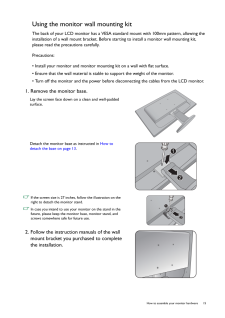
15 How to assemble your monitor hardwareUsing the monitor wall mounting kitThe back of your LCD monitor has a VESA standard mount with 100mm pattern, allowing the installation of a wall mount bracket. Before starting to install a monitor wall mounting kit, please read the precautions carefully.Precautions:* Install your monitor and monitor mountin g kit on a wall with flat surface.* Ensure that the wall material is stable to support the weight of the monitor.* Turn off the monitor and the power before...
- 1
- 2

