

Q&A
取扱説明書・マニュアル (文書検索対応分のみ)
39 件の検索結果
40 - 50 件目を表示
全般
質問者が納得>これって配線ミスとか何か問題なのでしょうか??
問題とかではありません、モニタ側で若干の調整が可能ですが、複数モニタの発色を合わせることはできないと考えてください。 同じ時期に複数台同じ製品を同時に購入しても発色はそろいません。
4212日前view193
全般
質問者が納得F8でブートドライブ(メインHDD)選択し、その後F8を連打すればセーフモードに入れます。
一度試してください。
4351日前view166
全般
質問者が納得ああ、すみません。
冒頭にBF4高設定とか実況とか記載がありましたね。
まぁどのみちBF4の高設定も何とか・・・・というレベルでしょうし、
実況も放送品質をどの程度にするかにもよりますけど、
それほど高解像度で快適に・・・とはいかない構成ですから、
とりあえず8GBで良いんじゃないでしょうか?
まぁメモリは価格的に大差ないと言えば大差ありませんが・・・・。
OSがHomeなら最大メモリはどっちにしろ16GBですしね?
あと、BF4もっていう事なら
何をどこにインストールしてどういう設定するのかによりますけ...
4476日前view118
全般
質問者が納得>SSD上位のものというのはどういうことでしょうか?
ではわかりやすく説明します。
性能で言えば簡単に比較できますよね?
でも性能=品質ではない・・・これは分かりますよね?
上位の製品は性能と安定性(品質や保証期間の長さ)を兼ね備えたものと私は考えます。
しかしSSDの体感的な速さは差がないのが現状です。
なのでSSDは安定性・・・特にプチフリがないなどが現在では重要な選択基準なのでは?
ハイスペックな構成ではやっぱり240GB以上のSSDでは?
PX-256M5P 5年保証でメンテナンスフリー(...
4477日前view186
全般
質問者が納得後々ゲームも楽しみたいのであればマザーにもう少しお金かけたほうが良いかと。
ケースはATXサイズなのに何ゆえマイクロATXを選ぶの?ここはATXのマザーを選んだほうがいいのでは?
OSはどちらでも、一ついえることは8のほうが新しいので長く使えるかと・・・・・。
補足を見て、
いいんじゃないでしょうか。
モニタはそれで大丈夫です。
4673日前view168
全般
質問者が納得ilovescandalandtennisさん、初めまして。
>トリプルディスプレイの設定なのですができません。グラボはラデの7770です。
?HD7770は最大6画面まで表示出来るはずですが・・・
>ディスプレイは3枚あります。
>BENQのGL2450HM二枚、LGのE2442一枚です。
3枚とも接続端子はD-Subx1/DVIx1/HDMIx1ですね。
>二つはDVIとHDMIでつないでいるのですがあと一つどこに
>つないでいいのかわかりません。
そもそもお使いのH...
4673日前view157
全般
質問者が納得マザボはあまり拡張性はないですが、そういう予定が無ければ安いので十分かと思います。
グラボは内臓でHDMI、DVI-D、D-Subの端子があってマルチ画面も対応しているので、ゲームをしないなら特に買う必要はないです。
メモリはOSの関係で最大4GBなので2GBを2枚になると思います。
メモリやHDやブルーレイドライブはそんなに製品ごとに違わないともいます。
まず規格をしっかり見て、あとは価格コムで売れ筋の商品の種類とだいたいの相場を見て、購入店舗の在庫から選んだりしてます。
半分くらいは会社名とかで選んで...
4767日前view79
全般
質問者が納得テレビのD端子(アナログ)とパソコンのDVI-D端子(デジタル)
は規格が違うので接続できません。
アップスキャンコンバータを間にかませて接続するのが一般的ですね。
4940日前view290
全般
質問者が納得少し状況が分かりにくいのでアドバイスがしにくいのですが、基本的にアスペクト比の固定はグラフィックドライバ側の設定になるのでモニター側に問題があるとは考えにくいです。
私もアスペクト比を固定をしようとした際、あるはずのスケーリングの設定の項目が表示されずに途方に暮れていましたが、下記サイトの方法で解決しました。
質問者様の場合だとどうなるか分かりませんが、一応参考までに。
http://poporuru0192.blog27.fc2.com/blog-entry-398.html
4954日前view159
全般
質問者が納得シリーズは同じで、画面サイズと値段が違うだけです^^;
どちらがよいといわれましても、貴方の用途にあった方を選べばすむ問題ですよ...
例えば、大きい画面でプレイしたいなら27型を買えばいいし、値段を取るなら24型を買えばいいかと
4954日前view111


4 Table of ContentsCopyright ......................................................................................................................................2Getting started .............................................................................................................................5Getting to know your monitor ................................................................................................7Front view .....................................................................

2 CopyrightCopyright 2013 by BenQ Corporatio n. All rights reserved. No part of this publication may be reproduced, transmitted, transcribed, stored in a retrieval system or translated into any language or computer language, in any form or by any means, el ectronic, mechanical, magnetic, optical, chemical, manual or otherwise, wi thout the prior written permission of BenQ Corporation.DisclaimerBenQ Corporation makes no repres entations or warranties, either expressed or implied, with respect to the cont...
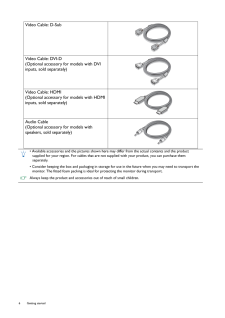
6 Getting started Video Cable: D-Sub Video Cable: DVI-D(Optional accessory for models with DVI inputs, sold separately)Video Cable: HDMI(Optional accessory for models with HDMI inputs, sold separately)Audio Cable(Optional accessory for models with speakers, sold separately)* Available accessories and the pictures shown here may differ from the actual contents and the product supplied for your region. For cables that are not supplied with your product, you can purchase them separately.* Consider keeping th...

3ServicingDo not attempt to service this product yourself, as opening or removing covers may expose you to dangerous voltages or other risks. If any of the above mentioned misuse or other accident such as dropping or mishandling occurs, contact qualified service personnel for servicing.BenQ ecoFACTSBenQ has been dedicated to th e design and development of gr eener product as part of its aspiration to realize the ideal of the "Bringing Enjoyment 'N Qu ality to Life" corporate vision with the ultimate ...
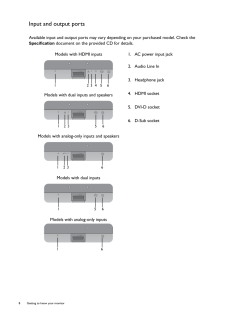
8 Getting to know your monitor Input and output portsAvailable input and output po rts may vary depending on your purchased model. Check the Specification document on the provided CD for details. Models with HDMI inputs 1. AC power input jack2. Audio Line In3. Headphone jack4. HDMI socket5. DVI-D socket6. D-Sub socketModels with dual inputs and speakersModels with analog-only inputs and speakersModels with dual inputsModels with analog-only inputs123456123 5 6123 615616
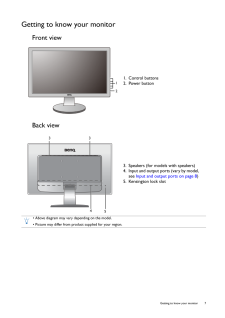
7 Getting to know your monitorGetting to know your monitorFront viewBack view1. Control buttons2. Power button123. Speakers (for models with speakers)4. Input and output ports (vary by model, see Input and output ports on page 8 )5. Kensington lock slot3354* Above diagram may vary depending on the model.* Picture may differ from product supplied for your region.

5 Getting startedGetting startedWhen unpacking please check you have the foll owing items. If any are missing or damaged, please contact the place of purchase for a replacement. BenQ LCD MonitorMonitor Stand(for models without height adjustment stand)Monitor Base(for models without height adjustment stand)Monitor Base(for models with height adjustment stand)Quick Start Guide CD-ROM Power Cord(Picture may differ from product supplied for your region.)
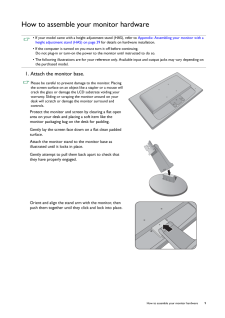
9 How to assemble your monitor hardwareHow to assemble your monitor hardware * If your model came with a height adjustment stand (HAS), refer to Appendix: Assembling your monitor with a height adjustment stand (HAS) on page 39 for details on hardware installation.* If the computer is turned on you must turn it off before continuing. Do not plug-in or turn-on the power to the monitor until instructed to do so.* The following illustrations are for your reference only. Available input and output jacks ma...
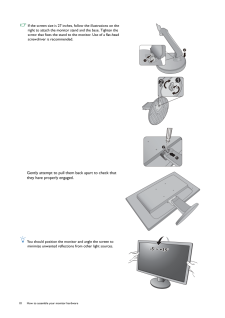
10 How to assemble your monitor hardware If the screen size is 27 inches , follow the illustrations on the right to attach the monitor st and and the base. Tighten the screw that fixes the stand to the monitor. Use of a flat-head screwdriver is recommended.Gently attempt to pull them back apart to check that they have properly engaged. You should position the monitor and angle the screen to minimize unwanted reflections from other light sources.211212- 5O ~ + 1 5O-5O ~ +15O

