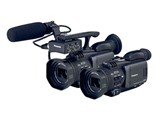
AG-DVC30 USER GUIDEHow to use this superbly mobile professional digital video camera!13The AG-DVC30 is equipped with an XLR jack, making it possible to connect two audio input lines and eliminating the need to use a gun microphone. The cable can be bound to the handle as shown here so that it won t get in the way when doing handheld shooting.Ideal for Capturing Shots of the StageBecause Colors Are Reproduced BeautifullyUsing zoom as well or shaking the camcorder can further heighten the sense of excitement.Providing Enhanced Dynamism with Slow Shutter SettingsThe area where the audience was sitting was almost completely dark, with only a small amount of illumination coming from the stage lighting. Using the built-in infrared lamp, however, I was able to capture the faces of the audience this clearly. The distance from the subjects was about 3 meters.Using the Built-In Infrared LampThe user buttons are designed to be assigned to three functions you use frequently. One possibility is to set them based on you r own style of using the camcorder and then never change the settings. However, we recommend resetting the buttons as appropriate before each new assignment, selecting the functions you will need based on the sort of situation in which you will be using the camcorder. Listed below are suggestions for the following types of situations.Case 1 corresponds to the live performance described on this page. I assigned the SPOTLIGHT (anti- blooming correction) function to USER 2 to be able to compensate immediately for the bright lights used on the stage. Case 2, in contrast, is a situation in which strong backlighting from the sun might be a problem, so I assig ned the BACKLIGHT function to USER 2. For the interview, I thought I would have use for an INDEX button. I have (PUSH) AF+ZOOM assigned to USER 3 in all cases, because I expect to make extensive use of it.What is the best way to make use of the three user buttons?Case 1: Indoor Live PerformanceUser Button 1: (PUSH) AFUser Button 2: SPOTLIGHTUser Button 3: (PUSH) AF+ZOOMCase 2: Shooting Mainly People OutdoorsUser Button 1: (PUSH) AFUser Button 2: BACKLIGHTUser Button 3: (PUSH) AF+ZOOMCase 3: Indoor InterviewUser Button 1: INDEXUser Button 2: AE LOCKUser Button 3: (PUSH) AF+ZOOMcreates is really something.As this illustrates, the user buttons can be assigned a variety of functions to match the circumstances in which you are using the camera-recorder. The buttons are conveniently positioned, and I got the impression that in actual use there would be little likelihood of accidentally confusing them.While trying out the camera-recorder at the performance venue I discovered that the 3.5-inch LCD monitor is another big attraction. It is big and easy to see when viewed indoors, and even outside the screen provides surprisingly good visibility. Generally speaking, I used manual focus when shooting to prevent instability or wobbliness in the focus. When I needed to make adjustments, however, I could use the user buttons to switch quickly to the auto-focus mode. The LCD monitor was terrific for checking the focus during such operations, making it easy to get the sharpness just right.I also tried out the Movie-Like and slow shutter settings. The Movie-Like setting is not a full-scale duplication of the AG-DVX100(A) 's Cine-Like feature, but rather a simplified version. Nevertheless, it gives the video image a similar feel and is quite effective.I adjusted the slow shutter setting while checking the results using the LCD monitor. I ended up using settings between 1/15 and 1/4 second for different parts of the show, depending on the mood of each song.The final result was quite atmospheric and benefited from the camera-recorder's excellent color reproduction, combined with special effects added using the slow shutter and Movie-Like settings.


![前ページ カーソルキー[←]でも移動](http://gizport.jp/static/images/arrow_left2.png)


