LS-30の取扱説明書・マニュアル [全49ページ 3.39MB]


3


37 / 49 ページ

37 / 49 ページ


現在のページURL
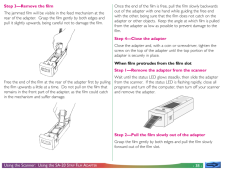
- 37 -Using the Scanner: Using the SA-20 STRIP F ILM A DAPTER4 Cautions* Do not attempt to insert film while scanning is in progress.* Do not remove the adapter or turn the scanner off whenthere is film in the adapter. Use the driver software pro-vided with your scanner to eject the film.* Do not leave film in the adapter for extended periods* Do not move the scanner while scanning is in progress.* Examine the film carefully prior to scanning. Film cannot beused in the adapter if:* there is tape on the film* the film has been folded* the perforations have been torn* the film has been cut on an angle or tornFilm that cannot be used in the SA-20 can be scanned withthe MA-20 using the FH-2 film holder provided with yourscanner (see "Using the MA-20 SLIDE M OUNT A DAPTER ," above).* Film for use in the SA-20 must be clean and free from finger-prints. If there is dirt on the film, damage to the film couldresult. Before scanning, remove dust with a blower andgently wipe off any finger prints with a soft, dry cloth.What to do if film jams in the adapterIf film cannot be ejected from the scanner using the softwareprovided or does not eject automatically after ten minutes havepassed with no operation being performed, you will need toremove the film from the adapter by hand. The process forclearing jams is given below.Note: If the SA-20 jams repeatedly, clean the adapter as de-scribed in the following section.When no film is visible in the film slotStep 1-Remove the adapter from the scannerWait until the status LED glows steadily, then slide the adapterfrom the scanner. If the status LED is flashing rapidly, close allprograms and turn off the computer, then turn off your scannerand remove the adapter.Step 2-Open the adapterWith a coin or screwdriver, loosen the screw on top of theadapter and open the top cover.1. Loosen screw2. Open adapter
参考になったと評価  4人が参考になったと評価しています。
このマニュアルの目次
-
1 .- 1 -Reference Manual35mm...- 1 -Reference Manual35mm Film ScannerLS-30ContentsCautionsSafety PrecautionsIf You Notice Anything AbnormalInstallation and StorageOverviewParts and AccessoriesWhat's in the BoxOptional AccessoriesSystem RequirementsParts of the LS-30Status LEDSetupInstal...
-
3 .- 3 -CautionsCautions* Th...- 3 -CautionsCautions* The reproduction of this manual in whole or in part is pro-hibited save in cases in which Nikon's prior permission hasbeen obtained.* The information contained in this manual is subject to changewithout notice.* Nikon has made every ...
-
4 .- 4 -CautionsFederal Comm...- 4 -CautionsFederal Communications Commission (FCC)Radio Frequency Interference StatementThis equipment has been tested and found to comply with thelimits for a Class B digital device, pursuant to Part 15 of the FCCRules. These limits are designed to pro...
-
5 .- 5 -Safety PrecautionsSa...- 5 -Safety PrecautionsSafety PrecautionsObserve the following safety precautions when installing andoperating the LS-30:*Do not allow your fingers, hair, or clothing into thefilm insertion slotDo not insert your fingers, hair, or clothing into the filmins...
-
6 .- 6 -Safety Precautions*W...- 6 -Safety Precautions*When handling the power and SCSI cablesUnplug the power cable by pulling on the plug, not on thecable itself. Pulling directly on the cord could result in dam-age that could cause fire or electric shock.* When connecting or disconn...
-
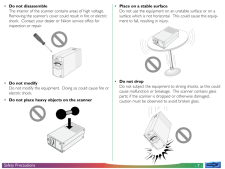
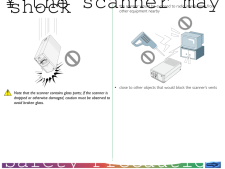
7 .- 7 -Safety Precautions*D...- 7 -Safety Precautions*Do not disassembleThe interior of the scanner contains areas of high voltage.Removing the scanner's cover could result in fire or electricshock. Contact your dealer or Nikon service office forinspection or repair.*Do not modifyDo n...
-
8 .- 8 -Safety Precautions*K...- 8 -Safety Precautions*Keep cleanUse a dry cloth to remove any dirt from metal sections ofthe scanner and their surroundings. Using the equipmentwhen dirty could cause fire.*Do not place foreign objects inside the scannerDo not allow foreign objects of a...
-
9 .- 9 -Safety PrecautionsIn...- 9 -Safety PrecautionsInstallation and StorageTo prevent fire or malfunction, follow the precautions givenbelow when operating or storing the scanner. When not inuse, cover the scanner appropriately to protect it from dust.Do not store or use where:*the ...
-
10 .10 ページ目のマニュアル
-
11 .- 11 -Notice concerning p...- 11 -Notice concerning prohibition of copying orreproductionNote that simply being in possession of material which has beencopied or reproduced by means of a scanner may be punish-able by law.* Items prohibited by law from being copied or reproducedDo not...
-
12 .- 12 -OverviewOverviewTha...- 12 -OverviewOverviewThank you for your purchase of a Nikon LS-30 scanner for 35mm and IX240 film. The LS-30 film scanner offers high speedand high resolution, making it ideally suited to the creation ofhigh-quality images for desk-top publishing, design...
-
13 .- 13 -Parts and Accessori...- 13 -Parts and Accessories: What's in the BoxParts and AccessoriesThis chapter introduces the parts of the LS-30 and lists theitems packaged with the scanner or available for purchaseseparately. It also lists the requirements for the computersystem that...
-
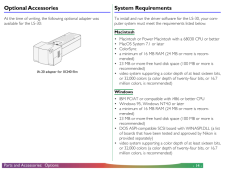
14 .- 14 -Parts and Accessori...- 14 -Parts and Accessories: OptionsOptional AccessoriesAt the time of writing, the following optional adapter wasavailable for the LS-30:IA-20 adapter for IX240 filmSystem RequirementsTo install and run the driver software for the LS-30, your com-puter s...
-
15 .- 15 -Parts and Accessori...- 15 -Parts and Accessories: PartsParts of the LS-30Poweron/offswitchVentsMADE IN JAPAN100098SCSI SCSISCSI NBTERMINATOROFF ON65432107100-240V~0.3-0.2A50/60 HzAC connectorTerminationon/off switchSCSI IDselectionswitchHolders forlocking screwsFemale half-pi...
-
16 .- 16 -Parts and Accessori...- 16 -Parts and Accessories: Status LEDStatus LEDThe scanner's status is shown by the LED on the front panel.When the status LED is on and glowing steadily (READY):the power is on but no operation is being performed.Adapters can be exchanged and film inse...
-
17 .- 17 -SetupSetupThis chap...- 17 -SetupSetupThis chapter explains how to set up your scanner and connectit to a computer. Before using your scanner, you will need tocomplete the following steps:* select a suitable location for the scanner* remove the transport locking screws* connec...
-
18 .- 18 -Setup: Installatio...- 18 -Setup: InstallationThe scanner has feet both on its base and on one side, makingit possible to place the scanner either on its base or on its side.When installing the scanner, leave enough space free for ease ofoperation. There should be at least 5...
-
19 .- 19 -Setup: Installatio...- 19 -Setup: InstallationOnce the scanner is installed, slide the front cover open. Usinga coin, remove the transport locking screws from the adapterslot and side panel and screw them into the holes provided onthe rear panel. The adapter slot contains a...
-
20 .- 20 -Setup: Connecting ...- 20 -Setup: Connecting the Power CableConnecting the Power CableBefore connecting the power cable, confirm that the scanner isoff and that the transport locking screw has been removed fromthe adapter slot. The scanner is off when the end of the powerswi...
-
21 .- 21 -Setup: Connecting ...- 21 -Setup: Connecting the SCSI CableConnecting the SCSI CableCommunication between your computer and the LS-30 relieson the Small Computer System Interface, or SCSI, standard.For connection to the scanner and other SCSI devices, a SCSIcontroller must be...
-
22 .- 22 -Setup: Connecting ...- 22 -Setup: Connecting the SCSI CableSCSI devices are connected to the computer in a "daisy chain."Up to eight devices, including the computer and any internalSCSI devices such as hard drives and CD-ROM drives, can beconnected in a SCSI chain. The first...
-
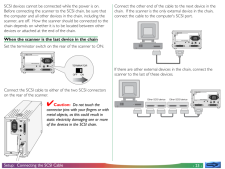
23 .- 23 -Setup: Connecting ...- 23 -Setup: Connecting the SCSI CableSCSI devices cannot be connected while the power is on.Before connecting the scanner to the SCSI chain, be sure thatthe computer and all other devices in the chain, including thescanner, are off. How the scanner shou...
-
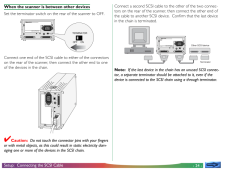
24 .- 24 -Setup: Connecting ...- 24 -Setup: Connecting the SCSI CableConnect a second SCSI cable to the other of the two connec-tors on the rear of the scanner, then connect the other end ofthe cable to another SCSI device. Confirm that the last devicein the chain is terminated.Other ...
-
25 .- 25 -Setup: Connecting ...- 25 -Setup: Connecting the SCSI Cable4 SCSI Connection Checklist* Turn off the computer, the LS-30, and all SCSI devicesbefore connecting the scanner.* Be sure that the devices at both ends of the SCSI chain areterminated. If the host computer is a Maci...
-
26 .- 26 -Setup: Setting the...- 26 -Setup: Setting the SCSI IDTo change the scanner's ID, turn the scanner off. Then, using ascrewdriver, turn the dial on the back of the scanner to choosea new ID.MADE IN JAPAN100098SCSI SCSISCSI NBTERMINATOROFF ON65432107Note: The LS-30 conforms to...
-
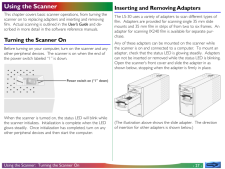
27 .- 27 -Using the Scanner: ...- 27 -Using the Scanner: Turning the Scanner OnUsing the ScannerThis chapter covers basic scanner operations, from turning thescanner on to replacing adapters and inserting and removingfilm. Actual scanning is outlined in the User's Guide and de-scribed...
-
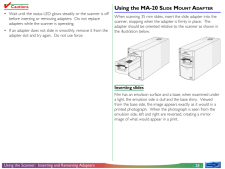
28 .- 28 -Using the Scanner: ...- 28 -Using the Scanner: Inserting and Removing Adapters4 Cautions* Wait until the status LED glows steadily or the scanner is offbefore inserting or removing adapters. Do not replaceadapters while the scanner is operating.* If an adapter does not slide ...
-
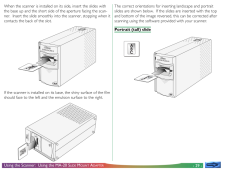
29 .- 29 -Using the Scanner: ...- 29 -Using the Scanner: Using the MA-20 SLIDE M OUNT A DAPTERWhen the scanner is installed on its side, insert the slides withthe base up and the short side of the aperture facing the scan-ner. Insert the slide smoothly into the scanner, stopping when...
-
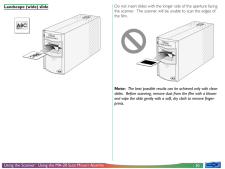
30 .- 30 -Using the Scanner: ...- 30 -Using the Scanner: Using the MA-20 SLIDE M OUNT A DAPTERLandscape (wide) slideDo not insert slides with the longer side of the aperture facingthe scanner. The scanner will be unable to scan the edges ofthe film.Note: The best possible results ca...
-
31 .- 31 -Using the Scanner: ...- 31 -Using the Scanner: Using the MA-20 SLIDE M OUNT A DAPTERSlides can be removed from the scanner by pressing the ejectbutton to eject the slide from the adapter and then pulling theslide the rest of the way out with your fingers.4 Cautions* Do not a...
-
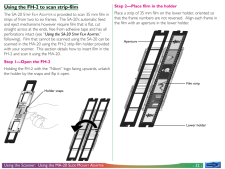
32 .- 32 -Using the Scanner: ...- 32 -Using the Scanner: Using the MA-20 SLIDE M OUNT A DAPTERUsing the FH-2 to scan strip-filmThe SA-20 S TRIP F ILM A DAPTER is provided to scan 35 mm film instrips of from two to six frames. The SA-20's automatic feedand eject mechanisms however ...
-
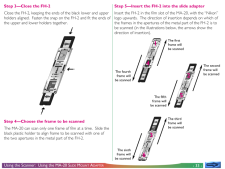
33 .- 33 -Using the Scanner: ...- 33 -Using the Scanner: Using the MA-20 SLIDE M OUNT A DAPTERStep 3-Close the FH-2Close the FH-2, keeping the ends of the black lower and upperholders aligned. Fasten the snap on the FH-2 and fit the ends ofthe upper and lower holders together.Step 4-...
-
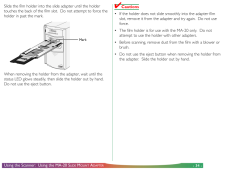
34 .- 34 -Using the Scanner: ...- 34 -Using the Scanner: Using the MA-20 SLIDE M OUNT A DAPTERSlide the film holder into the slide adapter until the holdertouches the back of the film slot. Do not attempt to force theholder in past the mark.When removing the holder from the adapter, ...
-
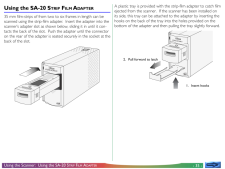
35 .- 35 -Using the Scanner: ...- 35 -Using the Scanner: Using the SA-20 STRIP F ILM A DAPTERUsing the SA-20 S TRIP F ILM A DAPTER35 mm film-strips of from two to six frames in length can bescanned using the strip-film adapter. Insert the adapter into thescanner's adapter slot as s...
-
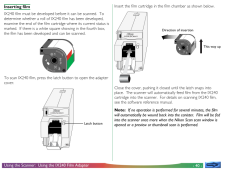
36 .- 36 -Using the Scanner: ...- 36 -Using the Scanner: Using the SA-20 STRIP F ILM A DAPTERInserting filmTo scan a film strip, grasp the film gently by the sides and slide itinto the adapter's film slot a short distance. The adapter's feedmechanism will be activated and the film wi...
-
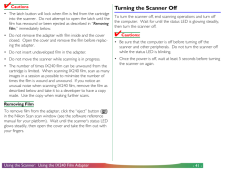
37 .- 37 -Using the Scanner: ...- 37 -Using the Scanner: Using the SA-20 STRIP F ILM A DAPTER4 Cautions* Do not attempt to insert film while scanning is in progress.* Do not remove the adapter or turn the scanner off whenthere is film in the adapter. Use the driver software pro-vided...
-
38 .- 38 -Using the Scanner: ...- 38 -Using the Scanner: Using the SA-20 STRIP F ILM A DAPTERStep 3-Remove the filmThe jammed film will be visible in the feed mechanism at therear of the adapter. Grasp the film gently by both edges andpull it slightly upwards, being careful not to da...
-
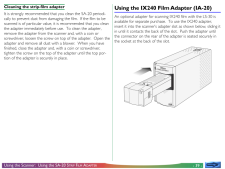
39 .- 39 -Using the Scanner: ...- 39 -Using the Scanner: Using the SA-20 STRIP F ILM A DAPTERCleaning the strip-film adapterIt is strongly recommended that you clean the SA-20 periodi-cally to prevent dust from damaging the film. If the film to bescanned is of particular value, it is...
-
40 .- 40 -Using the Scanner: ...- 40 -Using the Scanner: Using the IX240 Film AdapterInserting filmIX240 film must be developed before it can be scanned. Todetermine whether a roll of IX240 film has been developed,examine the end of the film cartridge where its current status ismarked....
-
41 .- 41 -Using the Scanner: ...- 41 -Using the Scanner: Using the IX240 Film Adapter4 Cautions* The latch button will lock when film is fed from the cartridgeinto the scanner. Do not attempt to open the latch until thefilm has rewound or been ejected as described in " RemovingFilm," i...
-
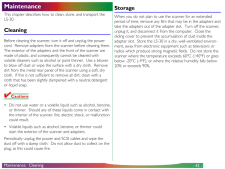
42 .- 42 -Maintenance: Clean...- 42 -Maintenance: CleaningMaintenanceThis chapter describes how to clean, store, and transport theLS-30.CleaningBefore cleaning the scanner, turn it off and unplug the powercord. Remove adapters from the scanner before cleaning them.The exterior of the ...
-
43 .- 43 -Maintenance: Trans...- 43 -Maintenance: TransportTransportThe LS-30 is for use only in the country of sale. Nikon will notbe held responsible for consequences resulting from use over-seas.The scanning mechanism must be locked in its home position fortransport within the coun...
-
44 .- 44 -TroubleshootingTrou...- 44 -TroubleshootingTroubleshootingIf you should encounter problems with your scanner, check thefollowing before contacting your retailer or Nikon representa-tive. If the problems occurred during scanning, you may wish torefer to the software reference m...
-
45 .- 45 -Troubleshooting* If...- 45 -Troubleshooting* If you are using an IBM PC/AT compatible computer, hasyour SCSI board or PCMCIA card been tested and approvedby Nikon?A list of Nikon-approved SCSI adapters is provided sepa-rately. If your adapter is not on this list, you may need ...
-
46 .- 46 -TroubleshootingProb...- 46 -TroubleshootingProblem: the scan window controls are grayed out ora "no adapter" or "no media" error appears whenyou attempt to scan an image using Nikon ScanCheck that there is an adapter in the device and that it is fullyinserted in the adapter sl...
-
47 .- 47 -SpecificationsSpeci...- 47 -SpecificationsSpecificationsLS-30Film: 35 mm filmPositive and negative film, both color andmonochrome, may be used. Film may bemounted as 35 mm slides (mounts must be1.0 mm-3.2 mm thick) or strip film of up tosix frames.IX240 film cartridge (with op...
-
48 .- 48 -SpecificationsSA-20...- 48 -SpecificationsSA-20 S TRIP F ILM A DAPTERFilm: 35 mm film strips of two to six frames (filmmust be flat or curl towards the emulsionsurface not more than 3 mm, be free fromadhesive tape, have all perforations intact, andbe cut straight across)Opera...
-
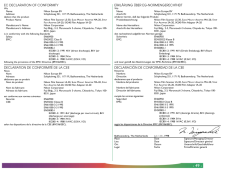
49 .- 49 -EC DECLARATION OF C...- 49 -EC DECLARATION OF CONFORMITYWeName: Nikon Europe BVAddress:Schipholweg 321, 1171 PL Badhoevedorp, The Netherlandsdeclare that the productProduct Name: Nikon Film Scanner LS-30, SLIDE M OUNT A DAPTER MA-20, S TRIPFILM A DAPTER SA-20, IX240 Film A...