MINIの取扱説明書・マニュアル [全152ページ 1.43MB]


6


77 / 152 ページ

77 / 152 ページ


現在のページURL
75OVERVIEW REPAIRS OPERATION CONTROLS DATA INDEXCARGO AREA Cargo area cover When the tailgate is opened, the cargo area cover is also raised.Never place any heavy or hard objects on the cargo area cover; otherwise occupants could be injured during braking maneuvers. <Removal To load bulky luggage, the compartment cover can be removed. 1. Remove the retaining straps on the tail-gate2. Pull the cargo area cover out towards the rear.Foldable rear backrest 1. Pull lever2. Fold the rear backrest forwards.When folding the backrest back into its original position, always ensure that the catch engages securely. A loose backrest might fail to prevent cargo from entering the passenger compartment dur-ing sudden braking or evasive maneuvers, posing a potential hazard to occupants. <
参考になったと評価  8人が参考になったと評価しています。


このマニュアルの目次
-
2 .2 ページ目のマニュアル
-
3 .CONGRATULATIONS ON YOUR ...CONGRATULATIONS ON YOUR NEW MINI This Owner's Manual should be considered a permanent part of this vehicle. It should stay with the vehicle when sold to provide the next owner with important operating, safety and maintenance information.We wish you an enj...
-
4 .CONTENTS 2 (C) 2003 Baye...CONTENTS 2 (C) 2003 Bayerische Motoren Werke AktiengesellschaftMunich, GermanyReprinting, including excerpts, only with the written consent of BMW AG, Munich. Order No. 01 41 0 157 644US English VIII/03Printed in GermanyPrinted on environmentally friendly...
-
5 .3 OVERVIEW REPAIRS OPERA...3 OVERVIEW REPAIRS OPERATION CONTROLS DATA INDEX Driving: Ignition lock 41Starting the engine 41Switching off the engine 43Parking brake 43Manual transmission 44Continuously Variable automatic Transmission (CVT) 45Parking lamps/Low beams 48Turn signal ind...
-
6 .CONTENTS 4 In the engine...CONTENTS 4 In the engine compartment: Bonnet 95Engine compartment: MINI COOPER 96Engine compartment: MINI COOPER S 97Washer fluid 98Engine oil 98Coolant 100Brake fluid 101 Maintenance and care: MINI Maintenance System 102Caring for your vehicle 103Vehicle...
-
7 .5 OVERVIEW REPAIRS OPERA...5 OVERVIEW REPAIRS OPERATION CONTROLS DATA INDEX INDEX Everything from A to Z 138
-
8 .6About this Owner's Manu...6About this Owner's Manual In compiling this Owner's Manual we have made every effort to furnish you with a convenient reference source affording quick access to all the essentials. The fast-est way to find detailed information on any specific subject is ...
-
9 .7 OVERVIEW REPAIRS OPERA...7 OVERVIEW REPAIRS OPERATION CONTROLS DATA INDEX Editorial notice The manufacturer pursues a policy of con-tinuous, ongoing development that is con-ceived to ensure that the MINI continues to embody the highest quality and safety standards combined with a...
-
10 .8 NOTES Parts and access...8 NOTES Parts and accessories For your own safety, use genuine parts and accessories approved by the manufacturer of the MINI.When you purchase accessories tested and approved by the manufacturer of the MINI and Original MINI Parts, you simulta-neously ac...
-
11 .9 OVERVIEW REPAIRS OPERA...9 OVERVIEW REPAIRS OPERATION CONTROLS DATA INDEX Reporting safety defects The following only applies to vehicles owned and operated in the US.If you believe that your vehicle has a defect which could cause a crash or could cause injury or death, you shoul...
-
12 .12 ページ目のマニュアル
-
13 .OVERVIEW CONTROLSOPERATI...OVERVIEW CONTROLSOPERATION, CARE, MAINTENANCEOWNER SERVICE PROCEDURESINDEXTECHNICAL DATA 11 OVERVIEW REPAIRS OPERATION CONTROLS DATA INDEX Overview
-
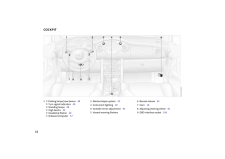
14 .12 COCKPIT 1 > Parking ...12 COCKPIT 1 > Parking lamps/Low beams 48 > Turn signal indicators 49 > Standing lamps 48 > High beams 49 > Headlamp flasher 49 > Onboard computer 572 Washer/wiper system 503 Instrument lighting 494 Outside mirror adjustment 365 Hazard warning flashers6 ...
-
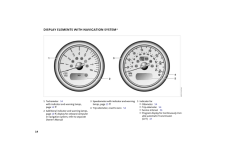
15 .13 OVERVIEW REPAIRS OPER...13 OVERVIEW REPAIRS OPERATION CONTROLS DATA INDEX DISPLAY ELEMENTS 1 Tachometer 54with indicator and warning lamps, page 15 ff2 Display for onboard computer 57If there is no onboard computer:Display of outside temperature and cur-rent vehicle speed3 Sp...
-
16 .14 DISPLAY ELEMENTS WITH...14 DISPLAY ELEMENTS WITH NAVIGATION SYSTEM * 1 Tachometer 54with indicator and warning lamps, page 15 ff2 Additional indicator and warning lamps, page 16 ff, display for onboard computer in navigation system, refer to separate Owner's Manual 3 Speed...
-
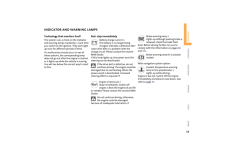
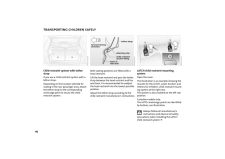
17 .15 OVERVIEW REPAIRS OPER...15 OVERVIEW REPAIRS OPERATION CONTROLS DATA INDEX INDICATOR AND WARNING LAMPS Technology that monitors itself The system runs a check on the indicator and warning lamps marked by + each time you switch on the ignition. They each light up once for differ...
-
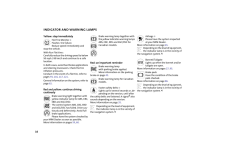
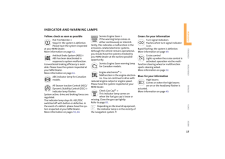
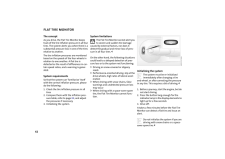
18 .16 INDICATOR AND WARNING...16 INDICATOR AND WARNING LAMPS Yellow: stop immediately Flat Tire Monitor + Flashes: tire failure. Reduce speed immediately and stop the vehicle. With Run Flat tires:Carefully reduce the driving speed to below 50 mph / 80 km/h and continue to a safe loca...
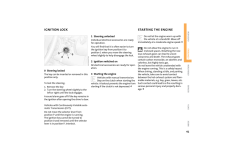
-
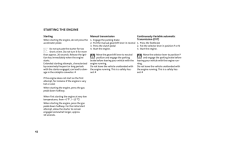
19 .17 OVERVIEW REPAIRS OPER...17 OVERVIEW REPAIRS OPERATION CONTROLS DATA INDEX INDICATOR AND WARNING LAMPS Yellow: check as soon as possible Flat Tire Monitor + Stays lit: the system is defective. Please have the system inspected at your MINI Dealer.More information on page 62 .Ant...
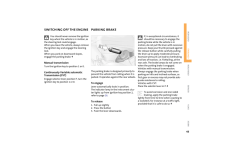
-
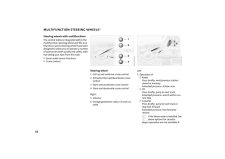
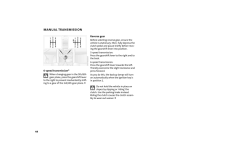
20 .18 MULTIFUNCTION STEERIN...18 MULTIFUNCTION STEERING WHEELS * Steering wheels with multifunctions The control buttons integrated within the multifunction steering wheel and the mul-tifunction sports steering wheel have been designed to allow you to operate a number of accessories ...
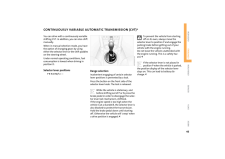
-
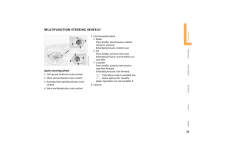
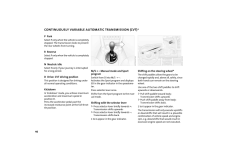
21 .19OVERVIEW REPAIRS OPERAT...19OVERVIEW REPAIRS OPERATION CONTROLS DATA INDEXMULTIFUNCTION STEERING WHEELS* Sports steering wheel1 Call up and continue cruise control2 Store and accelerate cruise control 3 Activate/interrupt/deactivate cruise control4 Store and decelerate cruise contr...
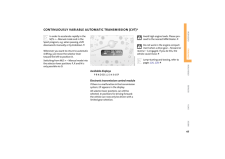
-
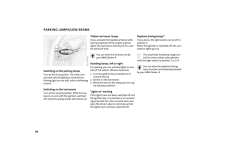
22 .22 ページ目のマニュアル
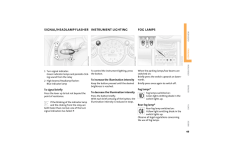
-
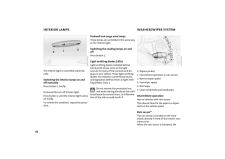
23 .OVERVIEWCONTROLSOPERATION...OVERVIEWCONTROLSOPERATION, CARE, MAINTENANCEOWNER SERVICE PROCEDURESINDEXTECHNICAL DATA21OVERVIEW REPAIRS OPERATION CONTROLS DATA INDEXControls
-
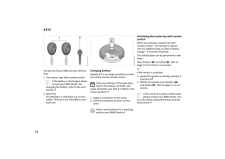
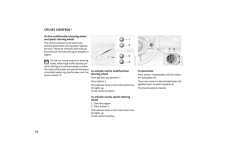
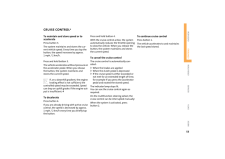
24 .22KEYS The key set of you...22KEYS The key set of your MINI consists of three keys. 1 Two master keys with remote controlIf the battery is discharged, please consult your MINI Dealer. For changing the battery, refer to the next section. <2 Spare keyFor keeping in a safe place, e.g. i...
-
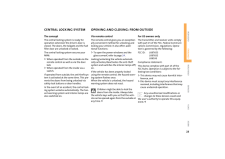
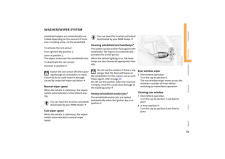
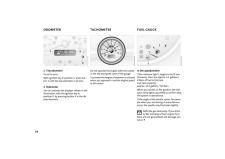
25 .23OVERVIEW REPAIRS OPERAT...23OVERVIEW REPAIRS OPERATION CONTROLS DATA INDEXCENTRAL LOCKING SYSTEM OPENING AND CLOSING: FROM OUTSIDE The concept The central locking system is ready for operation whenever the driver's door is closed. The doors, the tailgate and the fuel filler door ar...
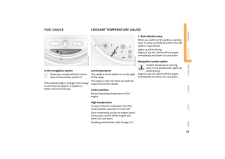
-
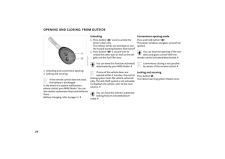
26 .24OPENING AND CLOSING: FR...24OPENING AND CLOSING: FROM OUTSIDE 1 Unlocking and convenience opening 2 Locking and securingIf the remote control does not react, the battery is discharged.In the event of a system malfunction, please contact your MINI Dealer. You can also obtain replace...
-
27 .25OVERVIEW REPAIRS OPERAT...25OVERVIEW REPAIRS OPERATION CONTROLS DATA INDEXOPENING AND CLOSING: FROM OUTSIDE Malfunctions External systems or devices may cause local interference in the functions of the remote control.In this case, unlock the vehicle via the door lock.Via the door l...
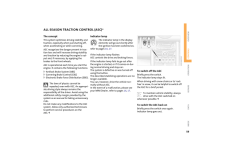
-
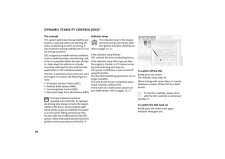
28 .26OPENING AND CLOSING: FR...26OPENING AND CLOSING: FROM INSIDE With this switch, you operate the central locking system when the doors are closed. The doors and tailgate are unlocked or locked only. The anti-theft system is not activated.If the remote control has been used to unlock ...
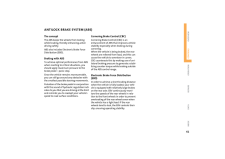
-
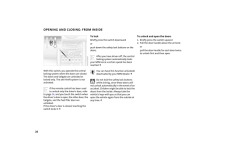
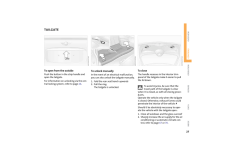
29 .27OVERVIEW REPAIRS OPERAT...27OVERVIEW REPAIRS OPERATION CONTROLS DATA INDEXTAILGATE To open from the outside Push the button in the strip handle and open the tailgate.For information on unlocking via the cen-tral locking system, refer to page 26 .To unlock manually In the event o...
-
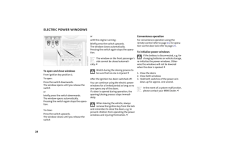
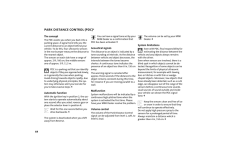
30 .28ELECTRIC POWER WINDOWS ...28ELECTRIC POWER WINDOWS To open and close windows From ignition key position 1:To open:Press the switch downwards.The window opens until you release the switchorbriefly press the switch downwards.The window opens automatically. Pressing the switch again ...
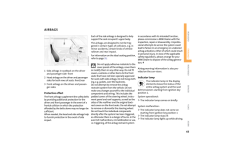
-
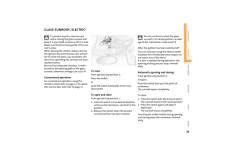
31 .29OVERVIEW REPAIRS OPERAT...29OVERVIEW REPAIRS OPERATION CONTROLS DATA INDEXGLASS SUNROOF, ELECTRIC* To prevent injuries, exercise care when closing the glass sunroof and keep it in your field of vision until it is shut. Make sure that the closing path of the sun-roof is clear.When l...
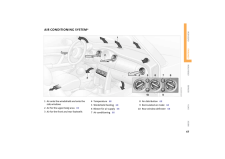
-
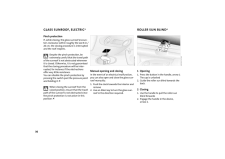
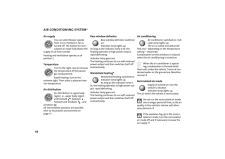
32 .30GLASS SUNROOF, ELECTRIC...30GLASS SUNROOF, ELECTRIC*ROLLER SUN BLIND* Pinch protectionIf, while closing, the glass sunroof encoun-ters resistance within roughly the last 8 in /20 cm, the closing procedure is interrupted and the roof reopens.Despite the pinch protection, be extremel...
-
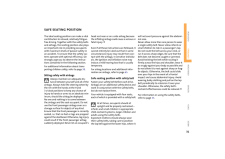
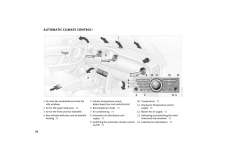
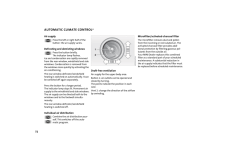
33 .31OVERVIEW REPAIRS OPERAT...31OVERVIEW REPAIRS OPERATION CONTROLS DATA INDEXSAFE SEATING POSITION The ideal seating position can make a vital contribution to relaxed, relatively fatigue-free driving. Together with the safety belts and airbags, the seating position also plays an impor...
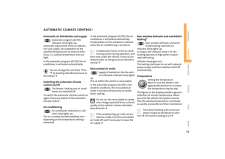
-
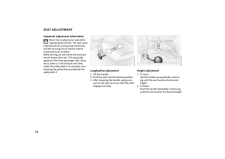
34 .32SEAT ADJUSTMENT Importa...32SEAT ADJUSTMENT Important adjustment informationNever try to adjust your seat while operating the vehicle. The seat could respond with an unexpected movement, and the ensuing loss of vehicle control could lead to an accident.While driving, do not recline...
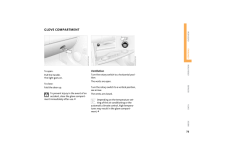
-
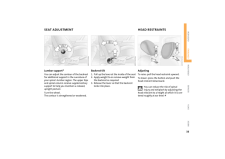
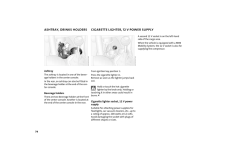
35 .33OVERVIEW REPAIRS OPERAT...33OVERVIEW REPAIRS OPERATION CONTROLS DATA INDEXSEAT ADJUSTMENT HEAD RESTRAINTS Lumbar support * You can adjust the contour of the backrest for additional support in the curvature of your spine's lumbar region. The upper hips and spinal column receive sup...
-
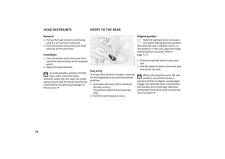
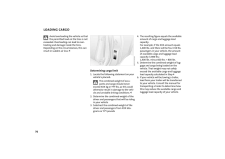
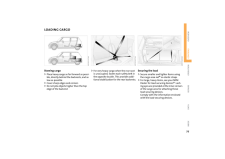
36 .34HEAD RESTRAINTS ENTRY T...34HEAD RESTRAINTS ENTRY TO THE REAR Removal 1. Pull up the head restraint, continuing until it is at maximum extension2. Press the button and remove the head restraint at the same time.Installation 1. Press the button and at the same time insert the head r...
-
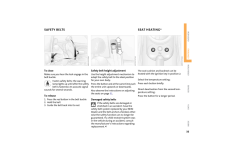
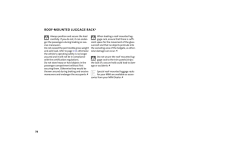
37 .35OVERVIEW REPAIRS OPERAT...35OVERVIEW REPAIRS OPERATION CONTROLS DATA INDEXSAFETY BELTS SEAT HEATING* To closeMake sure you hear the lock engage in the belt buckle.Fasten safety belts: the warning lamp lights up until after the safety belt is fastened. An acoustic signal sounds for...
-
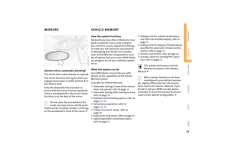
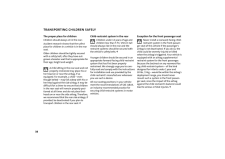
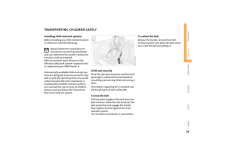
38 .36STEERING WHEEL MIRRORSD...36STEERING WHEEL MIRRORSDo not adjust the steering wheel while the vehicle is moving; other-wise unexpected movement could increase the risk of accident.39 .37OVERVIEW REPAIRS OPERAT...37OVERVIEW REPAIRS OPERATION CONTROLS DATA INDEXMIRRORS VEHICLE MEMORY Interior mirror, automatic dimming * This mirror dims automatically as required.The mirror becomes clear again when you engage reverse gear or select position R on the selector lever. ...40 .38TRANSPORTING CHILDREN S...38TRANSPORTING CHILDREN SAFELY The proper place for children Children should always sit in the rear:Accident research shows that the safest place for children in a vehicle is in the rear seat.Older children should be tightly secured with a safety belt, af...41 .39OVERVIEW REPAIRS OPERAT...39OVERVIEW REPAIRS OPERATION CONTROLS DATA INDEXTRANSPORTING CHILDREN SAFELY Installing child-restraint systems Before installing any child-restraint system or child seat, read the following: Always follow the manufacturer's instructions concerning install...42 .40TRANSPORTING CHILDREN S...40TRANSPORTING CHILDREN SAFELY Child-restraint system with tether strapIf you use a child-restraint system with a tether strap:Depending on the location selected for seating in the rear passenger area, attach the tether strap to the corresponding anchorage...43 .41OVERVIEW REPAIRS OPERAT...41OVERVIEW REPAIRS OPERATION CONTROLS DATA INDEXIGNITION LOCK STARTING THE ENGINE 0 Steering locked The key can be inserted or removed in this position only.To lock the steering:1. Remove the key2. Turn the steering wheel slightly to the left or right unt...44 .42STARTING THE ENGINE Sta...42STARTING THE ENGINE Starting When starting the engine, do not press the accelerator pedal.Do not actuate the starter for too short a time. Do not turn it for more than approx. 20 seconds. Release the igni-tion key immediately when the engine starts.Exten...45 .43OVERVIEW REPAIRS OPERAT...43OVERVIEW REPAIRS OPERATION CONTROLS DATA INDEXSWITCHING OFF THE ENGINE PARKING BRAKE You should never remove the ignition key when the vehicle is in motion, as the steering lock could engage.When you leave the vehicle, always remove the ignition key and...46 .44MANUAL TRANSMISSION 6-...44MANUAL TRANSMISSION 6-speed transmission *When changing gear in the 5th/6th gear plane, press the gearshift lever to the right to prevent inadvertently shift-ing to a gear of the 3rd/4th gear plane.47 .45OVERVIEW REPAIRS OPERAT...45OVERVIEW REPAIRS OPERATION CONTROLS DATA INDEXCONTINUOUSLY VARIABLE AUTOMATIC TRANSMISSION (CVT)*You can drive with a continuously variable shifting CVT. In addition, you can also shift manually.When in manual selection mode, you have the option of chang...48 .46CONTINUOUSLY VARIABLE A...46CONTINUOUSLY VARIABLE AUTOMATIC TRANSMISSION (CVT)*P ParkSelect P only when the vehicle is completely stopped. The transmission locks to prevent the rear wheels from turning.R Reverse Select P only when the vehicle is completely stopped.N Neutral: idle ...49 .47OVERVIEW REPAIRS OPERAT...47OVERVIEW REPAIRS OPERATION CONTROLS DATA INDEXCONTINUOUSLY VARIABLE AUTOMATIC TRANSMISSION (CVT)*In order to accelerate rapidly in the M/S + – Manual mode and in the Sport program, e.g. when passing, shift downwards manually or by kickdown.50 .48PARKING LAMPS/LOW BEAMS...48PARKING LAMPS/LOW BEAMS Switching on the parking lamps Turn to the first position. The front, rear and side vehicle lighting is switched on. Parking light on one side, refer to following column.Switching on the low beams Turn to the second position. Wi...51 .49OVERVIEW REPAIRS OPERAT...49OVERVIEW REPAIRS OPERATION CONTROLS DATA INDEXSIGNAL/HEADLAMP FLASHER INSTRUMENT LIGHTING FOG LAMPS 1 Turn signal indicator: Green indicator lamps and periodic click-ing sound from the relay2 High beams/Headlamp flasher: Blue indicator lampTo signal br...52 .50INTERIOR LAMPS WASHER/W...50INTERIOR LAMPS WASHER/WIPER SYSTEM The interior light is controlled automati-cally.Switching the interior lamps on and off manuallyPress button 1 briefly.Permanently turn off interior light:Press button 1 until the interior light comes on briefly.To rev...53 .51OVERVIEW REPAIRS OPERAT...51OVERVIEW REPAIRS OPERATION CONTROLS DATA INDEXWASHER/WIPER SYSTEM windshield wipers are automatically con-trolled depending on the amount of mois-ture, including snow, on the windshield. To activate the rain sensor:From ignition key position 1:Lever in p...54 .52CRUISE CONTROL*On the m...52CRUISE CONTROL*On the multifunction steering wheel and sports steering wheelThe vehicle maintains and stores any desired speed when driving above approx. 20 mph / 30 km/h. Vehicles with manual transmission must be driving in 3rd gear or higher.Do not use...55 .53OVERVIEW REPAIRS OPERAT...53OVERVIEW REPAIRS OPERATION CONTROLS DATA INDEXCRUISE CONTROL*To maintain and store speed or to acceleratePress button 3.The system maintains and stores the cur-rent vehicle speed. Every time you tap the button, the speed increases by approx. 1 mph / 2 km...56 .54ODOMETER TACHOMETER FUE...54ODOMETER TACHOMETER FUEL GAUGE 1 Trip odometer To set to zero:With ignition key in position 1, press but-ton 3 until the trip odometer is at zero.2 Odometer You can activate the displays shown in the illustration, with the ignition key in position 0, b...57 .55OVERVIEW REPAIRS OPERAT...55OVERVIEW REPAIRS OPERATION CONTROLS DATA INDEXFUEL GAUGE COOLANT TEMPERATURE GAUGE In the navigation system Please also comply with the instruc-tions in the previous section.58 .56SERVICE INTERVAL DISPLA...56SERVICE INTERVAL DISPLAY CLOCK Remaining distance for service The distance remaining before the next scheduled service is displayed in miles /kilometers with the ignition key in position 1 or higher. The display also indicates whether an engine oil servi...59 .57OVERVIEW REPAIRS OPERAT...57OVERVIEW REPAIRS OPERATION CONTROLS DATA INDEXONBOARD COMPUTER* Mode selectionWith the ignition key in position 1 and higher, you can use the button in the turn signal indi-cator lever to retrieve information from the onboard computer for display in the ...60 .58ONBOARD COMPUTER*RangeT...58ONBOARD COMPUTER*RangeThe onboard computer bases its calcula-tions for the cruising range on the driving style and on the remaining fuel in the tank.If the range displayed is less than 35 miles / 50 km, be sure to refuel; otherwise engine functions are n...61 .59OVERVIEW REPAIRS OPERAT...59OVERVIEW REPAIRS OPERATION CONTROLS DATA INDEXALL SEASON TRACTION CONTROL (ASC)* The conceptThis system optimizes driving stability and traction, especially when just starting off, when accelerating or when cornering. ASC recognizes the danger present in...62 .60DYNAMIC STABILITY CONTR...60DYNAMIC STABILITY CONTROL (DSC)* The conceptThis system optimizes driving stability and traction, especially when just starting off, when accelerating or when cornering. It also maintains driving stability even in criti-cal driving situations.DSC recogni...63 .61OVERVIEW REPAIRS OPERAT...61OVERVIEW REPAIRS OPERATION CONTROLS DATA INDEXANTILOCK BRAKE SYSTEM (ABS) The concept The ABS keeps the wheels from locking while braking, thereby enhancing active driving safety. ABS also includes Electronic Brake Force Distribution (EBD).Braking with...64 .62FLAT TIRE MONITOR The ...62FLAT TIRE MONITOR The concept As you drive, the Flat Tire Monitor keeps track of the tire inflation pressure in all four tires. The system alerts you when there is a substantial pressure loss in one of the tires relative to another.The tire inflation pr...65 .63OVERVIEW REPAIRS OPERAT...63OVERVIEW REPAIRS OPERATION CONTROLS DATA INDEXFLAT TIRE MONITOR Flat tire Indicator lamp: The indicator lamp in the display elements flashes. In addition, an acoustic signal sounds.1. Reduce speed and stop the vehicle with caution. Avoid hard brake appli...66 .64PARK DISTANCE CONTROL (...64PARK DISTANCE CONTROL (PDC)* The conceptThe PDC assists you when you back into a parking space. A signal tone tells you the current distance to an object behind your vehicle. To do this, four ultrasonic sensors in the rear bumper measure the distance to ...67 .65OVERVIEW REPAIRS OPERAT...65OVERVIEW REPAIRS OPERATION CONTROLS DATA INDEXAIRBAGS 1 Side airbags in seatback on the driver and passenger side: front2 Head airbags on the driver and passenger sides for both rows of seats: front/rear3 Front airbags on the driver and passen-ger sidesP...68 .66 AIRBAGS A system malf...66 AIRBAGS A system malfunction could prevent the airbags from deploying in response to a severe impact occurring within the system's normal triggering range. Please have the airbag system checked as soon as possible by your MINI Dealer. <69 .67OVERVIEW REPAIRS OPERAT...67OVERVIEW REPAIRS OPERATION CONTROLS DATA INDEXAIR CONDITIONING SYSTEM*1 Air onto the windshield and onto the side windows 2 Air for the upper body area 693 Air for the front and rear footwells4 Temperature 685 Windshield heating 686 Blower for air supply...70 .68AIR CONDITIONING SYSTEM...68AIR CONDITIONING SYSTEM*Air supplyYou can select blower speeds from 1 to 4. Position 0: fan is turned off. The button for recir-culated air mode fully blocks the supply of air from outside.Heating and ventilation operate as of position 1.TemperatureTurn ...71 .69OVERVIEW REPAIRS OPERAT...69OVERVIEW REPAIRS OPERATION CONTROLS DATA INDEXAIR CONDITIONING SYSTEM* Draft-free ventilation Air supply for the upper body area:Button 1: air outlets can be opened and closed by turning. The points indicate the position in each case.Nozzle 2: change the...72 .70AUTOMATIC CLIMATE CONTR...70AUTOMATIC CLIMATE CONTROL*1 Air onto the windshield and onto the side windows2 Air for the upper body area 723 Air for the front and rear footwells4 Rear window defroster and windshield heating 715 Interior temperature sensor, please keep clear and unobs...73 .71OVERVIEW REPAIRS OPERAT...71OVERVIEW REPAIRS OPERATION CONTROLS DATA INDEXAUTOMATIC CLIMATE CONTROL*Automatic air distribution and supply Automatic program (AUTO): Indicator lamp lights up.Automatic adjustment of the air distribu-tion and supply, and adaptation of the specified tem...74 .72AUTOMATIC CLIMATE CONTR...72AUTOMATIC CLIMATE CONTROL* Air supply Press the left or right half of the button: the air supply varies. Defrosting and demisting windows Press the button briefly.The indicator lamp flashes.Ice and condensation are rapidly removed from the rear window, w...75 .73OVERVIEW REPAIRS OPERAT...73OVERVIEW REPAIRS OPERATION CONTROLS DATA INDEXGLOVE COMPARTMENT To open:Pull the handle. The light goes on.To close:Fold the door up.To prevent injury in the event of an accident, close the glove compart-ment immediately after use.76 .74ASHTRAY, DRINKS HOLDERS...74ASHTRAY, DRINKS HOLDERS CIGARETTE LIGHTER, 12 V POWER SUPPLY Ashtray The ashtray is located in one of the bever-age holders in the center console.In the rear, an ashtray can also be fitted in the beverage holder at the end of the cen-ter console.Beverag...77 .75OVERVIEW REPAIRS OPERAT...75OVERVIEW REPAIRS OPERATION CONTROLS DATA INDEXCARGO AREA Cargo area cover When the tailgate is opened, the cargo area cover is also raised.Never place any heavy or hard objects on the cargo area cover; otherwise occupants could be injured during brakin...78 .76LOADING CARGO Avoid ove...76LOADING CARGO Avoid overloading the vehicle so that the permitted load on the tires is not exceeded. Overloading can lead to over-heating and damage inside the tires. Depending on the circumstances, this can result in sudden air loss.79 .77OVERVIEW REPAIRS OPERAT...77OVERVIEW REPAIRS OPERATION CONTROLS DATA INDEXLOADING CARGO Stowing cargo > Place heavy cargo as far forward as possi-ble, directly behind the backrests, and as low as possible> Cover sharp edges and corners> Do not pile objects higher than the top edge...80 .78ROOF-MOUNTED LUGGAGE RA...78ROOF-MOUNTED LUGGAGE RACK*Always position and secure the load carefully. If you do not, it can endan-ger the passengers during braking or eva-sive maneuvers.Do not exceed the permissible gross weight and axle load, refer to page 134 ; otherwise the vehi...82 .82 ページ目のマニュアル83 .OVERVIEWCONTROLSOPERATION...OVERVIEWCONTROLSOPERATION, CARE, MAINTENANCEOWNER SERVICE PROCEDURESINDEXTECHNICAL DATA81OVERVIEW REPAIRS OPERATIONCONTROLS DATA INDEXOperation84 .82BREAK-IN PROCEDURES To...82BREAK-IN PROCEDURES To ensure that your vehicle provides maxi-mum economy throughout a long service life, we request that you comply with the following information: Engine Up to 1,250 miles / 2,000 km:> Drive at various vehicle and engine speeds> Do not...85 .83OVERVIEW REPAIRS OPERAT...83OVERVIEW REPAIRS OPERATIONCONTROLS DATA INDEXGENERAL DRIVING NOTES Parking the vehicle Condensation forms in the air conditioner system during operation, and then exits under the vehicle. Traces of condensed water on the ground are therefore normal.Brak...86 .84REFUELING Always switch...84REFUELING Always switch off the engine before refueling. If you do not, fuel cannot be filled into the tank and the SERVICE ENGINE SOON lamp may come on. <1. Open the fuel filler door2. Turn the gas cap counterclockwise3. Put the gas cap in the bracket a...87 .85OVERVIEW REPAIRS OPERAT...85OVERVIEW REPAIRS OPERATIONCONTROLS DATA INDEXREFUELING FUEL SPECIFICATIONS Close the tank 1. Put on gas cap 2. Turn gas cap clockwise until it clicks3. Close fuel filler door.Fuel tank capacity: Approx. 13.2 gallons / 50 liters, of which approx. 2.1 gal...88 .86BRAKE SYSTEM Brake flui...86BRAKE SYSTEM Brake fluid level If the brake fluid level is too low and brake pedal travel has become longer, there may be a defect in one of the brake system's hydraulic circuits.Proceed to the nearest MINI Dealer. Higher brake application pressure may b...89 .87OVERVIEW REPAIRS OPERAT...87OVERVIEW REPAIRS OPERATIONCONTROLS DATA INDEXTIRE INFLATION PRESSURE Information for your safety It is not merely the tire's service life, but also driving safety and driving comfort that depend on the condition of the tires and the maintenance of the s...90 .88TIRE INFLATION PRESSURE...88TIRE INFLATION PRESSUREModel TiresPressures specified in psi / kilopascalMINI COOPER175/65 R 15 84 H175/65 R 15 84 Q M+S30 / 210 35 / 240 35 / 240 35 / 240195/55 R 16 87 H195/55 R 16 87 H M+S205/45 R 17 84 V205/45 R 17 84 V M+S30 / 210 30 / 210 35 / 240 ...91 .89OVERVIEW REPAIRS OPERAT...89OVERVIEW REPAIRS OPERATIONCONTROLS DATA INDEXTIRE CODING Knowing the tire code on the tire's sidewall makes it easier for you to choose and iden-tify the correct tires.Tire size e.g. 205/45 R 17 84 VNominal width in mm Cross-sectional ratio in % Radial b...92 .90TIRE CODING Traction T...90TIRE CODING Traction The traction grades, from highest to lowest, are AA, A, B, and C. Those grades represent the tire's ability to stop on wet pavement as measured under controlled conditions on specified govern-ment test surfaces of asphalt and concre...93 .91OVERVIEW REPAIRS OPERAT...91OVERVIEW REPAIRS OPERATIONCONTROLS DATA INDEXTIRE CONDITION Tire tread Inspect your tires frequently for tread wear, signs of damage and for foreign objects lodged in the tread. Check the tread depth.The tread depth should not fall below 1/8 in / 3 mm....94 .92WHEEL AND TIRE REPLACEM...92WHEEL AND TIRE REPLACEMENT Unprofessional attempts by laymen to service tires can lead to damage and accidents. Have this work performed by skilled profes-sionals only. Your MINI Dealer will be glad to assist you with both their expertise and the proper ...95 .93OVERVIEW REPAIRS OPERAT...93OVERVIEW REPAIRS OPERATIONCONTROLS DATA INDEXRUN FLAT TIRES* You will recognize Run Flat tires by a circu-lar symbol containing the letters RSC on the side of the tire. Run Flat tires consist of self-contained tires and special rims. The tire reinforceme...96 .94SNOW CHAINS* Only certa...94SNOW CHAINS* Only certain types of snow chains have been tested by the manufacturer of your MINI, classified as road-safe and approved. Contact your MINI Dealer for more details. The manufacturer of your MINI recom-mends that you use only these approved ...97 .95OVERVIEW REPAIRS OPERAT...95OVERVIEW REPAIRS OPERATIONCONTROLS DATA INDEXBONNETDo not attempt to service your vehi-cle if you do not have the required technical background. Before working in the engine compartment, switch off the engine and allow it to cool down. Before working on ...98 .96ENGINE COMPARTMENT: MIN...96ENGINE COMPARTMENT: MINI COOPER 1 Reservoir for windshield washer system 982 Coolant expansion tank 1003 Engine oil filler neck 994 Battery 1245 Brake fluid reservoir 1016 Reservoir for headlamp cleaning system 987 Engine oil dipstick 9899 .97OVERVIEW REPAIRS OPERAT...97OVERVIEW REPAIRS OPERATIONCONTROLS DATA INDEXENGINE COMPARTMENT: MINI COOPER S 1 Reservoir for windshield washer system 982 Coolant expansion tank 1003 Engine oil filler neck 994 Auxiliary terminal for jump-starting 1265 Brake fluid reservoir 1016 Reserv...100 .98WASHER FLUID ENGINE OI...98WASHER FLUID ENGINE OIL Headlamp * and windshield washer system The capacity of the headlamp washer sys-tem is approx. 2.6 quarts / 2.5 liters, that of the windshield washer system approx. 2.1 quarts / 2.0 liters.Fill with water and, if required, with a...ログイン


ファイルをアップロードしています。
しばらくお待ちください。
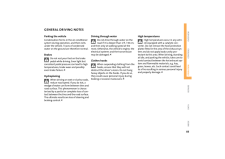
しばらくお待ちください。